nginx反向代理
- nginx反向代理
-
- 8.反向代理
-
- 8.1 实现http反向代理
-
- 8.1.1 反向代理配置参数
- 8.1.2 反向代理单台web服务器
-
- 8.1.2.1 端口号后加"/"
- 8.1.2.2 端口号后不加"/"
- 8.1.3指定location 实现反向代理,动静分离
- 8.1.4 反向代理实例:缓存功能
-
- 8.1.4.1 举例
- 8.1.5 实现反向代理客户端 IP 透传
-
- 8.1.5.1 一级代理
- 8.1.5.2 多级代理ip地址透传
nginx反向代理
8.反向代理
8.1 实现http反向代理
官方文档: https://nginx.org/en/docs/http/ngx_http_proxy_module.html
8.1.1 反向代理配置参数
#官方文档:https://nginx.org/en/docs/http/ngx_http_proxy_module.html#proxy_pass
proxy_pass;
#用来设置将客户端请求转发给的后端服务器的主机,可以是主机名(将转发至后端服务做为主机头首部)、IP
地址:端口的方式
#也可以代理到预先设置的主机群组,需要模块ngx_http_upstream_module支持

#示例:
 location /web {
   index index.html;
   proxy_pass http://10.0.0.18:8080; #8080后面无uri,即无 / 符号,需要将location后面url 附加到proxy_pass指定的url后面,此行为类似于root
#proxy_pass指定的uri不带斜线将访问的/web,等于访问后端服务器
http://10.0.0.18:8080/web/index.html,即后端服务器配置的站点根目录要有web目录才可以被访问
    # http://nginx/web/index.html ==> http://10.0.0.18:8080/web/index.html

proxy_pass http://10.0.0.18:8080/;   #8080后面有uri,即有 / 符号,相当于置换,即访问/web时实际返回proxy_pass后面uri内容.此行为类似于alias
    #proxy_pass指定的uri带斜线,等于访问后端服务器的http://10.0.0.18:8080/index.html 内容返回给客户端
 }  # http://nginx/web/index.html ==> http://10.0.0.18:8080

#重启Nginx测试访问效果:
#curl -L http://www.kgc.org/web

#如果location定义其uri时使用了正则表达式模式(包括~,~*,但不包括^~),则proxy_pass之后必须不能使用uri; 即不能有/ ,用户请求时传递的uri将直接附加至后端服务器之后
server {
 ...
 server_name HOSTNAME;
 location ~|~* /uri/ {
 proxy_pass http://host:port; #proxy_pass后面的url 不能加/
 }
 ...
 }
 http://HOSTNAME/uri/ --> http://host/uri/

proxy_hide_header field;
#用于nginx作为反向代理的时候,在返回给客户端http响应时,隐藏后端服务器相应头部的信息,可以设置
在http,server或location块
#示例: 隐藏后端服务器ETag首部字段
 location /web {
   index index.html;
   proxy_pass http://10.0.0.18:8080/;
   proxy_hide_header ETag;
 }

proxy_pass_header field;
#默认nginx在响应报文中不传递后端服务器的首部字段Date, Server, X-Pad, X-Accel等参数,如果
要传递的话则要使用 proxy_pass_header field声明将后端服务器返回的值传递给客户端
#field 首部字段大小不敏感
#示例:透传后端服务器的Server和Date首部给客户端,同时不再响应报中显示前端服务器的Server字段
proxy_pass_header Server;
proxy_pass_header Date;


proxy_pass_request_body on | off;
#是否向后端服务器发送HTTP实体部分,可以设置在http,server或location块,默认即为开启


proxy_pass_request_headers on | off;
#是否将客户端的请求头部转发给后端服务器,可以设置在http,server或location块,默认即为开启
8.1.2 反向代理单台web服务器
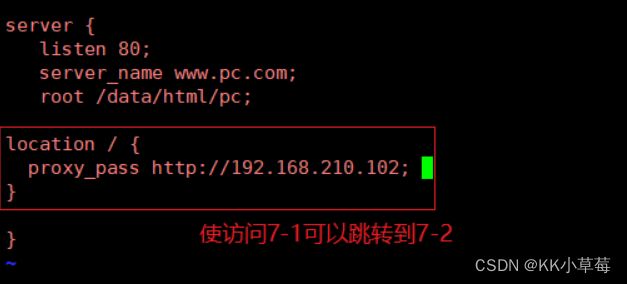
要求:将用户对域 www.pc.com的请求转发给后端服务器处理
7-1
vim /apps/nginx/conf.d/pc.conf
location / {
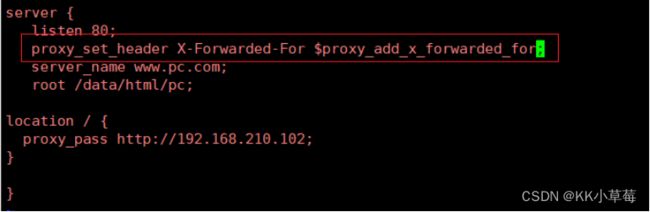
proxy_pass http://192.168.210.102;
}
#添加此项,使访问7-1可以跳转到7-2
nginx -s reload
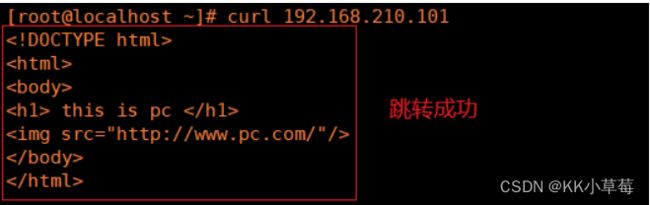
7-3
curl 192.168.210.101
端口号问题,端口号转的时候可以一起转
7-1
vim /apps/nginx/conf.d/pc.conf
location / {
   proxy_pass http://192.168.210.102:9527;
}
#添加端口号

nginx  -s reload

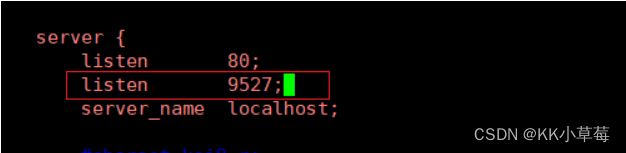
7-2
vim /apps/nginx/conf/nginx.conf
server {
  listen 80;
  listen 9527;
  #添加端口号9527
}

nginx -s reload
ss -lntp | grep nginx

7-3
curl 192.168.210.101

8.1.2.1 端口号后加"/"
7-1
vim /apps/nginx/conf.d/pc.conf
location /web {
   proxy_pass http://192.168.210.102:9527;
}
#不加/,相当于把/web追加到9527的后面,访问的时候会报错,因为7-2下没有web文件夹

nginx -s reload
7-2
cd /apps/nginx/html
mkdir web
#创建web文件夹
echo web > web/index.html

7-3
curl 192.168.210.101/web -L

8.1.2.2 端口号后不加"/"
7-1
vim /apps/nginx/conf.d/pc.conf
location /web {
   proxy_pass http://192.168.210.102:9527/;
}
#加/,代表将location后面的url置换到后面
nginx -s reload
7-3
curl 192.168.210.101/web -L

8.1.3指定location 实现反向代理,动静分离
7-3(192.168.210.103)客户端
7-1(192.168.210.101)反向代理
7-4(192.168.210.104)动态页面
7-2(192.168.210.102)静态页面
7-4
systemctl stop firewalld
setenforce 0
#关闭防火墙
yum install httpd -y
#安装apache
cd /var/www/html
echo httpd > index.html
#制作页面
ls
cat index.html
systemctl start httpd
#开启服务
7-1
vim /apps/nginx/conf.d/pc.conf
location /static {
   proxy_pass http://192.168.210.102:9527;
}
location /api {
   proxy_pass http://192.168.210.104;
}

nginx -s reload

7-4
cd /var/www/html
mkdir api
#创建文件夹api
echo api >> api/index.html
echo api >> api/index.html
echo api >> api/index.html
#制作动态页面
cat api/index.html

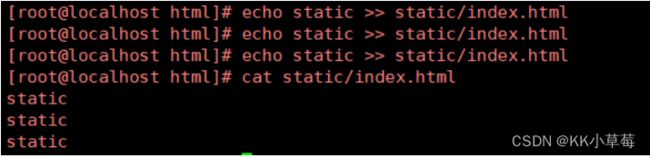
7-2
cd /apps/nginx/html
mkdir static
#创建static文件夹
echo static >> static/index.html
echo static >> static/index.html
echo static >> static/index.html
#制作静态页面
cat static/index.html
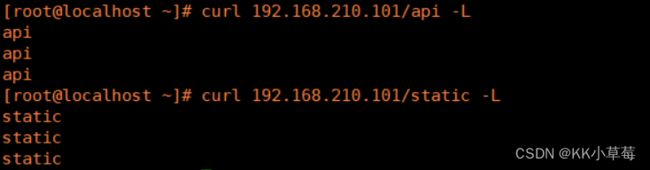
7-3
curl 192.168.210.101/api -L
curl 192.168.210.101/static -L
#实现动静分离
8.1.4 反向代理实例:缓存功能
proxy_cache zone_name | off; 默认off
#指明调用的缓存,或关闭缓存机制;Context:http, server, location
#zone_name 表示缓存的名称.需要由proxy_cache_path事先定义

proxy_cache_key string;
#缓存中用于“键”的内容,默认值:proxy_cache_key $scheme$proxy_host$request_uri;


proxy_cache_valid [code ...] time;
#定义对特定响应码的响应内容的缓存时长,定义在http{...}中
 示例:
 proxy_cache_valid 200 302 10m;
 proxy_cache_valid 404 1m;


proxy_cache_path;
#定义可用于proxy功能的缓存;Context:http
proxy_cache_path path [levels=levels] [use_temp_path=on|off]
keys_zone=zone_name:size [inactive=time] [max_size=size] [manager_files=number]
[manager_sleep=time] [manager_threshold=time] [loader_files=number]
[loader_sleep=time] [loader_threshold=time] [purger=on|off]
[purger_files=number] [purger_sleep=time] [purger_threshold=time];


#示例:在http配置定义缓存信息
   proxy_cache_path /var/cache/nginx/proxy_cache #定义缓存保存路径,proxy_cache会自动创建
   levels=1:2:2 #定义缓存目录结构层次,1:2:2可以生成2^4x2^8x2^8=2^20=1048576个目录
   keys_zone=proxycache:20m #指内存中缓存的大小,主要用于存放key和metadata(如:使用次数),一般1M可存放8000个左右的key
   inactive=120s  #缓存有效时间
   max_size=10g; #最大磁盘占用空间,磁盘存入文件内容的缓存空间最大值


#调用缓存功能,需要定义在相应的配置段,如server{...};或者location等
proxy_cache proxycache;
proxy_cache_key $request_uri; #对指定的数据进行MD5的运算做为缓存的key
proxy_cache_valid 200 302 301 10m; #指定的状态码返回的数据缓存多长时间
proxy_cache_valid any 1m;   #除指定的状态码返回的数据以外的缓存多长时间,必须设置,否则不会缓存


proxy_cache_use_stale error | timeout | invalid_header | updating | http_500 |
http_502 | http_503 | http_504 | http_403 | http_404 | off ; #默认是off
#在被代理的后端服务器出现哪种情况下,可直接使用过期的缓存响应客户端
#示例
proxy_cache_use_stale error http_502 http_503;


proxy_cache_methods GET | HEAD | POST ...;
#对哪些客户端请求方法对应的响应进行缓存,GET和HEAD方法总是被缓存
8.1.4.1 举例
7-1
vim /apps/nginx/conf/nginx.conf

proxy_cache_path /data/nginx/proyxcache   levels=1:1:1 keys_zone=proxycache:20m inactive=120s max_size=1g;
#加在include前

mkdir /data/nginx
#创建nginx文件夹

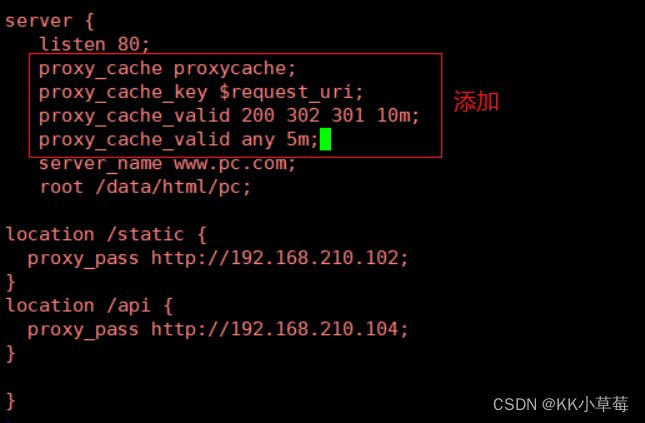
vim /apps/nginx/conf.d/pc.conf
 server{
   listen 80;
   proxy_cache proxycache;
   proxy_cache_key $request_uri;
   proxy_cache_valid 200 302 301 10m;
   proxy_cache_valid any 5m;
 }
 nginx -t
 nginx -s reload
 ls /data/nginx
 #看是否生成proyxcache文件
在浏览器访问192.168.210.101

关闭web服务器7-2,再次在浏览器访问192.168.210.101
还能出来界面,说明有缓存

8.1.5 实现反向代理客户端 IP 透传
8.1.5.1 一级代理

7-1(192.168.210.101)代理服务器
7-2(192.168.210.102)web服务器
7-3(192.168.210.103)客户端
7-2
yum install httpd -y
#安装apache
cd /var/www/html
echo real server > index.html
#制作页面
cat index.html
systemctl start httpd
ss -lntp |grep 80
#开启服务

7-1
vim /apps/nginx/conf.d/pc.conf
#删掉这个location模块
location /api {
   proxy_pass http://192.168.210.104;
}
nginx -t
nginx -s reload

7-3
curl 192.168.210.101

7-2
tail -f /var/log/httpd/access_log
#只能看到192.168.210.101的日志,看不到192.168.210.103的
7-1
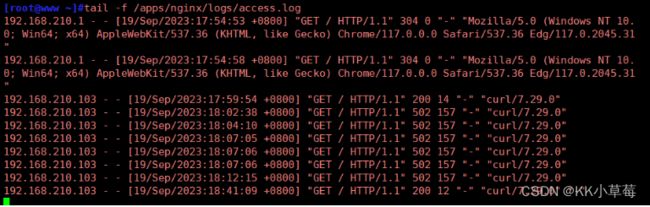
tail -f /apps/nginx/logs/access.log
#192.168.210.101可以看到192.168.210.103的日志

7-1
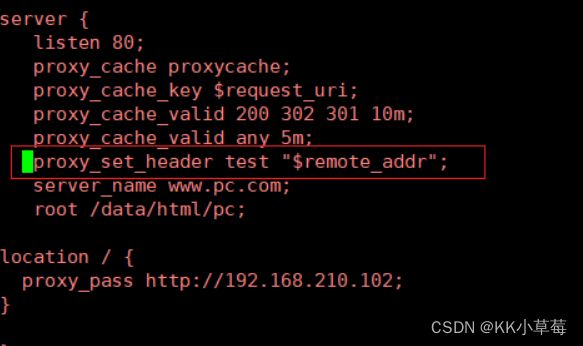
vim /apps/nginx/conf.d/pc.conf
proxy_set_header test "$remote_addr";
#往日志里面加了test,内容是$remote_addr
#$remote_addr只能记一次,如果中间是三层代理,它就无法去实现了
nginx -t
nginx -s reload
7-2
vim /etc/httpd/conf/httpd.conf
LogFormat "%h %l %u %t \"%r\" %>s %b \"%{Referer}i\" \"%{User-Agent}i\" \"%{test}i\"" combined

systemctl restart httpd
![]()
7-3
curl 192.168.210.101

7-2
tail -f /var/log/httpd/access_log
#192.168.210.103的地址就过来了
8.1.5.2 多级代理ip地址透传

7-1
vim /apps/nginx/conf/nginx.conf
#把日志全都打开

7-4
yum install -y epel-release
yum install nginx -y
7-1
scp /apps/nginx/conf.d/pc.conf 192.168.210.104:/etc/nginx
7-4
cd /etc/nginx
vim pc.conf
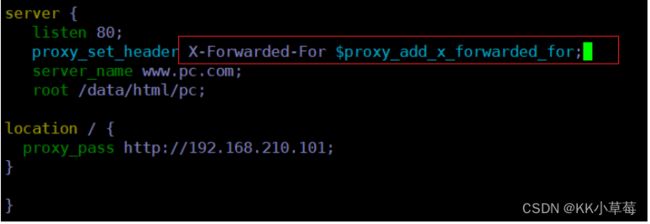
proxy_set_header X-Forwarded-For $proxy_add_x_forwarded_for;
#添加
nginx -t
systemctl start nginx
7-1
vim /apps/nginx/conf.d/pc.conf
systemctl restart nginx
7-2
vim /etc/httpd/conf/httpd.conf
LogFormat "%h %l %u %t \"%r\" %>s %b \"%{Referer}i\" \"%{User-Agent}i\" \"%{X-Forwarded-For}i\"" combined

systemctl restart httpd
![]()
7-3
curl 192.168.210.101

7-1
tail -f /apps/nginx/logs/access.log
7-2
tail -f /var/log/httpd/access_log