springboot2整合nacos云服务,配置基本类型和json类型
最近公司要搭建一个配置中心,由于不想自己运维,便选择了云服务,定的是阿里云的nacos服务,即 https://mse.console.aliyun.com/。
这里记录一下在springboot 2项目中,使用云nacos来做一些基本配置String、int等,和配置json数据映射到java对象中。
1 云nacos操作说明
在控制台创建一个实例,这个实例就是一个nacos的服务端。
在创建时,需要注意公网ip的问题,如果没有公网ip,就只能在阿里云服务器上才能访问,本地测试的话访问不了。
如图,基本信息里有公网、内网连接地址、端口信息。因为本篇是在本地使用云nacos,所以我在创建nacos时选择了外网地址。红框里需要注意配置白名单,不在白名单里的ip无法访问云nacos。本机的话,就在百度搜索ip,查看自己的外网ip,配进去如11.11.11.11/32即可。
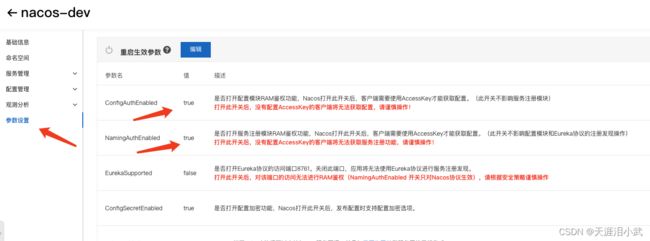
当然配白名单麻烦,建议采用accessKey的方式访问配置中心,也就是把公网白名单删掉,把权限验证打开。然后用access-key和secret-key来访问nacos。
之后就可以创建配置了。
这里我没有创建命名空间,就默认是public的命名空间。
创建配置时,Group里填写名字,建议一个模块、一个应用用同一个Group,代表一个组。
Data ID的范围比Group要小,代表一个类型、一个对象,譬如我把系统里所有的开关都放到一个Data Id里,里面配很多个开关。譬如我可以把一个大对象,有多个属性,也作为一个Data ID。
将来监听变化,自动拉取最新配置信息的最小单元就是Data ID。
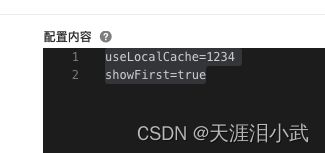
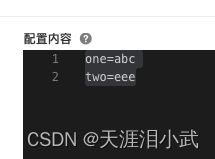
如图配置格式选择TEXT,就是最简单的类型,配置内容里就可以是a=1,b=2这种。这里面的每一行都是一个最小的配置项,将来代码里用的就是最小的配置项。
2 java接入云nacos
nacos提供了支持java、springboot的pom依赖,我们先来看看普通的java接入方式。
依赖的pom就不贴了,直接看使用的代码。
import com.alibaba.nacos.api.NacosFactory;
import com.alibaba.nacos.api.config.ConfigService;
import com.alibaba.nacos.api.config.listener.Listener;
import com.alibaba.nacos.api.exception.NacosException;

import java.util.Properties;
import java.util.concurrent.Executor;
import java.util.concurrent.ExecutorService;
import java.util.concurrent.Executors;

/**
 * @author weifengwu
 * @create 2023/9/4 15:48
 */
public class NacosTest {
    public static void main(String[] args) {
        try {
            ExecutorService executorService = Executors.newFixedThreadPool(5);
            //改成自己的配置外网地址
            String serverAddr = "mse-xxxxxxx-p.nacos-ans.mse.aliyuncs.com:8848";
            Properties properties = new Properties();
            properties.put("serverAddr", serverAddr);
            //所有对于配置项的操作都是靠ConfigService完成的
            ConfigService configService = NacosFactory.createConfigService(properties);

            //读取该dataId的内容。注意,每次调用getConfig都会发起一次网络请求
            String content = configService.getConfig( "switch", "llmCenter", 5000);
            System.out.println(content);

            //读取一个配置项,该配置项是个json字符串,
            //  "app-pc-lu": {
            //        "userAudit": 1,
            //        "aiAudit": 14,
            //        "modelList": [
            //            "modelA",
            //            "modelB",
            //            "modelC"
            //        ]
            //    }
            String jsonAppFlowInfo = configService.getConfig("jsonAppFlowInfo", "llmCenter", 1000);
            //给这个Data ID添加一个监听器,当DataId数据发生变化时,会调用该回调方法。用户可以接收到新值后保存到内存里。
            configService.addListener("jsonAppFlowInfo", "llmCenter", new Listener() {
                @Override
                public Executor getExecutor() {
                    return executorService;
                }

                @Override
                public void receiveConfigInfo(String s) {
                    System.err.println(Thread.currentThread().getName());
                    System.out.println(s);
                }
            });
            System.out.println(jsonAppFlowInfo);

            try {
                Thread.sleep(100000000);
            } catch (InterruptedException e) {
                throw new RuntimeException(e);
            }

            //新增一个配置,如果已存在该DataId,则会覆盖
//            boolean isPublishOk = false;
//            try {
//                isPublishOk = configService.publishConfig("second", "llmCenter", "content=1");
//            } catch (NacosException e) {
//                throw new RuntimeException(e);
//            }
//            System.out.println(isPublishOk);

        } catch (NacosException e) {
            // TODO Auto-generated catch block
            e.printStackTrace();
        }
    }
}
以上代码展示了获取配置、新增/修改配置,监听配置的功能。
需要注意的是configService.getConfig读取配置信息时,每次都会发起一个网络请求,并不是从本地内存读取的,这一点和我的认知中的配置中心不太一样,如果说的不对,可以指正,因为我从nacos的后台看到确实在不断的请求。
3 springboot接入云nacos
如果使用的是springboot,nacos提供了一些自动化监听的功能,当服务端配置的值发生变更时,不需要客户端做处理,即可自动读取到新的配置内容。
@RestController
@NacosPropertySource(groupId = "llmCenter", dataId = "switch", autoRefreshed = true)
@NacosPropertySource(groupId = "llmCenter", dataId = "textInfo", autoRefreshed = true)
public class TestController {
    @Autowired
    private ConvMessageService convMessageService;

    @NacosValue(value = "${useLocalCache:false}",autoRefreshed = true)
    private boolean useLocalCache;

    @NacosValue(value = "${one:1}",autoRefreshed = true)
    private String one;

    @NacosValue(value = "${model.name.app-pc-luca.userAudit:2}",autoRefreshed = true)
    private String userAudit;

    /**
     * 这种写法不支持,将无法映射
     */
    @NacosValue(value = "${model.name.app-pc-luca.modelList:2}",autoRefreshed = true)
    private List modelList;

    @RequestMapping(value = "/get", method = GET)
    public boolean get() {
        System.out.println("useLocalCache-" + useLocalCache);
        System.out.println("one-" + one);
        System.out.println("userAudit-" + userAudit);
        System.out.println("modelList-" + modelList);

        return true;
    }
}
其中NacosPropertySource注解加在一个被spring托管的类上即可,里面注明了dataId和groupId,代表这个dataId的配置值发生变化时会自动推送到被@NacosValue标注的属性上。
其中@NacosValue里只需要写最终配置的属性名即可,不需要再指定dataId,也就是对应下图的每一行里的key。
@NacosValue(value = "${useLocalCache:false}",autoRefreshed = true)这个里面useLocalCache:false代表如果配置中心里没找到useLocalCache这个key,就用false作为默认值。
application.yml配置如下:
nacos:
  config:
    server-addr: mse-80a0d732-p.nacos-ans.mse.aliyuncs.com:8848
    access-key: xx
    secret-key: xxx
    autoRefresh: true
    data-ids: switch,hello,textInfo
    group: llmCenter
    bootstrap:
      enable: true
其中需要注意的点是,yml里面要写data-ids,这里面写的data-ids是等同于在java类上加的@NacosPropertySource(groupId = "llmCenter", dataId = "switch", autoRefreshed = true)。二者功能相同。
如果你在yml里配置了data-ids,那么类上的可以不用写。个人建议是都写在yml文件里即可。
4 对于json类型的
本身并不支持将一个json格式的文本,直接映射到一个java对象上。但如果你的配置中心里,确实是需要配一个json,那么建议用一个data-id来存放,里面放个json字符串。要使用时,自己解析即可。
见第二段java接入云nacos里的代码,通过下面的方式,获取到json字符串,并监听这个data-id字符串。
正确做法应该是,在项目启动时,就拉取配置,并将结果保存到系统内存中,使用时从内存中获取。当监听到变化时,也更新内存中的json对象。不要每次都用configService.getConfig获取。
//读取一个配置项,该配置项是个json字符串,
            //  "app-pc-lu": {
            //        "userAudit": 1,
            //        "aiAudit": 14,
            //        "modelList": [
            //            "modelA",
            //            "modelB",
            //            "modelC"
            //        ]
            //    }
            String jsonAppFlowInfo = configService.getConfig("jsonAppFlowInfo", "llmCenter", 1000);
            //给这个Data ID添加一个监听器,当DataId数据发生变化时,会调用该回调方法。用户可以接收到新值后保存到内存里。
            configService.addListener("jsonAppFlowInfo", "llmCenter", new Listener() {
                @Override
                public Executor getExecutor() {
                    return executorService;
                }

                @Override
                public void receiveConfigInfo(String s) {
                    System.err.println(Thread.currentThread().getName());
                    System.out.println(s);
                }
            });
            System.out.println(jsonAppFlowInfo);


