Nginx

文章目录
-
-
- 一、引言
-
- 1.1 代理问题
- 1.2 负载均衡问题
- 1.3 资源优化
- 1.4 Nginx定义
- 二、Nginx概述
- 三、Nginx的安装
-
- 3.1 安装Nginx
- 3.2 Nginx的配置文件
- 四、Nginx的反向代理【`重点`】
-
- 4.1 正向代理和反向代理介绍
- 4.2 基于Nginx实现反向代理
- 4.3 关于Nginx的location路径映射
- 五、Nginx负载均衡【`重点`】
-
- 5.1 轮询
- 5.2 权重
- 5.3 ip_hash
- 六、Nginx动静分离【`重点`】
-
- 6.1 动态资源代理
- 6.2 静态资源代理
- 七 Nginx使用HTTPS
-
一、引言
1.1 代理问题
客户端到底要将请求发送给哪台服务器。

1.2 负载均衡问题
如果所有客户端的请求都发送给了服务器1,那么服务器2将没有任何意义
1.3 资源优化
客户端发送的请求可能是申请动态资源的,也有申请静态资源,但是都是去Tomcat中获取的
1.4 Nginx定义
- 高性能的反向代理服务器,负载均衡、动静分离。
二、Nginx概述
Nginx是由俄罗斯人研发的,应对Rambler的网站,并且2004年发布的第一个版本。
Nginx的特点:
- 稳定性极强。 7*24小时不间断运行。
- Nginx提供了非常丰富的配置实例。
- 占用内存小,并发能力强(不做优化,5w)。
三、Nginx的安装
3.1 安装Nginx
http://nginx.org/en/download.html
windows 安装
常用命令:windows
start nginx
nginx -s stop
nginx -h
nginx -s reload
Linux
./sbin/nginx #启动
./sbin/nginx -s stop #停止
./sbin/nginx -h #帮助
./sbin/nginx -s reload #重启
启动后 :本地地址加 : server的端口号/ 进行访问
入门案例:
静态资源处理:增加静态页面
反向代理: www.baidu.com
 location /search/ {
	proxy_pass https://www.baidu.com/;
 }
搭建文件服务器
  # 搭建文件服务器
  location /img {
    root data;
    autoindex on;
  }

Linux 安装 : 源码编译安装
- 安装gcc : yum -y install gcc
- pcre、pcre-devel安装。pcre是一个perl库,包括perl兼容的正则表达式库,nginx的http模块使用pcre来解析正则表达式,所以需要安装pcre库。 yum install -y pcre pcre-devel
- zlib安装。zlib库提供了很多种压缩和解压缩方式nginx使用zlib对http包的内容进行gzip,所以需要安装yum install -y zlib zlib-devel
- 安装openssl。 yum install -y openssl openssl-devel
- yum -y install gcc pcre pcre-devel zlib zlib-devel openssl openssl-devel
- 下载 nginx安装包。 wget http://nginx.org/download/nginx-1.20.1.tar.gz
- 解压缩。tar -zxvf nginx-1.20.1.tar.gz

- 在里面 cd nginx-1.20.1里输入以下指令
- 解压后执行 ./configure --prefix=/usr/local/nginx --with-http_stub_status_module --with-http_ssl_module
- make 编译c源代码为linux系统中的可执行文件 。
- make install 把编译好的可执行文件和一些配置文件安装到指定目录
- nginx的安装目录为 : /usr/local/nginx
- 去到 cd /usr/local/nginx
- 启动:./sbin/nginx
3.2 Nginx的配置文件
关于Nginx的核心配置文件nginx.conf
# 全局块
# 指定work进程所属的用户
user  root;
# 根据cpu的核心 数量设置该参数。一般设置成cpu核心的倍数  例如我的12核  6 个
worker_processes  1;  #6

#error_log  logs/error.log;
#error_log  logs/error.log  notice;
#error_log  logs/error.log  info;

#pid        logs/nginx.pid;


# 事件块
events {
    worker_connections  1024;  # 每个work进程允许的最大连接数
}


# http块
http {
    include       mime.types;
    default_type  application/octet-stream;

    #log_format  main  '$remote_addr - $remote_user [$time_local] "$request" '
    #                  '$status $body_bytes_sent "$http_referer" '
    #                  '"$http_user_agent" "$http_x_forwarded_for"';

    #access_log  logs/access.log  main;

    sendfile        on;
    #tcp_nopush     on;

    #keepalive_timeout  0;
    keepalive_timeout  65;

    #gzip  on;

    server {
        listen       80;
        server_name  localhost;   # 虚拟主机

        #charset koi8-r;

        #access_log  logs/host.access.log  main;

        location / {
            # 把匹配的请求当成静态资源处理, html是nginx安装目录下的一个目录
            root   html;
            index  index.html index.htm;
        }

        #error_page  404              /404.html;

        # redirect server error pages to the static page /50x.html
        #
        error_page   500 502 503 504  /50x.html;
        location = /50x.html {
            root   html;
        }

        # proxy the PHP scripts to Apache listening on 127.0.0.1:80
        #
        #location ~ \.php$ {
        #    proxy_pass   http://127.0.0.1;
        #}

    }
	# 增加一个虚拟主机,当在浏览器中输入 :  http://www.demo1.com 会使用该虚拟主机中的配置
    #server {
    #    listen       80;
    #    server_name  www.demo1.com;
	#
    #    location / {
	#		proxy_pass   http://www.baidu.com/;
    #    }
    #}
#server_name  www.demo1.com; 根据你host配置文件配置的域名映射,名字来匹配


}
当在浏览器中输入 url (没有直接输入ip地址,输入的是域名,例如www.baidu.com)之后,发生了什么
DNS 解析: 把域名转换为ip地址 www.baidu.com ------> 110.242.68.4
(1)先查本地的hosts文件,如果hosts文件中已经存在 域名和ip的对应关系,则直接使用该ip地址
(2) 如没有,则去 当前操作系统配置的dns服务器上查找 域名对应的ip地址 ,114.114.114.114
根据得到的ip地址,建立 tcp连接 。tcp: 本地ip:本地端口 ,远程ip:远程端口
按照http协议,组织请求报文(请求行 + 请求头 +请求体)。
发送请求
接收响应
渲染响应内容
修改windows本地hosts文件,使用本地DNS解析
C:\Windows\System32\drivers\etc\hosts
四、Nginx的反向代理【重点】
4.1 正向代理和反向代理介绍
正向代理:
- 正向代理服务是由客户端设立的。
- 客户端了解代理服务器和目标服务器都是谁。
- 帮助咱们实现突破访问权限,提高访问的速度,对目标服务器隐藏客户端的ip地址。

反向代理:
- 反向代理服务是配置在服务器端的。
- 客户端是不知道访问的到底是哪一台服务器。
- 达到负载均衡,并且可以隐藏服务器真正的ip地址。

4.2 基于Nginx实现反向代理
准备一个目标服务器。
启动tomcat服务器。
编写nginx的配置文件,通过Nginx访问到tomcat服务器。
server{
  listen 80;
  server_name localhost;
  location / {
    proxy_pass http://192.168.57.132:8080/;  # 要以分号结尾
  }
}
4.3 关于Nginx的location路径映射
优先级关系如下:
- location = /路径:优先级最高,精准匹配,一旦匹配, 不再去找其他匹配项。
- location ~ 正则表达式。 注意(该正则写法的优先级与下面的正则优先级相同,谁在前面先匹配谁)
- location ~* 正则表达式:和location ~ 正则表达式相同,不过当前方式不区分大小写。
- location /路径:常规方式,匹配前缀,优先级低。
- location / : 通配的方式 优先级最低。
举个栗子:
        location = /hello.html {
            root   html;
        }

		# http://192.168.57.139/img/aaa/a.jpeg
        location ~* \.(gif|jpg|png|jpeg)$ {
            root   data02;
        }

        location ~ /img {
            root   data01;
            index  index.html index.htm;
        }
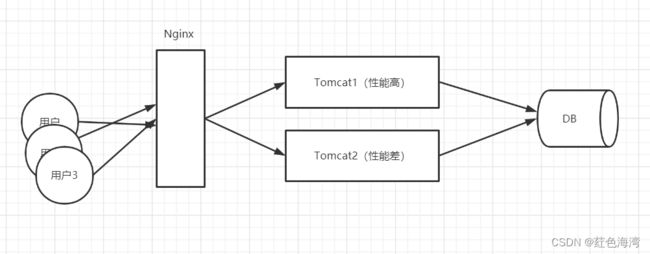
五、Nginx负载均衡【重点】
Nginx为我们默认提供了三种负载均衡的策略:
轮询:将客户端发起的请求,平均的分配给每一台服务器。
权重:会将客户端的请求,根据服务器的权重值不同,分配不同的数量。
ip_hash:基于发起请求的客户端的ip地址不同,他始终会将请求发送到指定的服务器上。

5.1 轮询
想实现Nginx轮询负载均衡机制只需要在配置文件中添加以下内容
upstream tomcat {
  server 192.168.57.161:8080;
  server 192.168.57.161:8081;
}
server {
  listen 80;
  server_name localhost;

  location / {
    proxy_pass http://tomcat/;
  }
}
5.2 权重
实现权重的方式
upstream 名字 {
  server ip:port weight=10;
  server ip:port weight=2;
  ...
}
server {
  listen 80;
  server_name localhost;

  location / {
    proxy_pass http://upstream的名字/;
  }
}
5.3 ip_hash
ip_hash实现
upstream 名字 {
  ip_hash;
  server ip:port;
  server ip:port;
  ...
}
server {
  listen 80;
  server_name localhost;

  location / {
    proxy_pass http://upstream的名字/;
  }
}
六、Nginx动静分离【重点】
Nginx的并发能力公式:
worker_processes * worker_connections / 4 或 2 = Nginx最终的并发能力
动态资源需要/4,静态资源需要/2.
Nginx通过动静分离,来提升Nginx的并发能力,更快的给用户响应。
6.1 动态资源代理
使用proxy_pass动态代理
# 配置如下
location / {
  proxy_pass 路径;
}
6.2 静态资源代理
使用root静态代理
  location /html {
    root data;
    index index.html;
  }

  location /img {
    root /data;
    autoindex on;  #开启文件目录结构在网页显示
  }
七 Nginx使用HTTPS
直接使用OpenSSL工具生成私钥文件和证书
在root目录下创建一个cert目录
进入这个目录下输入以下命令
openssl genrsa > cert.key
openssl req -new -x509 -key cert.key > cert.pem

需要编译nginx时,进行如下配置,之前安装执行过了,所以不用执行下面命令
./configure --prefix=/usr/local/nginx --with-http_stub_status_module --with-http_ssl_module
    server {
        listen       443 ssl;
        server_name  localhost;

        ssl_certificate      /root/cert/cert.pem;
        ssl_certificate_key  /root/cert/cert.key;

        ssl_session_cache    shared:SSL:1m;
        ssl_session_timeout  5m;

        ssl_ciphers  HIGH:!aNULL:!MD5;
        ssl_prefer_server_ciphers  on;

          location /file {
            root data;
            autoindex on;
          }

 		 location /test {
           proxy_pass http://upstream的名字/; #以分号结尾
        }

        location / {
            root   html;
            index  index.html index.htm;
        }
    }
当把静态资源和 后端服务器放入 Nginx 代理,则不会出现 跨域问题