Redux
Redux
(1)Web 应用是一个状态机,视图与状态是一一对应的。
(2)所有的状态,保存在一个对象里面。
基本概念和API
Store
Store 就是保存数据的地方,可以把它看成一个容器。整个应用只能有一个 Store(全局唯一)。
Redux提供createStore这个函数,用来生成 Store。
createStore 函数接收另一个函数作为参数,返回新生成的Store对象
Redux 应用只有一个单一的 store。当需要拆分数据处理逻辑时,你应该使用 reducer 组合 而不是创建多个 store。
import { createStore } from 'redux';
const store = createStore(fn);
createStore方法还可以接受第二个参数,表示 State 的最初状态。这通常是服务器给出的。
let store = createStore(todoApp, window.STATE_FROM_SERVER)
上面代码中,window.STATE_FROM_SERVER就是整个应用的状态初始值。注意,如果提供了这个参数,它会覆盖 Reducer 函数的默认初始值。
下面是createStore方法的一个简单实现,可以了解一下 Store 是怎么生成的。
const createStore = (reducer,enhancer) => {
  if(enhancer){
	return enhancer(createSore)(reducer);
  }
  let state;
  let listeners = [];

  const getState = () => state;

  const dispatch = (action) => {
    state = reducer(state, action);
    listeners.forEach(listener => listener());
  };

  const subscribe = (listener) => {
    listeners.push(listener);
    return () => {
      listeners = listeners.filter(l => l !== listener);
    }
  };

  dispatch({});

  return { getState, dispatch, subscribe };
};
Store 有以下职责:
- 维持应用的 state;
- 提供 getState() 方法获取 state;
- 提供 dispatch(action) 方法更新 state;
- 通过 subscribe(listener) 注册监听器;
- 通过 subscribe(listener) 返回的函数注销监听器。
State
Store对象包含所有数据。如果想得到某个时点的数据,就要对 Store 生成快照。这种时点的数据集合,就叫做 State。
当前时刻的 State,可以通过store.getState()拿到。
import { createStore } from 'redux';
const store = createStore(fn);

const state = store.getState();
Action
Action 是把数据从应用(译者注:这里之所以不叫 view 是因为这些数据有可能是服务器响应,用户输入或其它非 view 的数据 )传到 store 的有效载荷。它是 store 数据的唯一来源。一般来说你会通过 store.dispatch() 将 action 传到 store。
const action = {
  type: 'ADD_TODO',
  payload: 'Learn Redux'
};
Action 本质上是 JavaScript 普通对象。我们约定,action 内必须使用一个字符串类型的 type
字段来表示将要执行的动作。多数情况下,type 会被定义成字符串常量。其他属性可以自由设置,
Action Creator
Action Creator 就是生成 action 的方法
const ADD_TODO = '添加 TODO';

function addTodo(text) {
  return {
    type: ADD_TODO,
    text
  }
}

const action = addTodo('Learn Redux');
上面代码中,addTodo函数就是一个 Action Creator。
Reducer
Store 收到 Action 以后,必须给出一个新的 State,这样 View 才会发生变化。这种 State 的计算过程就叫做Reducer。
reducer 就是一个纯函数,接收旧的 state 和 action,返回新的 state。
(previousState, action) => newState
之所以将这样的函数称之为reducer,是因为这种函数与被传入 Array.prototype.reduce(reducer, ?initialValue) 里的回调函数属于相同的类型。保持 reducer 纯净非常重要。永远不要在 reducer 里做这些操作:
修改传入参数;
执行有副作用的操作,如 API 请求和路由跳转;
调用非纯函数,如 Date.now() 或 Math.random()。因为每次会得到不一样的结果
整个应用的初始状态,可以作为 State 的默认值。
const defaultState = 0;
const reducer = (state = defaultState, action) => {
  switch (action.type) {
    case 'ADD':
      return state + action.payload;
    default:
      return state;
  }
};

const state = reducer(1, {
  type: 'ADD',
  payload: 2
});
上面代码中,reducer函数收到名为ADD的 Action 以后,就返回一个新的 State,作为加法的计算结果。其他运算的逻辑(比如减法),也可以根据 Action 的不同来实现。
实际应用中,Reducer 函数不用像上面这样手动调用,store.dispatch方法会触发 Reducer 的自动执行。为此,Store 需要知道 Reducer 函数,做法就是在生成 Store 的时候,将 Reducer 传入createStore方法。
import { createStore } from 'redux';
const store = createStore(reducer);
上面代码中,createStore接受 Reducer 作为参数,生成一个新的 Store。以后每当store.dispatch发送过来一个新的 Action,就会自动调用 Reducer,得到新的 State。
为什么这个函数叫做 Reducer 呢?因为它可以作为数组的reduce方法的参数。请看下面的例子,一系列 Action 对象按照顺序作为一个数组。
const actions = [
  { type: 'ADD', payload: 0 },
  { type: 'ADD', payload: 1 },
  { type: 'ADD', payload: 2 }
];

const total = actions.reduce(reducer, 0); // 3
上面代码中,数组actions表示依次有三个 Action,分别是加0、加1和加2。数组的reduce方法接受 Reducer 函数作为参数,就可以直接得到最终的状态3。
Reducer 的拆分
Reducer 函数负责生成 State。由于整个应用只有一个 State 对象,包含所有数据,对于大型应用来说,这个 State 必然十分庞大,导致 Reducer 函数也十分庞大。
const chatReducer = (state = defaultState, action = {}) => {
  const { type, payload } = action;
  switch (type) {
    case ADD_CHAT:
      return Object.assign({}, state, {
        chatLog: state.chatLog.concat(payload)
      });
    case CHANGE_STATUS:
      return Object.assign({}, state, {
        statusMessage: payload
      });
    case CHANGE_USERNAME:
      return Object.assign({}, state, {
        userName: payload
      });
    default: return state;
  }
};
上面代码中,三种 Action 分别改变 State 的三个属性。这三个属性之间没有联系,这提示我们可以把 Reducer 函数拆分。不同的函数负责处理不同属性,最终把它们合并成一个大的 Reducer 即可。
const chatReducer = (state = defaultState, action = {}) => {
  return {
    chatLog: chatLog(state.chatLog, action),
    statusMessage: statusMessage(state.statusMessage, action),
    userName: userName(state.userName, action)
  }
};
上面代码中,Reducer 函数被拆成了三个小函数,每一个负责生成对应的属性。
这样一拆,Reducer 就易读易写多了。而且,这种拆分与 React 应用的结构相吻合:一个 React 根组件由很多子组件构成。这就是说,子组件与子 Reducer 完全可以对应。
Redux 提供了一个combineReducers方法,用于 Reducer 的拆分。你只要定义各个子 Reducer 函数,然后用这个方法,将它们合成一个大的 Reducer。
import { combineReducers } from 'redux';

const chatReducer = combineReducers({
  chatLog,
  statusMessage,
  userName
})

export default chatReducer;
上面的代码通过combineReducers方法将三个子 Reducer 合并成一个大的函数。
这种写法有一个前提,就是 State 的属性名必须与子 Reducer 同名。如果不同名,就要采用下面的写法。
const reducer = combineReducers({
  a: doSomethingWithA,
  b: processB,
  c: c
})

// 等同于
function reducer(state = {}, action) {
  return {
    a: doSomethingWithA(state.a, action),
    b: processB(state.b, action),
    c: c(state.c, action)
  }
}
总之,combineReducers()做的就是产生一个整体的 Reducer 函数。该函数根据 State 的 key 去执行相应的子 Reducer,并将返回结果合并成一个大的 State 对象。
下面是combineReducer的简单实现。
const combineReducers = reducers => {
  return (state = {}, action) => {
    return Object.keys(reducers).reduce(
      (nextState, key) => {
        nextState[key] = reducers[key](state[key], action);
        return nextState;
      },
      {}
    );
  };
};
数据流
严格的单向数据流是 Redux 架构的设计核心。
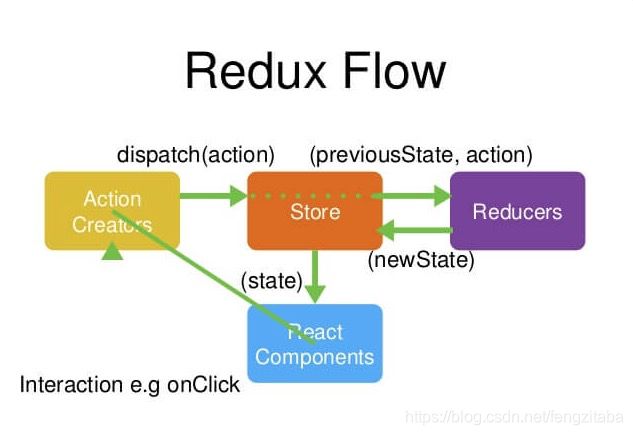
- 发出acton(调用 store.dispatch(action))
Action 就是一个描述“发生了什么”的普通对象。比如:
{ type: ‘LIKE_ARTICLE’, articleId: 42 }
{ type:‘FETCH_USER_SUCCESS’, response: { id: 3, name: ‘Mary’ } }
{ type:‘ADD_TODO’, text: ‘Read the Redux docs.’ }
可以把 action 理解成新闻的摘要。如“玛丽喜欢42号文章。” 或者 “任务列表里添加了’学习 Redux 文档’”。
你可以在任何地方调用 store.dispatch(action),包括组件中、XHR 回调中、甚至定时器中。
- Redux store 调用传入的 reducer 函数
Store 会把两个参数传入 reducer: 当前的 state 树和 action。
let nextState = todoApp(previousState, action);
- 根 reducer 应该把多个子 reducer 输出合并成一个单一的 state 树。
function todos(state = [], action) {
   // 省略处理逻辑...
   return nextState
 }

 function visibleTodoFilter(state = 'SHOW_ALL', action) {
   // 省略处理逻辑...
   return nextState
 }

 let todoApp = combineReducers({
   todos,
   visibleTodoFilter
 })
当你触发 action 后,combineReducers 返回的 todoApp 会负责调用两个 reducer,然后会把两个结果集合并成一个 state 树:
let nextTodos = todos(state.todos, action)
let nextVisibleTodoFilter = visibleTodoFilter(state.visibleTodoFilter, action)
return {
   todos: nextTodos,
   visibleTodoFilter: nextVisibleTodoFilter
 }
- Redux store 保存了根 reducer 返回的完整 state 树。
这个新的树就是应用的下一个 state!所有订阅 store.subscribe(listener) 的监听器都将被调用;监听器里可以调用store.getState() 获得当前 state。
现在,可以应用新的 state 来更新 UI。如果你使用了 React Redux 这类的绑定库,这时就应该调用
component.setState(newState) 来更新。
搭配 React
安装 React Redux
npm install --save react-redux
export const connect =
  (mapStateToProps = (state) => state, mapDispatchToProps = {}) =>
  (WrapComponent) => {
    return class ConnectComponent extends React.Component {
      static contextTypes = {
        store: PropTypes.object,
      };
      constructor(props, context) {
        super(props, context);
        this.state = {
          props: {},
        };
      }
      componentDidMount() {
        const { store } = this.context;
        store.subscribe(() => this.update());
        this.update();
      }
      update() {
        const { store } = this.context;
        const stateProps = mapStateToProps(store.getState());
        const dispatchProps = bindActionCreators(
          mapDispatchToProps,
          store.dispatch
        );
        this.setState({
          props: {
            ...this.state.props,
            ...stateProps,
            ...dispatchProps,
          },
        });
      }
      render() {
        return <WrapComponent {...this.state.props}></WrapComponent>;
      }
    };
  };
export class Provider extends React.Component {
  static childContextTypes = {
    store: PropTypes.object,
  };
  getChildContext() {
    return { store: this.store };
  }
  constructor(props, context) {
    super(props, context);
    this.store = props.store;
  }
  render() {
    return this.props.children;
  }
}
中间件(middleware)

中间件就是一个函数,对store.dispatch方法进行了改造,在发出 Action 和执行 Reducer 这两步之间,添加了其他功能。
(1)Reducer:纯函数,只承担计算 State 的功能,不合适承担其他功能,也承担不了,因为理论上,纯函数不能进行读写操作。
(2)View:与 State 一一对应,可以看作 State 的视觉层,也不合适承担其他功能。
(3)Action:存放数据的对象,即消息的载体,只能被别人操作,自己不能进行任何操作。
只有发送 Action 的这个步骤,即store.dispatch()方法,可以添加功能。举例来说,要添加日志功能,把 Action 和 State 打印出来,可以对store.dispatch进行如下改造。
let next = store.dispatch;
store.dispatch = function dispatchAndLog(action) {
  console.log('dispatching', action);
  next(action);
  console.log('next state', store.getState());
}
中间件的用法
import { applyMiddleware, createStore } from 'redux';
import createLogger from 'redux-logger';
const logger = createLogger();

const store = createStore(
  reducer,
  applyMiddleware(logger)
);
redux-logger提供一个生成器createLogger,可以生成日志中间件logger。然后,将它放在applyMiddleware方法之中,传入createStore方法,就完成了store.dispatch()的功能增强。
(1)createStore方法可以接受整个应用的初始状态作为参数,那样的话,applyMiddleware就是第三个参数了。
const store = createStore(
  reducer,
  initial_state,
  applyMiddleware(logger)
);
(2)中间件的次序有讲究。applyMiddleware方法的三个参数,就是三个中间件。有的中间件有次序要求,使用前要查一下文档。比如,logger就一定要放在最后,否则输出结果会不正确。
const store = createStore(
  reducer,
  applyMiddleware(thunk, promise, logger)
);
applyMiddlewares
它是 Redux 的原生方法,作用是将所有中间件组成一个数组,依次执行。下面是它的源码。
export default function applyMiddleware(...middlewares) {
  return (createStore) => (reducer, preloadedState, enhancer) => {
    var store = createStore(reducer, preloadedState, enhancer);
    var dispatch = store.dispatch;
    var chain = [];

    var middlewareAPI = {
      getState: store.getState,
      dispatch: (action) => dispatch(action)
    };
    chain = middlewares.map(middleware => middleware(middlewareAPI));
    dispatch = compose(...chain)(store.dispatch);

    return {...store, dispatch}
  }
}
上面代码中,所有中间件被放进了一个数组chain,然后嵌套执行,最后执行store.dispatch。可以看到,中间件内部(middlewareAPI)可以拿到getState和dispatch这两个方法
export function compose(...funcs) {
  if (funcs.length == 0) {
    return (arg) => arg;
  }
  if (funcs.length == 1) {
    return funcs[0];
  }
  return funcs.reduce(
    (ret, item) =>
      (...args) =>
        ret(item(...args))
  );
}
function bindActionCreator(creator, dispatch) {
  return (...args) => dispatch(creator(...args));
}
export function bindActionCreators(creators, dispatch) {
  return Object.keys(creators).reduce((ret, item) => {
    ret[item] = bindActionCreator(creators[item], dispatch);
    return ret;
  }, {});
}
异步操作的基本思路
同步操作只要发出一种 Action 即可

异步操作的差别是它要发出三种 Action
操作发起时的 Action
操作成功时的 Action
操作失败时的 Action
以向服务器取出数据为例,三种 Action 可以有两种不同的写法
// 写法一:名称相同,参数不同
{ type: 'FETCH_POSTS' }
{ type: 'FETCH_POSTS', status: 'error', error: 'Oops' }
{ type: 'FETCH_POSTS', status: 'success', response: { ... } }

// 写法二:名称不同
{ type: 'FETCH_POSTS_REQUEST' }
{ type: 'FETCH_POSTS_FAILURE', error: 'Oops' }
{ type: 'FETCH_POSTS_SUCCESS', response: { ... } }
除了 Action 种类不同,异步操作的 State 也要进行改造,反映不同的操作状态。下面是 State 的一个例子。
let state = {
  // ...
  isFetching: true,
  didInvalidate: true,
  lastUpdated: 'xxxxxxx'
};
上面代码中,State
的属性isFetching表示是否在抓取数据。didInvalidate表示数据是否过时,lastUpdated表示上一次更新时间。现在,整个异步操作的思路就很清楚了。
- 操作开始时,送出一个 Action,触发 State 更新为"正在操作"状态,View 重新渲染
- 操作结束后,再送出一个 Action,触发 State 更新为"操作结束"状态,View 再一次重新渲染
redux-thunk 中间件
异步操作至少要送出两个 Action:用户触发第一个 Action,这个跟同步操作一样,没有问题;如何才能在操作结束时,系统自动送出第二个
Action 呢?奥妙就在 Action Creator 之中。
class AsyncApp extends Component {
  componentDidMount() {
    const { dispatch, selectedPost } = this.props
    dispatch(fetchPosts(selectedPost))
  }
上面代码是一个异步组件的例子。加载成功后(componentDidMount方法),它送出了(dispatch方法)一个
Action,向服务器要求数据 fetchPosts(selectedSubreddit)。这里的fetchPosts就是 Action Creator。下面就是fetchPosts的代码,关键之处就在里面
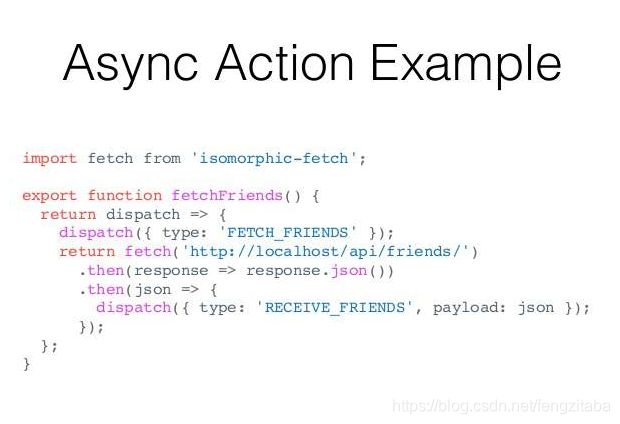
const fetchPosts = postTitle => (dispatch, getState) => {
  dispatch(requestPosts(postTitle));
  return fetch(`/some/API/${postTitle}.json`)
    .then(response => response.json())
    .then(json => dispatch(receivePosts(postTitle, json)));
  };
};

// 使用方法一
store.dispatch(fetchPosts('reactjs'));
// 使用方法二
store.dispatch(fetchPosts('reactjs')).then(() =>
  console.log(store.getState())
);
上面代码中,fetchPosts是一个Action Creator(动作生成器),返回一个函数。这个函数执行后,先发出一个Action(requestPosts(postTitle)),然后进行异步操作。拿到结果后,先将结果转成 JSON 格式,然后再发出一个 Action( receivePosts(postTitle, json))。
上面代码中,有几个地方需要注意。
(1)fetchPosts返回了一个函数,而普通的 Action Creator 默认返回一个对象。
(2)返回的函数的参数是dispatch和getState这两个 Redux 方法,普通的 Action Creator 的参数是
Action 的内容。(3)在返回的函数之中,先发出一个 Action(requestPosts(postTitle)),表示操作开始。
(4)异步操作结束之后,再发出一个 Action(receivePosts(postTitle, json)),表示操作结束。
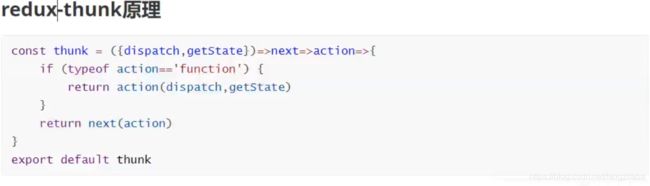
这样的处理,就解决了自动发送第二个 Action 的问题。但是,又带来了一个新的问题,Action 是由store.dispatch方法发送的。而store.dispatch方法正常情况下,参数只能是对象,不能是函数。
这时,就要使用中间件redux-thunk。
import { createStore, applyMiddleware } from 'redux';
import thunk from 'redux-thunk';
import reducer from './reducers';

// Note: this API requires redux@>=3.1.0
const store = createStore(
  reducer,
  applyMiddleware(thunk)
);
上面代码使用redux-thunk中间件,改造store.dispatch,使得后者可以接受函数作为参数。
因此,异步操作的第一种解决方案就是,写出一个返回函数的 Action
Creator,然后使用redux-thunk中间件改造store.dispatch
redux-promise 中间件
既然 Action Creator 可以返回函数,当然也可以返回其他值。另一种异步操作的解决方案,就是让 Action Creator 返回一个 Promise 对象。
这就需要使用redux-promise中间件。
import { createStore, applyMiddleware } from 'redux';
import promiseMiddleware from 'redux-promise';
import reducer from './reducers';

const store = createStore(
  reducer,
  applyMiddleware(promiseMiddleware)
);
这个中间件使得store.dispatch方法可以接受 Promise 对象作为参数。这时,Action Creator 有两种写法。写法一,返回值是一个 Promise 对象。
const fetchPosts =
  (dispatch, postTitle) => new Promise(function (resolve, reject) {
     dispatch(requestPosts(postTitle));
     return fetch(`/some/API/${postTitle}.json`)
       .then(response => {
         type: 'FETCH_POSTS',
         payload: response.json()
       });
});
写法二,Action 对象的payload属性是一个 Promise 对象。这需要从redux-actions模块引入createAction方法,并且写法也要变成下面这样。
import { createAction } from 'redux-actions';

class AsyncApp extends Component {
  componentDidMount() {
    const { dispatch, selectedPost } = this.props
    // 发出同步 Action
    dispatch(requestPosts(selectedPost));
    // 发出异步 Action
    dispatch(createAction(
      'FETCH_POSTS',
      fetch(`/some/API/${postTitle}.json`)
        .then(response => response.json())
    ));
  }
上面代码中,第二个dispatch方法发出的是异步 Action,只有等到操作结束,这个 Action 才会实际发出。注意,createAction的第二个参数必须是一个 Promise 对象。
看一下redux-promise的源码,就会明白它内部是怎么操作的。
export default function promiseMiddleware({ dispatch }) {
  return next => action => {
    if (!isFSA(action)) {
      return isPromise(action)
        ? action.then(dispatch)
        : next(action);
    }

    return isPromise(action.payload)
      ? action.payload.then(
          result => dispatch({ ...action, payload: result }),
          error => {
            dispatch({ ...action, payload: error, error: true });
            return Promise.reject(error);
          }
        )
      : next(action);
  };
}
从上面代码可以看出,如果 Action 本身是一个 Promise,它 resolve 以后的值应该是一个 Action 对象,会被dispatch方法送出(action.then(dispatch)),但 reject 以后不会有任何动作;如果 Action 对象的payload属性是一个 Promise 对象,那么无论 resolve 和 reject,dispatch方法都会发出 Action。
redux-saga
npm install --save redux-saga
//或
yarn add redux-saga
class UserComponent extends React.Component {
  ...
  onSomeButtonClicked() {
    const { userId, dispatch } = this.props
    dispatch({type: 'USER_FETCH_REQUESTED', payload: {userId}})
  }
  ...
}
这个组件 dispatch 一个 plain Object 的 action 到 Store。我们将创建一个 Saga 来监听所有的
USER_FETCH_REQUESTED action,并触发一个 API 调用获取用户数据。
//sagas.js
import { call, put, takeEvery, takeLatest } from 'redux-saga/effects'
import Api from '...'

// worker Saga : 将在 USER_FETCH_REQUESTED action 被 dispatch 时调用
function* fetchUser(action) {
   try {
      const user = yield call(Api.fetchUser, action.payload.userId);
      yield put({type: "USER_FETCH_SUCCEEDED", user: user});
   } catch (e) {
      yield put({type: "USER_FETCH_FAILED", message: e.message});
   }
}

/*
  在每个 `USER_FETCH_REQUESTED` action 被 dispatch 时调用 fetchUser
  允许并发(译注:即同时处理多个相同的 action)
*/
function* mySaga() {
  yield takeEvery("USER_FETCH_REQUESTED", fetchUser);
}

/*
  也可以使用 takeLatest

  不允许并发,dispatch 一个 `USER_FETCH_REQUESTED` action 时,
  如果在这之前已经有一个 `USER_FETCH_REQUESTED` action 在处理中,
  那么处理中的 action 会被取消,只会执行当前的
*/
function* mySaga() {
  yield takeLatest("USER_FETCH_REQUESTED", fetchUser);
}

export default mySaga;
为了能跑起 Saga,我们需要使用 redux-saga 中间件将 Saga 与 Redux Store 建立连接
//main.js
import { createStore, applyMiddleware } from 'redux'
import createSagaMiddleware from 'redux-saga'

import reducer from './reducers'
import mySaga from './sagas'

// create the saga middleware
const sagaMiddleware = createSagaMiddleware()
// mount it on the Store
const store = createStore(
  reducer,
  applyMiddleware(sagaMiddleware)
)

// then run the saga
sagaMiddleware.run(mySaga)

// render the application
takeEvery
提供了类似 redux-thunk 的行为。
首先我们创建一个将执行异步 action 的任务:
import { call, put } from 'redux-saga/effects'

export function* fetchData(action) {
   try {
      const data = yield call(Api.fetchUser, action.payload.url);
      yield put({type: "FETCH_SUCCEEDED", data});
   } catch (error) {
      yield put({type: "FETCH_FAILED", error});
   }
}
然后在每次 FETCH_REQUESTED action 被发起时启动上面的任务。
import { takeEvery } from 'redux-saga'

function* watchFetchData() {
  yield* takeEvery('FETCH_REQUESTED', fetchData)
}
在上面的例子中,takeEvery 允许多个 fetchData 实例同时启动。在某个特定时刻,尽管之前还有一个或多个 fetchData 尚未结束,我们还是可以启动一个新的 fetchData 任务,
如果我们只想得到最新那个请求的响应(例如,始终显示最新版本的数据)。我们可以使用 takeLatest 辅助函数。
import { takeLatest } from 'redux-saga'

function* watchFetchData() {
  yield* takeLatest('FETCH_REQUESTED', fetchData)
}
和 takeEvery 不同,在任何时刻 takeLatest 只允许一个 fetchData 任务在执行。并且这个任务是最后被启动的那个。 如果已经有一个任务在执行的时候启动另一个 fetchData ,那之前的这个任务会被自动取消。
如果你有多个 Saga 监视不同的 action ,你可以用内置辅助函数创建很多观察者,就像用了 fork 来派生他们 (之后我们会讲到 fork ,现在就把它当作一个允许我们在后台启动多个 saga 的 Effect )。
import { takeEvery } from 'redux-saga/effects'

// FETCH_USERS
function* fetchUsers(action) { ... }

// CREATE_USER
function* createUser(action) { ... }

// 同时使用它们
export default function* rootSaga() {
  yield takeEvery('FETCH_USERS', fetchUsers)
  yield takeEvery('CREATE_USER', createUser)
}