蓝牙低功耗BLE调研与开发
蓝牙低功耗BLE调研与开发
一: 蓝牙简介
蓝牙是一种近距离无线通信技术,运行在2.4GHz免费频段,它的特性就是近距离通信,典型距离是 10 米以内,传输速度最高可达 24 Mbps,支持多连接,安全性高,非常适合用智能设备上。
1. 蓝牙技术的发展
1999年 蓝牙1.0:
早期的蓝牙 1.0 A 和 1.0B 版存在多个问题,有多家厂商指出他们的产品互不兼容。
同时,在两个设备“链接”(Handshaking)的过程中,蓝牙硬件的地址(BD_ADDR)会被发送出去,在协议的层面上不能做到匿名,造成泄漏数据的危险。
因此,当 1.0 版本推出以后,蓝牙并未立即受到广泛的应用。除了当时对应蓝牙功能的电子设备种类少,蓝牙装置也十分昂贵。
2001年 蓝牙1.1版本:
蓝牙 1.1 版正式列入 IEEE 802.15.1 标准,该标准定义了物理层(PHY)和媒体访问控制(MAC)规范,用于设备间的无线连接,传输率为 0.7Mbps。但因为是早期设计,容易受到同频率之间产品干扰,影响通讯质量。
2003年:蓝牙 1.2
蓝牙 1.2 版针对 1.0 版本暴露出的安全性问题,完善了匿名方式,新增屏蔽设备的硬件地址(BD_ADDR)功能,保护用户免受身份嗅探攻击和跟踪,同时向下兼容 1.1 版。此外,还增加了四项新功能:
(1)AFH(Adaptive Frequency Hopping)适应性跳频技术,减少了蓝牙产品与其它无线通讯装置之间所产生的干扰问题;
(2)eSCO(Extended Synchronous Connection-Oriented links)延伸同步连结导向信道技术,用于提供 QoS 的音频传输,进一步满足高阶语音与音频产品的需求;
(3)Faster Connection 快速连接功能,可以缩短重新搜索与再连接的时间,使连接过程更为稳定快速;
(4)支持 Stereo 音效的传输要求,但只能以单工方式工作。
2004年:蓝牙 2.0
蓝牙 2.0 是 1.2 版本的改良版,新增的 EDR(Enhanced Data Rate)技术通过提高多任务处理和多种蓝牙设备同时运行的能力,
使得蓝牙设备的传输率可达 3Mbps。
蓝牙 2.0 支持双工模式:可以一边进行语音通讯,一边传输文档/高质素图片。
同时,EDR 技术通过减少工作负债循环来降低功耗,由于带宽的增加,蓝牙 2.0 增加了连接设备的数量。
2007年:蓝牙 2.1
蓝牙 2.1 新增了 Sniff Subrating 省电功能,将设备间相互确认的讯号发送时间间隔从旧版的 0.1 秒延长到 0.5 秒左右,从而让蓝牙芯片的工作负载大幅降低。
另外,新增 SSP 简易安全配对功能,改善了蓝牙设备的配对体验,同时提升了使用和安全强度。
支持 NFC 近场通信,只要将两个内置有 NFC 芯片的蓝牙设备相互靠近,配对密码将通过 NFC 进行传输,无需手动输入。
2009 年:蓝牙 3.0
蓝牙 3.0 新增了可选技术 High Speed,High Speed 可以使蓝牙调用 802.11 WiFi 用于实现高速数据传输,传输率高达 24Mbps,是蓝牙 2.0 的 8 倍,轻松实现录像机至高清电视、PC 至 PMP、UMPC 至打印机之间的资料传输。
蓝牙 3.0 的核心是 AMP(Generic Alternate MAC/PHY),这是一种全新的交替射频技术,允许蓝牙协议栈针对任一任务动态地选择正确射频。
功耗方面,蓝牙 3.0 引入了 EPC 增强电源控制技术,再辅以 802.11,实际空闲功耗明显降低。
此外,新的规范还加入 UCD 单向广播无连接数据技术,提高了蓝牙设备的相应能力。
2010 年:蓝牙 4.0
蓝牙 4.0 是迄今为止第一个蓝牙综合协议规范,将三种规格集成在一起。其中最重要的变化就是 BLE(Bluetooth Low Energy)低功耗功能,提出了低功耗蓝牙、传统蓝牙和高速蓝牙三种模式:
”高速蓝牙“主攻数据交换与传输;“传统蓝牙”则以信息沟通、设备连接为重点;”低功耗蓝牙“以不需占用太多带宽的设备连接为主,功耗较老版本降低了 90%。
BLE 前身是 NOKIA 开发的 Wibree 技术,本是作为一项专为移动设备开发的极低功耗的移动无线通信技术,在被 SIG 接纳并规范化之后重命名为 Bluetooth Low Energy(后简称低功耗蓝牙)。这三种协议规范还能够互相组合搭配、从而实现更广泛的应用模式。
蓝牙 4.0 的芯片模式分为 Single mode 与 Dual mode。Single mode 只能与蓝牙 4.0 互相传输无法向下与 3.0/2.1/2.0 版本兼容;Dual mode 可以向下兼容 3.0/2.1/2.0 版本。前者应用于使用纽扣电池的传感器设备,例如对功耗要求较高的心率检测器和温度计;后者应用于传统蓝牙设备,同时兼顾低功耗的需求。
此外,蓝牙 4.0 还把蓝牙的传输距离提升到100米以上(低功耗模式条件下)。拥有更快的响应速度,最短可在 3 毫秒内完成连接设置并开始传输数据。更安全的技术,使用 AES-128 CCM 加密算法进行数据包加密和认证。
2013 年:蓝牙 4.1
蓝牙 4.1 在传输速度和传输范围上变化很小,但在软件方面有着明显的改进。此次更新目的是为了让 Bluetooth Smart 技术最终成为物联网(Internet of Things)发展的核心动力。
支持与 LTE 无缝协作。当蓝牙与 LTE 无线电信号同时传输数据时,那么蓝牙 4.1 可以自动协调两者的传输信息,以确保协同传输,降低相互干扰。
允许开发人员和制造商「自定义」蓝牙 4.1 设备的重新连接间隔,为开发人员提供了更高的灵活性和掌控度。
支持「云同步」。蓝牙 4.1 加入了专用的 IPv6 通道,蓝牙 4.1 设备只需要连接到可以联网的设备(如手机),就可以通过 IPv6 与云端的数据进行同步,满足物联网的应用需求。
支持「扩展设备」与「中心设备」角色互换。支持蓝牙 4.1 标准的耳机、手表、键鼠,可以不用通过 PC、平板、手机等数据枢纽,实现自主收发数据。例如智能手表和计步器可以绕过智能手机,直接实现对话。
2014 年:蓝牙 4.2
蓝牙 4.2 的传输速度更加快速,比上代提高了 2.5 倍,因为蓝牙智能(Bluetooth Smart)数据包的容量提高,其可容纳的数据量相当于此前的10倍左右。
改善了传输速率和隐私保护程度,蓝牙信号想要连接或者追踪用户设备,必须经过用户许可。用户可以放心使用可穿戴设备而不用担心被跟踪。
支持 6LoWPAN,6LoWPAN 是一种基于 IPv6 的低速无线个域网标准。蓝牙 4.2 设备可以直接通过 IPv6 和 6LoWPAN 接入互联网。这一技术允许多个蓝牙设备通过一个终端接入互联网或者局域网,这样,大部分智能家居产品可以抛弃相对复杂的 WiFi 连接,改用蓝牙传输,让个人传感器和家庭间的互联更加便捷快速。
2016 年:蓝牙 5.0
蓝牙 5.0 在低功耗模式下具备更快更远的传输能力,传输速率是蓝牙 4.2 的两倍(速度上限为 2Mbps),有效传输距离是蓝牙 4.2 的四倍(理论上可达 300 米),数据包容量是蓝牙 4.2 的八倍。
支持室内定位导航功能,结合 WiFi 可以实现精度小于 1 米的室内定位。
针对 IoT 物联网进行底层优化,力求以更低的功耗和更高的性能为智能家居服务。
- 蓝牙版本总结
- 2007年发布的2.1版本,是之前使用最广的,也是我们所谓的经典蓝牙。
- 2009年推出蓝牙 3.0版本,也就是所谓的高速蓝牙,传输速率理论上可高达24 Mbit/s;
- 2010年推出蓝牙4.0版本,它是相对之前版本的集大成者,它包括经典蓝牙、高速蓝牙和蓝牙低功耗协议。
经典蓝牙包括旧有蓝牙协议,高速蓝牙基于Wi-Fi,低功耗蓝牙就是BLE。 - 2016年蓝牙技术联盟提出了新的蓝牙技术标准,即蓝牙5.0版本。
蓝牙5.0针对低功耗设备速度有相应提升和优化,结合wifi对室内位置进行辅助定位,
提高传输速度,增加有效工作距离,主要是针对物联网方向的改进。
2. Android版本中蓝牙简介
- Android1.5 中增加了蓝牙功能,立体声 Bluetooth 支持:A2DP [Advanced Audio Distribution Profile]、AVCRP [Audio/Video Remote Control Profile],自动配对。
- Android2.0 中支持Bluetooth2.1协议。
- Android3.0 中能让应用查询已经连接上 Bluetooth 设备的 Bluetooth Profile、音频状态等,然后通知用户。
- Android3.1 中系统可以通过 Bluetooth HID 方式同时接入一到多款输入设备。
- Android4.0 中新增支持连接 Bluetooth HDP [Health Device Profile)] 设备,通过第三方应用的支持,用户可以连接到医院、健身中心或者家庭等场合中的无线医疗设备和传感器。
- Android4.2 中引入了一种新的针对 Android 设备优化的 Bluetooth 协议栈 BlueDroid,从而取代 BlueZ 协议栈。Bluedroid 协议栈由 Google 和 Broadcom 公司共同开发,相对于 BlueZ 协议栈,BlueDroid 提升了兼容性和可靠性。
- Android4.3 中增加了对低功耗蓝牙的支持,内置支持 Bluetooth AVRCP 1.3,基于 Google 和 Broadcom 公司功能研发的针对于 Android 设备优化的新的蓝牙协议栈 BlueDroid。
- Android4.4 中新增两种新 Proifle 支持:HID [Human Interface Device]、MAP [Message Access Profile]
- Android5.0 中支持Bluetooth4.1协议。
- Android6.0 中扫描蓝牙需要动态获取定位才行。
- Android7.0 中支持Bluetooth4.2协议。
- Android8.0 中支持Bluetooth5.0协议,强化了蓝牙音频的表现。比如编码/传输格式可选SBC、AAC、aptX/aptX HD、LDAC等四种,音质依次提高。
- Android10.0 中支持Bluetooth5.1协议,在5.0的基础上,增加了侧向功能和厘米级定位服务,大幅度提高了定位精度。使室内定位更精准。
- Android11.0 中支持Bluetooth5.2协议,增强版ATT协议,LE功耗控制和信号同步,连接更快,更稳定,抗干扰性更好。
- Android12.0 中支持Bluetooth5.3协议,增强了经典蓝牙BR/EDR(基础速率和增强速率)的安全性。蓝牙5.3的延迟更低、抗干扰性更强、提升了电池续航时间。系统引入了新的运行时权限 BLUETOOTH_SCAN、BLUETOOTH_ADVERTISE 和 BLUETOOTH_CONNECT权限,用于更好地管理应用于附近蓝牙设备的连接。
- Android13.0 中引入LE Audio支持,LE Audio 是蓝牙技术联盟(SIG Q) 在 2020 年国际消费电子展上推出的新一代蓝牙低功耗音频技术,能以蓝牙低功耗状态下传递音频有利于提升蓝牙耳机续航力和性能,同时也导入新世代蓝牙音频编码 LC3(Low Complexity Communication Codec),以及多种音频分享、广播音频模式等,并且有利于助听器产品,能够达到低延迟、高音质等功能。
蓝牙低功耗音频LE Audio 算是蓝牙技术联盟发展 20 年全新的音频技术,中间历经8年发展与两次核心规格更新,也算是有史以来最大型开发项目,能够分许开发者通过23种不同文件配置与服务规范,开发出蓝牙高音质、新拓朴结构和省电音频装置。 - 目前最新的蓝牙协议是蓝牙5.3版本(截止到2023年9月22日)
- Android 4.3 开始,开始支持BLE功能,但只支持Central(中心角色or主机)
- Android 5.0开始,开始支持Peripheral(外设角色or从机)
中心模式和外设模式是什么意思?
- Central Mode: Android端作为中心设备,连接其他外围设备。
- Peripheral Mode:Android端作为外围设备,被其他中心设备连接。在Android 5.0支持外设模式之后,才算实现了两台Android手机通过BLE进行相互通信。
3. 蓝牙的广播和扫描
关于这部分内容,需要引入一个概念,GAP(Generic Access Profile),它用来控制设备连接和广播。GAP 使你的设备被其他设备可见,并决定了你的设备是否可以或者怎样与设备进行交互。例如 Beacon 设备就只是向外发送广播,不支持连接;小米手环就可以与中心设备建立连接。
在 GAP 中蓝牙设备可以向外广播数据包,广播包分为两部分: Advertising Data Payload(广播数据)和 Scan Response Data Payload(扫描回复),每种数据最长可以包含 31 byte。这里广播数据是必需的,因为外设必需不停的向外广播,让中心设备知道它的存在。扫描回复是可选的,中心设备可以向外设请求扫描回复,这里包含一些设备额外的信息,例如设备的名字。在 Android 中,系统会把这两个数据拼接在一起,返回一个 62 字节的数组。这些广播数据可以自己手动去解析,在 Android 5.0 也提供 ScanRecord 帮你解析,直接可以通过这个类获得有意义的数据。广播中可以有哪些数据类型呢?设备连接属性,标识设备支持的 BLE 模式,这个是必须的。设备名字,设备包含的关键 GATT service,或者 Service data,厂商自定义数据等等。
外围设备会设定一个广播间隔,每个广播间隔中,它会重新发送自己的广播数据。广播间隔越长,越省电,同时也不太容易扫描到。
刚刚讲到,GAP决定了你的设备怎样与其他设备进行交互。答案是有2种方式:
完全基于广播的方式
也有些情况是不需要连接的,只要外设广播自己的数据即可。用这种方式主要目的是让外围设备,把自己的信息发送给多个中心设备。使用广播这种方式最典型的应用就是苹果的 iBeacon。这是苹果公司定义的基于 BLE 广播实现的功能,可以实现广告推送和室内定位。这也说明了,APP 使用 BLE,需要定位权限。
基于非连接的,这种应用就是依赖 BLE 的广播,也叫作 Beacon。这里有两个角色,发送广播的一方叫做 Broadcaster,监听广播的一方叫 Observer。
基于GATT连接的方式
大部分情况下,外设通过广播自己来让中心设备发现自己,并建立 GATT 连接,从而进行更多的数据交换。这里有且仅有两个角色,发起连接的一方,叫做中心设备—Central,被连接的设备,叫做外设—Peripheral。
外围设备:这一般就是非常小或者简单的低功耗设备,用来提供数据,并连接到一个更加相对强大的中心设备,例如小米手环。
中心设备:中心设备相对比较强大,用来连接其他外围设备,例如手机等。
GATT 连接需要特别注意的是:GATT 连接是独占的。也就是一个 BLE 外设同时只能被一个中心设备连接。一旦外设被连接,它就会马上停止广播,这样它就对其他设备不可见了。当设备断开,它又开始广播。中心设备和外设需要双向通信的话,唯一的方式就是建立 GATT 连接。
GATT 通信的双方是 C/S 关系。外设作为 GATT 服务端(Server),它维持了 ATT 的查找表以及 service 和 characteristic 的定义。中心设备是 GATT 客户端(Client),它向 Server 发起请求。需要注意的是,所有的通信事件,都是由客户端发起,并且接收服务端的响应。
4. BLE通信基础
BLE通信的基础有两个重要的概念,ATT和GATT。
ATT
全称 attribute protocol,中文名“属性协议”。它是 BLE 通信的基础。
ATT 把数据封装,向外暴露为“属性”,提供“属性”的为服务端,获取“属性”的为客户端。
ATT 是专门为低功耗蓝牙设计的,结构非常简单,数据长度很短。
GATT
全称 Generic Attribute Profile, 中文名“通用属性配置文件”。它是在ATT 的基础上,
对 ATT 进行的进一步逻辑封装,定义数据的交互方式和含义。GATT是我们做 BLE 开发的时候直接接触的概念。
GATT 层级
GATT按照层级定义了4个概念:配置文件(Profile)、服务(Service)、特征(Characteristic)和描述(Descriptor)。
他们的关系是这样的:Profile 就是定义了一个实际的应用场景,一个 Profile包含若干个 Service,
一个 Service 包含若干个 Characteristic,一个 Characteristic 可以包含若干 Descriptor。
-
Profile
Profile 并不是实际存在于 BLE 外设上的,它只是一个被 Bluetooth SIG 或者外设设计者预先定义的 Service 的集合。例如心率Profile(Heart Rate Profile)就是结合了 Heart Rate Service 和 Device Information Service。所有官方通过 GATT Profile 的列表可以从这里找到。
-
Service
Service 是把数据分成一个个的独立逻辑项,它包含一个或者多个 Characteristic。每个 Service 有一个 UUID 唯一标识。 UUID 有 16 bit 的,或者 128 bit 的。16 bit 的 UUID 是官方通过认证的,需要花钱购买,128 bit 是自定义的,这个就可以自己随便设置。官方通过了一些标准 Service,完整列表在这里。以 Heart Rate Service为例,可以看到它的官方通过 16 bit UUID 是 0x180D,包含 3 个 Characteristic:Heart Rate Measurement, Body Sensor Location 和 Heart Rate Control Point,并且定义了只有第一个是必须的,它是可选实现的。
-
Characteristic
需要重点提一下Characteristic, 它定义了数值和操作,包含一个Characteristic声明、Characteristic属性、值、值的描述(Optional)。通常我们讲的 BLE 通信,其实就是对 Characteristic 的读写或者订阅通知。比如在实际操作过程中,我对某一个Characteristic进行读,就是获取这个Characteristic的value。
-
UUID
Service、Characteristic 和 Descriptor 都是使用 UUID 唯一标示的。
UUID 是全局唯一标识,它是 128bit 的值,为了便于识别和阅读,一般以 “8位-4位-4位-4位-12位”的16进制标示,比如“12345678-abcd-1000-8000-123456000000”。
但是,128bit的UUID 太长,考虑到在低功耗蓝牙中,数据长度非常受限的情况,蓝牙又使用了所谓的 16 bit 或者 32 bit 的 UUID,形式如下:“0000XXXX-0000-1000-8000-00805F9B34FB”。除了 “XXXX” 那几位以外,其他都是固定,所以说,其实 16 bit UUID 是对应了一个 128 bit 的 UUID。这样一来,UUID 就大幅减少了,例如 16 bit UUID只有有限的 65536(16的四次方) 个。与此同时,因为数量有限,所以 16 bit UUID 并不能随便使用。蓝牙技术联盟已经预先定义了一些 UUID,我们可以直接使用,比如“00001011-0000-1000-8000-00805F9B34FB”就一个是常见于BLE设备中的UUID。当然也可以花钱定制自定义的UUID。
二: BLE开发流程-扫描,连接,发送和接收数据,分包解包
demo地址:https://github.com/PangHaHa12138/AndroidBLE
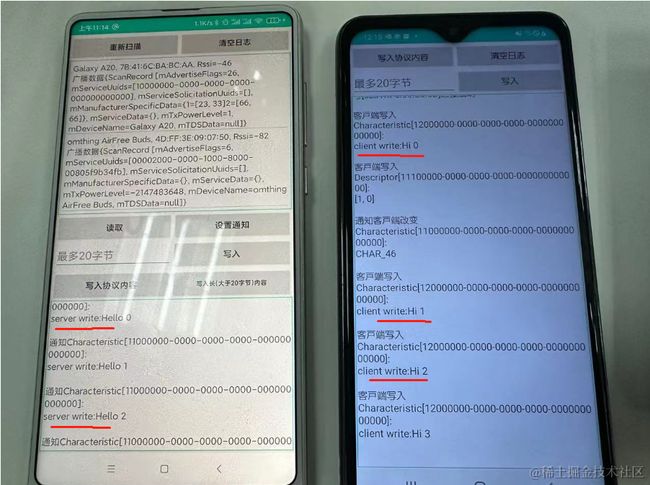
demo演示1
涉及ble蓝牙通讯的客户端(中心设备)开启、扫描、连接、发送和接收数据、分包解包,
和服务端(外围设备)初始化广播数据、开始广播、配置Services、Server回调操作
1,两台手机A 小米手机 为客户端,B 三星手机 为服务端
2,B开启广播,A扫描设备,扫描到B Galaxy A20,建立连接,
3,A通过唯一UUID服务 发送数据给B,B收到数据,显示日志
4,A设置回调通知,B绑定通知服务,回调给A
5,A写入协议给B,B通过回调通知写入协议给A
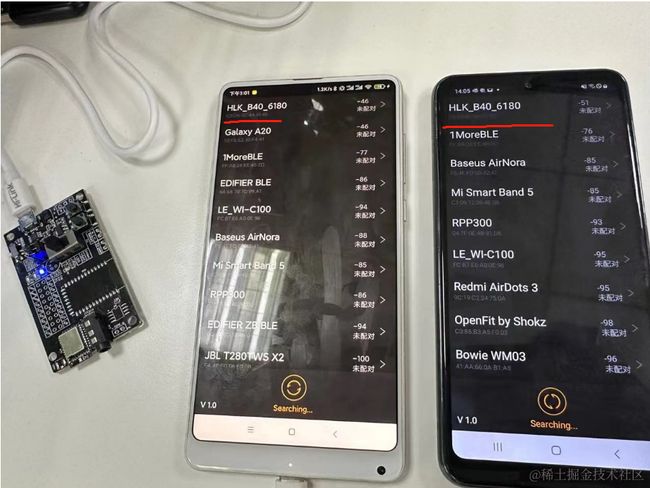
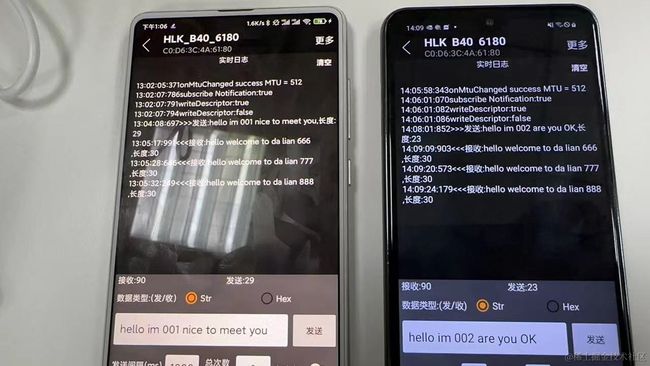
demo演示2
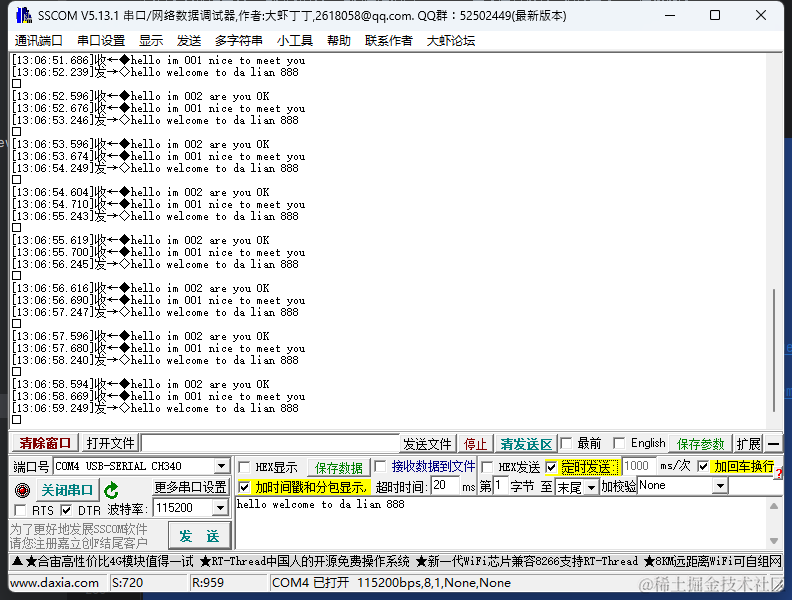
两台手机都是主机,电脑为从机(电脑通过插入HLK-B40蓝牙透传模块,获得蓝牙BLE连接能力)
1,两台手机分别扫描低功耗蓝牙,并发现HLK-B40,
3,电脑端使用蓝牙串口助手调试 收到数据
4,电脑端发送数据
5,手机端接收数据
6,电脑端定时发送数据,手机端定时发送数据
下面详细讲解下客户端和服务端的开发步骤流程
三: BLE客户端开发流程
1、申请权限
安卓手机涉及蓝牙权限问题,蓝牙开发需要在AndroidManifest.xml文件中添加权限声明:
权限说明:
在Android4.3 至 Android6.0 需要蓝牙权限
在Android6.0(包括6.0) 到 Android12.0需要定位权限,包括模糊位置和精准位置,并且需要代码动态申请
Android11之前权限申请:
https://developer.android.com/guide/topics/connectivity/bluetooth/permissions
Android12权限申请:
https://developer.android.google.cn/about/versions/12/features/bluetooth-permissions
在Android12.0及以上,需要申请蓝牙扫描,连接,广播权限
如果App不需要获取位置权限可以增加应用不推导位置的flag,则不需要申请位置权限了
如果要在后台开启服务扫描蓝牙,则还需要增加后台访问位置权限
2、打开蓝牙
在搜索设备之前先要询问打开手机蓝牙
if (!getPackageManager().hasSystemFeature(PackageManager.FEATURE_BLUETOOTH_LE)) {

    //不支持BLE

    Toast.makeText(this, R.string.ble_not_supported, Toast.LENGTH_SHORT).show();

    finish();

}

final BluetoothManager bluetoothManager = (BluetoothManager) getSystemService(Context.BLUETOOTH_SERVICE);

mBluetoothAdapter = bluetoothManager.getAdapter();

if (mBluetoothAdapter == null) {

    Toast.makeText(this, R.string.error_bluetooth_not_supported, Toast.LENGTH_SHORT).show();

    finish();

    return;

}


// 开启蓝牙

if(!mBluetoothAdapter.isEnabled()){

    //不建议强制打开蓝牙,官方建议通过Intent让用户选择打开蓝牙

    //mBluetoothAdapter.enable();

    Intent enableBtIntent = new Intent(BluetoothAdapter.ACTION_REQUEST_ENABLE);

    startActivityForResult(enableBtIntent, REQUEST_ENABLE_BLUETOOTH);

}
动态权限申请,申请权限后还需要检查手机GPS是否开启,有没有定位权限和GPS是否打开是两回事
List mPermissionList = new ArrayList<>();

// Android 版本大于等于 12 时,申请新的蓝牙权限

if (Build.VERSION.SDK_INT >= Build.VERSION_CODES.S) {

    mPermissionList.add(Manifest.permission.BLUETOOTH_SCAN);

    mPermissionList.add(Manifest.permission.BLUETOOTH_ADVERTISE);

    mPermissionList.add(Manifest.permission.BLUETOOTH_CONNECT);

    //根据实际需要申请定位权限

    mPermissionList.add(Manifest.permission.ACCESS_COARSE_LOCATION);

    mPermissionList.add(Manifest.permission.ACCESS_FINE_LOCATION);

} else {

    //Android 6.0开始 需要定位权限

    mPermissionList.add(Manifest.permission.ACCESS_FINE_LOCATION);

    mPermissionList.add(Manifest.permission.ACCESS_COARSE_LOCATION);

}

boolean hasPermission = false;

for (int i = 0; i < mPermissionList.size(); i++) {

    int permissionCheck = ContextCompat.checkSelfPermission(this, mPermissionList.get(i));

    hasPermission = permissionCheck == PackageManager.PERMISSION_GRANTED;

}

if (hasPermission) {

   //已经有权限了

} else {

    ActivityCompat.requestPermissions(this, mPermissionList.toArray(new String[0]), REQUEST_PERMISSION_CODE);

}


//开启位置服务,支持获取ble蓝牙扫描结果

if (Build.VERSION.SDK_INT >=  Build.VERSION_CODES.M && !isLocationOpen(getApplicationContext())) {

    Intent enableLocate = new Intent(Settings.ACTION_LOCATION_SOURCE_SETTINGS);

    startActivityForResult(enableLocate, REQUEST_LOCATION_PERMISSION);

}


public static boolean isLocationOpen(final Context context){

LocationManager manager = (LocationManager) context.getSystemService(Context.LOCATION_SERVICE);

    //gps定位

    boolean isGpsProvider = manager.isProviderEnabled(LocationManager.GPS_PROVIDER);

    //网络定位

    boolean isNetWorkProvider = manager.isProviderEnabled(LocationManager.NETWORK_PROVIDER);

    return isGpsProvider|| isNetWorkProvider;

}
3、搜索设备
注意: BLE设备地址是动态变化(每隔一段时间都会变化),而经典蓝牙设备是出厂就固定不变了!
final BluetoothManager bluetoothManager = (BluetoothManager) getSystemService(Context.BLUETOOTH_SERVICE);

BluetoothAdapter bluetoothAdapter = bluetoothManager.getAdapter();

 // 下面使用Android5.0新增的扫描API,扫描返回的结果更友好,比如BLE广播数据以前是byte[] scanRecord,

 // 而新API帮我们解析成ScanRecord类

BluetoothLeScanner bluetoothLeScanner = bluetoothAdapter.getBluetoothLeScanner();

 // 扫描结果Callback

private ScanCallback mScanCallback = new ScanCallback() {

    @Override

    public void onScanResult(int callbackType, ScanResult result) {

        // result.getScanRecord() 获取BLE广播数据

        BluetoothDevice device = result.getDevice() 获取BLE设备信息

        String strName = bluetoothDevice.getName();

        if (strName != null && strName.length() > 0) {

            //添加设备到列表

        }


    }

};

bluetoothLeScanner.startScan(mScanCallback); //开启扫描

mHandler.postDelayed(new Runnable() {

    @Override

    public void run() {

        bluetoothLeScanner.stopScan(mScanCallback); //停止扫描

        isScanning = false;

    }

}, 3000);


// 旧API是BluetoothAdapter.startLeScan(LeScanCallback callback)方式扫描BLE蓝牙设备,如下:

private BluetoothAdapter.LeScanCallback leScanCallback = new BluetoothAdapter.LeScanCallback() {


        @Override

        public void onLeScan(BluetoothDevice device, int rssi, byte[] scanRecord) {

            //获取设备信息 device

            String strName = device.getName();

            if (strName != null && strName.length() > 0) {

                //添加设备到列表

            }

        }

    };

bluetoothAdapter.startLeScan(leScanCallback); //开启扫描

mHandler.postDelayed(new Runnable() {

    @Override

    public void run() {

        bluetoothAdapter.stopLeScan(leScanCallback); //停止扫描

        isScanning = false;

    }

}, 3000);
4、连接设备
通过扫描BLE设备,根据设备名称区分出目标设备targetDevice,下一步实现与目标设备的连接,在连接设备之前要停止搜索蓝牙;停止搜索一般需要一定的时间来完成,最好调用停止搜索函数之后加以100ms的延时,保证系统能够完全停止搜索蓝牙设备。停止搜索之后启动连接过程;
BLE蓝牙的连接方法相对简单只需调用BluetoothDevice的connectGatt方法;
public BluetoothGatt connectGatt (Context context, boolean autoConnect, BluetoothGattCallback callback);

//示例

if (Build.VERSION.SDK_INT >= Build.VERSION_CODES.M) {

    mBluetoothGatt = bluetoothDevice.connectGatt(BleClientActivity.this, false, mBluetoothGattCallback, BluetoothDevice.TRANSPORT_LE);

} else {

    mBluetoothGatt = bluetoothDevice.connectGatt(BleClientActivity.this, false, mBluetoothGattCallback);

}
参数说明
- 返回值 BluetoothGatt: BLE蓝牙连接管理类,主要负责与设备进行通信;
- boolean autoConnect:建议置为false,能够提升连接速度;
- BluetoothGattCallback callback 连接回调,重要参数,BLE通信的核心部分
5、设备通信
与设备建立连接之后与设备通信,整个通信过程都是在BluetoothGattCallback的异步回调函数中完成;
BluetoothGattCallback中主要回调函数如下:
private BluetoothGattCallback gattCallback = new BluetoothGattCallback() {


    @Override

    public void onConnectionStateChange(BluetoothGatt gatt, int status,int newState) {

        //连接状态改变的Callback

    }


    @Override

    public void onServicesDiscovered(BluetoothGatt gatt, int status) {

        //服务发现成功的Callback

    }


    @Override

    public void onCharacteristicWrite(BluetoothGatt gatt,BluetoothGattCharacteristic characteristic, int status) {

        //写入Characteristic

    }


    @Override

    public void onCharacteristicRead(BluetoothGatt gatt, BluetoothGattCharacteristic characteristic, int status) {

         //读取Characteristic

     }


    @Override

    public void onCharacteristicChanged(BluetoothGatt gatt,BluetoothGattCharacteristic characteristic) {

        //通知Characteristic

    }


    @Override

    public void onDescriptorWrite(BluetoothGatt gatt, BluetoothGattDescriptor descriptor, int status) {

        //写入Descriptor

    }


    @Override

    public void onDescriptorRead(BluetoothGatt gatt, BluetoothGattDescriptor descriptor, int status) {

        //读取Descriptor

    }


};
上述几个回调函数是BLE开发中不可缺少的
6、等待设备连接成功
当调用targetDevice.connectGatt(context, false, gattCallback)后系统会主动发起与BLE蓝牙设备的连接,
若成功连接到设备将回调onConnectionStateChange方法,其处理过程如下;
@Override

public void onConnectionStateChange(BluetoothGatt gatt, int status,int newState) {

     if (newState == BluetoothGatt.STATE_CONNECTED) {

         Log.e(TAG, "设备连接上 开始扫描服务");

         // 连接成功后,开始扫描服务

         mBluetoothGatt.discoverServices();

     }

     if (newState == BluetoothGatt.STATE_DISCONNECTED) {

         // 连接断开

         /*连接断开后的相应处理*/

     }

};
判断newState == BluetoothGatt.STATE_CONNECTED表明此时已经成功连接到设备
7、开启扫描服务
bluetoothGatt.discoverServices() 扫描BLE设备服务是安卓系统中关于BLE蓝牙开发的重要一步,一般在设备连接成功后调用,
扫描到设备服务后回调onServicesDiscovered()函数,函数原型如下:
public BluetoothGattCallback mBluetoothGattCallback = new BluetoothGattCallback() {


@Override

public void onConnectionStateChange(BluetoothGatt bluetoothGatt, int status, int newState) {

    BluetoothDevice dev = bluetoothGatt.getDevice();

    if (status == BluetoothGatt.GATT_SUCCESS && newState == BluetoothProfile.STATE_CONNECTED) {

        isConnected = true;

        bluetoothGatt.discoverServices(); //启动服务发现

    } else {

        isConnected = false;

    }

}


@Override

public void onServicesDiscovered(BluetoothGatt bluetoothGatt, int status) {

    if (status == BluetoothGatt.GATT_SUCCESS) { //BLE服务发现成功

      private List servicesList;

      //获取服务列表

      servicesList = bluetoothGatt.getServices();

    }

}

...

}
- BLE蓝牙协议下数据的通信方式采用BluetoothGattService、BluetoothGattCharacteristic和BluetoothGattDescriptor三个主要的类实现通信;
- BluetoothGattService 简称服务,是构成BLE设备协议栈的组成单位,一个蓝牙设备协议栈一般由一个或者多个BluetoothGattService组成;
- BluetoothGattCharacteristic 简称特征,一个服务包含一个或者多个特征,特征作为数据的基本单元;
- 一个BluetoothGattCharacteristic特征包含一个数据值和附加的关于特征的描述;
- BluetoothGattDescriptor:用于描述特征的类,其同样包含一个value值;
8、获取负责通信的BluetoothGattCharacteristic
BLE蓝牙开发主要有负责通信的BluetoothGattService完成的。当且称为通信服务。通信服务通过硬件工程师提供的UUID获取。获取方式如下:
- BluetoothGattService service = mBluetoothGatt.getService(UUID.fromString(“蓝牙模块提供的负责通信UUID字符串”));
- 通信服务中包含负责读写的BluetoothGattCharacteristic,且分别称为notifyCharacteristic和writeCharacteristic。其中notifyCharacteristic负责开启监听,也就是启动收数据的通道,writeCharacteristic负责写入数据;
具体操作方式如下:
  BluetoothGattService service = mBluetoothGatt.getService(UUID.fromString("蓝牙模块提供的负责通信服务UUID字符串"));

   // 例如形式如:49535343-fe7d-4ae5-8fa9-9fafd205e455

  notifyCharacteristic = service.getCharacteristic(UUID.fromString("notify uuid"));

  writeCharacteristic =  service.getCharacteristic(UUID.fromString("write uuid"));
9、开启监听
开启监听,即建立与设备的通信的首发数据通道,BLE开发中只有当客户端成功开启监听后才能与服务端收发数据。开启监听的方式如下:
mBluetoothGatt.setCharacteristicNotification(notifyCharacteristic, true)

BluetoothGattDescriptor descriptor = characteristic .getDescriptor(UUID.fromString("00002902-0000-1000-8000-00805f9b34fb"));

descriptor.setValue(BluetoothGattDescriptor.ENABLE_NOTIFICATION_VALUE);

//若开启监听成功则会回调BluetoothGattCallback中的onDescriptorWrite()方法,处理方式如下:

@Override

public void onDescriptorWrite(BluetoothGatt gatt, BluetoothGattDescriptor descriptor, int status) {

   if (status == BluetoothGatt.GATT_SUCCESS) {

       //开启监听成功,可以向设备写入命令了

       Log.e(TAG, "开启监听成功");

   }

};
10、写入数据
BLE单次写的数据量大小是有限制的,通常是20字节,可以尝试通过requestMTU增大,但不保证能成功。分包写是一种解决方案,需要定义分包协议,假设每个包大小20字节,分两种包,数据包和非数据包。对于数据包,头两个字节表示包的序号,剩下的都填充数据。对于非数据包,主要是发送一些控制信息。
监听成功后通过向 writeCharacteristic写入数据实现与服务端的通信。写入方式如下:
//value为客户端向服务端发送的指令

writeCharacteristic.setValue(value);

mBluetoothGatt.writeCharacteristic(writeCharacteristic)
其中:value一般为Hex格式指令,其内容由设备通信的蓝牙通信协议规定;
11、接收数据
若写入指令成功则回调BluetoothGattCallback中的onCharacteristicWrite()方法,说明将数据已经发送给下位机;
@Override

public void onCharacteristicWrite(BluetoothGatt gatt,

    BluetoothGattCharacteristic characteristic, int status) {

    if (status == BluetoothGatt.GATT_SUCCESS) {

        Log.e(TAG, "发送成功");

    }

}
若发送的数据符合通信协议,则服务端会向客户端回复相应的数据。发送的数据通过回调onCharacteristicChanged()方法获取,其处理方式如下:
@Override

public void onCharacteristicChanged(BluetoothGatt gatt, BluetoothGattCharacteristic characteristic) {

    // value为设备发送的数据,根据数据协议进行解析

    byte[] value = characteristic.getValue();

}
通过向服务端发送指令获取服务端的回复数据,即可完成与设备的通信过程;
12、断开连接
当与设备完成通信之后之后一定要断开与设备的连接,防止下次连接设备出问题,调用以下方法断开与设备的连接:
mBluetoothGatt.disconnect();

mBluetoothGatt.close();
四: BLE服务端开发流程
1、设置广播以及初始化广播数据
//广播设置(必须)

AdvertiseSettings settings = new AdvertiseSettings.Builder()

        .setAdvertiseMode(AdvertiseSettings.ADVERTISE_MODE_LOW_LATENCY) //广播模式: 低功耗,平衡,低延迟

        .setTxPowerLevel(AdvertiseSettings.ADVERTISE_TX_POWER_HIGH) //发射功率级别: 极低,低,中,高

        .setTimeout(0)

        .setConnectable(true) //能否连接,广播分为可连接广播和不可连接广播

        .build();


//广播数据(必须,广播启动就会发送)

AdvertiseData advertiseData = new AdvertiseData.Builder()

        .setIncludeDeviceName(true) //包含蓝牙名称

        .setIncludeTxPowerLevel(true) //包含发射功率级别

        .addManufacturerData(1, new byte[]{23, 33}) //设备厂商数据,自定义

        .build();


//扫描响应数据(可选,当客户端扫描时才发送)

AdvertiseData scanResponse = new AdvertiseData.Builder()

        .addManufacturerData(2, new byte[]{66, 66}) //设备厂商数据,自定义

        .addServiceUuid(new ParcelUuid(UUID_SERVICE)) //服务UUID

//                .addServiceData(new ParcelUuid(UUID_SERVICE), new byte[]{2}) //服务数据,自定义

        .build();
2、开始广播
BluetoothManager bluetoothManager = (BluetoothManager) getSystemService(Context.BLUETOOTH_SERVICE);

BluetoothAdapter bluetoothAdapter = bluetoothManager.getAdapter();

//BluetoothAdapter bluetoothAdapter = BluetoothAdapter.getDefaultAdapter();


// ============启动BLE蓝牙广播(广告) ===============

mBluetoothLeAdvertiser = bluetoothAdapter.getBluetoothLeAdvertiser();

mBluetoothLeAdvertiser.startAdvertising(settings, advertiseData, scanResponse, mAdvertiseCallback);


// BLE广播Callback

private AdvertiseCallback mAdvertiseCallback = new AdvertiseCallback() {

    @Override

    public void onStartSuccess(AdvertiseSettings settingsInEffect) {

        logTv("BLE广播开启成功");

    }


    @Override

    public void onStartFailure(int errorCode) {

        logTv("BLE广播开启失败,错误码:" + errorCode);

    }

};
3、配置Services以及Characteristic
// 注意:必须要开启可连接的BLE广播,其它设备才能发现并连接BLE服务端!

// =============启动BLE蓝牙服务端======================================

BluetoothGattService service = new BluetoothGattService(UUID_SERVICE, BluetoothGattService.SERVICE_TYPE_PRIMARY);


//添加可读+通知characteristic

BluetoothGattCharacteristic characteristicRead = new BluetoothGattCharacteristic(UUID_CHAR_READ_NOTIFY,BluetoothGattCharacteristic.PROPERTY_READ | BluetoothGattCharacteristic.PROPERTY_NOTIFY, BluetoothGattCharacteristic.PERMISSION_READ);

characteristicRead.addDescriptor(new BluetoothGattDescriptor(UUID_DESC_NOTITY, BluetoothGattCharacteristic.PERMISSION_WRITE));

service.addCharacteristic(characteristicRead);


//添加可写characteristic

BluetoothGattCharacteristic characteristicWrite = new BluetoothGattCharacteristic(UUID_CHAR_WRITE, BluetoothGattCharacteristic.PROPERTY_WRITE, BluetoothGattCharacteristic.PERMISSION_WRITE);

service.addCharacteristic(characteristicWrite);


if (bluetoothManager != null){

    mBluetoothGattServer = bluetoothManager.openGattServer(this, mBluetoothGattServerCallback);

}


mBluetoothGattServer.addService(service);
4、Server回调以及操作
/**

* 服务事件的回调

*/

private BluetoothGattServerCallback mBluetoothGattServerCallback = new BluetoothGattServerCallback() {

    // 1.连接状态发生变化时

    @Override

    public void onConnectionStateChange(BluetoothDevice device, int status, int newState) {


    }

    @Override

    public void onServiceAdded(int status, BluetoothGattService service) {


    }

    @Override

    public void onCharacteristicReadRequest(BluetoothDevice device, int requestId, int offset, BluetoothGattCharacteristic characteristic) {

       String response = "CHAR_" + (int) (Math.random() * 100); //模拟数据

       // 响应客户端

       mBluetoothGattServer.sendResponse(device, requestId, BluetoothGatt.GATT_SUCCESS, offset, response.getBytes());

    }

    // 3. onCharacteristicWriteRequest,接收具体的字节

    @Override

    public void onCharacteristicWriteRequest(BluetoothDevice device, int requestId, BluetoothGattCharacteristic characteristic, boolean preparedWrite, boolean responseNeeded, int offset, byte[] requestBytes) {

    // 获取客户端发过来的数据

    String requestStr = new String(requestBytes);

    // 响应客户端

    mBluetoothGattServer.sendResponse(device, requestId, BluetoothGatt.GATT_SUCCESS, offset, requestBytes);

    }

    // 5.特征被读取。当回复响应成功后,客户端会读取然后触发本方法

    @Override

    public void onDescriptorReadRequest(BluetoothDevice device, int requestId, int offset, BluetoothGattDescriptor descriptor) {

    String response = "DESC_" + (int) (Math.random() * 100); //模拟数据

     // 响应客户端

    mBluetoothGattServer.sendResponse(device, requestId, BluetoothGatt.GATT_SUCCESS, offset, response.getBytes());

    }

    // 2.描述被写入时,在这里执行 bluetoothGattServer.sendResponse(device, requestId, BluetoothGatt.GATT_SUCCESS...  收,触发 onCharacteristicWriteRequest

    @Override

    public void onDescriptorWriteRequest(final BluetoothDevice device, int requestId, BluetoothGattDescriptor descriptor, boolean preparedWrite, boolean responseNeeded, int offset, byte[] value) {

    // 收到客户端发过来的数据

    String valueStr = Arrays.toString(value);

    mBluetoothGattServer.sendResponse(device, requestId, BluetoothGatt.GATT_SUCCESS, offset, value);// 响应客户端

    //4.处理响应内容

    // 简单模拟通知客户端Characteristic变化

    if (Arrays.toString(BluetoothGattDescriptor.ENABLE_NOTIFICATION_VALUE).equals(valueStr)) { //是否开启通知

       deviceNotify = device;

       descriptorNotify = descriptor;

       final BluetoothGattCharacteristic characteristic = descriptor.getCharacteristic();

       new Thread(new Runnable() {

          @Override

          public void run() {

          String response = "CHAR_" + (int) (Math.random() * 100); //模拟数据

           characteristic.setValue(response);

           //通知客户端改变Characteristic

            mBluetoothGattServer.notifyCharacteristicChanged(device, characteristic, false);

          }

       }).start();

    }

    }

    @Override

    public void onExecuteWrite(BluetoothDevice device, int requestId, boolean execute) {


    }

    @Override

    public void onNotificationSent(BluetoothDevice device, int status) {


    }

    @Override

    public void onMtuChanged(BluetoothDevice device, int mtu) {


    }

    };
5、Server主动写入数据通知client
private void write(String response) {

  if (deviceNotify == null && descriptorNotify == null) {

     return;

  }

  if (TextUtils.isEmpty(response.trim())) {

      return;

  }

  BluetoothGattCharacteristic characteristic = descriptorNotify.getCharacteristic();

  characteristic.setValue(response);

  mBluetoothGattServer.notifyCharacteristicChanged(deviceNotify, characteristic, false);

}
6、关闭广播,断开连接
if (mBluetoothLeAdvertiser != null) {

   mBluetoothLeAdvertiser.stopAdvertising(mAdvertiseCallback);

}


if (mBluetoothGattServer != null) {

   mBluetoothGattServer.close();

}
五:蓝牙操作的注意事项
1、如何避免ble蓝牙连接出现133错误?
- Android 连接外围设备的数量有限,当不需要连接蓝牙设备的时候,必须调用 BluetoothGatt#close 方法释放资源;
- 蓝牙 API 连接蓝牙设备的超时时间大概在 20s 左右,具体时间看系统实现。有时候某些设备进行蓝牙连接的时间会很长,大概十多秒。如果自己手动设置了连接超时时间在某些设备上可能会导致接下来几次的连接尝试都会在 BluetoothGattCallback#onConnectionStateChange 返回 state == 133;
- 能否避免android设备与ble设备连接/断开时上报的133这类错误?
- 1、在连接失败或者断开连接之后,调用 close 并刷新缓存
- 2、尽量不要在startLeScan的时候尝试连接,先stopLeScan后再去连
- 3、对同一设备断开后再次连接(连接失败重连),哪怕调用完close,需要等待一段时间(400毫秒试了1次,结果不 行;1000毫秒则再没出现过问题)后再去connectGatt
- 4、可以在连接前都startLeScan一下,成功率要高一点
2、单次写的数据大小有20字节限制,如何发送长数据?
BLE单次写的数据量大小是有限制的,通常是20字节,可以尝试通过requestMTU增大,但不保证能成功。分包写是一种解决方案,需要定义分包协议,假设每个包大小20字节,分两种包,数据包和非数据包。对于数据包,头两个字节表示包的序号,剩下的都填充数据。对于非数据包,主要是发送一些控制信息。
总体流程如下:
- (1)、定义通讯协议,如下(这里只是个举例,可以根据项目需求扩展)
| 消息号(1个字节) | 功能(1个字节) | 子功能(1个字节) | 数据长度(2个字节) | 数据内容(N个字节) | CRC校验(1个字节) |
|---|---|---|---|---|---|
| 01 | 01 | 01 | 0000 | – | 2D |
消息号(1个字节) 功能(1个字节) 子功能(1个字节) 数据长度(2个字节) 数据内容(N个字节) CRC校验(1个字节)
01 01 01 0000 – 2D
- (2)、封装通用发送数据接口(拆包)
该接口根据会发送数据内容按最大字节数拆分(一般20字节)放入队列,拆分完后,依次从队列里取出发送 - (3)、封装通用接收数据接口(组包)
该接口根据从接收的数据按协议里的定义解析数据长度判读是否完整包,不是的话把每条消息累加起来 - (4)、解析完整的数据包,进行业务逻辑处理
- (5)、协议还可以引入加密解密,需要注意的选算法参数的时候,加密后的长度最好跟原数据长度一致,这样不会影响拆包组包
3、在Android不同版本或不同的手机扫描不到蓝牙设备
一般都是Android版本适配以及不同ROM机型(小米/红米、华为/荣耀等)(EMUI、MIUI、ColorOS等)的权限问题
4、读写问题
蓝牙的写入操作, 读取操作必须序列化进行. 写入数据和读取数据是不能同时进行的, 如果调用了写入数据的方法,
马上调用又调用写入数据或者读取数据的方法,第二次调用的方法会立即返回 false, 代表当前无法进行操作;
5、一个完整的数据包分析
AAAB5D65501E08040004001B130053D550F6
- AA – 前导帧(preamble)
- 0x50655DAB – 访问地址(access address)
- 1E – LL帧头字段(LL header)
- 08 – 有效数据包长度(payload length)
- 04000400 – ATT数据长度,以及L2CAP通道编号
- 1B – notify command
- 0x0013 – 电量数据handle
- 0x53 – 真正要发送的电量数据
- 0xF650D5 – CRC24值
参考文档:
蓝牙技术联盟:
https://www.bluetooth.com/zh-cn/learn-about-bluetooth/tech-overview/
BLE技术详解:
http://doc.iotxx.com/BLE技术揭秘
Android蓝牙BLE开发指南:
https://developer.android.com/guide/topics/connectivity/bluetooth/ble-overview
BLE蓝牙开源库:
https://github.com/Jasonchenlijian/FastBle
https://github.com/dingjikerbo/Android-BluetoothKit
https://github.com/aicareles/Android-BLE
https://github.com/NordicSemiconductor/Android-BLE-Library
https://github.com/xiaoyaoyou1212/BLE


