《动手学深度学习 Pytorch版》 7.3 网络中的网络(NiN)
LeNet、AlexNet和VGG的设计模式都是先用卷积层与汇聚层提取特征,然后用全连接层对特征进行处理。
AlexNet和VGG对LeNet的改进主要在于扩大和加深这两个模块。网络中的网络(NiN)则是在每个像素的通道上分别使用多层感知机。
import torch
from torch import nn
from d2l import torch as d2l
7.3.1 NiN
NiN的想法是在每个像素位置应用一个全连接层。 如果我们将权重连接到每个空间位置,我们可以将其视为 1 × 1 1\times 1 1×1 卷积层,即是作为在每个像素位置上独立作用的全连接层。 从另一个角度看,是将空间维度中的每个像素视为单个样本,将通道维度视为不同特征(feature)。
NiN块以一个普通卷积层开始,后面是两个 1 × 1 1\times 1 1×1 的卷积层。这两个卷积层充当带有ReLU激活函数的逐像素全连接层。
def nin_block(in_channels, out_channels, kernel_size, strides, padding):
    return nn.Sequential(
        nn.Conv2d(in_channels, out_channels, kernel_size, strides, padding),
        nn.ReLU(),
        nn.Conv2d(out_channels, out_channels, kernel_size=1), nn.ReLU(),
        nn.Conv2d(out_channels, out_channels, kernel_size=1), nn.ReLU())
7.3.2 NiN 模型
最初的 NiN 网络是在 AlexNet 后不久提出的,显然 NiN 网络是从 AlexNet 中得到了一些启示的。 NiN 使用窗口形状为 11 × 11 11\times 11 11×11 、 5 × 5 5\times 5 5×5 和 3 × 3 3\times 3 3×3 的卷积层,输出通道数量与 AlexNet 中的相同。每个NiN块后有一个最大汇聚层,汇聚窗口形状为 3 × 3 3\times 3 3×3 ,步幅为 2。
NiN 和 AlexNet 之间的显著区别是 NiN 使用一个 NiN 块取代了全连接层。其输出通道数等于标签类别的数量。最后放一个全局平均汇聚层,生成一个对数几率。
NiN 设计的一个优点是显著减少了模型所需参数的数量。然而,在实践中,这种设计有时会增加训练模型的时间。
net = nn.Sequential(
    nin_block(1, 96, kernel_size=11, strides=4, padding=0),
    nn.MaxPool2d(3, stride=2),
    nin_block(96, 256, kernel_size=5, strides=1, padding=2),
    nn.MaxPool2d(3, stride=2),
    nin_block(256, 384, kernel_size=3, strides=1, padding=1),
    nn.MaxPool2d(3, stride=2),
    nn.Dropout(0.5),
    # 标签类别数是10
    nin_block(384, 10, kernel_size=3, strides=1, padding=1),
    nn.AdaptiveAvgPool2d((1, 1)),
    # 将四维的输出转成二维的输出,其形状为(批量大小,10)
    nn.Flatten())
X = torch.rand(size=(1, 1, 224, 224))
for layer in net:
    X = layer(X)
    print(layer.__class__.__name__,'output shape:\t', X.shape)
Sequential output shape:	 torch.Size([1, 96, 54, 54])
MaxPool2d output shape:	 torch.Size([1, 96, 26, 26])
Sequential output shape:	 torch.Size([1, 256, 26, 26])
MaxPool2d output shape:	 torch.Size([1, 256, 12, 12])
Sequential output shape:	 torch.Size([1, 384, 12, 12])
MaxPool2d output shape:	 torch.Size([1, 384, 5, 5])
Dropout output shape:	 torch.Size([1, 384, 5, 5])
Sequential output shape:	 torch.Size([1, 10, 5, 5])
AdaptiveAvgPool2d output shape:	 torch.Size([1, 10, 1, 1])
Flatten output shape:	 torch.Size([1, 10])
7.3.3 训练模型
lr, num_epochs, batch_size = 0.1, 10, 128
train_iter, test_iter = d2l.load_data_fashion_mnist(batch_size, resize=224)
d2l.train_ch6(net, train_iter, test_iter, num_epochs, lr, d2l.try_gpu())  # 大约需要二十五分钟,慎跑
loss 0.600, train acc 0.769, test acc 0.775
447.9 examples/sec on cuda:0
练习
(1)调整 NiN 的超参数,以提高分类准确性。
net2 = nn.Sequential(
    nin_block(1, 96, kernel_size=11, strides=4, padding=0),
    nn.MaxPool2d(3, stride=2),
    nin_block(96, 256, kernel_size=5, strides=1, padding=2),
    nn.MaxPool2d(3, stride=2),
    nin_block(256, 384, kernel_size=3, strides=1, padding=1),
    nn.MaxPool2d(3, stride=2),
    nn.Dropout(0.5),
    nin_block(384, 10, kernel_size=3, strides=1, padding=1),
    nn.AdaptiveAvgPool2d((1, 1)),
    nn.Flatten())

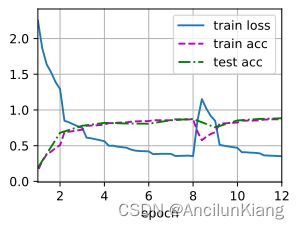
lr, num_epochs, batch_size = 0.15, 12, 128
train_iter, test_iter = d2l.load_data_fashion_mnist(batch_size, resize=224)
d2l.train_ch6(net2, train_iter, test_iter, num_epochs, lr, d2l.try_gpu())  # 大约需要三十分钟,慎跑
loss 0.353, train acc 0.871, test acc 0.884
449.5 examples/sec on cuda:0
学习率调大一点点之后精度更高了,但是波动变的分外严重。
(2)为什么 NiN 块中有两个 1 × 1 1\times 1 1×1 的卷积层?删除其中一个,然后观察和分析实验现象。
def nin_block2(in_channels, out_channels, kernel_size, strides, padding):
    return nn.Sequential(
        nn.Conv2d(in_channels, out_channels, kernel_size, strides, padding),
        nn.ReLU(),
        nn.Conv2d(out_channels, out_channels, kernel_size=1), nn.ReLU())

net3 = nn.Sequential(
    nin_block2(1, 96, kernel_size=11, strides=4, padding=0),
    nn.MaxPool2d(3, stride=2),
    nin_block2(96, 256, kernel_size=5, strides=1, padding=2),
    nn.MaxPool2d(3, stride=2),
    nin_block2(256, 384, kernel_size=3, strides=1, padding=1),
    nn.MaxPool2d(3, stride=2),
    nn.Dropout(0.5),
    # 标签类别数是10
    nin_block2(384, 10, kernel_size=3, strides=1, padding=1),
    nn.AdaptiveAvgPool2d((1, 1)),
    # 将四维的输出转成二维的输出,其形状为(批量大小,10)
    nn.Flatten())

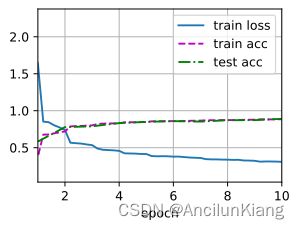
lr, num_epochs, batch_size = 0.15, 10, 128
train_iter, test_iter = d2l.load_data_fashion_mnist(batch_size, resize=224)
d2l.train_ch6(net3, train_iter, test_iter, num_epochs, lr, d2l.try_gpu())  # 大约需要二十分钟,慎跑
loss 0.309, train acc 0.884, test acc 0.890
607.5 examples/sec on cuda:0
有时候会更好,有时候会不收敛。
(3)计算 NiN 的资源使用情况。
a. 参数的数量是多少?

b. 计算量是多少?

c. 训练期间需要多少显存?

d. 预测期间需要多少显存?
a. 参数数量:
[ 11 × 11 + 2 ] + [ 5 × 5 + 2 ] + [ 3 × 3 + 2 ] + [ 3 × 3 + 2 ] = 123 + 27 + 11 + 11 = 172 \begin{align} &[11\times 11 + 2] + [5\times 5 + 2] + [3\times 3 + 2] + [3\times 3 + 2]\\ =& 123+27+11+11\\ =& 172 \end{align} ==[11×11+2]+[5×5+2]+[3×3+2]+[3×3+2]123+27+11+11172
b. 计算量:
{ [ ( 224 − 11 + 4 ) / 4 ] 2 × 1 1 2 × 96 + 22 4 2 × 2 } + [ ( 26 − 5 + 2 + 1 ) 2 × 5 2 × 96 × 256 + 2 6 2 × 2 ] + [ ( 12 − 3 + 1 + 1 ) 2 × 3 2 × 256 × 384 + 1 2 2 × 2 ] + [ ( 5 − 3 + 1 + 1 ) 2 × 3 2 × 384 × 10 + 5 2 × 2 ] = 34286966 + 353895752 + 107053344 + 553010 = 495789072 \begin{align} &\{[(224-11+4)/4]^2\times 11^2\times 96 + 224^2\times 2\} + [(26-5+2+1)^2\times 5^2\times 96\times 256 + 26^2\times 2] + \\ &[(12-3+1+1)^2\times 3^2\times 256\times 384 + 12^2\times 2]+[(5-3+1+1)^2\times 3^2\times 384\times 10 + 5^2\times 2]\\ =&34286966+353895752+107053344+553010\\ =&495789072 \end{align} =={[(224−11+4)/4]2×112×96+2242×2}+[(26−5+2+1)2×52×96×256+262×2]+[(12−3+1+1)2×32×256×384+122×2]+[(5−3+1+1)2×32×384×10+52×2]34286966+353895752+107053344+553010495789072
(4)一次性直接将 384 × 5 × 5 384\times 5\times 5 384×5×5 的表示压缩为 10 × 5 × 5 10\times 5\times 5 10×5×5 的表示,会存在哪些问题?
压缩太快可能导致特征损失过多。


