eBPF深度探索: 高效DNS监控实现
eBPF可以灵活扩展Linux内核机制,本文通过实现一个DNS监控工具为例,介绍了怎样开发实际的eBPF应用。原文: A Deep Dive into eBPF: Writing an Efficient DNS Monitoring
eBPF[1]是内核内置的虚拟机,在Linux内核内部提供了高层库、指令集以及执行环境,被用于诸多Linux内核子系统,特别是网络、跟踪、调试和安全领域。其功能即支持改变内核对数据包的处理,也允许对网络设备(如智能网卡)进行编程。
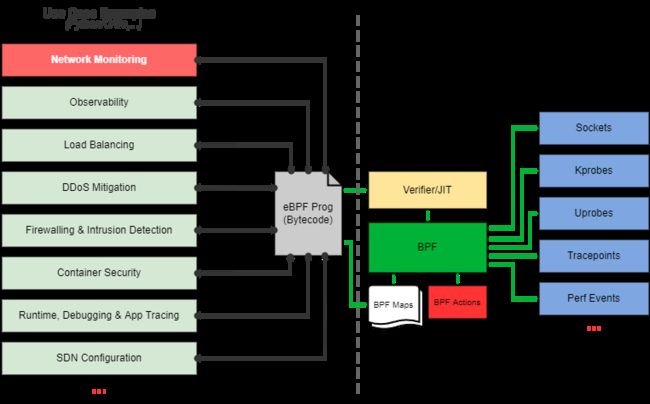 eBPF实现的用例。
已经有大量各种语言的关于eBPF的介绍文章[2],所以本文不会过多涉及eBPF的细节。尽管许多文章都提供了相当多的信息,但都没有回答最重要的问题: eBPF是如何处理数据包并监视从主机发送给用户的数据包的?本文将从头开始创建一个实际的应用程序,逐步丰富其功能,特别是监控DNS请求、响应及其过程,并提供所有这些过程的解释、评论以及源代码链接。因为想多举几个例子,而不仅仅只是单一问题的解决方案,因此有时候我们会稍微有点偏题。最终希望那些想要熟悉eBPF的人可以花更少的时间研究有用的材料,并更快的开始编程。
简介
假设主机可以发送合法的DNS请求,但发送这些请求的IP地址是未知的。在网络过滤器日志中,可以看到不断受到请求,但不清楚这是合法请求,还是信息已经泄露给了攻击者?如果发送数据的服务器所在的域是已知的,那就容易了。不幸的是,PTR已经过时,SecurityTrails显示这个IP要么什么都没有,要么有太多乱七八糟的东西。
我们可以执行*tcpdump*[3]命令,但是谁愿意一直盯着显示器呢?如果有多个服务器又怎么办呢?ELK技术栈里有*packetbeat*[4],这是一个可以吃掉服务器上所有处理器处理能力的怪物。*Osquery*[5]也是一个很好的工具,它非常了解网络连接,但不了解DNS查询,相关支持已经不再提供了。*Zeek*[6]是一个我在寻找如何跟踪DNS查询时了解到的工具,看起来还不错,但有两点让人感到困惑: 它不仅仅监视DNS,这意味着资源还将花在我不需要的工作上(也许尽管可以在设置中选择协议),它也不知道是哪个进程发送了请求。
我们将用Python并从最简单的部分开始编写代码,从而理解Python是如何与eBPF交互的。首先安装这些包:
#apt install python3-bpfcc bpfcc-tools libbpfcc linux-headers-$(uname -r)
这是在Ubuntu下的命令,但是如果想要深入内核,为其他发行版找到必要的包应该也不是问题。现在让我们开始吧:
#!/usr/bin/env python3
from bcc import BPF
FIRST_BPF = r"""
int first(void *ctx) {
  bpf_trace_printk("Hello world! execve() is calling\n");
  return 0;
}
"""
bpf = BPF(text=FIRST_BPF)
bpf.attach_kprobe(event=bpf.get_syscall_fnname("execve"), fn_name="first")
while True:
    try:
        (_, _, _, _, _, event_b) = bpf.trace_fields()
        events = event_b.decode('utf8')
        if 'Hello world' in events:
            print(events)
    except ValueError:
        continue
    except KeyboardInterrupt:
        break
注意: 在Ubuntu 20.04 LTS和18.04 LTS中,默认情况下允许无特权用户加载eBPF程序,但在最近的Ubuntu版本(21.10和22.04 LTS)中,出于安全考虑,默认禁用了这一功能。通过以下命令可以重启此能力:
$ sudo sysctl kernel.unprivileged_bpf_disabled=0
与所有hello-world示例一样,它没有做任何有用的事情,只是向我们介绍了基础知识。当主机上的任何程序调用execve()系统调用时,first()函数就会被执行。可以在另一个控制台上运行命令ls|cat|grep|clear或任何包含execve()的命令来触发,然后执行我们的代码。也可以在内核中发生的各种事件时调用eBPF程序,attach_kprobe()表示在调用特定内核函数时触发。但我们更习惯于处理系统调用,谁会知道对应函数的名字呢?因此,助手函数get_syscall_fnname()可以帮助我们将系统调用名转换为内核函数名。
eBPF中最简单的输出选项是函数bpf_trace_printk(),但这只是用于调试的输出。传递给这个函数的所有东西都可以通过 /sys/kernel/debug/tracing/trace_pipe 文件获得。为了避免在另一个控制台中读取这个文件,我们使用函数trace_fields(),它可以读取这个文件,并在程序中为我们提供其内容。
代码的其余部分比较明确,在一个能够被Ctrl-C中断的无限循环中,读取调试输出,如果出现"Hello world"字符串,就将其完整输出。
注意:
bpf_trace_printk()可以实现类似printf()的格式化文本,但有重要限制: 不能超过3个参数,并且只有一个参数是%s。
现在我们已经大致了解了如何使用eBPF,接下来我们开始构建一个实际的应用程序,监视所有DNS请求和响应,并记录谁问了什么以及收到了什么响应。
开始
我们从eBPF开始,处理数据包最简单的方法是将它们附加到网络套接字上。在本例中,每个包都将触发我们的程序。稍后我们将详细说明这是如何完成的,但现在我们需要在所有数据包中捕获端口为53的UDP包。要做到这一点,必须自己拆解包结构,并在C中分离所有嵌套的协议。cursor_advance宏可以在包的范围内移动光标(指针),返回其当前位置并移动到指定位置,从而帮助我们做到这一点:
#include
#include
#include
int dns_matching(struct __sk_buff *skb) {
 u8 *cursor = 0;
// Checking the IP protocol::
 struct ethernet_t *ethernet = cursor_advance(cursor, sizeof(*ethernet));
if (ethernet->type == ETH_P_IP) {
 …
proto.h文件中描述的结构ethernet_t:
struct ethernet_t {
  unsigned long long  dst:48;
  unsigned long long  src:48;
  unsigned int        type:16;
} BPF_PACKET_HEADER;
以太帧格式本身非常简单,包含6个字节(48位)的目地地址,相同大小的源地址,然后是两个字节(16位)的负载类型。
负载类型由一个等于0x0800的常量ETH_P_IP编码,定义在文件```if_ether.h```[7]中,确保下一层协议是IP(该代码以及其他可能的值都由IEEE[8]描述)。
我们继续检查IP内部是否是端口为53的UDP:
// Checking the UDP protocol:
struct ip_t *ip = cursor_advance(cursor, sizeof(*ip));
if (ip->nextp == IPPROTO_UDP) {
    // Checking port 53:
    struct udp_t *udp = cursor_advance(cursor, sizeof(*udp));
    if (udp->dport == 53) {
        // Request
        return -1;
    }
    if (udp->sport == 53) {
        // Respose
        return -1;
    }
}
ip_t和udp_t仍然定义在proto.h中,但IPPROTO_UDP来自于```in.h```[9]。一般来说,这个例子并不完全正确。IP结构已经有点复杂了,它有可选字段,因此头部长度有可能不一样。正确做法是首先从头部获取其长度值,然后执行偏移,但我们才刚刚开始,不需要搞得太复杂。
这就很简单的找到了DNS包,接下来需要分析它的结构。为了简单起见,我们把包传递给用户空间(为此返回-1,而返回码0意味着不需要复制包)。
回到Python,我们首先仍然将程序附加到套接字上:
#!/usr/bin/env python3
import dnslib
import sys
from bcc import BPF
...
bpf = BPF(text=BPF_PROGRAM)
function_dns_matching = bpf.load_func("dns_matching", BPF.SOCKET_FILTER)
BPF.attach_raw_socket(function_dns_matching, '')
与上一个例子不同,现在程序不是在调用任何函数时被调用,而是被每个包调用。attach_raw_socket中的空参数意味着"所有网络接口",如果我们需要监控特定网络接口,那么就填入对应的名字。
将socket设置为阻塞模式:
import fcntl
import os
socket_fd = function_dns_matching.sock
fl = fcntl.fcntl(socket_fd, fcntl.F_GETFL)
fcntl.fcntl(socket_fd, fcntl.F_SETFL, fl & ~os.O_NONBLOCK)
剩下的就很简单了,使用类似的无限循环,从套接字读取数据,去掉所有头域,直接获得DNS包并解码。
完整代码如下:
#!/usr/bin/env python3

import dnslib
import fcntl
import os
import sys

from bcc import BPF

BPF_APP = r'''
#include
#include
#include
int dns_matching(struct __sk_buff *skb) {
    u8 *cursor = 0;
     // Checking the IP protocol:
    struct ethernet_t *ethernet = cursor_advance(cursor, sizeof(*ethernet));
    if (ethernet->type == ETH_P_IP) {
         // Checking the UDP protocol:
        struct ip_t *ip = cursor_advance(cursor, sizeof(*ip));
        if (ip->nextp == IPPROTO_UDP) {
             // Check the port 53:
            struct udp_t *udp = cursor_advance(cursor, sizeof(*udp));
            if (udp->dport == 53 || udp->sport == 53) {
                return -1;
            }
        }
    }
    return 0;
}
'''


bpf = BPF(text=BPF_APP)
function_dns_matching = bpf.load_func("dns_matching", BPF.SOCKET_FILTER)
BPF.attach_raw_socket(function_dns_matching, '')

socket_fd = function_dns_matching.sock
fl = fcntl.fcntl(socket_fd, fcntl.F_GETFL)
fcntl.fcntl(socket_fd, fcntl.F_SETFL, fl & ~os.O_NONBLOCK)

while True:
    try:
        packet_str = os.read(socket_fd, 2048)
    except KeyboardInterrupt:
        sys.exit(0)

    packet_bytearray = bytearray(packet_str)

    ETH_HLEN = 14
    UDP_HLEN = 8

    # IP header length
    ip_header_length = packet_bytearray[ETH_HLEN]
    ip_header_length = ip_header_length & 0x0F
    ip_header_length = ip_header_length << 2

    # Starting the DNS packet
    payload_offset = ETH_HLEN + ip_header_length + UDP_HLEN

    payload = packet_bytearray[payload_offset:]

    dnsrec = dnslib.DNSRecord.parse(payload)

    # If it’s the response:
    if dnsrec.rr:
        print(f'Resp: {dnsrec.rr[0].rname} {dnslib.QTYPE.get(dnsrec.rr[0].rtype)} {", ".join([repr(dnsrec.rr[i].rdata) for i in range(0, len(dnsrec.rr))])}')
    # If it’s the request:
    else:
        print(f'Request: {dnsrec.questions[0].qname} {dnslib.QTYPE.get(dnsrec.questions[0].qtype)}')
该示例展示了哪些DNS请求/响应会通过我们的网络接口,但通过这种方式,我们还是不知道是什么进程在处理。也就是说,只有有限的信息,由于缺乏信息,我没有选择Zeek。
从数据包到进程
要获取关于eBPF中的进程信息,可以使用以下函数: bpf_get_current_pid_tgid()、bpf_get_current_uid_gid()、bpf_get_current_comm(char *buf, int size_of_buf)。当程序被绑定到对某个内核函数调用时(如第一个示例所示),就可以使用它们。UID/GID应该比较明确,但对于那些以前没有接触过内核操作细节的人来说,还是需要解释一下。在内核中被视为PID的东西在用户空间中显示为进程的thread ID。内核认为用户空间中的thread group ID是PID。类似的,bpf_get_current_comm()返回的不是通常的进程名(可以通过ps命令查看),而是线程名。
好吧,我们总归会拿到进程数据,那怎么将数据传递到用户空间?Table就是用于此目的,通过BPF_PERF_OUTPUT(event)创建,通过方法event.perf_submit(ctx, data, data_size)传递,并通过b.perf_buffer_poll()轮询接收。在此之后,只要数据可用,就会调用callback()函数,即b["event"].open_perf_buffer(callback)。
下面将详细介绍这一机制,但现在,我们继续从理论上进行分析。我们既可以传输数据,也可以传输数据包本身。但要做到这一点,必须为传输的数据选择一个特定长度的变量。怎么选?直接回答是512字节,但并不正确。这一长度并没有考虑EDNS,而且我们还想正确跟踪基于TCP的DNS报文。因此我们不得不分配大量的预留空间,而更大的包将会被丢弃,大多数情况下,我们将分配比所需更多的内存。我不喜欢这种方法,幸运的是,还有另一个方法: perf_submit_skb()。除了数据外,它还从缓冲区传输指定字节的数据包。但需要注意,该方法仅适用于网络程序eBPF: 套接字,XDP。也就是说,我们无法获得有关进程的信息。
幸运的是,可以使用多个eBPF程序并互相交换数据!这也可以通过Table来实现。声明如下:
BPF_TABLE_PUBLIC("hash", key, val, name, max_elements);
这是为了使其对其他eBPF程序可用。在另一个程序中,通过如下代码访问:
BPF_TABLE("extern", key, val, name, max_elements);
因此,即使5元组(协议、源地址、源端口、目的地址和目的端口)都一样,也不会丢失数据包,键将是以下结构:
struct port_key {
     u8 proto;
     u32 saddr;
     u32 daddr;
     u16 sport;
     u16 dport;
 };
值是我们想知道的关于这个进程的所有信息:
struct port_val {
     u32 ifindex;
     u32 pid;
     u32 tgid;
     u32 uid;
     u32 gid;
     char comm[64];
 };
ifindex是网络设备,我们将在套接字上运行的另一个程序中填充这个值。在这里,我们用它来将整个结构转移到未来的用户空间。
总结: 当调用内核函数发送数据包时,存储涉及到的进程信息。当数据包出现在网络接口上时(不管是传出的还是传入),检查是否在目的地之间通过这样或那样的协议传输包的任何信息。如果有,就将其与包一起传递给Python,在那里完成其余工作。
好了,我们已经讨论程序的基本逻辑,接下来开始编程吧!
我的名字是进程
我们从获取相关进程的信息开始。```udp_sendmsg()```[10]和```tcp_sendmsg()```[11]函数用于发送数据包,两者都将```sock```[12]结构作为第一个参数。在eBPF中有两种方法可以访问所研究函数的实参: 将其指定为函数的形参,或者使用宏PT_REGS_PARMx,其中x是实参号。下面将展示这两个选项,这是第一个程序,C_BPF_KPROBE:
// The structure that will be used as the key for
// eBPF table 'proc_ports':
struct port_key {
    u8 proto;
    u32 saddr;
    u32 daddr;
    u16 sport;
    u16 dport;
};
// The structure that will be stored in the eBPF table 'proc_ports'
// contains information about the process:
struct port_val {
    u32 ifindex;
    u32 pid;
    u32 tgid;
    u32 uid;
    u32 gid;
    char comm[64];
};
// Public (accessible from other eBPF programs) eBPF table in which
// information about the process is written.
// It's read when a packet appears on the socket:
BPF_TABLE_PUBLIC("hash", struct port_key, struct port_val, proc_ports, 20480);
// These are two ways to get access to the function arguments:
//int trace_udp_sendmsg(struct pt_regs *ctx) {
// struct sock *sk = (struct sock *)PT_REGS_PARM1(ctx);
int trace_udp_sendmsg(struct pt_regs *ctx, struct sock *sk) {
    u16 sport = sk->sk_num;
    u16 dport = sk->sk_dport;

    // Processing packets only on port 53.
    // 13568 = ntohs(53);
    if (sport == 13568 || dport == 13568) {
        // Preparing the data:
        u32 saddr = sk->sk_rcv_saddr;
        u32 daddr = sk->sk_daddr;
        u64 pid_tgid = bpf_get_current_pid_tgid();
        u64 uid_gid = bpf_get_current_uid_gid();
        // Forming the key structure.
        // These strange transformations will be explained below.
        struct port_key key = {.proto = 17};
        key.saddr = htonl(saddr);
        key.daddr = htonl(daddr);
        key.sport = sport;
        key.dport = htons(dport);
        // Forming a structure with the process properties:
        struct port_val val = {};
        val.pid = pid_tgid >> 32;
        val.tgid = (u32)pid_tgid;
        val.uid = (u32)uid_gid;
        val.gid = uid_gid >> 32;
        bpf_get_current_comm(val.comm, 64);
        //Writing the value into the eBPF table:
        proc_ports.update(&key, &val);
    }
    return 0;
}
使用tcp_sendmsg也完全一样,唯一的区别是,在结构port_key中,字段proto将等于6,这两个值(17和6)分别是UDP和TCP的协议号,可以在/etc/protocols文件中查看这些值。
两个bpf_get_current_*函数都返回64比特,因此我们分别获取高低32比特来提取数据。此外,对于PID/TGID,我们可以立即以常见的形式获取(例如,对于PID,写入字段的高32位,其中包含内核认为是TGID的内容)。
我们接下来看看关键数据结构的转换。在下一节中,我们将在程序中创建一个类似的结构。但我们不是从原子结构sock中获取数据,而是从eBPF的```__sk_buff```[13]中,数据的存储形式为:
__u32 remote_ip4; /* Stored in network byte order */
__u32 local_ip4; /* Stored in network byte order */
__u32 remote_port; /* Stored in network byte order */
__u32 local_port; /* stored in host byte order */
提取到用户空间
我们的第二个程序BPF_SOCK_TEXT将"挂起(hang)"在套接字上,为每个包检查对应进程的信息,并将其和包本身一起传输到用户空间:
// The structure that will be used as the key for
// eBPF table 'proc_ports':
struct port_key {
    u8 proto;
    u32 saddr;
    u32 daddr;
    u16 sport;
    u16 dport;
};
// The structure that will be stored in the eBPF table 'proc_ports',
// Contains information about the process:
struct port_val {
    u32 ifindex;
    u32 pid;
    u32 tgid;
    u32 uid;
    u32 gid;
    char comm[64];
};
// eBPF table from which information about the process is extracted.
// Filled when calling kernel functions udp_sendmsg()/tcp_sendmsg():
BPF_TABLE("extern", struct port_key, struct port_val, proc_ports, 20480);
// Table for transferring data to the user space:
BPF_PERF_OUTPUT(dns_events);
// Look for DNS packets among the data passing through the socket and
// check if there is any information about the process:
int dns_matching(struct __sk_buff *skb) {
    u8 *cursor = 0;
// Checking the IP protocol:
struct ethernet_t *ethernet = cursor_advance(cursor, sizeof(*ethernet));
     if (ethernet->type == ETH_P_IP) {
        struct ip_t *ip = cursor_advance(cursor, sizeof(*ip));
        u8 proto;
        u16 sport;
        u16 dport;
        // Checking the transport layer protocol:
        if (ip->nextp == IPPROTO_UDP) {
            struct udp_t *udp = cursor_advance(cursor, sizeof(*udp));
            proto = 17;
            // Getting the data about the ports:
            sport = udp->sport;
            dport = udp->dport;
        } else if (ip->nextp == IPPROTO_TCP) {
            struct tcp_t *tcp = cursor_advance(cursor, sizeof(*tcp));
            // We don't need packets where no data is transmitted:
            if (!tcp->flag_psh) {
                return 0;
            }
            proto = 6;
            // Getting the data about the ports:
            sport = tcp->src_port;
            dport = tcp->dst_port;
        } else {
            return 0;
        }
        // If it's a DNS query:
        if (dport == 53 || sport == 53) {
            // Form a key structure:
            struct port_key key = {};
            key.proto = proto;
            if (skb->ingress_ifindex == 0) {
                key.saddr = ip->src;
                key.daddr = ip->dst;
                key.sport = sport;
                key.dport = dport;
            } else {
                key.saddr = ip->dst;
                key.daddr = ip->src;
                key.sport = dport;
                key.dport = sport;
            }
            // By the key, look for a value in the eBPF table:
            struct port_val *p_val;
            p_val = proc_ports.lookup(&key);
            // If no value is found, then we have no information about the
            // process and there is no point in continuing:
            if (!p_val) {
                return 0;
            }
            // Network device index:
            p_val->ifindex = skb->ifindex;
            // Transmit the structure with the process information along with
            // skb->len bytes sent to the socket:
            dns_events.perf_submit_skb(skb, skb->len, p_val,
                                       sizeof(struct port_val));
            return 0;
        } //dport == 53 || sport == 53
    } //ethernet->type == ETH_P_IP
return 0;
}
该程序的启动方式与第一个示例相同。我们在数据包中移动指针,从不同级别的协议中收集信息。当前仍然不考虑IP头的实际长度,但还是添加了一些新的东西,对于TCP包,我们将检查其标志,过滤掉不携带数据的包(SYN、ACK等)。
但我们必须恢复键,从而从proc_ports表中获取数据。同时,必须区分流量的方向,毕竟,当我们在表中输入数据时,意味着我们是源。但是对于传入的数据包,源将是远程服务器。为了理解数据包的移动方向,我将ingress_ifindex标识为0用于标识输出流量。
提供服务
我们需要通过Python做三件事: 将程序加载到内核中,从内核中获取数据,并对其进行处理。
前两个任务很简单。此外,我们已经在第一个例子中考虑了使用eBPF的两种方法:
# BPF initialization:
bpf_kprobe = BPF(text=C_BPF_KPROBE)
bpf_sock = BPF(text=BPF_SOCK_TEXT)
# Send UDP:
bpf_kprobe.attach_kprobe(event="udp_sendmsg", fn_name="trace_udp_sendmsg")
# Send TCP:
bpf_kprobe.attach_kprobe(event="tcp_sendmsg", fn_name="trace_tcp_sendmsg")
# Socket:
function_dns_matching = bpf_sock.load_func("dns_matching", BPF.SOCKET_FILTER)
BPF.attach_raw_socket(function_dns_matching, '')
获取数据的代码甚至更短:
bpf_sock["dns_events"].open_perf_buffer(print_dns)
while True:
    try:
        bpf_sock.perf_buffer_poll()
    except KeyboardInterrupt:
        exit()
但数据处理将更加繁琐。尽管有现成模块,我们还是决定自己解析协议头。首先,我想自己弄清楚这是如何发生的(最后,尽管在当前情况下正确处理IP包头的长度没有意义,因为头域有额外选项的包将在eBPF中被丢弃),其次是减少对模块的依赖。然而,对于直接解析DNS,我仍然(到目前为止)使用现成模块,DNS结构比IP/TCP稍微复杂一些,需要另一个模块(ctypes)来处理C数据类型。
def print_dns(cpu, data, size):
    import ctypes as ct
    class SkbEvent(ct.Structure):
        _fields_ = [
            ("ifindex", ct.c_uint32),
            ("pid", ct.c_uint32),
            ("tgid", ct.c_uint32),
            ("uid", ct.c_uint32),
            ("gid", ct.c_uint32),
            ("comm", ct.c_char * 64),
            ("raw", ct.c_ubyte * (size - ct.sizeof(ct.c_uint32 * 5) - ct.sizeof(ct.c_char * 64)))
        ]
    # We get our 'port_val' structure and also the packet itself in the 'raw' field:
    sk = ct.cast(data, ct.POINTER(SkbEvent)).contents
    # Protocols:
    NET_PROTO = {6: "TCP", 17: "UDP"}
    # eBPF operates on thread names.
    # Sometimes they coincide with process names, but often not.
    # So we try to get the process name by its PID:
    try:
        with open(f'/proc/{sk.pid}/comm', 'r') as proc_comm:
            proc_name = proc_comm.read().rstrip()
    except:
        proc_name = sk.comm.decode()
    # Get the name of the network interface by index:
    ifname = if_indextoname(sk.ifindex)
    # The length of the Ethernet frame header is 14 bytes:
    ip_packet = bytes(sk.raw[14:])
    # The length of the IP packet header is not fixed due to the arbitrary
    # number of parameters.
    # Of all the possible IP header we are only interested in 20 bytes:
    (length, _, _, _, _, proto, _, saddr, daddr) = unpack('!BBHLBBHLL', ip_packet[:20])
    # The direct length is written in the second half of the first byte (0b00001111 = 15):
    # len_iph = length & 15
    # Length is written in 32-bit words, convert it to bytes:
    # len_iph = len_iph * 4
    # Convert addresses from numbers into IPs, assembling it into octets:
    saddr = ".".join(map(str, [saddr >> 24 & 0xff, saddr >> 16 & 0xff, saddr >> 8 & 0xff, saddr & 0xff]))
    daddr = ".".join(map(map(str, [daddr >> 24 & 0xff, daddr >> 16 & 0xff, daddr >> 8 & 0xff, daddr & 0xff]))
    # If the transport layer protocol is UDP:
    if proto == 17:
        udp_packet = ip_packet[len_iph:]
        (sport, dport) = unpack('!HH', udp_packet[:4])
        # UDP datagram header length is 8 bytes:
        dns_packet = udp_packet[8:]
    # If the transport layer protocol is TCP:
    elif proto == 6:
        tcp_packet = ip_packet[len_iph:]
        # TCP packet header length is also not fixed due to the optional
        # options. Of the entire TCP header, we are only interested in the data up to the 13th
        # byte (header length):
        (sport, dport, _, length) = unpack('!HHQB', tcp_packet[:13])
        # The direct length is written in the first half (4 bits):
        len_tcph = length >> 4
        # Length is written in 32-bit words, converted to bytes:
        len_tcph = len_tcph * 4
        # That's the tricky part.
        # I don't know where I went wrong or why I need a 2 byte offset,
        # but it's necessary because the DNS packet doesn't start until after it:
        dns_packet = tcp_packet[len_tcph + 2:]
    # other protocols are not handled:
    else:
        return
    # DNS data decoding:
    dns_data = dnslib.DNSRecord.parse(dns_packet)
    # Resource record types:
    DNS_QTYPE = {1: "A", 28: "AAAA"}
    # Query:
    If dns_data.header.qr == 0:
        # We are only interested in A (1) and AAAA (28) records:
        for q in dns_data.questions:
            If q.qtype == 1 or q.qtype == 28:
                print(f'COMM={proc_name} PID={sk.pid} TGID={sk.tgid} DEV={ifname} PROTO={NET_PROTO[proto]} SRC={saddr} DST={daddr} SPT={sport} DPT={dport} UID={sk.uid} GID={sk.gid} DNS_QR=0 DNS_NAME={q.qname} DNS_TYPE={DNS_QTYPE[q.qtype]}')
    # Response:
    elif dns_data.header.qr == 1:
        # We are only interested in A (1) and AAAA (28) records:
        For rr in dns_data.rr:
            If rr.rtype == 1 or rr.rtype == 28:
                print(f'COMM={proc_name} PID={sk.pid} TGID={sk.tgid} DEV={ifname} PROTO={NET_PROTO[proto]} SRC={saddr} DST={daddr} SPT={sport} DPT={dport} UID={sk.uid} GID={sk.gid} DNS_QR=1 DNS_NAME={rr.rname} DNS_TYPE={DNS_QTYPE[rr.rtype]} DNS_DATA={rr.rdata}')
    else:
        print('Invalid DNS query type.')
最后
启动应用程序Python代码,在另一个控制台中用```dig```[14]工具发起请求。
# dig @1.1.1.1 google.com +tcp
如果正确执行,程序输出应该是这样的:
# python3 final_code_eBPF_dns.py
The program is running. Press Ctrl-C to abort.
COMM=dig PID=10738 TGID=10739 DEV=ens18 PROTO=TCP SRC=192.168.44.3 DST=1.1.1.1 SPT=57915 DPT=53 UID=0 GID=0 DNS_QR=0 DNS_NAME=google.com. DNS_TYPE=A
COMM=dig PID=10738 TGID=10739 DEV=ens18 PROTO=TCP SRC=1.1.1.1 DST=192.168.44.3 SPT=53 DPT=57915 UID=0 GID=0 DNS_QR=1 DNS_NAME=google.com. DNS_TYPE=A DNS_DATA=142.251.12.101
COMM=dig PID=10738 TGID=10739 DEV=ens18 PROTO=TCP SRC=1.1.1.1 DST=192.168.44.3 SPT=53 DPT=57915 UID=0 GID=0 DNS_QR=1 DNS_NAME=google.com. DNS_TYPE=A DNS_DATA=142.251.12.113
COMM=dig PID=10738 TGID=10739 DEV=ens18 PROTO=TCP SRC=1.1.1.1 DST=192.168.44.3 SPT=53 DPT=57915 UID=0 GID=0 DNS_QR=1 DNS_NAME=google.com. DNS_TYPE=A DNS_DATA=142.251.12.102
COMM=dig PID=10738 TGID=10739 DEV=ens18 PROTO=TCP SRC=1.1.1.1 DST=192.168.44.3 SPT=53 DPT=57915 UID=0 GID=0 DNS_QR=1 DNS_NAME=google.com. DNS_TYPE=A DNS_DATA=142.251.12.139
COMM=dig PID=10738 TGID=10739 DEV=ens18 PROTO=TCP SRC=1.1.1.1 DST=192.168.44.3 SPT=53 DPT=57915 UID=0 GID=0 DNS_QR=1 DNS_NAME=google.com. DNS_TYPE=A DNS_DATA=142.251.12.100
COMM=dig PID=10738 TGID=10739 DEV=ens18 PROTO=TCP SRC=1.1.1.1 DST=192.168.44.3 SPT=53 DPT=57915 UID=0 GID=0 DNS_QR=1 DNS_NAME=google.com. DNS_TYPE=A DNS_DATA=142.251.12.138
到此为止,我们已经创建了一个有用的应用程序,可以显示系统中所有的DNS查询。希望上面的解释足够详细,这样如果你对编写eBPF程序感兴趣,可以更容易开始。这段代码已经帮助我更好的了解服务器上发生的事情,以下链接可以获取完整代码。
完整代码[15]
结论
这段代码还可以做得更好吗?当然可以!首先,应该增加对IPv6的支持。其次,不要再依赖IP头的固定长度,而是要对其进行解析。我拒绝使用Python库来处理数据包,不是没有原因的,在C语言中,仍然需要手动操作。第三,用C语言重写代码也很好,可以完全放弃Python,当然还要增加几行JSON输出的代码,这样在以后开发UI仪表盘时会更方便。这将导致第四点,对DNS数据包的手动分析。最后,最诱人的一点是停止查看端口(因为也许DNS数据包并不总是通过53端口),并尝试分析每个数据包,在其中寻找那些符合DNS格式的数据包,这将使我们即使在非标准的端口上也能检测到数据包。
你好,我是俞凡,在Motorola做过研发,现在在Mavenir做技术工作,对通信、网络、后端架构、云原生、DevOps、CICD、区块链、AI等技术始终保持着浓厚的兴趣,平时喜欢阅读、思考,相信持续学习、终身成长,欢迎一起交流学习。
微信公众号:DeepNoMind
参考资料
[1]eBPF: https://docs.kernel.org/bpf/classic_vs_extended.html
[2]Awesome eBPF: https://github.com/zoidbergwill/awesome-ebpf
[3]tcpdump: https://www.tcpdump.org
[4]packetbeat: https://www.elastic.co/beats/packetbeat
[5]Osquery: https://osquery.io
[6]Zeek: https://zeek.org
[7]if_ether.h: https://kernel.googlesource.com/pub/scm/linux/kernel/git/nico/archive/+/d9cc76127bcc137e3214b9166c439e02d2060cda/include/linux/if_ether.h#32
IEEE: https://standards-oui.ieee.org/ethertype/eth.txt
[9]in.h: https://github.com/torvalds/linux/blob/master/include/uapi/linux/in.h#L43
udp_sendmsg(): https://github.com/torvalds/linux/blob/master/net/ipv4/udp.c#L1045
tcp_sendmsg(): https://github.com/torvalds/linux/blob/master/net/ipv4/tcp.c#L1478
sock: https://github.com/torvalds/linux/blob/master/include/net/sock.h#L352
__sk_buff: https://github.com/iovisor/bcc/blob/master/src/cc/compat/linux/virtual_bpf.h#L5746
dig: https://linux.die.net/man/1/dig
final_code_eBPF_dns.py: https://gist.github.com/oghie/b4e3accf1f87afcb939f884723e2b462
- END -本文由 mdnice 多平台发布