动手学深度学习(pytorch版)第二章2.1 Note-ndarray
1.入门
x = torch.arange(12)
//首先,我们可以使用 `arange` 创建一个行向量 `x`。这个行向量包含以0开始的前12个整数,
//它们默认创建为整数。也可指定创建类型为浮点数。张量中的每个值都称为张量的元素(element)
x.shape
x.numel()//如果只想知道张量中元素的总数
X = x.reshape(3, 4)
torch.randn(3, 4)
//以下代码创建一个形状为(3,4)的张量。
//其中的每个元素都从均值为0、标准差为1的标准高斯分布(正态分布)中随机采样。
torch.tensor([[2, 1, 4, 3], [1, 2, 3, 4], [4, 3, 2, 1]])
torch.zeros((2, 3, 4))
torch.ones((2, 3, 4))
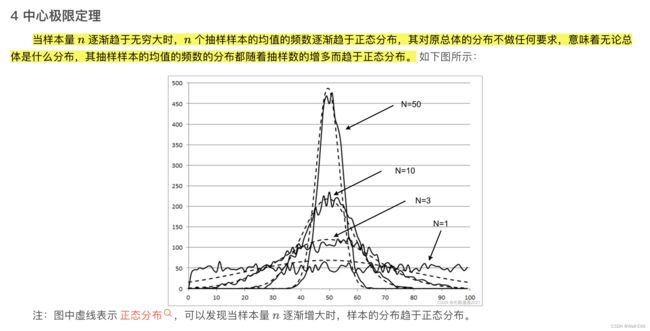
标准高斯分布(即正态分布)介绍
Q:为什么高斯分布重要?
中心极限定理恰好刻画出的是正态分布,应该说在大样本情况下还是很有用的

2.运算符
x = torch.tensor([1.0, 2, 4, 8])
y = torch.tensor([2, 2, 2, 2])
//x + y, x - y, x * y, x / y, x ** y, X == Y # **运算符是求幂运算
torch.exp(x)

X = torch.arange(12, dtype=torch.float32).reshape((3,4))
Y = torch.tensor([[2.0, 1, 4, 3], [1, 2, 3, 4], [4, 3, 2, 1]])
torch.cat((X, Y), dim=0), torch.cat((X, Y), dim=1)

//dim:按第几维合并

X.sum()

//tensor广播机制
a = torch.arange(3).reshape((3, 1))
b = torch.arange(2).reshape((1, 2))
a + b
/*
(a:
 tensor([[0],
         [1],
         [2]]),
 b:
 tensor([[0, 1]]))
 a+b:
 tensor([[0, 1],
         [1, 2],
         [2, 3]])
*/
3.索引和切片
:代表这一维的所有元素
[-1]选择最后一个元素
[1:3]选择第二个和第三个元素
X[-1], X[1:3]
X[1, 2] = 9
X[0:2, :] = 12
4.ndarray和tensor转换
将深度学习框架定义的张量转换为NumPy张量(`ndarray`)很容易,反之也同样容易。
torch张量和numpy数组将共享它们的底层内存,就地操作更改一个张量也会同时更改另一个张量。
要将大小为1的张量转换为Python标量,我们可以调用`item`函数或Python的内置函数。
A = X.numpy()
B = torch.tensor(A)
type(A), type(B)
a = torch.tensor([3.5])
a, a.item(), float(a), int(a)