python如何导入opencv_手把手教你用OpenCV和Python实现图像和视频神经风格迁移(代码)...
原标题:手把手教你用OpenCV和Python实现图像和视频神经风格迁移(代码)
新智元推荐
来源:pyimagesearch
编译:Bing
【新智元导读】在这篇教程中,作者Adrian Rosebrock将教你如何用OpenCV、Python和深度学习技术对图像和实时视频进行神经风格迁移。
2015年,Gatsys等人在论文A Neural Algorithm of Artistic Style中提出了最初的神经风格迁移算法。2016年,Johnson等人发表了Perceptual Losses for Real-Time Style Transfer and Super-Resolutioin一文,将神经网络迁移作为用感知损失处理超分辨率问题的框架。结果表明该算法比Gatys等人的方法快了三倍。接下来,我将介绍如何在自己的图像和视频流中应用神经风格迁移。
用OpenCV进行神经风格迁移
首先说明的一点是,今天讨论的方法在一个CPU上可以达到近乎实时的效果,如果在GPU上则完全可以实现实时效果。
首先我们会简单塔伦下什么是神经风格迁移,以及它是如何运作的。之后我们会用OpenCV和Python动手操作。
什么是神经风格迁移?
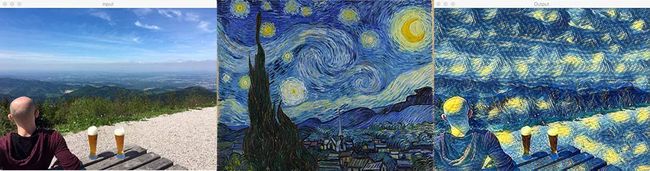
从左至右:我们的内容图像;风格图像;输出的风格迁移图像
神经风格迁移主要有两个过程:
提取某张图片的风格
将该种风格应用到另一张图片上
上图就是将梵高著名的画作《星夜》的风格应用到普通的生活照上,我们保留了原照片中的山、人物和啤酒等所有内容,但全部替换成了梵高的油画风格。
问题就是,我们应该如何定义一个神经网络,让它执行神经风格迁移呢?
神经风格迁移如何工作?
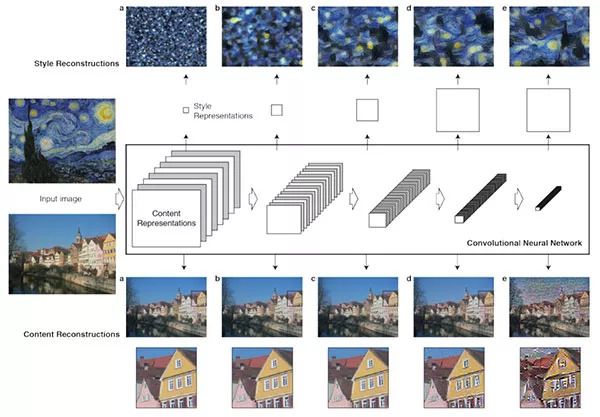
在Gatys等人提出的首篇论文中,神经风格迁移算法不需要新的架构。相反,我们可以用一个预训练网络(通常在ImageNet上进行的预训练),并且定义一个损失函数,能让我们达到风格迁移的目标,然后对损失函数不断优化。
那么,这里的问题就不是“该用什么神经网络”了,而是“该用什么损失函数”。
答案包括:内容损失、风格损失和总变差损失。每个部分都是单独计算,然后在一个元损失函数中结合。通过将元损失函数最小化,我们将依次对内容、风格和总变差损失进行优化。
虽然Gatys等人的方法能生成不错的神经风格迁移结果,但是它的速度非常慢。2016年,Johnson等人在Gatys的基础上提出的全新算法速度快了三倍,但同时也存在着缺点,即用户不能随机选择想要应用的风格图像。用户首先要训练一个网络,生成你想要的风格。网络训练好后,你可以将它应用到任意内容图像上。
然而到了2017年,Ulyanov等人发表了Instance Normalization: The Missing Ingredient for Fast Stylization一文,他们表示将batch normalization替换成instance normalization(然后在训练和测试时都应用instance normalization),可以达到更快的效果,并且艺术效果也更好。
项目结构
在开始今天的教程前,请先下载我提供的资料(点击文末原文地址获取资料)。准备好了脚本、模型和图像后,你可以用tree指令检查项目的结构:
1$ tree --dirsfirst
2.
3├── images
4│ ├── baden_baden.jpg
5│ ├── giraffe.jpg
6│ ├── jurassic_park.jpg
7│ └── messi.jpg
8├── models
9│ ├── eccv16
10│ │ ├── composition_vii.t7
11│ │ ├── la_muse.t7
12│ │ ├── starry_night.t7
13│ │ └── the_wave.t7
14│ └── instance_norm
15│ ├── candy.t7
16│ ├── feathers.t7
17│ ├── la_muse.t7
18│ ├── mosaic.t7
19│ ├── starry_night.t7
20│ ├── the_scream.t7
21│ └── udnie.t7
22├── neural_style_transfer.py
23├── neural_style_transfer_examine.py
24└── neural_style_transfer_video.py
如果你从下载了.zip文件,就无需上网找其他素材了。我在其中提供了很多测试用的图像和模型。同时还有三种Python脚本。
开始神经风格迁移
接下来让我们用OpenCV和Python进行神经风格迁移的实践。
首先打开neural_style_transfer.py文件,插入如下代码:
1# import the necessary packages
2importargparse
3importimutils
4importtime
5importcv2
6
7# construct the argument parser and parse the arguments
8ap = argparse.ArgumentParser()
9ap.add_argument("-m", "--model", required=True,
10help="neural style transfer model")
11ap.add_argument("-i", "--image", required=True,
12help="input image to apply neural style transfer to")
13args = vars(ap.parse_args())
首先,我们导入所需的包并解析命令行参数。
导入的有:
imutils:这个包可以通过pip install --upgrade imutils安装。最近我发布了imutils==0.5.1,所以不要忘记更新!
OpenCV:你需要一个OpenCV 3.4或者更高版本。
该脚本下需要两个命令行:
--model:神经风格迁移的模型路径。在“下载”区中,我加入了11中经过与训练的模型。
--image:需要进行风格迁移的图像(输入图像)。在其中我放入了四张图片。
你不需要改变命令行代码,参数会在运行过程中进行处理。如果你不熟悉这一过程,可以阅读我另一篇文章:
www.pyimagesearch.com/2018/03/12/python-argparse-command-line-arguments/
接下来的部分比较有趣,我们要下载图像和模型,然后计算神经风格迁移:
15# load the neural style transfer model from disk
16print("[INFO] loading style transfer model...")
17net = cv2.dnn.readNetFromTorch(args["model"])
18
19# load the input image, resize it to have a width of 600 pixels, and
20# then grab the image dimensions
21image = cv2.imread(args["image"])
22image = imutils.resize(image, width=600)
23(h, w) = image.shape[:2]
24
25# construct a blob from the image, set the input, and then perform a
26# forward pass of the network
27blob = cv2.dnn.blobFromImage(image, 1.0, (w, h),
28(103.939, 116.779, 123.680), swapRB=False, crop=False)
29net.setInput(blob)
30start = time.time()
31output = net.forward()
32end = time.time()
在这部分代码中,我们进行了:
将下载的预训练神经风格迁移模型称为net(第17行);
下载输入图像并调整尺寸(21和22行);
用均值减法创建blob(27和28行);
执行forward,获取output图像(31行)。
接下来,重要的是对输出图像进行后处理:
34# reshape the output tensor, add back in the mean subtraction, and
35# then swap the channel ordering
36output = output.reshape((3, output.shape[2], output.shape[3]))
37output[0] += 103.939
38output[1] += 116.779
39output[2] += 123.680
40output /= 255.0
41output = output.transpose(1, 2, 0)
最后一步是将输出图像显示在屏幕上:
43# show information on how long inference took
44print("[INFO] neural style transfer took {:.4f} seconds".format(
45end - start))
46
47# show the images
48cv2.imshow("Input", image)
49cv2.imshow("Output", output)
50cv2.waitKey(0)
神经风格迁移结果
当你下载好文件后,打开终端执行以下命令:
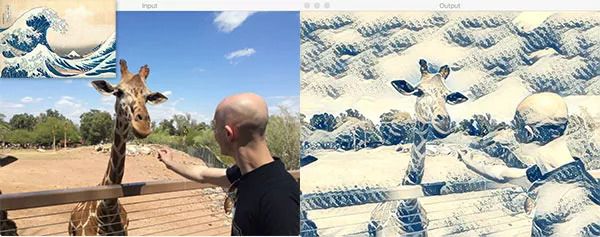
1$ python neural_style_transfer.py --image images/giraffe.jpg
2--model models/eccv16/the_wave.t7
3[INFO] loading style transfer model...
4[INFO] neural style transfer took 0.3152seconds
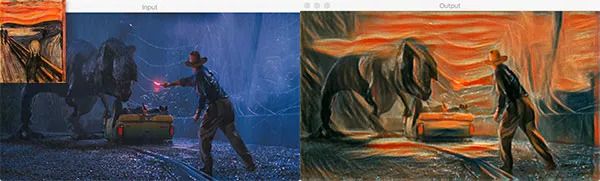
现在,对命令行参数做简单改变,然后用《侏罗纪公园》中的截图作为内容图像,进行风格迁移:
1$ python neural_style_transfer.py --image images/jurassic_park.jpg
2--model models/instance_norm/the_scream.t7
3[INFO] loading style transfer model...
4[INFO] neural style transfer took 0.1202seconds
另一个例子:
1$ python neural_style_transfer.py --image images/messi.jpg
2--model models/instance_norm/udnie.t7
3[INFO] loading style transfer model...
4[INFO] neural style transfer took 0.1495seconds
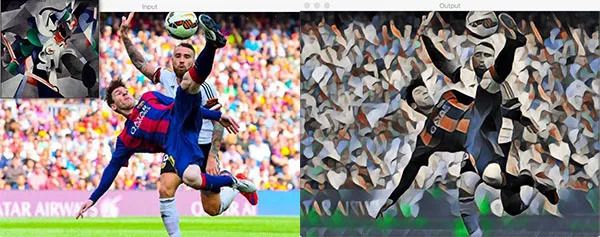
这是我最喜欢的案例,感觉都能当做酒吧的装饰画了。
实时神经风格迁移
上面我们讲了如何在单一图像上应用风格迁移,现在我们要把这一过程放在视频上。
大致流程和图像处理差不多,在这一脚本中,我们将:
利用一个特殊的Python迭代器,它可以让我们在模型路径中循环使用所有可用的神经风格迁移模型。
启动网络摄像头视频流,我们会(近乎)实时处理摄像头的帧。对于某些较大的模型,系统可能会慢一些。
在每一帧上应用风格迁移,对输出进行后处理,并将结果显示在屏幕上。
如果用户按下“n”键,我们将把迭代器循环运用到下一个神经风格迁移模型上,不用重启脚本。
首先,打开neural_style_transfer_video.py文件,插入以下代码:
1# import the necessary packages
2fromimutils.video importVideoStream
3fromimutils importpaths
4importitertools
5importargparse
6importimutils
7importtime
8importcv2
9
10# construct the argument parser and parse the arguments
11ap = argparse.ArgumentParser()
12ap.add_argument("-m", "--models", required=True,
13help="path to directory containing neural style transfer models")
14args = vars(ap.parse_args())
之后,创建模型路径迭代器:
16# grab the paths to all neural style transfer models in our 'models'
17# directory, provided all models end with the '.t7' file extension
18modelPaths = paths.list_files(args["models"], validExts=(".t7",))
19modelPaths = sorted(list(modelPaths))
20
21# generate unique IDs for each of the model paths, then combine the
22# two lists together
23models = list(zip(range(0, len(modelPaths)), (modelPaths)))
24
25# use the cycle function of itertools that can loop over all model
26# paths, and then when the end is reached, restart again
27modelIter = itertools.cycle(models)
28(modelID, modelPath) = next(modelIter)
一旦我们开始在while循环中处理帧,“n”按键就会在迭代器中下载“下一个”模型。
为了创建模型迭代器,我们:
搜集所有神经风格迁移模型并分类(18和19行)
为每种模型分配ID(23行)
利用itertools和cycle创建迭代器(27行)。
让我们开始下载第一个模型并对视频进行处理:
30# load the neural style transfer model from disk
31print("[INFO] loading style transfer model...")
32net = cv2.dnn.readNetFromTorch(modelPath)
33
34# initialize the video stream, then allow the camera sensor to warm up
35print("[INFO] starting video stream...")
36vs = VideoStream(src=0).start()
37time.sleep(2.0)
38print("[INFO] {}. {}".format(modelID + 1, modelPath))
在32行,我们读取了第一个模型利用的路径。在36和37行,启动了视频,从摄像头中采集帧。
之后在帧与帧之间进行循环:
40# loop over frames from the video file stream
41whileTrue:
42# grab the frame from the threaded video stream
43frame = vs.read()
44
45# resize the frame to have a width of 600 pixels (while
46# maintaining the aspect ratio), and then grab the image
47# dimensions
48frame = imutils.resize(frame, width=600)
49orig = frame.copy()
50(h, w) = frame.shape[:2]
51
52# construct a blob from the frame, set the input, and then perform a
53# forward pass of the network
54blob = cv2.dnn.blobFromImage(frame, 1.0, (w, h),
55(103.939, 116.779, 123.680), swapRB=False, crop=False)
56net.setInput(blob)
57output = net.forward()
接着进行后处理并将输出图像展示出来:
59# reshape the output tensor, add back in the mean subtraction, and
60# then swap the channel ordering
61output = output.reshape((3, output.shape[2], output.shape[3]))
62output[0] += 103.939
63output[1] += 116.779
64output[2] += 123.680
65output /= 255.0
66output = output.transpose(1, 2, 0)
67
68# show the original frame along with the output neural style
69# transfer
70cv2.imshow("Input", frame)
71cv2.imshow("Output", output)
72key = cv2.waitKey(1) & 0xFF
对按键的处理:
74# if the `n` key is pressed (for "next"), load the next neural
75# style transfer model
76ifkey == ord("n"):
77# grab the next neural style transfer model model and load it
78(modelID, modelPath) = next(modelIter)
79print("[INFO] {}. {}".format(modelID + 1, modelPath))
80net = cv2.dnn.readNetFromTorch(modelPath)
81
82# otheriwse, if the `q` key was pressed, break from the loop
83elifkey == ord("q"):
84break
85
86# do a bit of cleanup
87cv2.destroyAllWindows()
88vs.stop()
两种不同的按键会对脚本运行产生不同的影响:
“n”:抓取下一个模型的路径和ID,并进行下载。如果我们已经获取上一个模型,迭代器就会从头开始循环。
“q”:按下q会退出while循环。
实时风格迁移的结果
执行以下命令就可以在视频上运用风格迁移啦:
1$ python neural_style_transfer_video.py --models models
可以看到,只需要按一个按键就能轻松地进行循环。下面是我自己做的demo视频:
结语
今天的教程是教大家如何用OpenCV和Python在图片和视频上运用神经风格迁移。具体来说,我们用的模型是Johnson等人于2016年提出的,你可以在我提供的链接中下载。希望这篇教程对你有用!
(本文经授权转载自公众号“论智 ID:jqr_AI”)
http://www.aiworld2018.com/返回搜狐,查看更多
责任编辑: