Spring Boot自动装配原理超详细解析
目录
- 前言
- 一、什么是SPI?
-
- 1. JDK中的SPI
- 2. Spring中的SPI
-
- 2.1 加载配置
- 2.2 实例化
- 二、@Import注解和ImportSelector是什么?
-
- 1. 代码示例
- 2. 过程解析
- 3. 源码分析
- 三、Spring Boot的自动装配
-
- 1.源码分析
- 2.代码示例
- 3.Spring Boot自带的自动装配
- 四、总结
前言
Spring Boot的自动装配原理是怎么样的?想必大家面试都会被问到这个问题,那么这篇文章将会带你们进入去了解spring boot的自动装配原理,在开始之前,我们先提几个问题,我们带着疑问去深究
- 为什么要自动装配
- 什么是自动装配
- 自动装配怎么实现
想必学过或者没学过的朋友都会带有这三个疑问,那么我们带着问题发车
友情提示,自己对着源码一步一步看会加深理解
一、什么是SPI?
1. JDK中的SPI
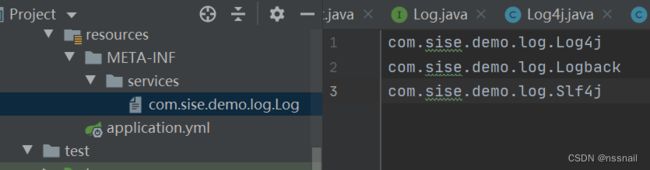
我们定义一个log接口,并且有三个实现类Log4j,Logback,Slf4J
public interface Log {

    void debug();

    void info();
}
public class Log4j implements Log{
    @Override
    public void debug() {
        System.out.println("======log4j debug=========");
    }

    @Override
    public void info() {
        System.out.println("======log4j info=========");
    }
}
public class Logback implements Log{
    @Override
    public void debug() {
        System.out.println("======Logback debug=========");
    }

    @Override
    public void info() {
        System.out.println("======Logback info=========");
    }
}
public class Slf4j implements Log{
    @Override
    public void debug() {
        System.out.println("======Slf4j debug=========");
    }

    @Override
    public void info() {
        System.out.println("======Slf4j info=========");
    }
}
然后在resource目录添加/META-INF/services目录,并且创建以Log接口全路径命名的文件,并把他的实现类全路径添加到文件中,如下所示
添加main方法,并运行
public static void main(String[] args) {
    ServiceLoader<Log> all = ServiceLoader.load(Log.class);
    Iterator<Log> iterator = all.iterator();


    while (iterator.hasNext()) {
        Log next = iterator.next();
        next.debug();
        next.info();
    }
}
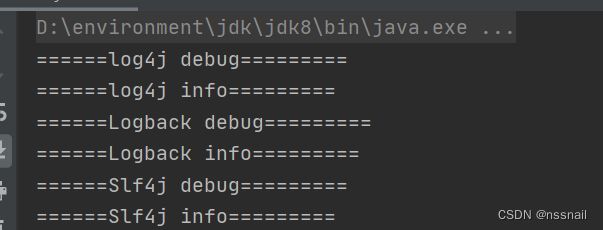
我们可以看到我们通过ServiceLoader.load就可以将Log的所有实现类实例化
这里的实现原理我就简单略过下,因为这里不是重点,只是让大家有个印象
他在ServiceLoader.load中有一个常量,所以这就是为什么我们要在META-INF/services/这个路径下创建的原因
private static final String PREFIX = "META-INF/services/";
而在他是一个懒加载的方式,他在迭代器的hasNext的时候加载配置
public boolean hasNext() {
    if (acc == null) {
        //加载配置
        return hasNextService();
    } else {
        PrivilegedAction<Boolean> action = new PrivilegedAction<Boolean>() {
            public Boolean run() { return hasNextService(); }
        };
        return AccessController.doPrivileged(action, acc);
    }
}
private boolean hasNextService() {
  	//此处省略
    String fullName = PREFIX + service.getName();
    if (loader == null)
        //加载配置
        configs = ClassLoader.getSystemResources(fullName);
    else
        configs = loader.getResources(fullName);
  	//此处省略
    return true;
}
在next()的时候初始化实例
public S next() {
    if (acc == null) {
        //初始化实例
        return nextService();
    } else {
        PrivilegedAction<S> action = new PrivilegedAction<S>() {
            public S run() { return nextService(); }
        };
        return AccessController.doPrivileged(action, acc);
    }
}
private S nextService() {
    //此处省略
    //反射获取class类型
    Class<?> c = null;
    c = Class.forName(cn, false, loader);
·	//newInstance创建实例
    S p = service.cast(c.newInstance());
     //此处省略
}
JDK的SPI大概就是这样实现的
2. Spring中的SPI
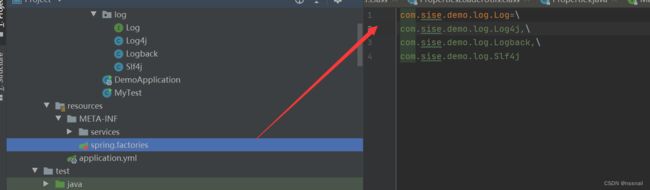
在META-INF目录下添加spring.factories,结构如下,接口全路径+实现类,多个实现类用逗号隔开,换行用\
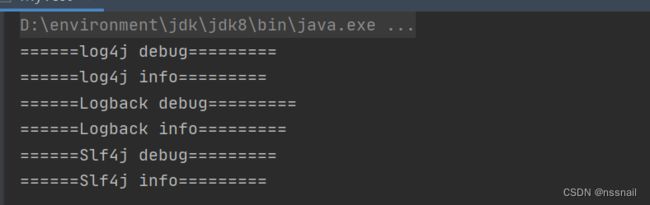
添加main方法,并运行
public static void main(String[] args) {
    List<Log> logs = SpringFactoriesLoader.loadFactories(Log.class,ClassUtils.getDefaultClassLoader());
    for (Log log : logs) {
        log.debug();
        log.info();
    }
}
结果如下,我们可以看到还是可以把实现类正常加载
我们看下原理实现
2.1 加载配置
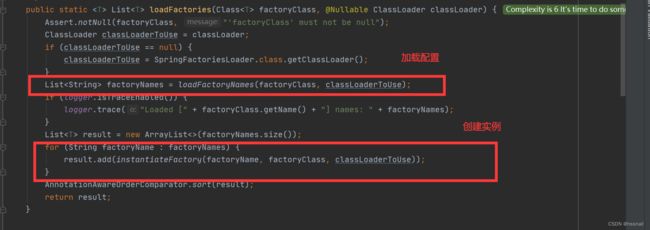
进入SpringFactoriesLoader.loadFactories方法,其他啥也不用看,就看loadFactoryNames这个方法
public static <T> List<T> loadFactories(Class<T> factoryClass, @Nullable ClassLoader classLoader) {
    //此处省略
    //获取需要创建的类名
    List<String> factoryNames = loadFactoryNames(factoryClass, classLoaderToUse);

    List<T> result = new ArrayList<>(factoryNames.size());
    //循环类名创建实例
    for (String factoryName : factoryNames) {
        //在instantiateFactory方法初始化实例
        result.add(instantiateFactory(factoryName, factoryClass, classLoaderToUse));
    }
    //此处省略
}
获取所有类的实现类,并通过getOrDefault方法拿到传入的接口或者实现类
public static List<String> loadFactoryNames(Class<?> factoryClass, @Nullable ClassLoader classLoader) {
    String factoryClassName = factoryClass.getName();
    //获取所有类的实现类,并通过getOrDefault方法拿到传入的接口或者实现类,此时的factoryClassName为com.sise.demo.log.Log
    return (List)loadSpringFactories(classLoader).getOrDefault(factoryClassName, Collections.emptyList());
}
这里东西不多,继续往下看loadSpringFactories方法就行
private static Map<String, List<String>> loadSpringFactories(@Nullable ClassLoader classLoader) {
    MultiValueMap<String, String> result = cache.get(classLoader);
     //判断是否有缓存,有缓存就直接返回
    if (result != null) {
        return result;
    }

    try {
         //获取含有META-INF/spring.factories的所有url路径,这里包括自己定义的,和扩展的
         //这里的url指例如D:/demo1/target/classes/META-INF/spring.factories,每一个jar里面的spring.factories
         // FACTORIES_RESOURCE_LOCATION = "META-INF/spring.factories"
        Enumeration<URL> urls = (classLoader != null ?
                                 classLoader.getResources(FACTORIES_RESOURCE_LOCATION) :
                                 ClassLoader.getSystemResources(FACTORIES_RESOURCE_LOCATION));

         //用于接收某个抽象类或者接口的所有实现类,例如{"log":["Log4j","Logback","Slf4j"]}
        result = new LinkedMultiValueMap<>();
        while (urls.hasMoreElements()) {
            URL url = urls.nextElement();
            UrlResource resource = new UrlResource(url);
            //解析这个url下的所有配置,获取对应的属性
            //此时的Properties长这样{"log":"Log4j,Logback,Slf4j"}
            Properties properties = PropertiesLoaderUtils.loadProperties(resource);
            for (Map.Entry<?, ?> entry : properties.entrySet()) {
                String factoryClassName = ((String) entry.getKey()).trim();
                 //将Log4j,Logback,Slf4j拆分成一个数组,并循环
                for (String factoryName : StringUtils.commaDelimitedListToStringArray((String) entry.getValue())) {
                    //把所有实现类的类名添加到result中
                    result.add(factoryClassName, factoryName.trim());
                }
            }
        }
        //放入缓存
        cache.put(classLoader, result);
        //返回map对象
        return result;
    }
    catch (IOException ex) {
        throw new IllegalArgumentException("Unable to load factories from location [" +
                                           FACTORIES_RESOURCE_LOCATION + "]", ex);
    }
}
最终的result返回是长这样的

上面的源码我已经写了注释了,我们重新理下思路
-
找到所有的
spring.factories文件 -
使用
PropertiesLoaderUtils.loadProperties将spring.factories所有属性解析 -
StringUtils.commaDelimitedListToStringArray((String)entry.getValue());把Properties的值解析成一个数组 -
通过for循环将这些类的全名称加进result中
-
通过
getOrDefault方法拿到对应的抽象类或者接口,就是我们传入的那个类名
2.2 实例化
他在loadFactories方法中的instantiateFactory中实例化,如下图所示

我们可以看到,此时就是将我们实现的三个log类名循环实例化,并加进List中
我们 看下instantiateFactory,很明显能看到他是在这里直接newInstance创建实例
private static <T> T instantiateFactory(String instanceClassName, Class<T> factoryClass, ClassLoader classLoader) {
    try {
        //获取Class实例
        Class<?> instanceClass = ClassUtils.forName(instanceClassName, classLoader);
        if (!factoryClass.isAssignableFrom(instanceClass)) {
            throw new IllegalArgumentException("Class [" + instanceClassName + "] is not assignable to [" + factoryClass.getName() + "]");
        } else {
            //创建实例
            return ReflectionUtils.accessibleConstructor(instanceClass, new Class[0]).newInstance();
        }
    } catch (Throwable var4) {
        throw new IllegalArgumentException("Unable to instantiate factory class: " + factoryClass.getName(), var4);
    }
}
二、@Import注解和ImportSelector是什么?
在开始之前,我再提个问题,我们知道spring中我们可以通过xml或者注解实现初始化bean,但是这两种方式都是知道包名才能初始化的,那外部的jar我们不知道包名,像redis,rabbitmq那些我们是不知道他源码的包名是什么的,所以使用@ComponentScan也扫码不出来,也不可能由spring官方一个一个加过去,只能由第三方自己去实现,那么如何实现呢
1. 代码示例
创建一个简单的bean
public class DeferredBean {

    @PostConstruct
    public void init(){
        System.out.println("==============DeferredBean.init=================");
    }
}
创建一个DeferredImportSelectorDemo类,实现DeferredImportSelector接口,DeferredImportSelector是实现ImportSelector接口的,所以可以把DeferredImportSelector当做ImportSelector
public class DeferredImportSelectorDemo implements DeferredImportSelector {


    @Override
    public String[] selectImports(AnnotationMetadata annotationMetadata) {
        System.out.println("============DeferredImportSelectorDemo.selectImports=================");
        //如果需要实例化,就要把该类的完整姓名返回
        return new String[]{DeferredBean.class.getName()};
    }

    /**
     * 返回group类
     * @return
     */
    @Override
    public Class<? extends Group> getImportGroup() {
        return DeferredImportSelectorGroupDemo.class;
    }


    public static class DeferredImportSelectorGroupDemo implements DeferredImportSelector.Group{

       private final List<Entry> list=new ArrayList<>();
        /**
         * 收集需要实例化的类
         * @param annotationMetadata
         * @param deferredImportSelector
         */
        @Override
        public void process(AnnotationMetadata annotationMetadata, DeferredImportSelector deferredImportSelector) {
            System.out.println("============DeferredImportSelectorGroupDemo.process=================");
            String[] strings = deferredImportSelector.selectImports(annotationMetadata);
            for (String string : strings) {
                list.add(new Entry(annotationMetadata,string));
            }
        }

        /**
         * process收集的结果返回,返回结果必须包装成Entry对象
         * @return
         */
        @Override
        public Iterable<Entry> selectImports() {
            System.out.println("============DeferredImportSelectorGroupDemo.selectImports=================");
            return list;
        }
    }
}
创建一个配置类
@Component
//使用@Import注解导入DeferredImportSelectorDemo类
@Import(DeferredImportSelectorDemo.class)
public class ImportBean {
}
我们先把代码结果运行看看
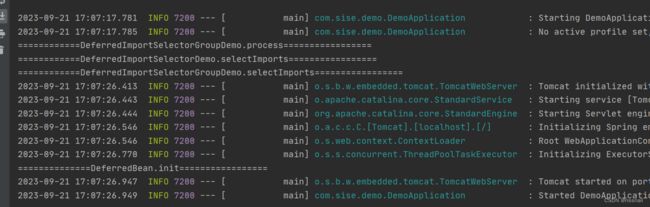
我们可以看到最后bean是被加载到了,这里记录一下运行殊顺序
- DeferredImportSelectorGroupDemo.process
- DeferredImportSelectorDemo.selectImports
- DeferredImportSelectorGroupDemo.selectImports
- DeferredBean.init
2. 过程解析
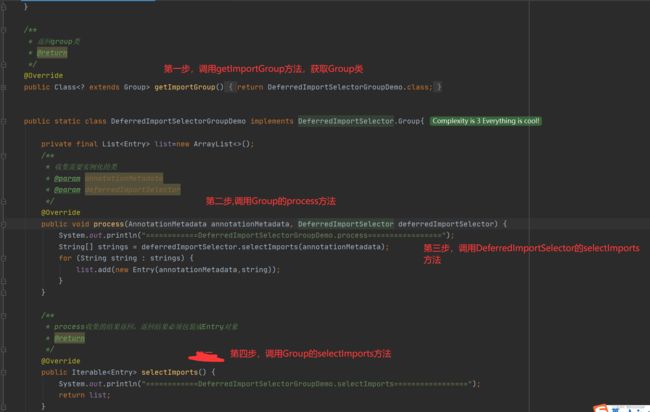
DeferredImportSelectors是一个spring的扩展接口,他会在spring生命周期里调用DeferredImportSelectors有两个实现方法,分别是selectImports和getImportGroup,此时他直接执行selectImports,会先调用getImportGroup拿到一个DeferredImportSelector.Group对象- 我们可以看到代码中有个内部类
DeferredImportSelectorGroupDemo实现了DeferredImportSelector.Group,这也是一个DeferredImportSelectors的内部类,他也有两个方法实现,分别是process和selectImports - 在
process方法中,我们需要拿到加载的bean的类名集合,封装成一个Entry对象 - 我们在
process方法中调用了deferredImportSelector.selectImports(annotationMetadata)拿到需要加载bean的类名,此时的deferredImportSelector就是DeferredImportSelectorGroupDemo,所以DeferredImportSelectorGroupDemo的selectImports是在这里我们手动调用的 - 然后底层会再调用
DeferredImportSelector.Group的selectImports方法将list返回交给spring
过程有点绕,梳理一下,
DeferredImportSelectors和DeferredImportSelector.Group都有个selectImports方法
- 先调用
DeferredImportSelector.Group的process方法- 在手动调用
DeferredImportSelectors的selectImports方法- 最后调用
DeferredImportSelector.Group的selectImports方法
图解
idea屏幕不够大,大致方法都在这了
我猜看到这里,大家已经明白了?不,肯定还懵,因为我一开始也是这样哈哈,我这里说出大家的几个疑问
-
为什么在第三步要去手动调用一下,不直接new String[]
答:没啥,看着优雅一点哈哈,分工明确
-
既然这样,为什么
DeferredImportSelectors还要整个selectImports,然后又Group啥的这么复杂答:因为我们可以直接实现
ImportSelectors接口,然后底层会直接调用ImportSelectors的selectImports,而实现了DeferredImportSelectors才会调用Group的selectImports,所以DeferredImportSelectors的selectImports需要保留 -
那既然有
selectImports为什么还要有DeferredImportSelectors答: 那这里就要说下
selectImports和DeferredImportSelectors的区别ImportSelector是在Spring容器初始化之前就会被调用的,而DeferredImportSelector则是在Spring容器初始化过程中被调用的简单来说
ImportSelector是立即执行,而DeferredImportSelector是等所有的配置都加载完毕后再执行。所以相对于
ImportSelector来说,DeferredImportSelector会更加灵活,更适用于自动装配的场景
这就完了吗?
不,我们还有一个类ImportBean上面添加了一个@Import(DeferredImportSelectorDemo.class)这样的注解,并导入了DeferredImportSelectorDemo的class类型,为什么要这样做呢,因为spring底层扫到所有带有@Import注解的类,并解析
3. 源码分析
ps源码这里会比较复杂,我会带大家一步一步去解析,如果觉得枯燥的话可以直接看第三章
我们可以直接搜索到ConfigurationClassParser.processImports方法,具体怎么找到的我就简单说下
- 从
SpringApplication.run方法进去,一直到具体实现 - 找到
this.refreshContext(context)方法,进去refresh方法 - 直接到
AbstractApplicationContext的refresh,然后进去invokeBeanFactoryPostProcessors方法 - 进入
invokeBeanFactoryPostProcessors方法,进去之后再进入invokeBeanDefinitionRegistryPostProcessors方法 - 我们看到他调用了
BeanDefinitionRegistryPostProcessor的postProcessBeanDefinitionRegistry方法,这是一个接口,我们看他的实现类ConfigurationClassPostProcessor的postProcessBeanDefinitionRegistry - 再进去
processConfigBeanDefinitions,这方法有点长,我们找下找到parser.parse(candidates)方法 - 一直parse进去,找到
processConfigurationClass方法,进去之后点击doProcessConfigurationClass - 然后核心代码来了
processImports,就是在这里出现
上面过程是方便你们找源码跟踪,如果不想看前面流程的可以直接略过,直接看下面
这段代码就是@Imports注解的核心导入
processImports(configClass, sourceClass, getImports(sourceClass), true);
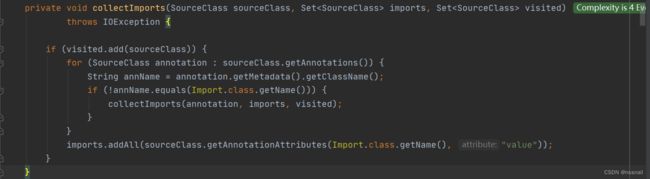
我们先来看getImports(sourceClass)方法
private Set<SourceClass> getImports(SourceClass sourceClass) throws IOException {
    Set<SourceClass> imports = new LinkedHashSet<>();
    Set<SourceClass> visited = new LinkedHashSet<>();
    //收集包含Imports的类
    collectImports(sourceClass, imports, visited);
    return imports;
}
很明显的能看到,所有imports就是在这里加载的
我们再回过去看processImports方法
private void processImports(ConfigurationClass configClass, SourceClass currentSourceClass,
                            Collection<SourceClass> importCandidates, boolean checkForCircularImports) {

    //此处省略
    //如果为ImportSelector类型就进入if
    if (candidate.isAssignable(ImportSelector.class)) {
        Class<?> candidateClass = candidate.loadClass();
        ImportSelector selector = BeanUtils.instantiateClass(candidateClass, ImportSelector.class);
        ParserStrategyUtils.invokeAwareMethods(
            selector, this.environment, this.resourceLoader, this.registry);
        //如果为DeferredImportSelector类型就进入handle方法
        if (selector instanceof DeferredImportSelector) {
            this.deferredImportSelectorHandler.handle(configClass, (DeferredImportSelector) selector);
        }
        else {
            String[] importClassNames = selector.selectImports(currentSourceClass.getMetadata());
            Collection<SourceClass> importSourceClasses = asSourceClasses(importClassNames);
            processImports(configClass, currentSourceClass, importSourceClasses, false);
        }
    }
    //此处省略
}
handle方法
public void handle(ConfigurationClass configClass, DeferredImportSelector importSelector) {
    DeferredImportSelectorHolder holder = new DeferredImportSelectorHolder(
        configClass, importSelector);
    if (this.deferredImportSelectors == null) {
        DeferredImportSelectorGroupingHandler handler = new DeferredImportSelectorGroupingHandler();
        handler.register(holder);
        handler.processGroupImports();
    }
    //此时进入的是else方法,因为deferredImportSelectors是空的
    else {
        this.deferredImportSelectors.add(holder);
    }
}
- 先判断是否为
ImportSelector类型 - 再判断是否为
DeferredImportSelector类型,执行this.deferredImportSelectorHandler.handle方法 - 我们可以看到此时他并没有初始化bean,只是加进了
deferredImportSelectors
那他在哪里调用呢,我们回到上面源码路径第七步那里有个parse方法
public void parse(Set<BeanDefinitionHolder> configCandidates) {
    for (BeanDefinitionHolder holder : configCandidates) {
        BeanDefinition bd = holder.getBeanDefinition();
        try {
            if (bd instanceof AnnotatedBeanDefinition) {
                //进入parse方法
                parse(((AnnotatedBeanDefinition) bd).getMetadata(), holder.getBeanName());
            }
            else if (bd instanceof AbstractBeanDefinition && ((AbstractBeanDefinition) bd).hasBeanClass()) {
                parse(((AbstractBeanDefinition) bd).getBeanClass(), holder.getBeanName());
            }
            else {
                parse(bd.getBeanClassName(), holder.getBeanName());
            }
        }
        catch (BeanDefinitionStoreException ex) {
            throw ex;
        }
        catch (Throwable ex) {
            throw new BeanDefinitionStoreException(
                "Failed to parse configuration class [" + bd.getBeanClassName() + "]", ex);
        }
    }

    //处理deferredImportSelector
    this.deferredImportSelectorHandler.process();
}
我们可以看到,在parse会调用一个this.deferredImportSelectorHandler.process()方法,我们进去看看
public void process() {
    List<DeferredImportSelectorHolder> deferredImports = this.deferredImportSelectors;
    this.deferredImportSelectors = null;
    try {
        //这里deferredImports不为空,因为this.deferredImportSelectors在上面this.deferredImportSelectorHandler.handle那里已经赋值
        if (deferredImports != null) {
            DeferredImportSelectorGroupingHandler handler = new DeferredImportSelectorGroupingHandler();
            deferredImports.sort(DEFERRED_IMPORT_COMPARATOR);
            deferredImports.forEach(handler::register);
            //获取deferredImports需要加载的类并放入configurationClasses中,也就是配置里,然后会通过spring的生命周期初始化成BeanDefinition
            handler.processGroupImports();
        }
    }
    finally {
        this.deferredImportSelectors = new ArrayList<>();
    }
}
如何初始化成BeanDefinition我就不多叙述,这是spring生命周期的内容,我们进去processGroupImports继续看
public void processGroupImports() {
    for (DeferredImportSelectorGrouping grouping : this.groupings.values()) {
        //获取Group的entry并循环
        grouping.getImports().forEach(entry -> {
            ConfigurationClass configurationClass = this.configurationClasses.get(
                entry.getMetadata());
            try {
                //这个是之前加载DeferredImportSelector的方法,但是走的不是那个if,因为传入的是需要初始化的bean,也就是DeferredBean,这个类没有实现ImportSelector
                processImports(configurationClass, asSourceClass(configurationClass),
                               asSourceClasses(entry.getImportClassName()), false);
            }
        	//此处省略
        });
    }
}
这里有个grouping.getImports()再去forEach遍历,我们先看下getImports方法
public Iterable<Group.Entry> getImports() {
    for (DeferredImportSelectorHolder deferredImport : this.deferredImports) {
        //这里先调用了group的process方法
        this.group.process(deferredImport.getConfigurationClass().getMetadata(),
                           deferredImport.getImportSelector());
    }
    //然后再调用group的selectImports方法
    return this.group.selectImports();
}
我们可以看到,group是先调用process方法再selectImports方法的,也验证了我们一开始运行的先后顺序
此时我们回到processGroupImports方法,他在forEach的时候将entry(也就是DeferredBean)传入了processImports方法
因为entry没有实现ImportSelector,所以会进入processImports的下一个判断
private void processImports(ConfigurationClass configClass, SourceClass currentSourceClass,
                            Collection<SourceClass> importCandidates, boolean checkForCircularImports) {

    //此处省略
    //如果为ImportSelector类型就进入if
    if (candidate.isAssignable(ImportSelector.class)) {
        Class<?> candidateClass = candidate.loadClass();
        ImportSelector selector = BeanUtils.instantiateClass(candidateClass, ImportSelector.class);
        ParserStrategyUtils.invokeAwareMethods(
            selector, this.environment, this.resourceLoader, this.registry);
        //如果为DeferredImportSelector类型就进入handle方法
        if (selector instanceof DeferredImportSelector) {
            this.deferredImportSelectorHandler.handle(configClass, (DeferredImportSelector) selector);
        }
        else {
            String[] importClassNames = selector.selectImports(currentSourceClass.getMetadata());
            Collection<SourceClass> importSourceClasses = asSourceClasses(importClassNames);
            processImports(configClass, currentSourceClass, importSourceClasses, false);
        }
        //因为此时传入的是DeferredBean,没有实现ImportSelector或者,所以下面的方法
    }
    else {
        this.importStack.registerImport(
            currentSourceClass.getMetadata(), candidate.getMetadata().getClassName());
        //将需要实例化的类加入到配置类中
        processConfigurationClass(candidate.asConfigClass(configClass));
    }
    //此处省略
}
往下继续看processConfigurationClass方法
protected void processConfigurationClass(ConfigurationClass configClass) throws IOException {
	//此处省略
    this.configurationClasses.put(configClass, configClass);
}
所以最后会将需要初始化的类加入到configurationClasses中,然后交给spring的生命周期去初始化
三、Spring Boot的自动装配
结合上两章我们重新理一下,我们现在知道两个重要的东西
- SPI,可以通过配置文件去拿到对应的类
- 使用spring的内置注解和接口,实现bean的初始化
那我们不是可以在DeferredImportSelector的实现类中,使用SPI将所有外部需要自动装配的bean都加载进来就可以了呢,我们去看下Spring Boot的源码验证一下我们的猜想
1.源码分析
我们知道Spring Boot的启动类,上面有个注解叫@SpringBootApplication,进去看看
//此处省略
@EnableAutoConfiguration
@//此处省略
public @interface SpringBootApplication {

	//此处省略

}
我把不必要的代码删掉,来看重点,这里有个@EnableAutoConfiguration,再点进去看看
//此处省略
@Import(AutoConfigurationImportSelector.class)
public @interface EnableAutoConfiguration {

	String ENABLED_OVERRIDE_PROPERTY = "spring.boot.enableautoconfiguration";

	//需要排除的类
	Class<?>[] exclude() default {};

    //需要排除类的url
	String[] excludeName() default {};

}
你看着不就来了@Import(AutoConfigurationImportSelector.class),AutoConfigurationImportSelector肯定就是实现DeferredImportSelector的,我们打开看看是怎么样的呢
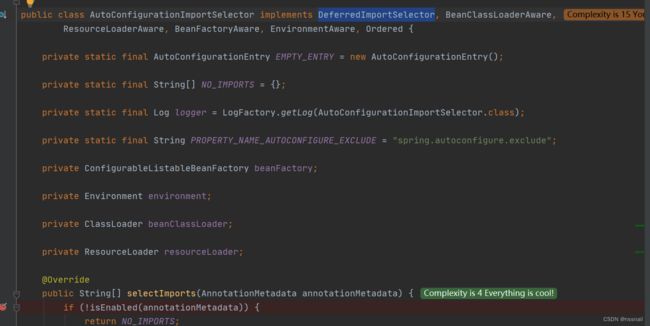
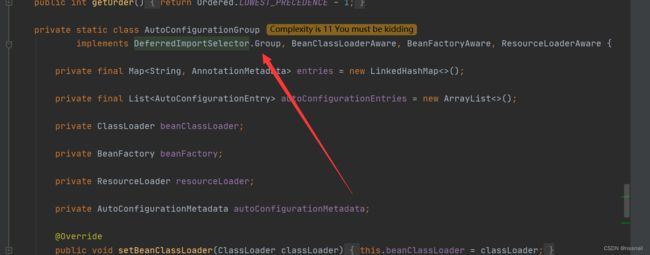
是不是可以看到他不仅实现了一个DeferredImportSelector,也是有一个内部类实现了DeferredImportSelector.Group接口,是不是看着和我们第二章节写的一模一样
我们继续往下看,看到Group的process方法
public void process(AnnotationMetadata annotationMetadata, DeferredImportSelector deferredImportSelector) {
    Assert.state(deferredImportSelector instanceof AutoConfigurationImportSelector,
                 () -> String.format("Only %s implementations are supported, got %s",
                                     AutoConfigurationImportSelector.class.getSimpleName(),
                                     deferredImportSelector.getClass().getName()));
    AutoConfigurationEntry autoConfigurationEntry = ((AutoConfigurationImportSelector) deferredImportSelector)
        .getAutoConfigurationEntry(getAutoConfigurationMetadata(), annotationMetadata);
    this.autoConfigurationEntries.add(autoConfigurationEntry);
    for (String importClassName : autoConfigurationEntry.getConfigurations()) {
        this.entries.putIfAbsent(importClassName, annotationMetadata);
    }
}
看着还是有点懵是不是,感觉不太像,没事,我们进去到他的getAutoConfigurationEntry方法,核心代码来啦
protected AutoConfigurationEntry getAutoConfigurationEntry(AutoConfigurationMetadata autoConfigurationMetadata,
                                                           AnnotationMetadata annotationMetadata) {
    if (!isEnabled(annotationMetadata)) {
        return EMPTY_ENTRY;
    }
    //获取注解属性exclude和excludeNames
    AnnotationAttributes attributes = getAttributes(annotationMetadata);
    //加载所有需要自动装配的url
    List<String> configurations = getCandidateConfigurations(annotationMetadata, attributes);
    //移除重复的url
    configurations = removeDuplicates(configurations);
    //获取需要排除的类
    Set<String> exclusions = getExclusions(annotationMetadata, attributes);
    //校验排除类
    checkExcludedClasses(configurations, exclusions);
    configurations.removeAll(exclusions);
    configurations = filter(configurations, autoConfigurationMetadata);
    fireAutoConfigurationImportEvents(configurations, exclusions);
    return new AutoConfigurationEntry(configurations, exclusions);
}
这里就是自动装配的核心代码,我们看下加载所有url的方法getCandidateConfigurations
protected List<String> getCandidateConfigurations(AnnotationMetadata metadata, AnnotationAttributes attributes) {
    List<String> configurations = SpringFactoriesLoader.loadFactoryNames(getSpringFactoriesLoaderFactoryClass(),
                                                                         getBeanClassLoader());
    Assert.notEmpty(configurations, "No auto configuration classes found in META-INF/spring.factories. If you "
                    + "are using a custom packaging, make sure that file is correct.");
    return configurations;
}
看到这里是不是很清晰了,他的配置都是从spring.factories这个文件读取的,通过SpringFactoriesLoader.loadFactoryNames这个就是Spring的SPI我们第一张讲过吧
SpringFactoriesLoader.loadFactoryNames和SpringFactoriesLoader.loadFactories一样,都是需要两个参数,一个是key和类加载器,在前面示例中,我们用的是Log.class,而这里用了个getSpringFactoriesLoaderFactoryClass()方法,我们进去看看
protected Class<?> getSpringFactoriesLoaderFactoryClass() {
    return EnableAutoConfiguration.class;
}
这里获取的是EnableAutoConfiguration的class类型,所以是不是我们只要在spring.factories加入这个EnableAutoConfiguration的类名和对应需要实例化的bean的url就可以了呢,我们来尝试一下
2.代码示例
创建一个TestBean,用于测试
public class TestBean {

    @PostConstruct
    public void init(){
        System.out.println("==============TestBean.init=================");
    }
}
在spring.factories中添加以下代码
org.springframework.boot.autoconfigure.EnableAutoConfiguration=\
com.sise.demo.test.TestBean
运行代码
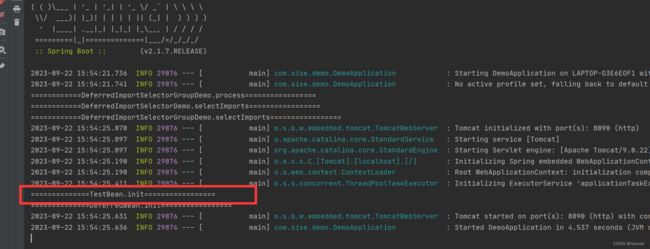
结果成功加载bean,到此整个spring boot的自动装配原理是不是已经很清晰来
3.Spring Boot自带的自动装配
后面我们来看看Spring Boot自带那些自动装配的类,这里就是闲聊的,与原理没啥关系
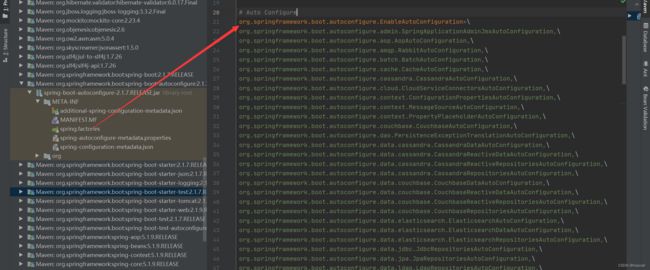
我们可以看到在Spring Boot中已经写好了很多自动装配的类,比如Aop,RabbitMq,Es,JDBC等等,大部分需要自动装配的类已经有了,但是如果再需要外部的jar实现自动装配,就像我们写的一样,自己去添加配置来完成
四、总结
我们回顾下发车之前的三个问题
-
为什么要自动装配?
答:我们在加载第三方jar的时候,并不知道第三方的包名,所以要使用自动装配来帮我们来帮忙初始化第三方的bean
-
什么是自动装配?
答:自动装配会通过扫描
spring.factories下面的类自动初始化bean,自动配置大大简化了Spring应用的配置,如果没有自动装配我们就要自己去实现ImportSelector, -
自动装配怎么实现?
答:
spring.factories文件中添加org.springframework.boot.autoconfigure.EnableAutoConfiguration对应需要初始化的bean的Url即可