Elasticsearch(五)--ES文档的操作(上)---写入文档
一、前言
使用ES构建搜索引擎时需要经常对文档进行操作,除了简单的单条文档操作,有时还需要进行批量操作。我们这章主要学习ES文档的增删改的操作,由于涉及到的代码量会比较多,所以分为3篇文章分别说明文档的这个三个操作。那么我们对文档操作的学习除了在kibana客户端之外,还会涉及到java的highLevelClient相应的操作代码。那么话不多说,我们直接开始下面的学习、
二、写入文档
2.1、单条写入文档
在ES中写入文档的请求的类型是POST,其请求形式如下:
POST /${index_name}/_doc/${_id}
{
    #写入的文档数据
}
上面的_id就是ES中的文档_id,这种请求方式是用户直接定义_id值,不使用ES自动生成的_id,请求的数据体即为写入的文档数据,格式是JSON格式。例如,在目标索引中写如下面的数据:
POST /hotel/_doc/001
{
    "name":"miss酒店1",
    "city":"厦门",
    "price":"1145.14"
}
ES返回的结果如下:
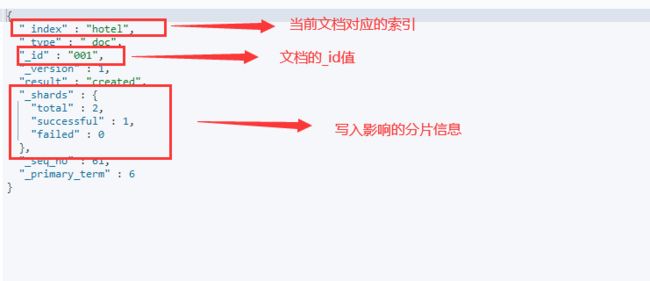
由以上结果可知,向hotel索引中写入文档成功。另外,ES在返回结果中还会显示文档的版本,这里因为文档刚刚建立,所以当前值为1.
当然,用户也可以不指定文档_id,该_id值将由ES自动生成,其请求形式如下:
POST /${index_name}/_doc
{
    #写入的文档数据
}
例如,写入上面的文档时不指定文档_id,请求的DSL如下:

在Java高级REST客户端中,单条写入文档需要创建IndexRequest对象并设置对应的索引和_id字段名称,执行时调用客户端的Index()方法并把IndexRequest对象传入即可。index()方法返回IndexResponse对象,通过该对象可以获取当前请求的索引名称、文档_id和版本等。下面的代码演示了向索引中添加单条文档的方法:
首先我们需要一个Hotel实体类,
package com.mbw.pojo;

import lombok.AllArgsConstructor;
import lombok.Data;
import lombok.NoArgsConstructor;

@Data
@AllArgsConstructor
@NoArgsConstructor
public class Hotel {
	private String id;    //对应文档_id
	private String index; //对应索引名称
	private Float score;  //对应文档得分
	private Long version; //对应文档的版本号
	private String title; //对应索引中的title
	private String city;  //对应索引中的city
	private Double price; //对应索引中的price
}
这个实体类和前面文章讲解ES客户端那篇是一致的,包括HighLevelClient的建立等代码,这里就不做赘述了,详情大家可以回头看ES客户端的文章
然后我们建立一个ESCreateDocService,并且注入HighLevelClient:
@Service
@Slf4j
public class EsCreateDocService {
    @Autowired
	private RestHighLevelClient client;
}
那么对于单条插入文档,在Java高级REST客户端中,需要创建IndexRequest对象并设置对应的索引和_id字段名称,然后将dataMap(大家可以想像成需要创建输入的数据体)设置进IndexRequest,接着执行时调用客户端的index()方法并把IndexRequest对象传入即可,index()方法返回IndexResponse对象,通过该对象可以获取当前请求的索引名称,文档_id和版本等。下面的代码演示了向索引中添加单条文档的方法。
public Map<String, Object> singleIndexDoc(Map<String, Object> dataMap, String indexName, String indexId) throws IOException {
		IndexRequest indexRequest = new IndexRequest(indexName).id(indexId).source(dataMap);
		IndexResponse indexResponse = client.index(indexRequest, RequestOptions.DEFAULT);//执行写入
		String index = indexResponse.getIndex(); //获取索引名
		String id = indexResponse.getId();  //获取文档ID
		long version = indexResponse.getVersion();  //获取文档版本
		HashMap<String, Object> resultMap = new HashMap<>();
		resultMap.put("index", index);
		resultMap.put("id", id);
		resultMap.put("version", version);
		return resultMap;
	}
然后我们创建一个controller,调用service层的方法即可,那这里之所以输入的参数传hotel,是为了不让前台输入复杂的map类型的json串,将这个json转map的操作交给后台进行。大家当然也可以将传参直接改为service层那样的传参,只不过由于参数涉及到Map,那么只能传json,表单是传不了Map类型的,所以大家一定要把service的三个参数全部放进一个类里,然后通过@RequestBody包装。
@RestController
@Slf4j
public class ESCreateController {
    @PostMapping("/create/doc")
	public FoundationResponse<Map<String, Object>> getResult(@RequestBody Hotel hotel) {
		if (hotel == null || CharSequenceUtil.isBlank(hotel.getIndex())) {
			return FoundationResponse.error(100, "参数错误");
		}
		HashMap<String, Object> dataMap = new HashMap<>();
		dataMap.put("title", hotel.getTitle());
		dataMap.put("city", hotel.getCity());
		dataMap.put("price", hotel.getPrice());
		try {
			Map<String, Object> resultMap = esCreateDocService.singleIndexDoc(dataMap, hotel.getIndex(), hotel.getId());
			return FoundationResponse.success(resultMap);
		} catch (IOException e) {
			log.warn("创建文档发生异常,原因为:{}", e.getMessage());
			return FoundationResponse.error(100, e.getMessage());
		} catch (Exception e) {
			log.error("服务发生异常,原因为:{}", e.getMessage());
			return FoundationResponse.error(100, e.getMessage());
		}
	}
}
接着到postman里验证一下:
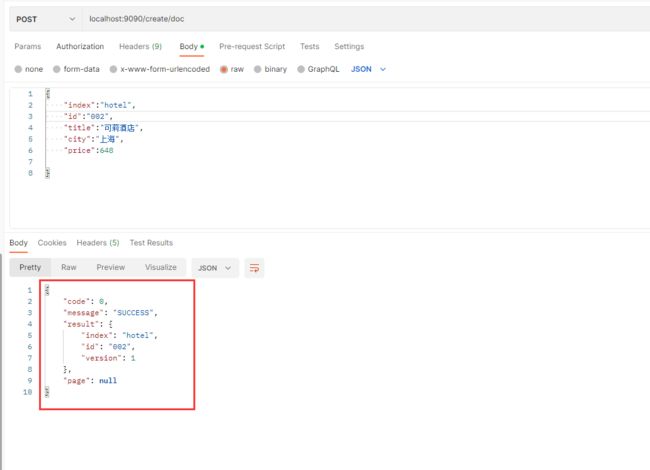
那么这里还需要拓展一个命令,它同样也可以创建文档:
POST /${index_name}/_create/${_id}
{
    #写入的文档数据
}
乍一看这个更像创建文档的命令,确实,它可以创建文档,但是它相较于_doc的创建有一种限制,比如我现在使用_doc创建一条_id已存在的记录:
POST /hotel_5/_doc/019
{
    "name":"miss酒店1",
    "city":"厦门",
    "price":"1145.14"
}
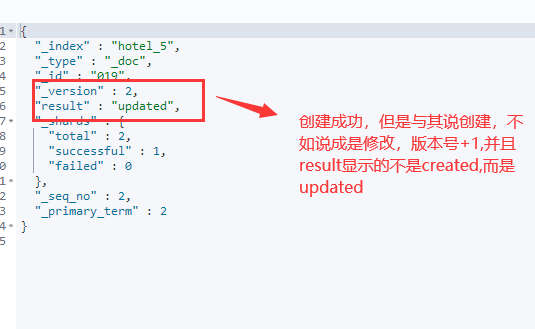
执行后结果如下图所示,发现创建成功,但是创建不如说成是修改,也就是_doc不仅仅可以创建新的文档,它可以在_id已存在的文档基础上进行修改
但是如果换成_create呢?
POST /hotel_5/_create/019
{
    "name":"miss酒店1",
    "city":"厦门",
    "price":"1145.14"
}
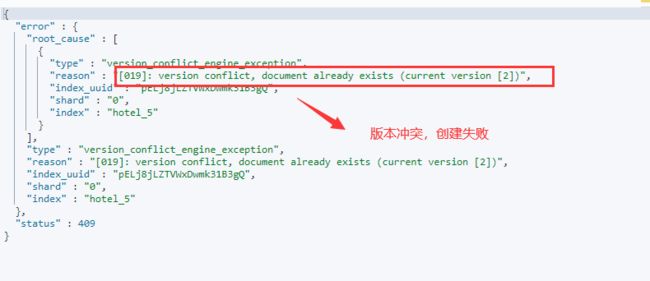
执行结果如下图:发现版本冲突,也就是版本已经大于1了,说明这个文档已经存在了,那么_create命令就会失败,这是和_doc命令的区别!
2.2、批量写入文档
在ES中批量写入文档的请求类型是POST,其请求类型如下:
POST /_bulk    //批量请求
{"index":{"_index":"${index_name}","_id":"${_id}"}}  //指定批量写入的请求
{...}
{"index":{"_index":"${index_name}","_id":"${_id}"}}  //设定写入的文档内容
{...}
{"index":{"_index":"${index_name}","_id":"${_id}"}}
{...}
请求体的第一行表示写入的第一条文档对应的元数据,其中,Index_name表示写入的目标索引,即写入的是哪个索引的哪个文档,第2行表示数据体,第3行表示写入的第二条文档对应的元数据,第4行表示数据体。以此类推,在一次请求里可以写入对条数据。记住,批量操作每一行代表的格式是固定的,不能不如你第一行的内容加个换行符,这样会报错,并且批量操作不允许存在换行符。下面将向hotel_order索引中批量写入3条酒店入住记录数据。
POST /_bulk
{"index":{"_index":"hotel_order","_id":"001"}}
{"username":"Mike JorDan"}
{"index":{"_index":"hotel_order","_id":"002"}}
{"username":"Tom JorDan"}
{"index":{"_index":"hotel_order","_id":"003"}}
{"username":"Kobi JorDan"}
如果你再插入的时候不指定_id,那么同前面的新增文档,_id由ES自动生成。
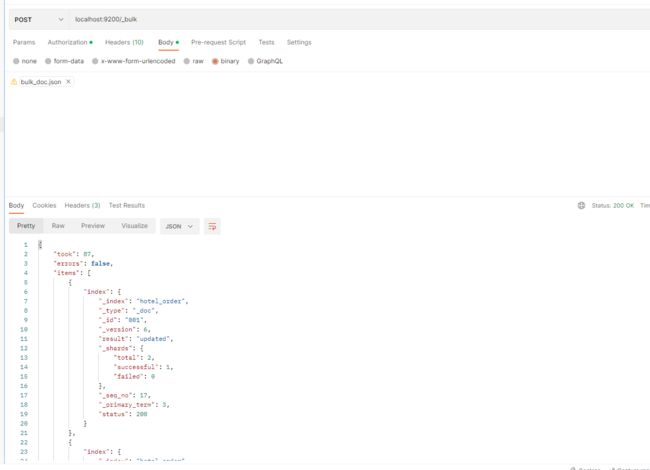
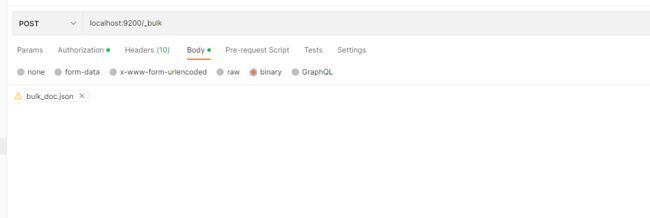
在实际使用过程中需要批量写入的文档比较多,有时甚至上千条或者上万条,这时如果使用Kibana的请求页面就很不方便了,一般使用Linux系统中的curl命令或者postman(Body选择binary)进行数据的批量写入。它们均支持上传文件,用户可以将批量写入的JSON数据保存到文件中,然后使用curl命令进行提交,这里我们以postman为例。
首先通过ES客户端需要进行授权,那么同之前学习Spring Security类似,我们可以通过postman中的Authorization中的Basic Auth进行授权登陆:

然后点击Body中的binary上传需要批量写入的数据的JSON文件,例如本例的bulk_doc.json:
文件内容如下:
{"index":{"_index":"hotel_order","_id":"001"}}
{"username":"Mike JorDan"}
{"index":{"_index":"hotel_order","_id":"002"}}
{"username":"Tom JorDan"}
{"index":{"_index":"hotel_order","_id":"003"}}
{"username":"Kobi JorDan"}
2.3、highLevelClient批量写入文档
在Java高级REST客户端中,批量写入文档需要创建BulkRequest对象并设置对应的索引名称。对于多条预写入的文档,可构建多个IndexRequest对象并调用BulkRequest方法添加这些IndexRequest对象,执行时调用客户端的bulk()方法并把BulkRequest传入即可。bulk()方法返回BulkResponse对象,通过该对象可以获取当前请求的状态。
那么我们为了能够解耦实体类,所以需要创建一个HotelDocRequest类用来封装需要上传的属性,代码如下:
package com.mbw.pojo;

import java.util.List;
import java.util.Map;

import lombok.AllArgsConstructor;
import lombok.Data;
import lombok.NoArgsConstructor;

@Data
@AllArgsConstructor
@NoArgsConstructor
public class HotelDocRequest {
	private Hotel hotel;
	private String indexName;
	private Long indexId;
	private String docIdKey;
	private List<Hotel> hotelList;
	private List<Map<String,Object>> recordMapList;
}
然后是service层代码:
public String bulkIndexDoc(HotelDocRequest hotelDocRequest) {
		String indexName = hotelDocRequest.getIndexName();
		if (CharSequenceUtil.isBlank(indexName)) {
			throw new SearchException("索引名不能为空");
		}
		BulkRequest bulkRequest = new BulkRequest(indexName);
		List<Map<String, Object>> recordMapList = hotelDocRequest.getRecordMapList();
		for (Map<String, Object> dataMap : recordMapList) {
			//这个docIdKey代表map中值为docId对应的键值
			String docIdKey = hotelDocRequest.getDocIdKey();
			String docId = dataMap.get(docIdKey).toString();
			//这里必须每次都使用new IndexRequest(index,type),不然只会插入最后一条记录(这样插入不会覆盖已经存在的Id,也就是不能更新)
			IndexRequest indexRequest = new IndexRequest().id(docId).source(dataMap);
			//添加IndexRequest
			bulkRequest.add(indexRequest);
		}
		bulkRequest.timeout(TimeValue.timeValueSeconds(6));   //设置超时时间
		BulkResponse bulkResponse;
		try {
			bulkResponse = client.bulk(bulkRequest, RequestOptions.DEFAULT);
			if (bulkResponse.hasFailures()) {
				return "失败,原因:" + bulkResponse.buildFailureMessage();
			} else {
				return "成功";
			}
		} catch (IOException e) {
			throw new SearchException("搜索错误");
		}
	}
然后controller,在controller层我们将前端传入的hotelList转化为recordMap,这样避免了前端传入map的复杂传入,只需要写入需要上传的数据即可,类似前面的单条插入的操作:
	@PostMapping("/bulk/create/doc")
	public FoundationResponse<String> bulkIndexDoc(@RequestBody HotelDocRequest hotelDocRequest){
		List<Hotel> hotelList = hotelDocRequest.getHotelList();
		if(CollUtil.isEmpty(hotelList)){
			return FoundationResponse.error(100,"无可插入的有效文档");
		}
		//这里之所以转化是因为json输入List>这个结构非常复杂,所以由后端这边做一次转化,这样前台只需要输入List的json
		ArrayList<Map<String, Object>> recordListMap = new ArrayList<>();
		hotelList.forEach(hotel -> {
			HashMap<String, Object> dataMap = new HashMap<>();
			//这里对比之前的插入单条文档,需要多加入一个id
			dataMap.put("id", hotel.getId());
			dataMap.put("title", hotel.getTitle());
			dataMap.put("city", hotel.getCity());
			dataMap.put("price", hotel.getPrice());
			recordListMap.add(dataMap);
		});
		hotelDocRequest.setRecordMapList(recordListMap);
		String s = esCreateDocService.bulkIndexDoc(hotelDocRequest);
		return FoundationResponse.success(s);
	}
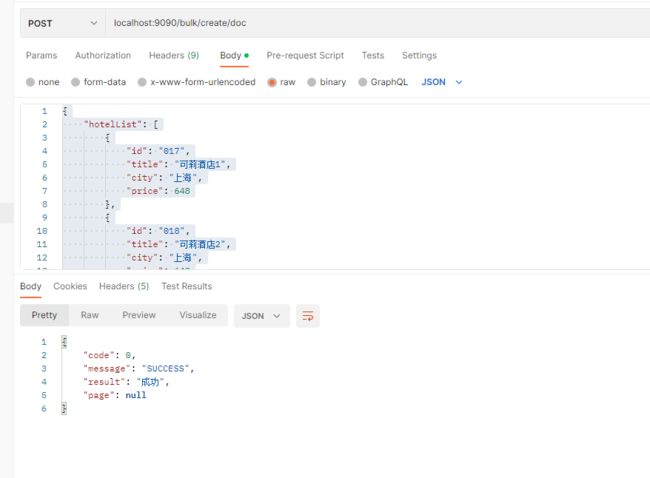
然后重启通过postman调用该接口,body中只需要输入hotelList即可:
{
    "hotelList": [
        {
            "id": "017",
            "title": "可莉酒店1",
            "city": "上海",
            "price": 648
        },
        {
            "id": "018",
            "title": "可莉酒店2",
            "city": "上海",
            "price": 648
        }
    ],
    "docIdKey":"id",
    "indexName":"hotel"
}
