反向代理HAproxy
- HAProxy 介绍和架构
- HAProxy 安装
- HAProxy 基础配置
- HAProxy 调度算法
- HAProxy 高级功能
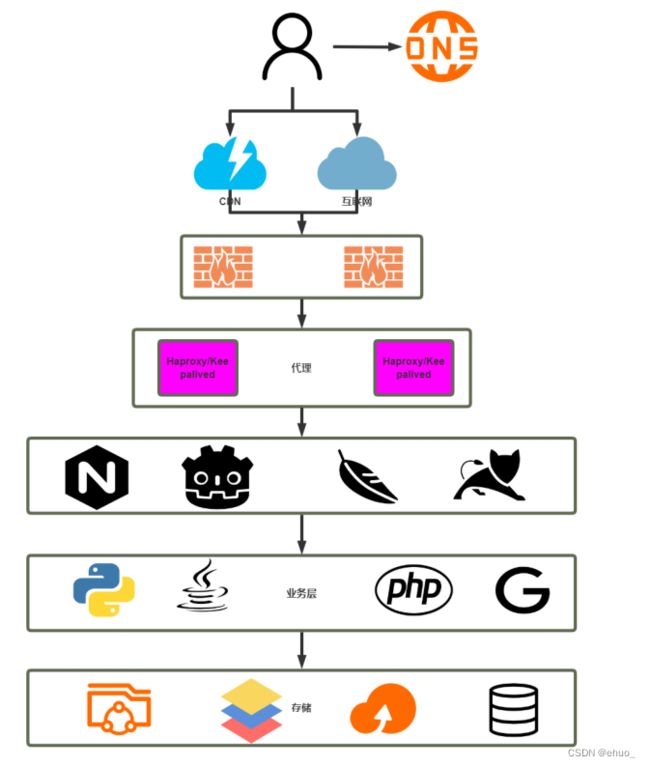
1 Web 架构介绍
2 HAProxy 简介
负载均衡:Load Balance,简称LB,是一种服务或基于硬件设备等实现的高可用反向代理技术,负载均衡将特定的业务(web服务、网络流量等)分担给指定的一个或多个后端特定的服务器或设备,从而提高了公司业务的并发处理能力、保证了业务的高可用性、方便了业务后期的水平动态扩展
2.1 为什么使用负载均衡
- 增加业务并发访问及处理能力–>解决单服务器瓶颈问题
- 节约公网IP地址–>降低IT支出成本
- 隐藏内部服务器IP–>提高内部服务器安全性
- Web服务器的动态水平扩展–>对用户无感知
- 负载均衡配置简单–>固定格式的配置文件
- 负载均衡功能丰富–>支持四层和七层,支持动态下线主机
- 负载均衡性能较强–>并发数万甚至百万
2.2 负载均衡类型
四层
LVS:Linux Virtual Server
Nginx:1.9版之后
HAProxy:High Availability Proxy
七层:
HAProxy
Nginx
2.3 应用场景
四层:Redis、Mysql、RabbitMQ、Memcached等
七层:Nginx、Tomcat、Apache、PHP、图片、动静分离、API等
随着公司业务的发展,公司负载均衡服务既有四层的,又有七层的,通过LVS实现四层和Nginx实现七层的负载均衡对机器资源消耗比较大,并且管理复杂度提升,运维总监要求,目前需要对前端负载均衡服务进行一定的优化和复用,能否用一种服务同既能实现七层负载均衡,又能实现四层负载均衡,并且性能高效,配置管理容易,而且还是开源。
2.4 HAProxy介绍
HAProxy是法国开发者 威利塔罗(Willy Tarreau) 在2000年使用C语言开发的一个开源软件,是一款具备高并发(一万以上)、高性能的TCP和HTTP负载均衡器,支持基于cookie的持久性,自动故障切换,支持正则表达式及web状态统计

2.4.2 社区版
社区版网站:http://www.haproxy.org/
github:https://github.com/haproxy
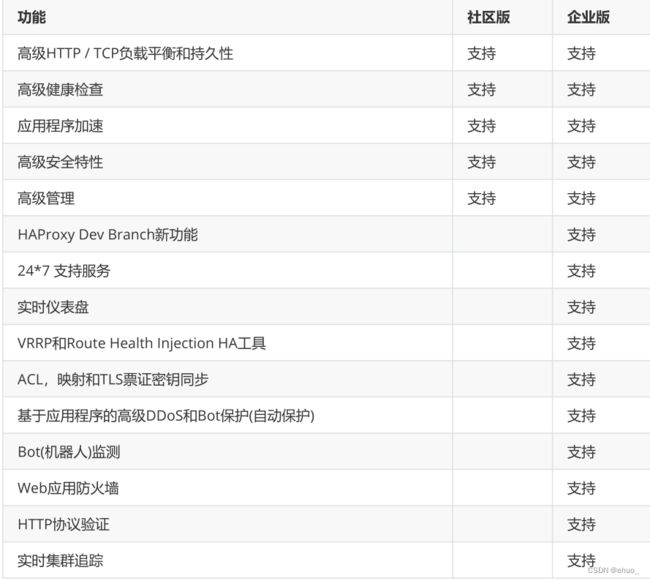
2.4.3 版本对比
2.4.4 HAProxy功能
支持功能:
TCP 和 HTTP反向代理
SSL/TSL服务器
可以针对HTTP请求添加cookie,进行路由后端服务器
可平衡负载至后端服务器,并支持持久连接
支持所有主服务器故障切换至备用服务器
支持专用端口实现监控服务
支持停止接受新连接请求,而不影响现有连接
可以在双向添加,修改或删除HTTP报文首部
响应报文压缩
支持基于pattern实现连接请求的访问控制
通过特定的URI为授权用户提供详细的状态信息
支持http反向代理
支持动态程序的反向代理
支持基于数据库的反向代理
不具备的功能:
正向代理--squid,nginx
缓存代理--varnish
web服务--nginx、tengine、apache、php、tomcat
UDP--目前不支持UDP协议
单机性能--相比LVS性能较差
3 HAProxy 安装
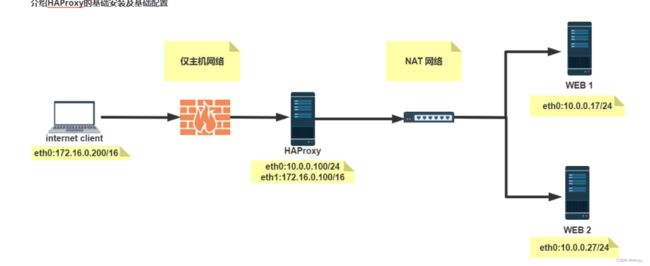
介绍HAProxy的基础安装及基础配置
cat /usr/lib/sysytemd/system/harproxy.service

getent passwd #独立的账号

apt automove --purge haproxy

https://haproxy.debian.net
新版安装
apt-get install software-properties-common
add-apt-repository ppa:vbernat/haproxy-2.0
apt-get update

apt-get install haproxy=2.0.\*
3.3 编译安装 HAProxy
编译安装HAProxy 2.0 LTS版本,更多源码包下载地址:http://www.haproxy.org/download/
3.3.1 解决 lua 环境
HAProxy 支持基于lua实现功能扩展,lua是一种小巧的脚本语言,于1993年由巴西里约热内卢天主教大学(Pontifical Catholic University of Rio de Janeiro)里的一个研究小组开发,其设计目的是为了嵌入应用程序中,从而为应用程序提供灵活的扩展和定制功能。
Lua 官网:www.lua.org
Lua 应用场景
- 游戏开发
- 独立应用脚本
- Web 应用脚本
- 扩展和数据库插件,如MySQL Proxy
- 安全系统,如入侵检测系统
基于docker安装,必须之前有配置文件
cat haproxy.cfg
global
maxconn 100000
stats socket /var/lib/haproxy/haproxy.sock 600 level admin
uid 99
gid 99
daemon

pidfile /var/lib/haproxy/haproxy.pid
log 127.0.0.1 local3 info


defaults
option http-keep-alive
option forwardfor
maxconn 100000
mode http
timeout connect 300000ms
timeout client 300000ms
timeout server 300000ms

listen stats
  mode http
  bind 0.0.0.0:9999
  stats enable
  log global
  stats uri /haproxy-status
  stats auth admin:123456

docker run -d --name my-running-haproxy -v /root/haproxy.cfg:/usr/local/etc/haproxy/haproxy.cfg:ro -p 9999:9999 --sysctl net.ipv4.ip_unprivileged_port_start=0 haproxy:2.6.0-alpine3.16
4 HAProxy 基础配置
GOLBG
创建账号
getent passwd haproxy

groupadd -g 99 haproxy ;
useradd -u 99 -g haproxy -d /var/lib/haproxy -M -r -s /sbin/nologin harproxy
HAProxy 的配置文件haproxy.cfg由两大部分组成,分别是global和proxies部分
global:全局配置段
进程及安全配置相关的参数
性能调整相关参数
Debug参数
proxies:代理配置段
-
defaults:为frontend, backend, listen提供默认配置
-
frontend:前端,相当于nginx中的server {}
-
lbackend:后端,相当于nginx中的upstream {}
-
listen:同时拥有前端和后端配置,配置简单,生产推荐使用
4.1 Global配置
4.1.1 Global 配置参数说明
官方文档:http://cbonte.github.io/haproxy-dconv/2.4/configuration.html#3
chroot #锁定运行目录

deamon #以守护进程运行

stats socket /var/lib/haproxy/haproxy.sock mode 600 level admin process 1
#socket文件,并可以通过此文件管理

user, group, uid, gid  #运行haproxy的用户身份

#nbproc  n #开启的haproxy worker 进程数,默认进程数是一个, nbproc从HAProxy2.5开始不再支持

nbthread  1 #和多进程 nbproc配置互斥(版本有关,CentOS8的haproxy1.8无此问题),指定每个haproxy进程开启的线程数,默认为每个进程一个线程

#如果同时启用nbproc和nbthread 会出现以下日志的错误,无法启动服务
Apr  7 14:46:23 haproxy haproxy: [ALERT] 097/144623 (1454) : config : cannot enable multiple processes if multiple threads areconfigured. Please use either nbproc or nbthread but not both.

#cpu-map 1 0  #绑定haproxy worker 进程至指定CPU,将第1个worker进程绑定至0号CPU
#cpu-map 2 1   #绑定haproxy worker 进程至指定CPU,将第2个worker进程绑定至1号CPU

cpu-map auto:1/1-8 0-7 #haproxy2.4中启用nbthreads,在global配置中添加此选项,可以进行线程和CPU的绑定,nbproc选项2.5版本中将会删除,每个进程中1-8个线程分别绑定0-7号CPU

maxconn n  #每个haproxy进程的最大并发连接数

maxsslconn n  #每个haproxy进程ssl最大连接数,用于haproxy配置了证书的场景下

maxconnrate n  #每个进程每秒创建的最大连接数量

spread-checks n #后端server状态check随机提前或延迟百分比时间,建议2-5(20%-50%)之间,默认值0

pidfile #指定pid文件路径

log 127.0.0.1 local2 info #定义全局的syslog服务器;日志服务器需要开启UDP协议,最多可以定义两个
4.1.3 HAProxy日志配置
HAproxy本身不记录客户端的访问日志.此外为减少服务器负载,一般生产中HAProxy不记录日志.
也可以配置HAProxy利用rsyslog服务记录日志到指定日志文件中
4.1.3.1 HAProxy配置
#在global配置项定义:
log 127.0.0.1 local{1-7} info #基于syslog记录日志到指定设备,级别有(err、warning、
info、debug)
listen web_port
bind 127.0.0.1:80
mode http
log global #开启当前web_port的日志功能,默认不记录日志
server web1  127.0.0.1:8080 check inter 3000 fall 2 rise 5
# systemctl restart haproxy
4.1.3.2 Rsyslog配置
vim /etc/rsyslog.conf
$ModLoad imudp
$UDPServerRun 514
......
local3.*  /var/log/haproxy.log
......
# systemctl restart rsyslog
4.2 Proxies 配置
官方文档:http://cbonte.github.io/haproxy-dconv/2.1/configuration.html#4
defaults [] #默认配置项,针对以下的frontend、backend和listen生效,可以多个name也可以没有name

frontend   #前端servername,类似于Nginx的一个虚拟主机 server和LVS服务集群。

backend   #后端服务器组,等于nginx的upstream和LVS中的RS服务器

listen    #将frontend和backend合并在一起配置,相对于frontend和backend配置更简洁,生产常用默认7层
cd /etc/netplan/
root@ubuntu2004:/etc/netplan# cat 01-netcfg.yaml
network:
  version: 2
  renderer: networkd
  ethernets:
    eth0:
      addresses: [10.0.0.100/24]
      gateway4: 10.0.0.2
      nameservers:
        addresses: [223.5.5.5, 180.76.76.76]
    eth1:
      addresses:
        - 192.168.10.100/24
root@ubuntu2004:/etc/netplan# netplan apply


#增加后端的web页面
apt update; apt install nginx -y

vi /var/www/html/index.html
 10.0.0.104
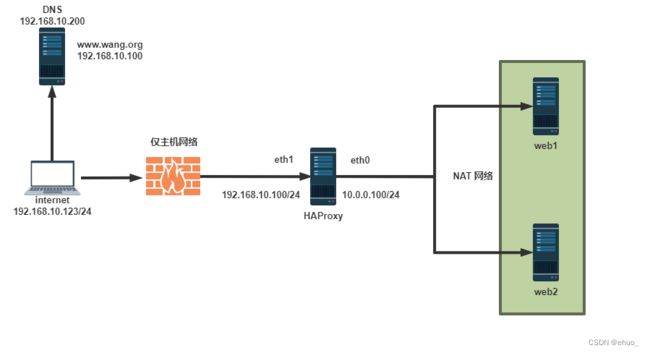
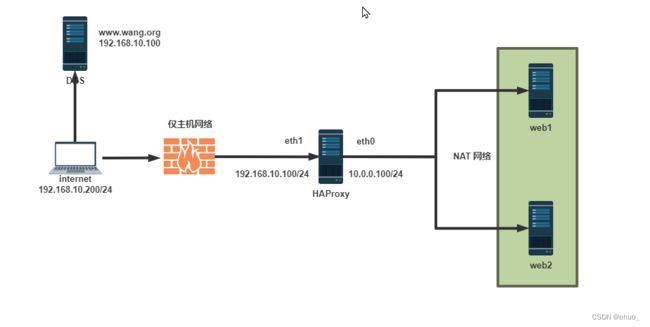
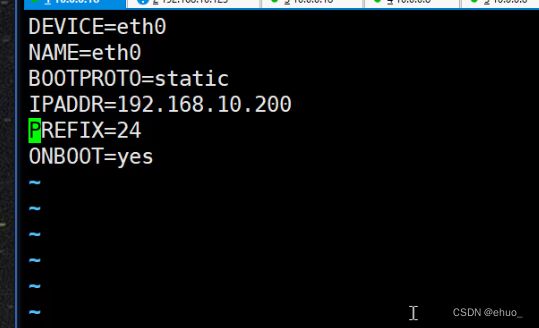
客户端仅主机模式
DNS机器 仅主机
listen ehuo.org_http_80
    bind 192.168.10.100:80   #对方发布的地址且端口
    mode http                #用什么模块,默认http 可以不加
    server web1     10.0.0.103:80
    server web2     10.0.0.104:80


root@ubuntu2004:~# haproxy -c -f /etc/haproxy/haproxy.cfg
Configuration file is valid

#检查语法
root@ubuntu2004:~# systemctl restart haproxy

root@ubuntu2004:~# ss -ntl
State        Recv-Q       Send-Q               Local Address:Port                Peer Address:Port       Process
LISTEN       0            4096                 127.0.0.53%lo:53                       0.0.0.0:*
LISTEN       0            128                        0.0.0.0:22                       0.0.0.0:*
LISTEN       0            4096                       0.0.0.0:54550                    0.0.0.0:*
LISTEN       0            64                         0.0.0.0:35064                    0.0.0.0:*
LISTEN       0            100                        0.0.0.0:25                       0.0.0.0:*
LISTEN       0            4096                       0.0.0.0:47610                    0.0.0.0:*
LISTEN       0            128                      127.0.0.1:6011                     0.0.0.0:*
LISTEN       0            4096                       0.0.0.0:62112                    0.0.0.0:*
LISTEN       0            64                         0.0.0.0:2049                     0.0.0.0:*
LISTEN       0            20480                      0.0.0.0:9999                     0.0.0.0:*
LISTEN       0            4096                       0.0.0.0:111                      0.0.0.0:*
LISTEN       0            20480               192.168.10.100:80                       0.0.0.0:*
LISTEN       0            128                           [::]:22                          [::]:*


#客户端测试
[root@internet ~]# curl www.ehuo.org
10.0.0.103

[root@internet ~]# curl www.ehuo.org
10.0.0.104
[root@internet ~]# curl www.ehuo.org
10.0.0.103

[root@internet ~]# curl www.ehuo.org
10.0.0.104
cat /etc/sysctl.conf
net.ipv4.ip_nonlocal_bind=1
sysctl -p
systemctl restart haproxy

#修改内核参数,作用是有一个不存在的IP,服务也在启动,也能生效;
#修改内核参数,作用是有一个不存在的IP,服务也在启动,也能生效;
4.2.3 Proxies配置-frontend
frontend 配置参数:
bind: #指定HAProxy的监听地址,可以是IPV4或IPV6,可以同时监听多个IP或端口,可同时用于listen字段中

#格式:
bind []: [, ...] [param*]
#注意:如果需要绑定在非本机的IP,需要开启内核参数:net.ipv4.ip_nonlocal_bind=1

backlog  #针对所有server配置,当前端服务器的连接数达到上限后的后援队列长度,注意:不支持backend
nginx与haproxy的对比
nginx
http{
upstream {相当于 backend
	后端服务器
}
server{   相当于frontend
	listen 80;
	server_name www.ehuo.org
}

}
vim /etc/haproxy/haproxy.cfg

frontend www.ehuo.org_httP_80
    bind 192.168.10.100:80
    use_backend www.ehuo.org_nginx      #use连接后端


backend www.ehuo.org_nginx

    server web1  10.0.0.103:80 check
    server web2  10.0.0.104:80 check

root@ubuntu2004:~# haproxy -c -f /etc/haproxy/haproxy.cfg
Configuration file is valid
root@ubuntu2004:~# systemctl restart haproxy
4.2.4 Proxies配置-backend
4.3 使用子配置文件保存配置
当业务众多时,将所有配置都放在一个配置文件中,会造成维护困难。可以考虑按业务分类,将配置信息拆分,放在不同的子配置文件中,从而达到方便维护的目的。
注意: 子配置文件的文件后缀必须为.cfg
mkdir /etc/haproxy/conf.d/
vim /usr/lib/systemd/system/haproxy.service

[Unit]
Description=HAProxy Load Balancer
After=syslog.target network.target

[Service]
ExecStartPre=/usr/sbin/haproxy -f /etc/haproxy/haproxy.cfg  -f /etc/haproxy/conf.d/  -c -q
ExecStart=/usr/sbin/haproxy -Ws -f /etc/haproxy/haproxy.cfg -f /etc/haproxy/conf.d/  -p /var/lib/haproxy/haproxy.pid
ExecReload=/bin/kill -USR2

[Install]
WantedBy=multi-user.target


root@ubuntu2004:~# systemctl daemon-reload
root@ubuntu2004systemctl restart haproxy.service
netplan apply
ubuntu
vim /var/www/html/index.html #nginx默认路径
curl IP

DNS
haproxy -c -f /etc/harproxy/harproxy.cfg
frontend+backed
frontend www.ehuo.org_hhtp_80
	bind 192.168.10.100:80
	use_backend www.ehuo.org_nginx


backend www.ehuo.org_http_80
	server web1 10.0.0.101:80 check
	server web2 10.0.0.102:80 check
使用子配置文件保存配置
mkdir /etc/haproxy/conf.d/
vim /lib/systemd/system/haproxy.service

systemctl daemon-release
5 HAProxy 调度算法
HAProxy通过固定参数 balance 指明对后端服务器的调度算法,该参数可以配置在listen或backend选项中。
HAProxy的调度算法分为静态和动态调度算法,但是有些算法可以根据参数在静态和动态算法中相互转换。
5.1 静态算法
静态算法:按照事先定义好的规则轮询进行调度,不关心后端服务器的当前负载、连接数和响应速度等,且无法实时动态修改权重(只能为0和1,不支持其它值)或者修改后不生效,如果需要修改只能靠重启HAProxy生效。
5.1.1 socat 工具
对服务器动态权重和其它状态可以利用 socat工具进行调整,Socat 是 Linux 下的一个多功能的网络工具,名字来由是Socket CAT,相当于netCAT的增强版.Socat 的主要特点就是在两个数据流之间建立双向通道,且支持众多协议和链接方式。如 IP、TCP、 UDP、IPv6、Socket文件等
echo command | socat stdin /var/lib/haproxy/haproxy.sock


#查看当前haproxy的信息
root@haproxy:~# echo "show info" | socat stdio /var/lib/haproxy/haproxy.sock
Name: HAProxy
Version: 2.6.1-f6ca66d
Release_date: 2022/06/21
Nbthread: 2
Nbproc: 1
Process_num: 1
Pid: 46164
Uptime: 0d 1h17m45s
Uptime_sec: 4665
Memmax_MB: 0
PoolAlloc_MB: 0
PoolUsed_MB: 0
PoolFailed: 0
Ulimit-n: 200032
Maxsock: 200032
Maxconn: 100000
Hard_maxconn: 100000
CurrConns: 0
CumConns: 4661
CumReq: 5
MaxSslConns: 0
CurrSslConns: 0
CumSslConns: 0
Maxpipes: 0
PipesUsed: 0
PipesFree: 0
ConnRate: 0
ConnRateLimit: 0
MaxConnRate: 2
SessRate: 0
SessRateLimit: 0
MaxSessRate: 2
SslRate: 0
SslRateLimit: 0
MaxSslRate: 0
SslFrontendKeyRate: 0
SslFrontendMaxKeyRate: 0
SslFrontendSessionReuse_pct: 0
SslBackendKeyRate: 0
SslBackendMaxKeyRate: 0
SslCacheLookups: 0
SslCacheMisses: 0
CompressBpsIn: 0
CompressBpsOut: 0
CompressBpsRateLim: 0
ZlibMemUsage: 0
MaxZlibMemUsage: 0
Tasks: 16
Run_queue: 0
Idle_pct: 100
node: ubuntu2004
Stopping: 0
Jobs: 5
Unstoppable Jobs: 1
Listeners: 4
ActivePeers: 0
ConnectedPeers: 0
DroppedLogs: 0
BusyPolling: 0
FailedResolutions: 0
TotalBytesOut: 56178
TotalSplicdedBytesOut: 0
BytesOutRate: 0
DebugCommandsIssued: 0
CumRecvLogs: 0
Build info: 2.6.1-f6ca66d
Memmax_bytes: 0
PoolAlloc_bytes: 141544
PoolUsed_bytes: 141544
Start_time_sec: 1657601632
Tainted: 0

root@haproxy:~# echo "show info" | socat stdio /var/lib/haproxy/haproxy.sock | awk '/CurrConns/{print $2}'
0

root@haproxy:~# echo "show servers state" | socat stdio /var/lib/haproxy/haproxy.sock
1
# be_id be_name srv_id srv_name srv_addr srv_op_state srv_admin_state srv_uweight srv_iweight srv_time_since_last_change srv_check_status srv_check_result srv_check_health srv_check_state srv_agent_state bk_f_forced_id srv_f_forced_id srv_fqdn srv_port srvrecord srv_use_ssl srv_check_port srv_check_addr srv_agent_addr srv_agent_port
4 www.ehuo.org_nginx 1 web1 10.0.0.103 2 0 1 1 2500 6 3 4 6 0 0 0 - 80 - 0 0 - - 0
4 www.ehuo.org_nginx 2 web2 10.0.0.104 2 0 1 1 2501 6 3 4 6 0 0 0 - 80 - 0 0 - - 0
#新的写法
#相当于disable server
[root@ubuntu2004 ~]#echo "set server www.wang.org_nginx/web1 state maint" | socat stdio /var/lib/haproxy/haproxy.sock
#维护


#相当于enable server
[root@ubuntu2004 ~]#echo "set server www.wang.org_nginx/web1 state ready" | socat stdio /var/lib/haproxy/haproxy.sock


[root@ubuntu2004 ~]#echo "set server www.wang.org_nginx/web1 state drain" | socat stdio /var/lib/haproxy/haproxy.sock


#禁用命令
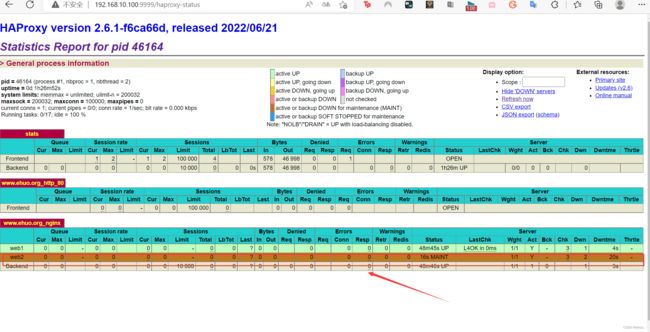
root@haproxy:~# echo disable server www.ehuo.org_nginx/web2 | socat stdio /var/lib/haproxy/haproxy.sock


#启用
root@haproxy:~# echo enable server www.ehuo.org_nginx/web2 | socat stdio /var/lib/haproxy/haproxy.sock

#查看后端的服务器的权重信息
root@haproxy:~# echo "get weight www.ehuo.org_nginx/web1" | socat stdio /var/lib/haproxy/haproxy.sock
1 (initial 1)


#将后端服务器软下线,即weight设为0
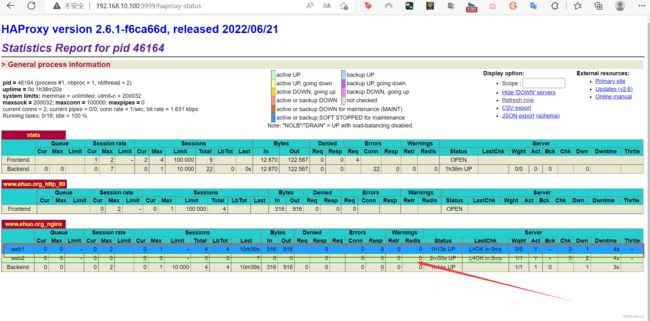
root@haproxy:~# echo "set weight www.ehuo.org_nginx/web1 0" | socat stdio /var/lib/haproxy/haproxy.sock

root@haproxy:~# echo "get weight www.ehuo.org_nginx/web1" | socat stdio /var/lib/haproxy/haproxy.sock
0 (initial 1)

#设置权重为2
root@haproxy:~# echo "set weight www.ehuo.org_nginx/web1 2" | socat stdio /var/lib/haproxy/haproxy.sock
权重设置为0
范例:实现容器服务的上线和下线
开发提交gitlab
下载源码
编译war,jar
制作镜像
上传harbor

在调度器haproxy下线服务器
docker rm app:v1.0 ;docker run app:v2.0
在调度器haproxy上线服务器

#镜像优化加速
root@web2:~# cat /etc/docker/daemon.json
{
    "registry-mirrors": ["https://si7y70hh.mirror.aliyuncs.com"],
    "insecure-registries": ["harbor.ehuo.org"]
}

docker info
Registry: https://index.docker.io/v1/
 Labels:
 Experimental: false
 Insecure Registries:
  harbor.ehuo.org
  127.0.0.0/8
 Registry Mirrors:
  https://si7y70hh.mirror.aliyuncs.com/
 Live Restore Enabled: false


mkdir /data/www/ -p
vim /data/www/index.html
docker-nginx1

docker run -d  -p 81:80 -v /data/www:/usr/share/nginx/html --name web1 nginx

systemctl restart haproxy


#ssh keygen认证
 ssh-keygen
ssh-copy-id WEBIP

ssh webIP docker run -d  -p 81:80 -v /data/www:/usr/share/nginx/html --name web1 nginx


root@haproxy:/etc/haproxy/conf.d# cat www.ehuo.org.cfg
frontend www.ehuo.org_http_80
    bind 192.168.10.100:80
    use_backend www.ehuo.org_nginx      #use连接后端


backend www.ehuo.org_nginx

    server 10.0.0.103 10.0.0.103:80 check
    server 10.0.0.104 10.0.0.104:80 check


cat host_up_down.sh

WEB_SERVERS="
10.0.0.103
10.0.0.104
"
for i in $WEB_SERVERS;do
    echo "set server  www.ehuo.org_nginx/$i state maint" | socat stdio /var/lib/haproxy/haproxy.sock
    ssh $i docker rm -f nginx
    ssh $i "echo  DOCKER $i WEBSITE $1 >   /data/www/index.html"
    ssh $i docker run -d -p 80:80 -v /data/www:/usr/share/nginx/html --name nginx nginx
    sleep 10  #停一段时间,稳定上线
    echo "set server  www.ehuo.org_nginx/$i state ready" | socat stdio /var/lib/haproxy/haproxy.sock
done
范例:利用工具socat 对服务器动态权重调整
haproxy代理,使用nginx的平滑升级

dd if=/dev/zero of=/var/www/html/test.img bs=1M count=100
wget --limit-rate 1024
5.1.2 static-rr
static-rr:基于权重的轮询调度,不支持运行时利用socat进行权重的动态调整(只支持0和1,不支持其它值)及后端服务器慢启动,其后端主机数量没有限制,相当于LVS中的 wrr(0% 100%)
![]()
root@haproxy:/etc/haproxy/conf.d# cat www.ehuo.org.cfg
frontend www.ehuo.org_http_80
    bind 192.168.10.100:80
    use_backend www.ehuo.org_nginx      #use连接后端


backend www.ehuo.org_nginx
    balance static-rr
    server web1  10.0.0.103:80 check
    server web2  10.0.0.104:80 check
5.1.3 first
first:根据服务器在列表中的位置,自上而下进行调度,但是其只会当第一台服务器的连接数达到上限,新请求才会分配给下一台服务,因此会忽略服务器的权重设置,==此方式使用较少不支持用socat进行动态修改权重,==可以设置0和1,可以设置其它值但
wget --limit-rate 1k /hhtp://ip/test.img
root@haproxy:/etc/haproxy/conf.d# cat www.ehuo.org.cfg
frontend www.ehuo.org_http_80
    bind 192.168.10.100:80
    use_backend www.ehuo.org_nginx      #use连接后端


backend www.ehuo.org_nginx
    balance first
    server web1  10.0.0.103:80 maxconn 2 weight 1 check inter 3000 fall 2 rise 5
    server web2  10.0.0.104:80 weight 1 check inter 3000 fall 2 rise 5
测试访问效果
同时运行下面命令,观察结果
#用wget下载文件测试才能看到效果
wget --limit-rate 1k http://192.168.10.100/test.img

#curl测试不成功

#while true;do curl http://10.0.0.7/index.html ; sleep 0.1;done

#动态修改权重,不报错,但不生效

[root@haproxy ~]#echo "set weight www.wang.org_nginx/10.0.0.102 10" | socat stdio /var/lib/haproxy/haproxy.sock
5.2 动态算法
动态算法:基于后端服务器状态进行调度适当调整,新请求将优先调度至当前负载较低的服务器,且权重可以在haproxy运行时动态调整无需重启
LVS
4种静态
RR WRR SH DH
6种动态
LC WLC SED NQ LBLC LBLCR
5.2.1 roundrobin
roundrobin:基于权重的轮询动态调度算法,支持权重的运行时调整,不同于lvs中的rr轮训模式,HAProxy中的roundrobin支持慢启动(新加的服务器会逐渐增加转发数),其每个后端backend中最多支持4095个real server,支持对real server权重动态调整,roundrobin为默认调度算法,此算法使用广泛
==慢启动(新加的服务器会逐渐增加转发数)==动态算法才支持
root@haproxy:/etc/haproxy/conf.d# cat www.ehuo.org.cfg
frontend www.ehuo.org_http_80
    bind 192.168.10.100:80
    use_backend www.ehuo.org_nginx      #use连接后端


backend www.ehuo.org_nginx
    balance static-rr
    server web1  10.0.0.103:80 check
    server web2  10.0.0.104:80 check
支持动态调整权重:
root@haproxy:~# echo "get weight www.ehuo.org_nginx/web1 " | socat stdio /var/lib/haproxy/haproxy.sock
3 (initial 3)

root@haproxy:~# echo "set weight www.ehuo.org_nginx/web1  1" | socat stdio /var/lib/haproxy/haproxy.sock
1 (initial 1)
5.2.2 leastconn
leastconn 加权的最少连接的动态,支持权重的运行时调整和慢启动,即根据当前连接最少的后端服务器而非权重进行优先调度(新客户端连接),比较适合长连接的场景使用,比如:MySQL等场景。
#安装redis   ======== 默认不支持远程连接
vim /etc/redis/redis.conf
bind 0.0.0.0
systemctl restart redis
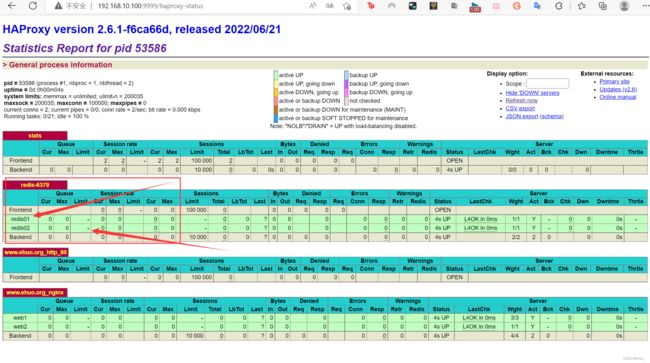
root@haproxy:/etc/haproxy/conf.d# cat redis.cfg
listen redis-6379
	mode tcp    #redis是基于tcp协议
    bind 192.168.10.100:6379
    balance leastconn
    server redis01 10.0.0.103:6379 check
    server redis02 10.0.0.104:6379 check
root@haproxy:systemctl restart haproxy

#动态算法,可以设置优先级

root@haproxy:~# echo "set weight redis-6379/redis01 10" | socat stdio /var/lib/haproxy/haproxy.sock

root@haproxy:~# echo "get weight redis-6379/redis01 " | socat stdio /var/lib/haproxy/haproxy.sock
10 (initial 1)
5.2.3 random 算法
在1.9版本开始增加 random的负载平衡算法,其基于随机数作为一致性hash的key,随机负载平衡对于大型服务器场或经常添加或删除服务器非常有用,支持weight的动态调整,weight较大的主机有更大概率获取新请求
random配置实例
root@haproxy:/etc/haproxy/conf.d# cat www.ehuo.org.cfg
frontend www.ehuo.org_http_80
    bind 192.168.10.100:80
    use_backend www.ehuo.org_nginx


backend www.ehuo.org_nginx
    balance random
    server web1  10.0.0.103:80 check
    server web2  10.0.0.104:80 check
5.3 其他算法
其它算法即可作为静态算法,又可以通过选项成为动态算法
5.3.1 source 算法
源地址hash,基于用户源地址hash并将请求转发到后端服务器,后续同一个源地址请求将被转发至同一个后端web服务器。此方式当后端服务器数据量发生变化时,会导致很多用户的请求转发至新的后端服务器,默认为静态方式,但是可以通过hash-type选项进行更改
这个算法一般是在不插入Cookie的TCP模式下使用,也可给不支持会话cookie的客户提供会话粘性,适用于需要session会话保持但不支持cookie和缓存的场景
地址有两种转发客户端请求到后端服务器的服务器选取计算方式,分别是取模法和一致性hash
5.3.1.1 map-base 取模法
map-based:取模法,对source地址进行hash计算,再基于服务器总权重的取模,最终结果决定将此
请求转发至对应的后端服务器。
此方法是静态的,即不支持在线调整权重,不支持慢启动,可实现对后端服务器均衡调度。缺点是当服务器的总权重发生变化时,即有服务器上线或下线,都会因总权重发生变化而导致调度结果整体改变,hash-type 指定的默认值为此算法
所谓取模运算,就是计算两个数相除之后的余数,10%7=3, 7%4=3
map-based算法:基于权重取模,hash(source_ip)%所有后端服务器相加的总权重
root@haproxy:/etc/haproxy/conf.d# cat www.ehuo.org.cfg
frontend www.ehuo.org_http_80
    bind 192.168.10.100:80
    use_backend www.ehuo.org_nginx      #use连接后端


backend www.ehuo.org_nginx
    balance source
    hash-type map-based     #默认可以不加
    server web1  10.0.0.103:80 check
    server web2  10.0.0.104:80 check


#不支持动态调整权重值
[root@haproxy ~]#echo "set weight www.ehuo.org_nginx/web1 10" | socat stdio /var/lib/haproxy/haproxy.sock
Backend is using a static LB algorithm and only accepts weights '0%' and '100%'.

#只能动态上线和下线
[root@haproxy ~]#echo "set weightwww.ehuo.org_nginx/web1 0" | socat stdio /var/lib/haproxy/haproxy.sock
[root@haproxy conf.d]#echo "get weight www.ehuo.org_nginx/web1 " | socat stdio /var/lib/haproxy/haproxy.sock
0 (initial 1)
5.3.1.2 一致性 hash
一致性哈希,当服务器的总权重发生变化时,对调度结果影响是局部的,不会引起大的变动,hash(o)mod n ,该hash算法是动态的,支持使用 socat等工具进行在线权重调整,支持慢启动
root@haproxy:/etc/haproxy/conf.d# cat www.ehuo.org.cfg
frontend www.ehuo.org_http_80
    bind 192.168.10.100:80
    use_backend www.ehuo.org_nginx      #use连接后端


backend www.ehuo.org_nginx
    balance source
    hash-type consistent      #不同之处,变为动态算法
    server web1  10.0.0.103:80 check
    server web2  10.0.0.104:80 check
5.3.2 uri 算法
基于对用户请求的URI的左半部分或整个uri做hash,再将hash结果对总权重进行取模后,根据最终结果将请求转发到后端指定服务器,适用于后端是缓存服务器场景,默认是静态算法,也可以通过hash-type指定map-based和consistent,来定义使用取模法还是一致性hash。
基于应用层,(配置缓存)
uri=urn+url
注意:此算法基于应用层,所以只支持 mode http ,不支持 mode tcp
://:@:/;?#
左半部分:/;
整个uri:/;?#
uri 取模法配置示例
root@haproxy:/etc/haproxy/conf.d# cat www.ehuo.org.cfg
frontend www.ehuo.org_http_80
    bind 192.168.10.100:80
    use_backend www.ehuo.org_nginx


backend www.ehuo.org_nginx
    balance uri
    server web1  10.0.0.103:80 check
    server web2  10.0.0.104:80 check


==uri 一致性hash配置示例==

root@haproxy:/etc/haproxy/conf.d# cat www.ehuo.org.cfg
frontend www.ehuo.org_http_80
    bind 192.168.10.100:80
    use_backend www.ehuo.org_nginx


backend www.ehuo.org_nginx
    balance uri
    hash-tpye consistent
    server web1  10.0.0.103:80 check
    server web2  10.0.0.104:80 check
5.3.3 url_param 算法
url_param对用户请求的url中的 params 部分中的一个参数key对应的value值作hash计算,并由服务器总权重相除以后派发至某挑出的服务器;通常用于追踪用户,以确保来自同一个用户的请求始终发往同一个real server,如果无没key,将按roundrobin算法
#假设:
url = http://www.ehuo.com/foo/bar/index.php?key=value
#则:
host = "www.ehuo.com"
url_param = "key=value"

url_param取模法配置示例

balance url_param userid   #url_param hash

url_param一致性hash配置示例

balance url_param userid #对url_param的值取hash
hash-type consistent
5.3.4 hdr 算法
针对用户每个http头部(header)请求中的指定信息做hash,此处由 name 指定的http首部将会被取出并做hash计算,然后由服务器总权重取模以后派发至某挑出的服务器,如果无有效值,则会使用默认的轮询调度。
balance hdr
listen web_host
bind 10.0.0.7:80,:8801-8810,10.0.0.7:9001-9010
mode http
log global
balance hdr(User-Agent)
#balance hdr(host)
server web1 10.0.0.17:80 weight 1 check inter 3000 fall 2 rise 5
server web2 10.0.0.27:80 weight 1 check inter 3000 fall 2 rise 5


一致性hash配置示例
listen web_host
bind 10.0.0.7:80,:8801-8810,10.0.0.7:9001-9010
mode http
log global
balance hdr(User-Agent)
hash-type consistent
server web1 10.0.0.17:80 weight 1 check inter 3000 fall 2 rise 5
server web2 10.0.0.27:80 weight 1 check inter 3000 fall 2 rise 5
5.3.5 rdp-cookie 算法
rdp-cookie对远windows远程桌面的负载,使用cookie保持会话,默认是静态,也可以通过hash-type指定map-based和consistent,来定义使用取模法还是一致性hash。
5.3.6 算法总结
#静态
static-rr--------->tcp/http
first------------->tcp/http

#动态
roundrobin-------->tcp/http
leastconn--------->tcp/http
random------------>tcp/http

#以下静态和动态取决于hash_type是否consistent
source------------>tcp/http
Uri--------------->http
url_param--------->http
hdr--------------->http
rdp-cookie-------->tcp

#各种算法使用场景
first #使用较少

static-rr #做了session共享的 web 集群
roundrobin
random

leastconn #数据库
source #基于客户端公网 IP 的会话保持

Uri--------------->http  #缓存服务器,CDN服务商,蓝汛、百度、阿里云、腾讯
url_param--------->http  #可以实现session保持

hdr #基于客户端请求报文头部做下一步处理

rdp-cookie #基于Windows主机,很少使用
6 HAProxy 高级功能
6.1 基于 Cookie 的会话保持
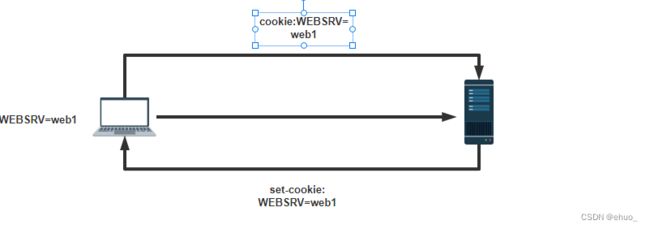
cookie value:为当前server指定cookie值,实现基于cookie的会话黏性,相对于基于 source 地址hash 调度算法对客户端的粒度更精准,但同时也加重了haproxy负载,目前此模式使用较少, 已经被session共享服务器代替
注意:不支持 tcp mode,使用 http mode
3种会话保持
==============================================================================
会话绑定   == 同一个客户访问,往同一个后端发送。
算法实现:源地址哈希 soucre   cookie地址  cookie的值

===============================================================================
会话复制
session复制

===============================================================================
会话服务器
6.1.1 配置选项
cookie name [ rewrite | insert | prefix ][ indirect ] [ nocache ][ postonly ] [preserve ][ httponly ] [ secure ][ domain ]* [ maxidle  ][ maxlife ]

name:         #cookie 的 key名称,用于实现持久连接
insert         #插入新的cookie.默认不插入
indirect       #客户端有了,就不发了
nocache        #不缓存,当client和hapoxy之间有缓存服务器(如:CDN)时,不允许中间缓存器缓存cookie,因为这会导致很多经过同一个CDN的请求都发送到同一台后端服务器
6.1.2 配置示例
root@haproxy:/etc/haproxy/conf.d# cat www.ehuo.org.cfg
frontend www.ehuo.org_http_80
    bind 192.168.10.100:80
    use_backend www.ehuo.org_nginx      #use连接后端


backend www.ehuo.org_nginx
    balance roundrobin
    mode http
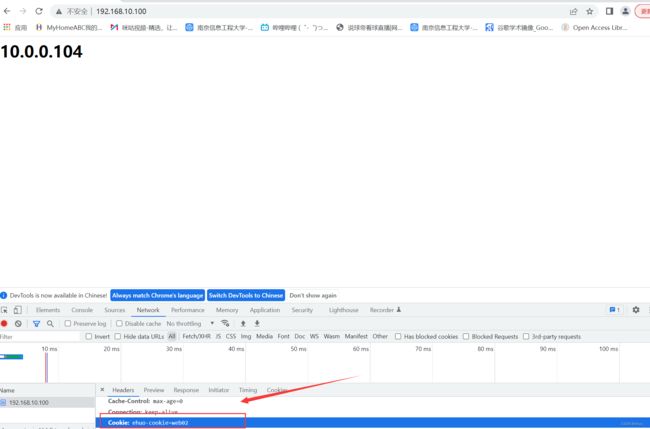
    cookie ehuo-cookie insert nocache indirect
    server web1  10.0.0.103:80 check  cookie web01
    server web2  10.0.0.104:80 check  cookie web02
6.1.3 验证 Cookie 信息
保存cookie
curl -c cookie.txt http://192.168.10.100
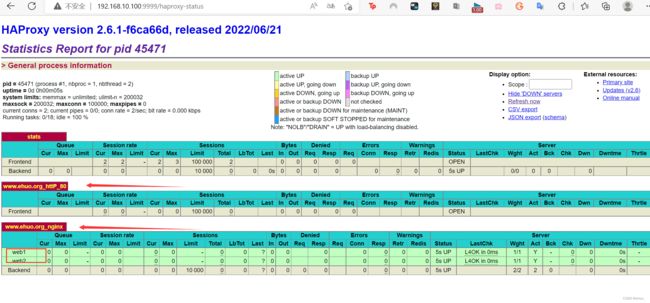
6.2 HAProxy 状态页
通过web界面,显示当前HAProxy的运行状态
官方帮助
http://cbonte.github.io/haproxy-dconv/2.4/configuration.html#4-stats%20admin
http://cbonte.github.io/haproxy-dconv/2.0/configuration.html#4-stats%20admin
6.2.1 状态页配置项
应用的状态页
nginx
apache
php-fpm
tomcat
haproxy
stats enable  # 基于默认的参数启用stats page
stats hiden 		#隐藏
stats refresh   #刷新

stats uri  /
stats realm
stats auth  # 账号进入

stats enable  #基于默认的参数启用stats page

stats hide-version  #将状态页中haproxy版本隐藏

stats refresh  #设定自动刷新时间间隔,默认不自动刷新,以秒为单位

stats uri  #自定义stats page uri,默认值:/haproxy?stats

stats realm  #账户认证时的提示信息,示例:stats realm  HAProxy\Statistics

stats auth : #认证时的账号和密码,可定义多个用户,每行指定一个用户.默认:noauthentication

stats admin { if | unless }  #启用stats page中的管理功能
启用页面
6.2.2 启用状态页示例
#脚本编译的状态页,参考
root@haproxy:/etc/haproxy# vim haproxy.cfg

global
maxconn 100000
stats socket /var/lib/haproxy/haproxy.sock mode 600 level admin
uid 99
gid 99
daemon

pidfile /var/lib/haproxy/haproxy.pid
log 127.0.0.1 local3 info    #日志

defaults
option http-keep-alive
option forwardfor
maxconn 100000
mode http
timeout connect 300000ms
timeout client 300000ms
timeout server 300000ms

listen stats
    mode http
    bind 0.0.0.0:9999
    stats enable
    log global                 #全局模式 日志
    stats uri /haproxy-status

#listen kubernetes-6443
#    bind 192.168.10.100:6443
#    mode tcp
#    log global
#    server 192.168.10.101 192.168.10.101:6443 check inter 3000 fall 2 rise 5
#    server 192.168.10.102 192.168.10.102:6443 check inter 3000 fall 2 rise 5
#    server 192.168.10.103 192.168.10.102:6443 check inter 3000 fall 2 rise 5
###################################################################################
=========================================================
listen haproxy-status

	bind 内网IP(最好):9999
	log go
    stats enable
    mode http   #默认
	#stats hide-version
	stats uri /haproxy-status      #自定义stats page uri
	stats realm HAProxy\ Stats\ Page   #账户认证时的提示信息
	stats auth haadmin:123456  #支持多个用户
	stats auth admin:123456
 	#stats refresh 30
	stats admin if TRUE  #开启管理功能,基于安全原因,不建议开启
内网访问加个链接地址
/haproxy?stats
6.2.3 登录状态页说明
pid = 27134 (process #1, nbproc = 1, nbthread = 1) #pid为当前pid号,process为当前进程号,nbproc和nbthread为一共多少进程和每个进程多少个线程

uptime = 0d 0h00m04s #启动了多长时间

system limits: memmax = unlimited; ulimit-n = 200029 #系统资源限制:内存/最大打开文件数/

maxsock = 200029; maxconn = 100000; maxpipes = 0 #最大socket连接数/单进程最大连接数/最大管道数maxpipes
current conns = 2; current pipes = 0/0; conn rate = 2/sec; bit rate = 0.000 kbps
#当前连接数/当前管道数/当前连接速率

Running tasks: 1/14; idle = 100 % #运行的任务/当前空闲率

active UP: #在线服务器
backup UP: #标记为backup的服务器
active UP, going down: #监测未通过正在进入down过程
backup UP, going down: #备份服务器正在进入down过程
active DOWN, going up: #down的服务器正在进入up过程
backup DOWN, going up: #备份服务器正在进入up过程
active or backup DOWN: #在线的服务器或者是backup的服务器已经转换成了down状态
not checked: #标记为不监测的服务器

active or backup DOWN for maintenance (MAINT) #active或者backup服务器人为下线的

active or backup SOFT STOPPED for maintenance #active或者backup被人为软下线(人为将weight改成0)
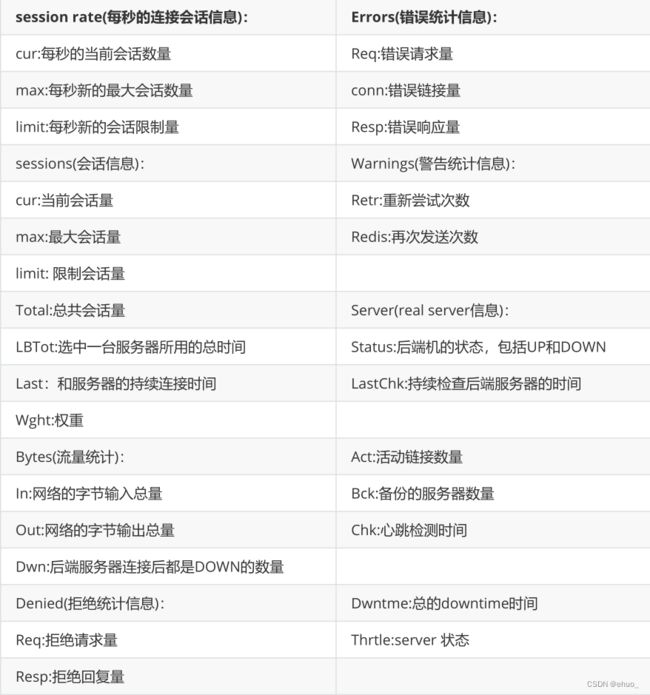
6.2.4 Backend Server 信息说明
6.3 IP透传
web服务器中需要记录客户端的真实IP地址,用于做访问统计、安全防护、行为分析、区域排行等场景。
6.3.1 Layer 4 与 Layer 7
- 四层:IP+PORT转发
- 七层:协议+内容交换
6.3.1.1 四层负载
LVS 传统的四层负载设备中,把client发送的报文目标地址(原来是负载均衡设备的IP地址),根据均衡设备设置的选择web服务器的规则选择对应的web服务器IP地址,这样client就可以直接跟此服务器建立TCP连接并发送数据,而四层负载自身不参与建立连接
而和LVS不同,haproxy是伪四层负载均衡,因为haproxy 需要分别和前端客户端及后端服务器建立连接
6.3.1.2 七层代理
七层负载均衡服务器起了一个反向代理服务器的作用,服务器建立一次TCP连接要三次握手,而client要访问Web Server要先与七层负载设备进行三次握手后建立TCP连接,把要访问的报文信息发送给七层负载均衡;然后七层负载均衡再根据设置的均衡规则选择特定的 Web Server,然后通过三次握手与此台Web Server建立TCP连接,然后Web Server把需要的数据发送给七层负载均衡设备,负载均衡设备再把数据发送给client;所以,七层负载均衡设备起到了代理服务器的作用,七层代理需要和Client和后端服务器分别建立连接
6.3.2 四层IP透传
vim layer4.cfg

listen web_http_nodes
    bind 192.168.10.100:80
    mode tcp
    server web1 10.0.0.103:80  send-proxy check inter 3000 fall 3 rise 5 #send-proxy


#nginx 配置:在访问日志中通过变量$proxy_protocol_addr 记录透传过来的客户端IP
http {
   log_format main  '$remote_addr - $remote_user [$time_local] "$request" "$proxy_protocol_addr"'
   server {
  		 listen    80 proxy_protocol; #启用此项,将无法直接访问此网站,只能通过四层代理访问
  		 server_name 10.0.0.103;


  #在nginx服务器上开启日志格式和proxy_protocal

  抓包可以看到 continuation 信息中带有客户端的源IP
6.3.3 七层IP透传
当haproxy工作在七层的时候,也可以透传客户端真实IP至后端服务器
6.3.3.1 HAProxy配置
在由haproxy发往后端主机的请求报文中添加“X-Forwarded-For"首部,其值为前端客户端的地址;用于向后端主发送真实的客户端IP
option forwardfor [ except  ] [ header  ] [ if-none ]

[ except  ]:请求报请来自此处指定的网络时不予添加此首部,如haproxy自身所在网络
[ header  ]:使用自定义的首部名称,而非“X-Forwarded-For",示例:X-client
[ if-none ] 如果没有首部才添加首部,如果有使用默认值
#haproxy 配置
defaults

#此为默认值,首部字段默认为:X-Forwarded-For
option forwardfor

#或者自定义首部,如:X-client
option forwardfor except 127.0.0.0/8 header X-client   #不区分大小写

listen配置

listen  web_host
	bind 192.168.10.100:80
	mode http      #一定是http模式,tcp模式不会传递客户端IP
	log global
	balance random
	server web1 10.0.0.103:80 weight 1 check
	server web2 10.0.0.104:80 weight 1 check
6.3.3.2 后端 web 服务器日志格式配置
配置web服务器,记录负载均衡透传的客户端IP地址
#nginx 日志格式:默认就支持
$proxy_add_x_forwarded_for:包括客户端IP和中间经过的所有代理的IP
$http_x_forwarded_For:只有客户端IP
log_format main  '"$proxy_add_x_forwarded_for" - $remote_user [$time_local]
"$request" '
           '$status $body_bytes_sent "$http_referer" '
           '"$http_user_agent" $http_x_forwarded_For';
6.4 报文修改
在http模式下,基于实际需求修改客户端的请求报文与响应报文,通过reqadd和reqdel在请求报文添加删除字段,通过rspadd与rspidel在响应报文中添加与删除字段。
#添加向后端服务器发送的请求报文首部
http-request add-header   [ { if | unless }  ]
#示例:http-request add-header X-Haproxy-Current-Date %T

#删除向后端服务器发送的请求报文首部
http-request del-header  [ { if | unless }  ]

#添加向客户端发送的响应报文首部
http-response add-header   [ { if | unless }  ]

#删除向客户端发送的响应报文首部
http-response del-header
#示例:http-response del-header Server
范例: 修改向后端服务器的请求首部user-agent
listen www.ehuo.org_http_80
    mode http
    bind 192.168.10.100:80

    http-request del-header user-agent
    http-request add-header user-agent test-browser

    server web1  10.0.0.103:80 check  cookie web01
    server web2  10.0.0.104:80 check  cookie web02
~
tail -f /var/log/nginx/access.log
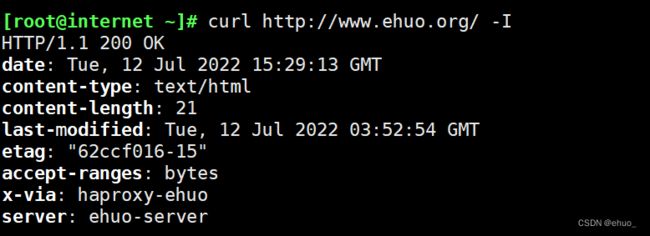
范例: 修改向客户端发送的响应报文首部,实现自定义Server首部
listen www.ehuo.org_http_80
    mode http
    bind 192.168.10.100:80


    http-response add-header x-via haproxy-ehuo
    http-response del-header server
    http-response add-header server ehuo-server


    server web1  10.0.0.103:80 check  cookie web01
    server web2  10.0.0.104:80 check  cookie web02
6.5 自定义日志格式
log global 开启日志功能,默认只会在记录下面格式的日志
option httplog 可以采用 http 格式记录下来,并且可以使用相关指令将特定信息记录在haproxy的日志中
但一般不建议开启,这会加重 HAProxy 负载
6.5.1 配置选项
log global #开启记录日志,默认不开启

option httplog              #开启记录httplog日志格式选项

capture cookie  len  #捕获请求和响应报文中的 cookie及值的长度,将之记录到日志

capture request header  len  #捕获请求报文中指定的首部内容和长度并记录日志

capture response header  len  #捕获响应报文中指定的内容和长度首部并记录日志


#示例:
log global
option httplog
capture request header Host len  256
capture request header User-Agent len 512
capture request header Referer len 15
capture request header X-Forwarded-For len 15
6.6 压缩功能
对响应给客户端的报文进行压缩,以节省网络带宽,但是会占用部分CPU性能
建议在后端服务器开启压缩功能,而非在HAProxy上开启压缩
6.6.1 配置选项
ompression algo  ... #启用http协议中的压缩机制,常用算法有gzip,deflate

#压缩算法支持下面类型:

	identity #debug调试使用的压缩方式
	gzip #常用的压缩方式,与各浏览器兼容较好
	deflate #有些浏览器不支持
	raw-deflate #新式的压缩方式

compression type  ... #要压缩的文件类型

#示例:
compression algo gzip deflate
compression type text/html text/css text/plain
root@web1:~# iptables -A INPUT -s 10.0.0.100 -p tcp --dport 80 -j REJECT
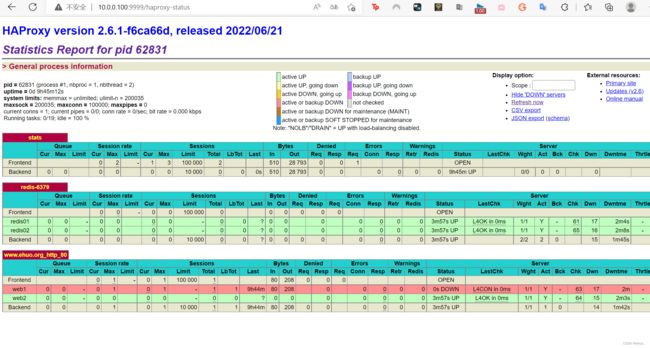
6.7 后端服务器健康性监测
6.7.1 三种状态监测方式
基于四层的传输端口做状态监测,此为默认方式
基于指定 URI 做状态监测,需要访问整个页面资源,占用更多带宽
基于指定 URI 的 request 请求头部内容做状态监测,占用较少带宽,建议使用此方式
6.7.2 基于应用层http协议进行健康性检测
基于应用层http协议,采有不同的监测方式,对后端real server进行状态监测
注意: 此方式会导致在后端服务器生成很多的HAProxy发起的访问日志
option httpchk  #启用七层健康性检测,对tcp 和 http 模式都支持,默认为:OPTIONS /HTTP/1.0

option httpchk
option httpchk
option httpchk

#期望以上检查得到的响应码
http-check expect [!]

#示例:
http-check expect status 200
http-check expect ! rstatus ^5 #支持正则表达式


option httpchk GET /monitor/check.html HTTP/1.1 #注意:HTTP/1.1强制要求必须有Host字段

option httpchk HEAD /monitor/check.html HTTP/1.1\r\nHost:\ 10.0.0.7 #使用HEAD减少网络流量
6.8 ACL
访问控制列表(ACL,Access Control Lists)是一种基于包过滤的访问控制技术,它可以根据设定的条件对经过服务器传输的数据包进行过滤(条件匹配),即对接收到的报文进行匹配和过滤,基于请求报文头部中的源地址、源端口、目标地址、目标端口、请求方法、URL、文件后缀等信息内容进行匹配并执行进一步操作,比如允许其通过或丢弃。
官方文档
http://cbonte.github.io/haproxy-dconv/2.1/configuration.html#7

http://cbonte.github.io/haproxy-dconv/2.0/configuration.html#7
6.8.1 定义ACL配置选项
acl     [flags]     [operator]    []
acl    名称      匹配规范     匹配模式   具体操作符      操作对象类型
6.8.1.1 ACL-Name
acl  image_service hdr_dom(host)  -i  img.wang.com

#ACL名称,可以使用大字母A-Z、小写字母a-z、数字0-9、冒号:、点.、中横线和下划线,并且严格区分大小写,比如:my_acl和My_Acl就是两个完全不同的acl
定义ACL匹配规范,判断条件
dr_dir([ [,]]):路径匹配,header的uri路径
hdr_len([ [,]]):长度匹配,header的长度匹配
hdr_reg([ [,]]):正则表达式匹配,自定义表达式(regex)模糊匹配
hdr_sub([ [,]]):子串匹配,header中的uri模糊匹配


hdr_dom(host)     请求host名称
hdr_beg(host)     #请求的host开头
hdr_end(host)      请求host结尾


示例:
acl bad_agent hdr_sub(User-Agent) -i curl wget
http-request deny  if bad_agent
#block if bad_agent 2.1版本后不再支持,用上面替代
6.8.2 多个ACL的组合调用方式
多个ACL的逻辑处理
与:隐式(默认)使用
或:使用“or" 或 “||"表示
否定:使用 "!" 表示
多个ACL调用方式:
示例:
if valid_src valid_port #与关系,ACL中A和B都要满足为true,默认为与
if invalid_src || invalid_port  #或,ACL中A或者B满足一个为true
if ! invalid_src #非,取反,不满足ACL才为true
6.8.3 ACL示例:域名匹配
一个IP两个域名
192.168.10.100
www.ehuo.org

DNS   /var/named/ehuo.org.zone
[root@DNS ~]# cat /var/named/ehuo.org.zone
$TTL 1D
@	IN SOA	master admin (
					1	; serial
					1D	; refresh
					1H	; retry
					1W	; expire
					3H )	; minimum
	        NS	 master
master      A    10.0.0.5
www     	A    192.168.10.100
m49         A    192.168.10.100
[root@DNS ~]# rndc reload
server reload successful


[root@internet ~]# ping www.ehuo.org
PING www.ehuo.org (192.168.10.100) 56(84) bytes of data.
64 bytes from 192.168.10.100 (192.168.10.100): icmp_seq=1 ttl=64 time=0.566 ms
64 bytes from 192.168.10.100 (192.168.10.100): icmp_seq=2 ttl=64 time=0.650 ms
64 bytes from 192.168.10.100 (192.168.10.100): icmp_seq=3 ttl=64 time=0.335 ms
64 bytes from 192.168.10.100 (192.168.10.100): icmp_seq=4 ttl=64 time=0.527 ms
^C
--- www.ehuo.org ping statistics ---
4 packets transmitted, 4 received, 0% packet loss, time 3064ms
rtt min/avg/max/mdev = 0.335/0.519/0.650/0.117 ms
[root@internet ~]# ping m49.ehuo.org
PING m49.ehuo.org (192.168.10.100) 56(84) bytes of data.
64 bytes from 192.168.10.100 (192.168.10.100): icmp_seq=1 ttl=64 time=0.767 ms
64 bytes from 192.168.10.100 (192.168.10.100): icmp_seq=2 ttl=64 time=0.328 ms
^C
--- m49.ehuo.org ping statistics ---
2 packets transmitted, 2 received, 0% packet loss, time 1002ms
rtt min/avg/max/mdev = 0.328/0.547/0.767/0.220 ms


建立两个虚拟主机
web1  web2

www.ehuo.org   ----> 103
m49.ehuo.org   ----> 104

root@web1:~# cat /var/www/html/index.html
www.ehuo.org   10.0.0.103
root@web2:~# cat /var/www/html/index.html
m49.ehuo.org   10.0.0.104


#haproxy代理配置

root@haproxy:/etc/haproxy/conf.d# cat www.ehuo.org.cfg
frontend http-80
    bind 192.168.10.100:80

    acl www_domain  hdr_dom(host)  -i www.ehuo.org
    acl m49_domain  hdr_dom(host)  -i m49.ehuo.org
    use_backend www.ehuo.org if  www_domain
    use_backend m49.ehuo.org if  m49_domain

backend www.ehuo.org
    server 10.0.0.103 10.0.0.103:80 check
backend m49.ehuo.org
    server 10.0.0.104 10.0.0.104:80 check


#测试页面

[root@internet ~]# curl m49.ehuo.org
m49.ehuo.org   10.0.0.104
[root@internet ~]# curl www.ehuo.org
www.ehuo.org   10.0.0.103
ACL示例:基于文件后缀名实现动静分离
root@haproxy:/etc/haproxy/conf.d# cat www.ehuo.org.cfg
frontend http-80
    bind 192.168.10.100:80
    acl acl_static path_end -i   .jpg  .jpeg  .png  .gif .css .js .html .txt

    acl www_domain  hdr_dom(host)  -i www.ehuo.org
    acl m49_domain  hdr_dom(host)  -i m49.ehuo.org


    use_backend www.ehuo.org if  www_domain or acl_static   #逻辑或
    use_backend m49.ehuo.org if  m49_domain

backend www.ehuo.org
    server 10.0.0.103 10.0.0.103:80 check

backend m49.ehuo.org
    server 10.0.0.104 10.0.0.104:80 check


[root@internet ~]# curl http://192.168.10.100/a.txt
/var/www/html/a.txt
[root@internet ~]# curl http://192.168.10.100/a.txt
/var/www/html/a.txt
[root@internet ~]# curl http://192.168.10.100/a.txt
/var/www/html/a.txt
[root@internet ~]# curl http://192.168.10.100/a.txt
/var/www/html/a.txt
ACL示例:匹配访问路径实现动静分离
root@haproxy:/etc/haproxy/conf.d# cat www.ehuo.org.cfg
frontend http-80
    bind 192.168.10.100:80
    acl acl_static path_end -i   .jpg  .jpeg  .png  .gif .css .js .html .txt
	acl acl_static path_beg  -i /static /images /javascript     #基于路径的ACL
	acl acl_static path_end  -i .jpg .jpeg .png .gif .css .js .html .htm  #ACL同名为或关系
    acl www_domain  hdr_dom(host)  -i www.ehuo.org
    acl m49_domain  hdr_dom(host)  -i m49.ehuo.org


    use_backend www.ehuo.org if  www_domain or acl_static   #逻辑或
    use_backend m49.ehuo.org if  m49_domain

backend www.ehuo.org
    server 10.0.0.103 10.0.0.103:80 check

backend m49.ehuo.org
    server 10.0.0.104 10.0.0.104:80 check
6.10 HAProxy 四层负载
除HTTP以外的TCP协议应用服务访问的应用场景
MySQL Redis Memcached RabbitMQ
问题: 后端服务器到底是与haproxy还是和客户端建立三次握手呢?
6.10.1 四层负载示例
注意:如果使用frontend和backend,一定在 frontend 和 backend 段中都指定mode tcp
root@haproxy:/etc/haproxy/conf.d# cat redis.cfg
listen redis-6379
    mode tcp
    bind 192.168.10.100:6379
    balance leastconn
    server redis01 10.0.0.103:6379 check
    server redis02 10.0.0.104:6379 check
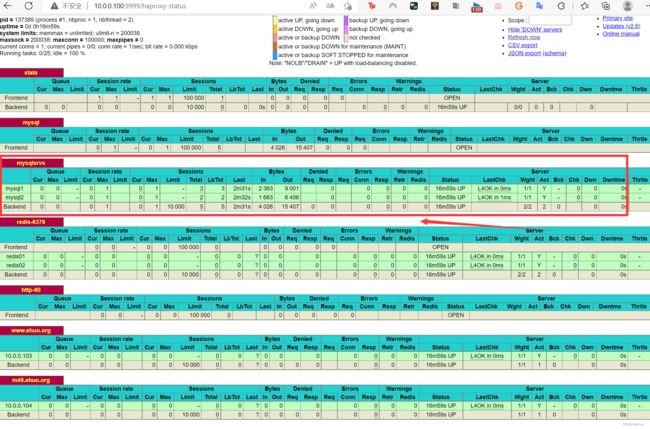
范例:对 MySQL 服务实现四层负载
root@haproxy:/etc/haproxy/conf.d# cat mysql.cfg
frontend mysql
    bind  :3306
    mode tcp     #一定要加
    use_backend mysqlsrvs

backend mysqlsrvs
    mode tcp      #一定要加
    balance leastconn
    server mysql1 10.0.0.103:3306 check
    server mysql2 10.0.0.104:3306 check

systemctl restart haproxy


#安装数据库(Ubuntu)
web1

apt install -y mysql-server

oot@web2:/etc/mysql/mysql.conf.d# ls
mysql.cnf  mysqld.cnf
root@web2:/etc/mysql/mysql.conf.d# vim mysqld.cnf

bind-address		= 0.0.0.0   #修改地址
mysqlx-bind-address	= 0.0.0.0
root@web2:/etc/mysql/mysql.conf.d# systemctl restart mysql.service

root@web2:/etc/mysql/mysql.conf.d# mysql
mysql> create user test@'10.0.0.%'  identified by '123456';  #建立账号,授权是haproxy的内网,伪四层,携带自己的报文发送过来;


web2

apt install -y mysql-server

oot@web2:/etc/mysql/mysql.conf.d# ls
mysql.cnf  mysqld.cnf
root@web2:/etc/mysql/mysql.conf.d# vim mysqld.cnf

bind-address		= 0.0.0.0   #修改地址
mysqlx-bind-address	= 0.0.0.0
root@web2:/etc/mysql/mysql.conf.d# systemctl restart mysql.service

root@web2:/etc/mysql/mysql.conf.d# mysql
mysql> create user test@'10.0.0.%'  identified by '123456';  #建立账号,授权是haproxy的内网,伪四层,携带自己的报文发送过来;


#测试结果

root@internet ~]# yum -y install mysql
[root@internet ~]# mysql -utest -p123456 -h192.168.10.100 -e "select @@hostname"
mysql: [Warning] Using a password on the command line interface can be insecure.
+------------+
| @@hostname |
+------------+
| web1       |
+------------+
[root@internet ~]# mysql -utest -p123456 -h192.168.10.100 -e "select @@hostname"
mysql: [Warning] Using a password on the command line interface can be insecure.
+------------+
| @@hostname |
+------------+
| web2       |
+------------+


[root@internet ~]# mysql -utest -p123456 -h192.168.10.100 -e status
mysql: [Warning] Using a password on the command line interface can be insecure.
--------------
mysql  Ver 8.0.26 for Linux on x86_64 (Source distribution)

Connection id:		11
Current database:
Current user:		[email protected]                      #内网的Ip在连接
SSL:			Cipher in use is TLS_AES_256_GCM_SHA384
Current pager:		stdout
Using outfile:		''
Using delimiter:	;
Server version:		8.0.29-0ubuntu0.20.04.3 (Ubuntu)
Protocol version:	10
Connection:		192.168.10.100 via TCP/IP
Server characterset:	utf8mb4
Db     characterset:	utf8mb4
Client characterset:	utf8mb4
Conn.  characterset:	utf8mb4
TCP port:		3306
Binary data as:		Hexadecimal
Uptime:			25 min 23 sec

Threads: 3  Questions: 14  Slow queries: 0  Opens: 163  Flush tables: 3  Open tables: 82  Queries per second avg: 0.009
--------------
zabbix自定义监控的流程
1 安装 zabbix agent
2 编写脚本获取监控项的值
3 agent配置定义key名称和脚本的对应关系,重启agent服务
4 从服务器端 zabbix_get -k xxx
5 web 监控项加入模板
6 模板添加此
监控的触发器,图形
7 模板关联到主机
7 本章重点总结
- 比较LVS,haproxy,nginx三者的特性和调度算法区别(面试题)
- HAProxy调度算法
- ACL使用与报文修改
- 动静分离(根据文件后缀或URL)
- 客户端源IP透传
- 服务器动态下线




![[外链图片转存失败,源站可能有防盗链机制,建议将图片保存下来直接上传(img-kq72lgCB-1657769469708)(C:\Users\78715\AppData\Roaming\Typora\typora-user-images\image-20220708154306835.png)]](http://img.e-com-net.com/image/info8/18c971b8fb1041b48b8faf6b599c5c15.jpg)


![[外链图片转存失败,源站可能有防盗链机制,建议将图片保存下来直接上传(img-9f5fkCzJ-1657769469710)(C:\Users\78715\AppData\Roaming\Typora\typora-user-images\image-20220712122412641.png)]](http://img.e-com-net.com/image/info8/48afa9e75ecf48a2bbbc8313014a50ed.jpg)
![[外链图片转存失败,源站可能有防盗链机制,建议将图片保存下来直接上传(img-Lz8RA3w2-1657769469711)(C:\Users\78715\AppData\Roaming\Typora\typora-user-images\image-20220712124652778.png)]](http://img.e-com-net.com/image/info8/91b74495079a4283af34643a4da56a2a.jpg)
