SpringBoot实现短信登陆功能
大家好我是小羽,这段时间做项目用到了手机短信登陆的功能,在此记录一下。欢迎大家来关注我的微信公众号Java小羽。
一、注册阿里云账号
- 登陆阿里云,直接用支付宝扫码就可以登陆注册。
- 点击控制台
3.点击侧边栏
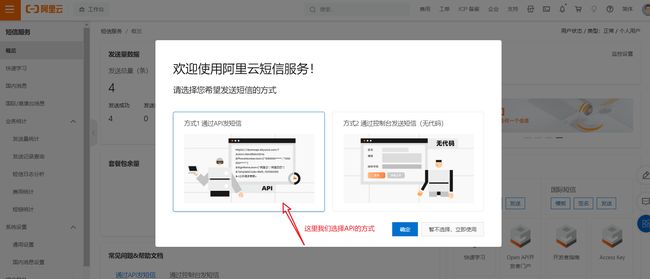
4.搜索短信服务
5.选择类型
6.进入短信服务中的快速学习,在这里可以用测试短信,不需要备案审核啥的,方便不少
7.向项目中导入相关Maven依赖
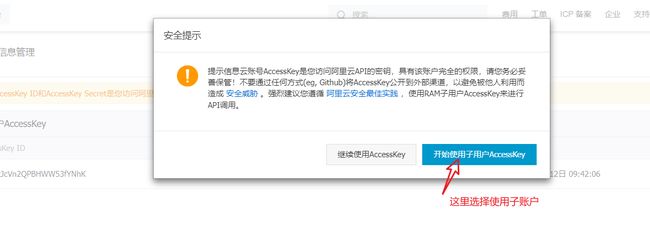
8.因为我们要操作阿里云的API,需要一个密钥,密钥只能给自己看,一旦泄露,相当于拥有你账户的全部权限,(主账户拥有全部权限,就是支付宝登陆的账号),所以要设置一个子账户,并赋予有限的权限,这样即使泄露了,可以将危害程度降低到最低。
9.设置子账户
10.(重点)此时会获取你的AccessKey ID和AccessKey Secret,当前界面只会出现一次,最好下载CSV文件到本地。
11.给子账户授权(若不授权,则没有权限调用任何功能)
出现以下界面,就添加权限完成
二、代码实现
准备工作做完了,可以代码实现了。
1.记得导入Maven的包,不要忘记这一步了,具体步骤上面截图有。
2.编写发送短信的工具类,其实在上述第8部分截图的页面中,官网给了示例代码,我只是将它封装成了一个工具类。
import com.aliyuncs.DefaultAcsClient;
import com.aliyuncs.IAcsClient;
import com.aliyuncs.exceptions.ClientException;
import com.aliyuncs.exceptions.ServerException;
import com.aliyuncs.profile.DefaultProfile;
import com.google.gson.Gson;
import java.util.*;
import com.aliyuncs.dysmsapi.model.v20170525.*;
/**
 * 短信发送工具类
 */
public class SMSUtils {

   /**
    * 发送短信
    * @param signName 签名
    * @param templateCode 模板
    * @param phoneNumbers 手机号
    * @param param 验证码
    */
   public static void sendMessage(String signName, String templateCode,String phoneNumbers,String param){

      DefaultProfile profile = DefaultProfile.getProfile("cn-shanghai","这里填写自己的access-key-id", "填写自己的access-key-secret");
      /** use STS Token
       DefaultProfile profile = DefaultProfile.getProfile(
       "",           // The region ID
       "",       // The AccessKey ID of the RAM account
       "",   // The AccessKey Secret of the RAM account
       "");          // STS Token
       **/

      IAcsClient client = new DefaultAcsClient(profile);

      SendSmsRequest request = new SendSmsRequest();
      request.setSignName("阿里云短信测试");	//因为使用的是阿里云的短信测试,所以这两行不能更改
      request.setTemplateCode("SMS_154950909");
      request.setPhoneNumbers(phoneNumbers);//这里传入的是你测试的手机号
      request.setTemplateParam("{\"code\":\""+param+"\"}");//这里传入的是短信验证码

      try {
         SendSmsResponse response = client.getAcsResponse(request);			                 		System.out.println("短信发送成功");
      } catch (ServerException e) {
         e.printStackTrace();
      } catch (ClientException e) {
         System.out.println("ErrCode:" + e.getErrCode());
         System.out.println("ErrMsg:" + e.getErrMsg());
         System.out.println("RequestId:" + e.getRequestId());
      }
   }

}
3.这里还要再设置一个生成短信验证码的工具类
import java.util.Random;

/**
 * 随机生成验证码工具类
 */
public class ValidateCodeUtils {
    /**
     * 随机生成验证码
     * @param length 长度为4位或者6位
     * @return
     */
    public static Integer generateValidateCode(int length){
        Integer code =null;
        if(length == 4){
            code = new Random().nextInt(9999);//生成随机数,最大为9999
            if(code < 1000){
                code = code + 1000;//保证随机数为4位数字
            }
        }else if(length == 6){
            code = new Random().nextInt(999999);//生成随机数,最大为999999
            if(code < 100000){
                code = code + 100000;//保证随机数为6位数字
            }
        }else{
            throw new RuntimeException("只能生成4位或6位数字验证码");
        }
        return code;
    }

    /**
     * 随机生成指定长度字符串验证码
     * @param length 长度
     * @return
     */
    public static String generateValidateCode4String(int length){
        Random rdm = new Random();
        String hash1 = Integer.toHexString(rdm.nextInt());
        String capstr = hash1.substring(0, length);
        return capstr;
    }
}
到这里工具类就配置齐全了,接下来就是调用了。
4.这是发送短信的功能模块
/**
 * 发送手机短信
 * @param user
 * @return
 */
@PostMapping("/sendMsg")
public R<String> sendMsg(@RequestBody User user, HttpSession session){
    //获取手机号
    String phone = user.getPhone();

    if(StringUtils.isNotEmpty(phone)){
        //生成随机验证码
        String code = ValidateCodeUtils.generateValidateCode(4).toString();
        log.info("code={}",code);

        //调用阿里云发送短信
        SMSUtils.sendMessage("阿里云测试","",phone,code);


        //需要将验证码保存到Session中
        session.setAttribute(phone,code);

        return R.success("手机验证码发送成功");
    }


    return R.error("短信发送失败");//R.error是我自己封装的返回类,返回值大家可以根据自己的需求修改。
}
5.验证用户验证码登陆的功能模块,这里使用了MyBatisPlus。
/**
 * 移动端用户登陆
 * @param map
 * @return
 */
@PostMapping("/login")
public R<User> login(@RequestBody Map map, HttpSession session){
    log.info(map.toString());

    //获取手机号
    String phone = map.get("phone").toString();

    //获取验证码
    String code = map.get("code").toString();

    //从session中获取保存的验证码
    Object codeInSession = session.getAttribute(phone);

    //如果比对成功,说明登陆成功
    if(codeInSession != null && codeInSession.equals(code)){

        //判断当前手机号对应的用户是否为新用户,如果是新用户则注册
        LambdaQueryWrapper<User> wrapper = new LambdaQueryWrapper<User>();
        wrapper.eq(User::getPhone,phone);
        User one = userService.getOne(wrapper);
        if(one == null){
            //用户不存在,则新增用户
            one=new User();
            one.setPhone(phone);
            one.setStatus(1);
            userService.save(one);
        }
        session.setAttribute("user",one.getId());
        return R.success(one);
    }
    return R.error("登陆失败");
}
6.这里是封装的返回结果类,不需要的可以忽略
import lombok.Data;
import java.util.HashMap;
import java.util.Map;

/**
 * @author shenyi
 * @date 2019/12/18
 * @description 通用返回结果类
 */
@Data
public class R<T> {

    private Integer code; //编码:1成功,0和其它数字为失败

    private String msg; //错误信息

    private T data; //数据

    private Map map = new HashMap(); //动态数据

    public static <T> R<T> success(T object) {
        R<T> r = new R<T>();
        r.data = object;
        r.code = 1;
        return r;
    }

    public static <T> R<T> error(String msg) {
        R r = new R();
        r.msg = msg;
        r.code = 0;
        return r;
    }

    public R<T> add(String key, Object value) {
        this.map.put(key, value);
        return this;
    }

}
谢谢大家观看,若有不合理的地方,欢迎大家在评论中指出问题。想要了解更多的Java知识,欢迎大家来关注我的微信公众号Java小羽。


