Navigation的基本使用
一 什么是Navigation
当前Android开发中使用Fragment来开发页面已经成为主流做法。Fragment轻量、可控性强等优点让人感觉很香。但是Fragment也有自己的硬伤,那就是回退栈与页面参数传递。
虽然当前有例如Fragmentation这样的开源库解决了这类问题,而且这些三方开源库也经受住了时间与项目的检验。但是总让Android开发者心中觉得少了点什么(尤其是学了iOS开发之后。。。)Navigation的横空出世,让Android开发者终于看到了一线曙光。
利用Navigation的三大组件,我们可以自由控制管理fragment的切换和数据传递和回退栈,不要再想以前一样通过FragmentManager进行replace或者show了,以及事务的提交,在数据传递方面,也不会通过fragmentID和接口回调的方式进行传递,大大方便了我们的代码编写。可以说,Navigation其实就是通过编写XML文件来管理导航fragment,当然如果使用熟悉了的话,也可以在AS中直接进行拖拽的方式进行快速编写代码。
二 Navigation的三大件
- 导航图:在一个集中位置包含所有导航相关信息的 XML 资源。这包括应用内所有单个内容区域(称为目标)以及用户可以通过应用获取的可能路径。
- NavHost:显示导航图中目标的空白容器。导航组件包含一个默认 NavHost 实现 (NavHostFragment),可显示Fragment 目标。
- NavController:在 NavHost 中管理应用导航的对象。当用户在整个应用中移动时,NavController 会安排 NavHost 中目标内容的交换。
在应用中导航时,您告诉 NavController,您想沿导航图中的特定路径导航至特定目标,或直接导航至特定目标。NavController 便会在 NavHost 中显示相应目标。
导航组件提供各种其他优势,包括以下内容:
- 处理 Fragment 事务
- 默认情况下,正确处理往返操作。
- 为动画和转换提供标准化资源。
- 实现和处理深层链接。
- 包括导航界面模式(例如抽屉式导航栏和底部导航),用户只需完成极少的额外工作。
- Safe Args - 可在目标之间导航和传递数据时提供类型安全的 Gradle 插件。
- ViewModel 支持 - 您可以将 ViewModel 的范围限定为导航图,以在图表的目标之间共享与界面相关的数据。
此外,您还可以使用 Android Studio 的 Navigation Editor 来查看和编辑导航图。
三 基本使用
3.1 导入依赖
```java
dependencies {
  def nav_version = "2.3.5"

  // Java language implementation
  implementation "androidx.navigation:navigation-fragment:$nav_version"
  implementation "androidx.navigation:navigation-ui:$nav_version"

  // Kotlin
  implementation "androidx.navigation:navigation-fragment-ktx:$nav_version"
  implementation "androidx.navigation:navigation-ui-ktx:$nav_version"

  // Feature module Support
  implementation "androidx.navigation:navigation-dynamic-features-fragment:$nav_version"

  // Testing Navigation
  androidTestImplementation "androidx.navigation:navigation-testing:$nav_version"

  // Jetpack Compose Integration
  implementation "androidx.navigation:navigation-compose:2.4.0-alpha03"
}
3.2 创建导航图
- 在“Project”窗口中,右键点击 res 目录,然后依次选择 New > Android Resource File。此时系统会显示New Resource File 对话框。
- 在 File name 字段中输入名称,例如“nav_graph”。
- 从 Resource type 下拉列表中选择 Navigation,然后点击 OK。
当您添加首个导航图时,Android Studio 会在 res 目录内创建一个 navigation 资源目录。该目录包含您的导航图资源文件(例如 nav_graph.xml)。
<?xml version="1.0" encoding="utf-8"?>
<navigation xmlns:android="http://schemas.android.com/apk/res/android"
    xmlns:app="http://schemas.android.com/apk/res-auto"
    xmlns:tools="http://schemas.android.com/tools"
    android:id="@+id/nav_graph"
    app:startDestination="@id/a_fragment"> //指定导航容器最开始显示的fragment

<fragment
    android:id="@+id/a_fragment"
    android:name="com.example.mynavigation.fragment.A_Fragment"
    android:label="afragment"
    tools:layout="@layout/afragment" >
    <action
        android:id="@+id/action_afragment_to_bfragment"
        app:destination="@+id/bfragment"   //跳转到bfragment
        app:enterAnim="@anim/nav_default_enter_anim">

    </action>

    <action android:id="@+id/action_afragment_to_efragment"
        app:destination="@+id/eragment"
        app:enterAnim="@anim/nav_default_enter_anim"></action>
</fragment>
</navigation>
3.3 向 Activity 添加 NavHost
<?xml version="1.0" encoding="utf-8"?>
<androidx.constraintlayout.widget.ConstraintLayout
    xmlns:android="http://schemas.android.com/apk/res/android"
    xmlns:app="http://schemas.android.com/apk/res-auto"
    xmlns:tools="http://schemas.android.com/tools"
    android:layout_width="match_parent"
    android:layout_height="match_parent"
    tools:context=".MainActivity">

    <androidx.appcompat.widget.Toolbar
        .../>

    <androidx.fragment.app.FragmentContainerView
        android:id="@+id/nav_host_fragment"
        android:name="androidx.navigation.fragment.NavHostFragment"
        android:layout_width="0dp"
        android:layout_height="0dp"
        app:layout_constraintLeft_toLeftOf="parent"
        app:layout_constraintRight_toRightOf="parent"
        app:layout_constraintTop_toTopOf="parent"
        app:layout_constraintBottom_toBottomOf="parent"

        app:defaultNavHost="true"
        app:navGraph="@navigation/nav_graph" />

    <com.google.android.material.bottomnavigation.BottomNavigationView
        .../>

</androidx.constraintlayout.widget.ConstraintLayout>
请注意以下几点:
- android:name 属性包含 NavHost 实现的类名称。
- app:navGraph 属性将 NavHostFragment 与导航图相关联。导航图会在此 NavHostFragment
中指定用户可以导航到的所有目的地。 - app:defaultNavHost=“true” 属性确保您的 NavHostFragment
会拦截系统返回按钮。请注意,只能有一个默认 NavHost。如果同一布局(例如,双窗格布局)中有多个宿主,请务必仅指定一个默认NavHost。
您也可以使用布局编辑器向 Activity 添加 NavHostFragment,具体操作步骤如下:
在项目文件列表中,双击 Activity 的布局 XML 文件,以在 Layout Editor 中将其打开。
- 在 Palette 窗格内,选择 Containers 类别,或者搜索“NavHostFragment”。
- 将 NavHostFragment 视图拖动到您的 Activity 上。
- 接下来,在随即显示的 Navigation Graphs 对话框中,选择需要与此 NavHostFragment
相关联的相应导航图,然后点击 OK。
3.4 向导航图添加目的地
在本示例中,我们来创建一个新目的地。如需使用 Navigation Editor 添加新目的地,请执行以下操作:
- 在 Navigation Editor 中,点击 New Destination 图标 ,然后点击 Create new destination。
- 在随即显示的 New Android Component 对话框中,创建您的 Fragment。
目的地详解
点击一个目的地以将其选中,并注意 Attributes 面板中显示的以下属性:
- Type 字段指示在您的源代码中,该目的地是作为 Fragment、Activity 还是其他自定义类实现的。
- Label 字段包含该目的地的 XML 布局文件的名称。
- ID 字段包含该目的地的 ID,它用于在代码中引用该目的地。
- Class 下拉列表显示与该目的地相关联的类的名称。您可以点击此下拉列表,将相关联的类更改为其他目的地类型。
- 点击 Text 标签页可查看导航图的 XML 视图。XML 中同样包含该目的地的 id、name、label 和 layout
属性,如下所示:
<?xml version="1.0" encoding="utf-8"?>
<navigation xmlns:app="http://schemas.android.com/apk/res-auto"
    xmlns:tools="http://schemas.android.com/tools"
    xmlns:android="http://schemas.android.com/apk/res/android"
    app:startDestination="@id/blankFragment">
    <fragment
        android:id="@+id/blankFragment"
        android:name="com.example.cashdog.cashdog.BlankFragment"
        android:label="Blank"
        tools:layout="@layout/fragment_blank" />
</navigation>
3.5 设置某个fragment为起始的目的地
始目的地是用户打开您的应用时看到的第一个屏幕,也是用户退出您的应用时看到的最后一个屏幕。Navigation Editor 使用房子图标 表示起始目的地。
所有目的地就绪后,您便可以选择起始目的地,具体操作步骤如下:
- 在 Design 标签页中,点击相应目的地,使其突出显示。
- 点击 Assign start destination 按钮 “房子”按钮。或者,您可以右键点击该目的地,然后点击 Set as Start
Destination。
3.6 连接目的地
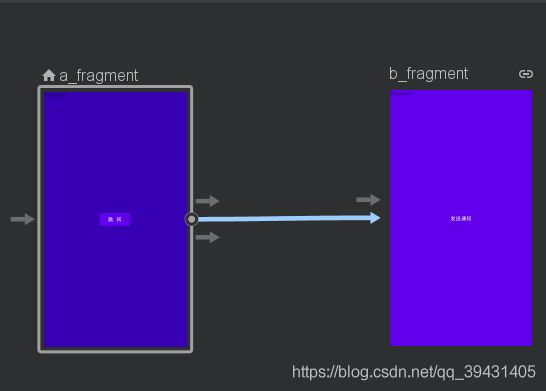
操作是指目的地之间的逻辑连接。操作在导航图中以箭头表示。操作通常会将一个目的地连接到另一个目的地,不过您也可以创建全局操作,此类操作可让您从应用中的任意位置转到特定目的地。
借助操作,您可以表示用户在您的应用中导航时可以采取的不同路径。请注意,如需实际导航到各个目的地,您仍然需要编写代码以执行导航操作。如需了解详情,请参阅本主题后面的导航到目的地部分。
您可以使用 Navigation Editor 将两个目的地连接起来,具体操作步骤如下:
- 在 Design 标签页中,将鼠标悬停在目的地的右侧,该目的地为您希望用户从中导航出来的目的地。该目的地右侧上方会显示一个圆圈,如图 所示

- 。点击您希望用户导航到的目的地,并将光标拖动到该目的地的上方,然后松开。这两个目的地之间生成的线条表示操作

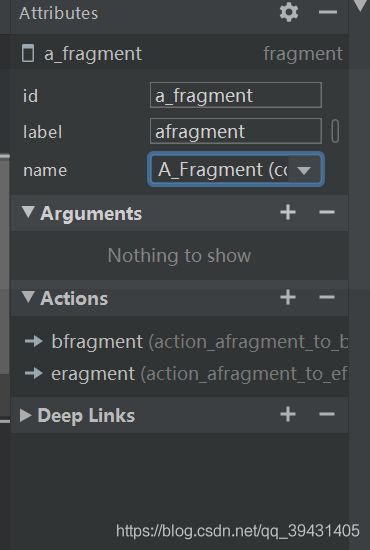
- 点击箭头以突出显示该操作。此时 Attributes 面板中会显示以下属性:
- Type 字段包含“Action”
- ID 字段包含该操作的 ID。
- Destination 字段包含目的地 Fragment 或 Activity 的 ID。
<?xml version="1.0" encoding="utf-8"?>
<navigation xmlns:app="http://schemas.android.com/apk/res-auto"
    xmlns:tools="http://schemas.android.com/tools"
    xmlns:android="http://schemas.android.com/apk/res/android"
    app:startDestination="@id/a_fragment">
    <fragment
        android:id="@+id/a_fragment"
        android:name="com.example.cashdog.cashdog.a_fragment"
        android:label="afragment"
        tools:layout="@layout/a_fragment" >
        <action
            android:id="@+id/action_a_fragment_to_b_fragment"
            app:destination="@id/b_fragment" />
    </fragment>
    <fragment
        android:id="@+id/b_fragment"
        android:name="com.example.cashdog.cashdog.b_fragment"
        android:label="bfragment"
        tools:layout="@layout/b_fragment" />
</navigation>
3.7 导航到目的地
public class MainActivity extends AppCompatActivity  {

    private BottomNavigationView buttion ;
    private NavController controller;

    @Override
    protected void onCreate(Bundle savedInstanceState) {
        super.onCreate(savedInstanceState);
        setContentView(R.layout.activity_main);
        buttion = findViewById(R.id.nav_bt);
       controller = Navigation.findNavController(this,R.id.navigation_host);
     	controller.navigate(R.id.action_to_afragment);

    }
``
用bundle传递参数

```java
 Bundle bundle = new Bundle();
                bundle.putString("name","navigation");
                Navigation.findNavController(getView()).navigate(R.id.action_afragment_to_efragment,bundle);
接收参数:
mParam1 = getArguments().getString("name");
四 深层链接
4.1 URL实现
假如通过URL访问b_fragment,需要利用deepLink标签
<fragment
    android:id="@+id/b_fragment"
    android:name="com.example.mynavigation.fragment.B_Fragment"
    android:label="afragment"
    tools:layout="@layout/bfragment" >

    <deepLink app:uri="www.YourWebsite.com/{params}" />

</fragment>
与此同时,需要在AndroidMenuifest文件里加入导航图nav-graph
<application
    android:allowBackup="true"
    android:icon="@mipmap/ic_launcher"
    android:label="@string/app_name"
    android:roundIcon="@mipmap/ic_launcher_round"
    android:supportsRtl="true"
    android:theme="@style/Theme.MyNavigation">
    <activity android:name=".MainActivity">
        <intent-filter>
            <action android:name="android.intent.action.MAIN" />

            <category android:name="android.intent.category.LAUNCHER" />
        </intent-filter>

        <nav-graph android:value="@navigation/nav_graph"></nav-graph>
    </activity>
</application>
4.2 通过发送通知实现
public class B_Fragment extends Fragment {


    private static final String CHANNEL_ID = "123" ;
    private int notificationId = 123;

    @Override
    public View onCreateView(LayoutInflater inflater, ViewGroup container,
                             Bundle savedInstanceState) {
        // Inflate the layout for this fragment
        return inflater.inflate(R.layout.bfragment, container, false);
    }

    @Override
    public void onViewCreated(@NonNull View view, @Nullable Bundle savedInstanceState) {

        Button button3 = view.findViewById(R.id.button3);
        button3.setOnClickListener(new View.OnClickListener() {
            @Override
            public void onClick(View v) {
                sendNotification();
            }
        });


    }

    private void sendNotification(){
        if(getActivity() == null)
        {
            return;
        }

        if (Build.VERSION.SDK_INT >= Build.VERSION_CODES.O)
        {
            int importance = NotificationManager.IMPORTANCE_DEFAULT;
            NotificationChannel channel = new NotificationChannel(CHANNEL_ID, "ChannelName", importance);
            channel.setDescription("description");
            NotificationManager notificationManager = getActivity().getSystemService(NotificationManager.class);
            notificationManager.createNotificationChannel(channel);
        }

        NotificationCompat.Builder builder = new NotificationCompat.Builder(getActivity(), CHANNEL_ID)
                .setSmallIcon(R.drawable.ic_launcher_background)
                .setContentTitle("DeepLinkDemo")
                .setContentText("Hello World!")
                .setPriority(NotificationCompat.PRIORITY_DEFAULT)
                .setContentIntent(getPendingIntent());//设置PendingIntent            .setAutoCancel(true);

        NotificationManagerCompat notificationManager = NotificationManagerCompat.from(getActivity());

        notificationManager.notify(notificationId, builder.build());
    }

    private PendingIntent getPendingIntent(){
        if(getActivity() != null)
        {
            Bundle bundle = new Bundle();
            bundle.putString("params", "from Notification");
            return Navigation
                    .findNavController(getActivity(), R.id.button3)
                    .createDeepLink()
                    .setGraph(R.navigation.nav_graph)
                    .setDestination(R.id.b_fragment)
                    .setArguments(bundle)
                    .createPendingIntent();
        }
        return null;}


}
