conda环境切换清华源下载。安装opencv问题和conda常用命令
Windows系统命令行中使用如下命令即可添加清华源
  conda config --add channels https://mirrors.tuna.tsinghua.edu.cn/anaconda/pkgs/free/
  conda config --add channels https://mirrors.tuna.tsinghua.edu.cn/anaconda/pkgs/main/
  conda config --add channels https://mirrors.tuna.tsinghua.edu.cn/anaconda/cloud/pytorch/
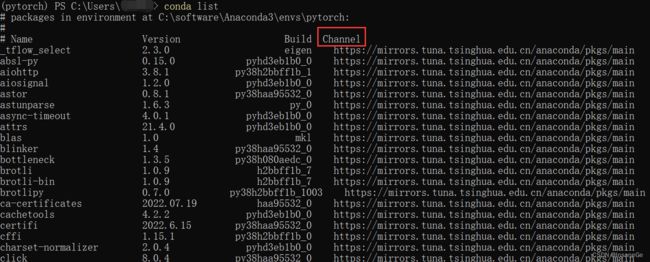
  conda config --set show_channel_urls yes
设置搜索时显示渠道地址,效果如下图
查看当前已有源(Current channels)
conda config --show-sources
有时候国内镜像源无法连接,需要恢复原来的源时使用如下命令:
conda config --remove-key channels
国内其他镜像源地址
阿里云
http://mirrors.aliyun.com/pypi/simple/
中国科技大学
https://pypi.mirrors.ustc.edu.cn/simple/
豆瓣(douban)
http://pypi.douban.com/simple/
清华大学
https://pypi.tuna.tsinghua.edu.cn/simple/
中国科学技术大学
http://pypi.mirrors.ustc.edu.cn/simple/
安装 o p e n c v 问题 + c o n d a 常用命令: \color{red}安装opencv问题+conda常用命令: 安装opencv问题+conda常用命令:
-i:指定库的安装源
–trusted-host:加上这个能省很多麻烦
conda环境下升级包:conda update package
pip环境下升级包:pip install --upgrade package或pip install -U package
#新建环境
#要指定python版本的话最好在创建时就指定,创建后再conda install python=修改版本可能导致其他已安装包出现问题
conda create -n 环境名 python=3.8
#删除环境
conda remove -n 环境名 --all

conda upgrade numpy
pip install -U numpy
#安装指定conda remove -n condaname --all版本
pip install numpy==1.23.1#如果此时有装numpy包,会卸载旧的并安装上指定版本的

#查看当前环境下安装的包
conda list

#查看某个指定包的版本
pip show numpy

#卸载某个包,pip指令装的包一般要pip uninstall删除
conda remove  package_name
conda uninstall  package_name
pip uninstall  package_name
conda安装tensorflow(tensorflow分gpu和cpu两种版本的)
3.8版本的python可以装2.4.0版本的tensorflow,3.10版本的python装2.4.0版本的tensorflow会显示不存在对应版本
conda install tensorflow=2.4.0
conda install tensorflow-gpu=2.4.0

对应2.4.0版本的tensorflow推荐搭配1.20.3版本的numpy比较稳定
pip install numpy=1.20.3
#直接conda命令不行的时候换pip和指定下载源尝试
pip install tensorflow==2.4.0
conda install --channel  https://conda.anaconda.org/anaconda  tensorflow=2.4.0
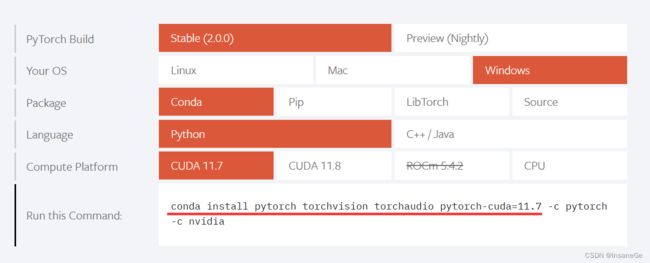
conda安装torch
在此链接https://pytorch.org/查看安装命令,而非单纯conda install torch
如果已经配置过下载源那-c及后面的官方源指定不加,官方源下载速度慢

解压服务器中的压缩包命令
unzip
conda环境改名(实质为先复制该虚拟环境再删除)
conda create --name 环境名 --clone oldname
conda remove --name 环境名 --all
--name可以简写为 -n
conda环境导出为requirements.txt或.yml格式并安装
正常的requirements.txt文件打开应该每行都是 包名==版本号
pip freeze > requirements.txt
这命令是用于要在本机上再创一个新conda环境用时,导出的requirements.txt文件不是每行均为 包名==版本号 的格式,不适用于跨机器迁移环境

pip list --format=freeze > requirements.txt
这命令导出的requirements.txt文件就是每行均为 包名==版本号 的格式,然后再用如下安装命令就可以将conda环境迁移到其他机器上
pip install -r requirements.txt
conda list -e > requirements.txt
此种方式导出的是整个conda环境相比pip导出的内容多
conda create --name 环境名 --file requirements.txt
.yaml格式用记事本打开可以看到里面信息包含了name、channels、dependencies信息,想换环境名先打开environment.yaml文件修改环境名再装即可
直接用environment.yml创建环境
conda env export > environment.yaml
conda env create -f environment.yaml
conda env create -f environment.yaml -p /home/user/anaconda3/envs/env_name
注:.yaml文件移植过来的环境只是安装了原来环境里用conda install等命令直接安装的包,
用pip之类装的东西没有移植过来,需要重新安装。
注:如果你原来的环境里的包比较多,不同包的下载来源又不同,可能以上方法均不能一次性移植环境成功
安装opencv(指的就是cv2)
#安装opencv指令
pip install  -i https://pypi.tuna.tsinghua.edu.cn/simple --trusted-host pypi.tuna.tsinghua.edu.cn opencv-python
目前建议安装指定版本opencv-python==4.5.3.56
因为按照最新版可能遇到类似Cannot find reference ‘imread’ in 'init.py’的警告很影响使用
命令中的–user作用(一般没必要加):是python中安装module库到用户packages路径中的方法。
在windows平台下,python版本3.7.2, 3.7.5, 3.7.8 解释器时调用 pip install --user xxx 都是将module库安装到:
C:\Users\xxx(用户名)\AppData\Roaming\Python\Python37\site-packages
在windows平台下,python版本3.8.2, 3.8.5, 3.8.8 解释器时调用 pip install --user xxx 都是将module库安装到:
C:\Users\xxx(用户名)\AppData\Roaming\Python\Python38\site-packages
在windows平台下,python版本3.9.2, 3.9.5, 3.9.8 解释器时调用 pip install --user xxx 都是将module库安装到:
C:\Users\xxx(用户名)\AppData\Roaming\Python\Python39\site-packages


