什么是code-push
CodePush是一个微软开发的云服务器。通过它,开发者可以直接在用户的设备上部署手机应用更新。CodePush相当于一个中心仓库,开发者可以推送当前的更新(包括JS/HTML/CSS/IMAGE等)到CoduPush,然后应用将会查询是否有更新。
当然我们也可以使用code-push-server来代替微软云服务器,自己搭建云服务管理需要更新的代码,待到下一篇来介绍code-push-server的使用。
1、安装code-push CLI
$ npm install -g code-push-cli
只需要这一条命令就可以安装,既然大家都是ReactNative开发NPM肯定安装了的。
2、注册 code-push账号
$ code-push register
会自动打开一个授权网页,让你选择使用哪种方式进行授权登录,一般选择GitHub就行,授权成功后就会得到授权码,回到终端输入授权码就注册并登录成功了
登录注册相关命令:
- 注册
code-push register - 登陆
code-push login - 注销
code-push logout - 列出 登陆的token
code-push access-key ls - 删除某个access-key
code-push access-key rm
3、在code-push服务器注册App
为了让CodePush服务器有我们的App,我们需要CodePush注册App。这里需要注意如果我们的应用分为iOS和Android两个平台,这时我们需要分别注册两套key。系统默认有两套部署环境,一个是Production和Staging,分别对应生产版的热更新部署,Staging代表开发版的热更新部署,但是我们也可以自定义添加部署环境。在ios中将staging的部署key复制在info.plist的CodePushDeploymentKey值中,在android中复制在Application的getPackages的CodePush中
- 添加部署环境
code-push deployment add//创建test环境test - 添加应用平台
code-push app add例如添加iOS平台
$ code-push app add iOSRNHybrid ios react-native,多个平台执行多次 - 查看应用列表
code-push app list - 查看APP的环境信息
code-push deployment list--format json
Usage: code-push app
命令:
  add       Add a new app to your account
  remove    Remove an app from your account
  rm        Remove an app from your account
  rename    Rename an existing app
  list      Lists the apps associated with your account
  ls        Lists the apps associated with your account
  transfer  Transfer the ownership of an app to another account**
4、ReactNative集成code-push
安装组件
项目根目录下 npm install react-native-code-push --save
添加依赖 npm link react-native-code-push
RN端代码
import React, { Component } from 'react';
import {
  Platform,
  StyleSheet,
  Text,
  View
} from 'react-native';
import CodePush from "react-native-code-push"; // 引入code-push

let codePushOptions = {
  //设置检查更新的频率
  //ON_APP_RESUME APP恢复到前台的时候
  //ON_APP_START APP开启的时候
  //MANUAL 手动检查
  checkFrequency : CodePush.CheckFrequency.ON_APP_RESUME
};

const instructions = Platform.select({
  ios: 'Press Cmd+R to reload,\n' +
    'Cmd+D or shake for dev menu',
  android: 'Double tap R on your keyboard to reload,\n' +
    'Shake or press menu button for dev menu',
});

type Props = {};
class App extends Component {
  //如果有更新的提示
  syncImmediate() {
    CodePush.sync( {
          //安装模式
          //ON_NEXT_RESUME 下次恢复到前台时
          //ON_NEXT_RESTART 下一次重启时
          //IMMEDIATE 马上更新
          mandatoryInstallMode : CodePush.InstallMode.IMMEDIATE ,
          deploymentKey: 'iOS平台Key,部署环境(Production/Staging)',
          //对话框
          updateDialog : {
            //是否显示更新描述
            appendReleaseDescription : true ,
            //更新描述的前缀。 默认为"Description"
            descriptionPrefix : "更新内容:" ,
            //强制更新按钮文字,默认为continue
            mandatoryContinueButtonLabel : "立即更新" ,
            //强制更新时的信息. 默认为"An update is available that must be installed."
            mandatoryUpdateMessage : "必须更新后才能使用" ,
            //非强制更新时,按钮文字,默认为"ignore"
            optionalIgnoreButtonLabel : '稍后' ,
            //非强制更新时,确认按钮文字. 默认为"Install"
            optionalInstallButtonLabel : '后台更新' ,
            //非强制更新时,检查到更新的消息文本
            optionalUpdateMessage : '有新版本了,是否更新?' ,
            //Alert窗口的标题
            title : '更新提示'
          }
        }
    );
  }
  componentWillMount() {
    CodePush.disallowRestart();//禁止重启
    this.syncImmediate(); //开始检查更新
  }
  componentDidMount() {
    CodePush.allowRestart();//在加载完了,允许重启
  }

/*或者采用这一段代码
componentDidMount() {
    CodePush.sync({
      updateDialog: {
        appendReleaseDescription: true,
        descriptionPrefix:'\n\n更新内容:\n',
        title:'更新',
        mandatoryUpdateMessage:'',
        mandatoryContinueButtonLabel:'更新',
      },
      mandatoryInstallMode:CodePush.InstallMode.IMMEDIATE,
      deploymentKey: 'iOS平台Key,部署环境(Production/Staging)',
    });
  }
*/
  render() {
    return (


          Welcome to React Native!


          To get started, edit App.js


          {instructions}


          这是更新的版本


    );
  }
}

// 这一行必须要写
App = CodePush(codePushOptions)(App)

export default App

const styles = StyleSheet.create({
  container: {
    flex: 1,
    justifyContent: 'center',
    alignItems: 'center',
    backgroundColor: '#F5FCFF',
  },
  welcome: {
    fontSize: 20,
    textAlign: 'center',
    margin: 10,
  },
  instructions: {
    textAlign: 'center',
    color: '#333333',
    marginBottom: 5,
  },
})
5、原生应用中配置code-push
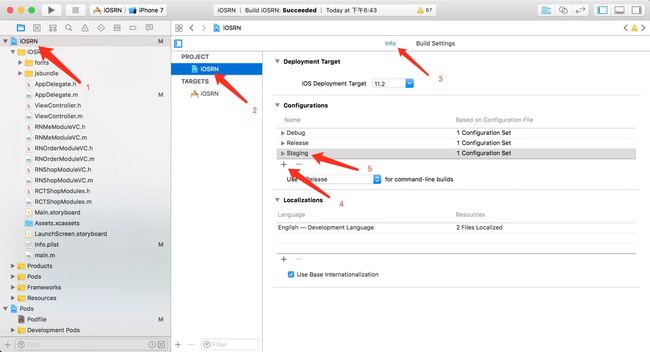
使用Xcode打开项目,Xcode的项目导航视图中的PROJECT下选择你的项目,选择Info页签 ,在Configurations节点下单击 + 按钮 ,选择Duplicate "Release Configaration,输入Staging
选择Build Settings tab,搜索Build Location -> Per-configuration Build Products Path -> Staging,将之前的值:$(BUILD_DIR)/$(CONFIGURATION)$(EFFECTIVE_PLATFORM_NAME) 改为:$(BUILD_DIR)/Release$(EFFECTIVE_PLATFORM_NAME)
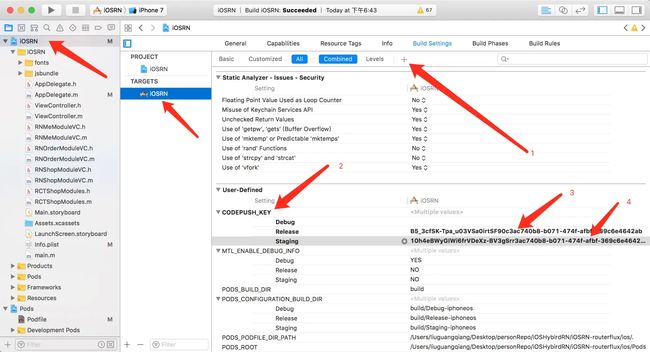
选择Build Settings tab,点击 + 号,选择Add User-Defined Setting,将key设置为CODEPUSH_KEY,Release 和 Staging的值为前面创建的key,我们直接复制进去即可
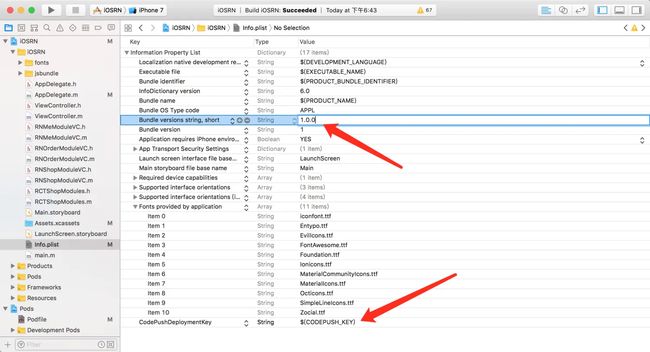
打开Info.plist文件,在CodePushDeploymentKey中输入$(CODEPUSH_KEY),并修改Bundle versions为三位
如果是cocoapods进行项目管理,那么修改podfile文件
pod 'CodePush', :path => './node_modules/react-native-code-push'
请正确填写path路径
6、发布更新的版本
发布更新两种方式:
1、打包和发布
react-native bundle --platform
code-push relase [AppName] -d [Deployment参数] [更新文件目录] [需要更新到App的版本号]
2、打包并发布
//综合的上面说的1,2步的操作:1,新建存放打包后的目录,打包js和资源文件到此目录;2,根据命令行配置参数更新此目录的内容
code-push release-react
[--bundleName
[--deploymentName
[--description
[--development
[--disabled
[--entryFile
[--mandatory]-m是否强制更新
[--sourcemapOutput
[--targetBinaryVersion
[--rollout
7、后续
清除已经上传的版本 code-push deployment clear //Production, Staging等
8、参考
code-push常用命令
CodePush热更新详细接入教程
微软的React Native热更新 - 使用篇
react-native-code-push进阶篇
ReactNative博客


