SpringCloudAlibaba之Seata-2pc源码剖析
seata客户端启动流程
本章大部分是源码,源码下面都会有对其大概意思的介绍,如果源码看着头疼,可以直接看下面的介绍,可以整体对2pc有个轮廓,如果经常阅读源码的朋友,肯定能够想到入口是利用springboot的starter来做客户端相关组件的初始化,立马就能想到starter下META-INFO/spring.factories。# Auto Configure
org.springframework.boot.autoconfigure.EnableAutoConfiguration=io.seata.spring.boot.autoconfigure.SeataAutoConfiguration
自动启动类:SeataAutoConfiguration
@ComponentScan(basePackages = {"io.seata.spring.boot.autoconfigure.properties"})@ConditionalOnProperty(prefix = "seata",name = {"enabled"},havingValue = "true",matchIfMissing = true)@Configuration@EnableConfigurationProperties({SeataProperties.class})public class SeataAutoConfiguration {private static final Logger LOGGER = LoggerFactory.getLogger(SeataAutoConfiguration.class);public SeataAutoConfiguration() {}@Bean({"springApplicationContextProvider"})@ConditionalOnMissingBean(name = {"springApplicationContextProvider"})public SpringApplicationContextProvider springApplicationContextProvider() {return new SpringApplicationContextProvider();}@Bean({"failureHandler"})@ConditionalOnMissingBean({FailureHandler.class})public FailureHandler failureHandler() {return new DefaultFailureHandlerImpl();}@Bean@DependsOn({"springApplicationContextProvider", "failureHandler"})@ConditionalOnMissingBean({GlobalTransactionScanner.class})public GlobalTransactionScanner globalTransactionScanner(SeataProperties seataProperties, FailureHandler failureHandler) {if (LOGGER.isInfoEnabled()) {LOGGER.info("Automatically configure Seata");}return new GlobalTransactionScanner(seataProperties.getApplicationId(), seataProperties.getTxServiceGroup(), failureHandler);}@Bean({"seataAutoDataSourceProxyCreator"})@ConditionalOnProperty(prefix = "seata",name = {"enableAutoDataSourceProxy", "enable-auto-data-source-proxy"},havingValue = "true",matchIfMissing = true)@ConditionalOnMissingBean({SeataAutoDataSourceProxyCreator.class})public SeataAutoDataSourceProxyCreator seataAutoDataSourceProxyCreator(SeataProperties seataProperties) {return new SeataAutoDataSourceProxyCreator(seataProperties.isUseJdkProxy(), seataProperties.getExcludesForAutoProxying());}}
从上面的注解@ConditionOnProperties可以看出,seata的starter默认是自动开启,不需要人为在进行配置,如果要关闭seata的默认开启功能,可以这样配置
seata.enabled=false再来看下注解,配置项相关属性,在上文中我们在配置微服务的时候,指定了事务相关的分组,可以看到下面的属性与之对应,还有一些默认的属性配置。
@EnableConfigurationProperties({SeataProperties.class})![]()

除了属性配置外,可以看到SeataAutoConfiguration还做了一些bean的初始化,其中GlobalTransactionScanner和
SeataAutoDataSourceProxyCreater是我们重点分析的两个类,从字面上看一个是全局事务扫描器,一个是seata的数据源代理的创建者。
public class GlobalTransactionScanner extends AbstractAutoProxyCreatorimplements InitializingBean, ApplicationContextAware,DisposableBean
可以看到全局事务扫描器的继承关系,其中利用到了spring容器相关组件,初始化Bean、spring上下文注入、销毁Bean和自动代理创建,先来看下spring相关初始化做了什么?
public void afterPropertiesSet() {if (disableGlobalTransaction) {if (LOGGER.isInfoEnabled()) {LOGGER.info("Global transaction is disabled.");}return;}initClient();}
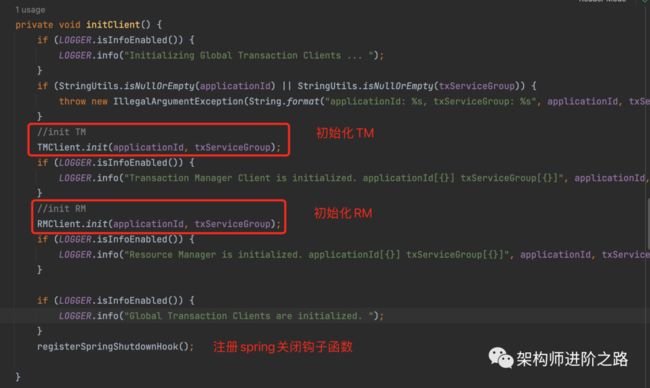
还记的我们在介绍Seata的模式中的角色吗?TM、RM和TC,TM是事务管理者:作用是开启事务、提交事务和回滚事务等。RM是资源管理器:也就是对应的微服务的数据源。TC事务协调器:seata-server事务状态管理。
public class TMClient {/*** Init.** @param applicationId the application id* @param transactionServiceGroup the transaction service group*/public static void init(String applicationId, String transactionServiceGroup) {TmNettyRemotingClient tmNettyRemotingClient = TmNettyRemotingClient.getInstance(applicationId, transactionServiceGroup);tmNettyRemotingClient.init();}}public class RMClient {/*** Init.** @param applicationId the application id* @param transactionServiceGroup the transaction service group*/public static void init(String applicationId, String transactionServiceGroup) {RmNettyRemotingClient rmNettyRemotingClient = RmNettyRemotingClient.getInstance(applicationId, transactionServiceGroup);rmNettyRemotingClient.setResourceManager(DefaultResourceManager.get());rmNettyRemotingClient.setTransactionMessageHandler(DefaultRMHandler.get());rmNettyRemotingClient.init();}}
从上面的两个初始化可以了解到,原来和seata-server的通信是基于Netty客户端做远程通信,这让我想起了nacos是基于gRpc协议也是通过Netty框架来做通信,可以提高服务器的性能,想一下eureka是基于rest接口做心跳上报、健康检测等,这得需要承受多少压力啊,特别是服务很多的情况下,再加上服务集群,压力不小。
除了spring相关组件,这里还继承了AbstractAutoProxyCreator,来看下当前类的继承关系
public abstract class AbstractAutoProxyCreatorextends ProxyProcessorSupportimplements SmartInstantiationAwareBeanPostProcessor, BeanFactoryAware
了解spring的同学应该知道BeanPostProcessor,是一种在Bean进行初始化或者实例化处理器,可以在实例化前后、初始化前后做一些扩展点操作,所以我们可以看到当前类应该实现了它的两个方法,我们来看下
//befor属于前置处理器public Object postProcessBeforeInstantiation(Class beanClass, String beanName) {Object cacheKey = this.getCacheKey(beanClass, beanName);if (!StringUtils.hasLength(beanName) || !this.targetSourcedBeans.contains(beanName)) {if (this.advisedBeans.containsKey(cacheKey)) {return null;}if (this.isInfrastructureClass(beanClass) || this.shouldSkip(beanClass, beanName)) {this.advisedBeans.put(cacheKey, Boolean.FALSE);return null;}}TargetSource targetSource = this.getCustomTargetSource(beanClass, beanName);if (targetSource != null) {if (StringUtils.hasLength(beanName)) {this.targetSourcedBeans.add(beanName);}Object[] specificInterceptors = this.getAdvicesAndAdvisorsForBean(beanClass, beanName, targetSource);Object proxy = this.createProxy(beanClass, beanName, specificInterceptors, targetSource);this.proxyTypes.put(cacheKey, proxy.getClass());return proxy;} else {return null;}}
以上代码是在初始化bean之前将bean进行了代理,创建了代理对象并返回给到springioc容器,也就是做了aop的处理。再来看下后置处理器
public Object postProcessAfterInitialization(@Nullable Object bean, String beanName) {if (bean != null) {Object cacheKey = this.getCacheKey(bean.getClass(), beanName);if (this.earlyProxyReferences.remove(cacheKey) != bean) {return this.wrapIfNecessary(bean, beanName, cacheKey);}}return bean;}
当初始化之后,做了一层包装warpIfNeccessary(),来看下包装了什么
protected Object wrapIfNecessary(Object bean, String beanName, Object cacheKey) {if (disableGlobalTransaction) {return bean;}try {synchronized (PROXYED_SET) {if (PROXYED_SET.contains(beanName)) {return bean;}interceptor = null;//check TCC proxyif (TCCBeanParserUtils.isTccAutoProxy(bean, beanName, applicationContext)) {//TCC interceptor, proxy bean of sofa:reference/dubbo:reference, and LocalTCCinterceptor = new TccActionInterceptor(TCCBeanParserUtils.getRemotingDesc(beanName));} else {Class serviceInterface = SpringProxyUtils.findTargetClass(bean);Class[] interfacesIfJdk = SpringProxyUtils.findInterfaces(bean);if (!existsAnnotation(new Class[]{serviceInterface})&& !existsAnnotation(interfacesIfJdk)) {return bean;}if (interceptor == null) {if (globalTransactionalInterceptor == null) {globalTransactionalInterceptor = new GlobalTransactionalInterceptor(failureHandlerHook);ConfigurationCache.addConfigListener(ConfigurationKeys.DISABLE_GLOBAL_TRANSACTION,(ConfigurationChangeListener)globalTransactionalInterceptor);}interceptor = globalTransactionalInterceptor;}}LOGGER.info("Bean[{}] with name [{}] would use interceptor [{}]", bean.getClass().getName(), beanName, interceptor.getClass().getName());if (!AopUtils.isAopProxy(bean)) {bean = super.wrapIfNecessary(bean, beanName, cacheKey);} else {AdvisedSupport advised = SpringProxyUtils.getAdvisedSupport(bean);Advisor[] advisor = buildAdvisors(beanName, getAdvicesAndAdvisorsForBean(null, null, null));for (Advisor avr : advisor) {advised.addAdvisor(0, avr);}}PROXYED_SET.add(beanName);return bean;}} catch (Exception exx) {throw new RuntimeException(exx);}}
可以看出来先判断是否使用了Tcc的事务模式,看下它是怎么判断的,核心代码如下,根据注解TwoPhaseBusinessAction来判断,我们上一篇文章是基于AT模式的所以他肯定不会走这里。
for (Method method : methods) {twoPhaseBusinessAction = method.getAnnotation(TwoPhaseBusinessAction.class);if (twoPhaseBusinessAction != null) {isTccClazz = true;break;}}
再来看下另外一个分支的核心代码逻辑,可以看到上一篇文章的案例中使用的注解@GlobalTransactional。
private boolean existsAnnotation(Class[] classes) {if (CollectionUtils.isNotEmpty(classes)) {for (Class clazz : classes) {if (clazz == null) {continue;}GlobalTransactional trxAnno = clazz.getAnnotation(GlobalTransactional.class);if (trxAnno != null) {return true;}Method[] methods = clazz.getMethods();for (Method method : methods) {trxAnno = method.getAnnotation(GlobalTransactional.class);if (trxAnno != null) {return true;}GlobalLock lockAnno = method.getAnnotation(GlobalLock.class);if (lockAnno != null) {return true;}}}}return false;}
如果我们使用了AT模式中的注解@GlobalTransactional,那么就增加过滤器,全局事务过滤器GlobalTransactionalInterceptor,所以焦点又来到了当前过滤器,也就是在当前过滤器中增强功能。来看下invoke()方法
public Object invoke(final MethodInvocation methodInvocation) throws Throwable {Class targetClass =methodInvocation.getThis() != null ? AopUtils.getTargetClass(methodInvocation.getThis()) : null;Method specificMethod = ClassUtils.getMostSpecificMethod(methodInvocation.getMethod(), targetClass);if (specificMethod != null && !specificMethod.getDeclaringClass().equals(Object.class)) {final Method method = BridgeMethodResolver.findBridgedMethod(specificMethod);final GlobalTransactional globalTransactionalAnnotation =getAnnotation(method, targetClass, GlobalTransactional.class);final GlobalLock globalLockAnnotation = getAnnotation(method, targetClass, GlobalLock.class);boolean localDisable = disable || (degradeCheck && degradeNum >= degradeCheckAllowTimes);if (!localDisable) {if (globalTransactionalAnnotation != null) {//处理全局事务return handleGlobalTransaction(methodInvocation, globalTransactionalAnnotation);} else if (globalLockAnnotation != null) {return handleGlobalLock(methodInvocation);}}}return methodInvocation.proceed();}
核心代码是处理全局事务,进去之后在进入execute()方法,可以看到核心的逻辑在这里
public Object execute(TransactionalExecutor business) throws Throwable {// 1 get transactionInfo//获取事务信息TransactionInfo txInfo = business.getTransactionInfo();if (txInfo == null) {throw new ShouldNeverHappenException("transactionInfo does not exist");}// 1.1 get or create a transaction//获取全局事务,如果没有则创建一个GlobalTransaction tx = GlobalTransactionContext.getCurrentOrCreate();// 1.2 Handle the Transaction propatation and the branchTypePropagation propagation = txInfo.getPropagation();......try {// 2. begin transaction//开始全局事务beginTransaction(txInfo, tx);Object rs = null;try {// Do Your Business//处理业务逻辑rs = business.execute();} catch (Throwable ex) {// 3.the needed business exception to rollback.//异常回滚completeTransactionAfterThrowing(txInfo, tx, ex);throw ex;}// 4. everything is fine, commit.//提交事务commitTransaction(tx);return rs;} finally {//5. cleartriggerAfterCompletion();cleanUp();}
我们可以大概梳理出来几个步骤
1、获取事务信息。
2、获取全局事务,如果没有创建一个新的。
3、开始全局事务
4、处理业务逻辑
5、如果异常则回滚
6、没有异常则提交
思路是不是很清晰,接下来就去看下这6个步骤具体做了什么,为什么可以做到分布式事务。
1、获取事务信息
@Overridepublic TransactionInfo getTransactionInfo() {TransactionInfo transactionInfo = new TransactionInfo();transactionInfo.setTimeOut(globalTrxAnno.timeoutMills());transactionInfo.setName(name());transactionInfo.setPropagation(globalTrxAnno.propagation());SetrollbackRules = new LinkedHashSet<>(); for (Class rbRule : globalTrxAnno.rollbackFor()) {rollbackRules.add(new RollbackRule(rbRule));}for (String rbRule : globalTrxAnno.rollbackForClassName()) {rollbackRules.add(new RollbackRule(rbRule));}for (Class rbRule : globalTrxAnno.noRollbackFor()) {rollbackRules.add(new NoRollbackRule(rbRule));}for (String rbRule : globalTrxAnno.noRollbackForClassName()) {rollbackRules.add(new NoRollbackRule(rbRule));}transactionInfo.setRollbackRules(rollbackRules);return transactionInfo;}//事务信息对象属性public final class TransactionInfo implements Serializable {//默认超时时间为60秒public static final int DEFAULT_TIME_OUT = 60000;private int timeOut;//事务名称private String name;private SetrollbackRules; private Propagation propagation;}//注解属性对应public @interface GlobalTransactional {/*** Global transaction timeoutMills in MILLISECONDS.** @return timeoutMills in MILLISECONDS.*/int timeoutMills() default TransactionInfo.DEFAULT_TIME_OUT;/*** Given name of the global transaction instance.** @return Given name.*/String name() default "";/*** roll back for the Class* @return*/Class[] rollbackFor() default {};/*** roll back for the class name* @return*/String[] rollbackForClassName() default {};/*** not roll back for the Class* @return*/Class[] noRollbackFor() default {};/*** not roll back for the class name* @return*/String[] noRollbackForClassName() default {};/*** the propagation of the global transaction** @return*/Propagation propagation() default Propagation.REQUIRED;}
事务信息其实就是封装了在开发中添加的注解属性信息,如果没有填写任何属性,则会使用默认值
2、获取全局事务,如果没有创建一个新的。
public static GlobalTransaction getCurrentOrCreate() {GlobalTransaction tx = getCurrent();if (tx == null) {return createNew();}return tx;}private static GlobalTransaction getCurrent() {String xid = RootContext.getXID();if (xid == null) {return null;}return new DefaultGlobalTransaction(xid, GlobalStatus.Begin, GlobalTransactionRole.Participant);}private static GlobalTransaction createNew() {return new DefaultGlobalTransaction();}
逻辑还是比较容易看懂,没有则创建一个默认的全局事务
3、开始全局事务
private void beginTransaction(TransactionInfo txInfo, GlobalTransaction tx) throws TransactionalExecutor.ExecutionException {try {triggerBeforeBegin();//开始全局事务tx.begin(txInfo.getTimeOut(), txInfo.getName());triggerAfterBegin();} catch (TransactionException txe) {throw new TransactionalExecutor.ExecutionException(tx, txe,TransactionalExecutor.Code.BeginFailure);}}@Overridepublic String begin(String applicationId, String transactionServiceGroup, String name, int timeout)throws TransactionException {GlobalBeginRequest request = new GlobalBeginRequest();request.setTransactionName(name);request.setTimeout(timeout);//发送请求到服务端并获取响应,返回事务的idGlobalBeginResponse response = (GlobalBeginResponse) syncCall(request);if (response.getResultCode() == ResultCode.Failed) {throw new TmTransactionException(TransactionExceptionCode.BeginFailed, response.getMsg());}return response.getXid();}private AbstractTransactionResponse syncCall(AbstractTransactionRequest request) throws TransactionException {try {//Tm的Netty客户端去发送请求获取响应,这里的timeout是和服务端链接的超时时间return (AbstractTransactionResponse) TmNettyRemotingClient.getInstance().sendSyncRequest(request);} catch (TimeoutException toe) {throw new TmTransactionException(TransactionExceptionCode.IO, "RPC timeout", toe);}}
总结一下:将事务信息通过TM的Netty客户端发送请求到服务端并返回响应,得到全局事务的id,可以理解为TM向服务端注册事务的过程。
4、处理业务逻辑
@Overridepublic Object execute() throws Throwable {return methodInvocation.proceed();}
执行业务逻辑
5、如果异常则回滚
private void completeTransactionAfterThrowing(TransactionInfo txInfo, GlobalTransaction tx, Throwable originalException) throws TransactionalExecutor.ExecutionException {//roll backif (txInfo != null && txInfo.rollbackOn(originalException)) {try {rollbackTransaction(tx, originalException);} catch (TransactionException txe) {// Failed to rollbackthrow new TransactionalExecutor.ExecutionException(tx, txe,TransactionalExecutor.Code.RollbackFailure, originalException);}} else {// not roll back on this exception, so commitcommitTransaction(tx);}}@Overridepublic GlobalStatus rollback(String xid) throws TransactionException {GlobalRollbackRequest globalRollback = new GlobalRollbackRequest();globalRollback.setXid(xid);GlobalRollbackResponse response = (GlobalRollbackResponse) syncCall(globalRollback);return response.getGlobalStatus();}
可以看到回滚是发送回滚请求到服务端,对于服务端的请求都是通过TM的Netty客户端进行通信,注册事务、发送回滚请求。
6、没有异常则提交
@Overridepublic GlobalStatus commit(String xid) throws TransactionException {GlobalCommitRequest globalCommit = new GlobalCommitRequest();globalCommit.setXid(xid);GlobalCommitResponse response = (GlobalCommitResponse) syncCall(globalCommit);return response.getGlobalStatus();}
同样最终将提交请求发送到服务端,也是通过TM的客户端发送请求。
所以AT的整个流程大概是这样子的一个过程

思考:在执行业务逻辑的完成之后,自己的本地事务怎么处理?
本地事务和全局事务没有做关联,所以如果没有出现异常的情况下,执行完业务逻辑之后就会提交本地事务,那如果另外一个服务出现异常,出现全局回滚,那么当前业务会执行补偿机制,也就是从undo_log中获取历史数据进行回滚,所以AT模式下可能会出现脏数据的情况。
那AT模式是怎么进行undo_log日志的操作的呢?在上一篇文章中SpringCloudAlibaba之Seata-下单扣库存分布式事务实战我们知道要想使用AT模式则将数据源的代理设置为DataSourceProxy,如果想使用XA模式则想数据源代理设置为DataSourceXAProxy,也就是说通过数据源的代码对SQL语句进行解析,然后将修改之前的数据进行提前保存在undo_log日志中,大概的思路已经很清晰了,也就是需要先看下数据源代理组件,这个组件就是解析SQL语句、保存undo_log等操作,下一篇将会继续探索。