Vue3+TypeScript封装Axios
在Vue3中,基于TS,封装的一个Class类Axios
该类中封装了:
1)不同使用范围的拦截器
2)在请求拦截器中封装每个请求携带的token
3)在请求/响应拦截器中对错误进行处理【两种处理方式,及对axios封装好的数据进行处理】
4)在请求/响应拦截器中添加loading/移除loading【element-plus的一个组件】
5)定义请求数据时,拿到的数据类型接口
共四个文件,描述如下:
utils/request.ts — 声明Class类 HYRequest
utils/type.ts — Class类Axios的类型注解
utils/config.ts — 模拟项目的环境变量配置
utils/diaoyong.ts — Axios的主入口,实例化类HYRequest
main.ts — 注入使用
// 使用的插件版本:
 "axios": "^0.21.1",  // 版本太高会出现问题,本文后面有讲解
 "vue": "^3.2.13",
 "typescript": "~4.5.5"
一、utils/type.ts — Class类Axios的类型注解
import type { AxiosRequestConfig, AxiosResponse } from 'axios'

// 声明接口 HYRequestInterceptors 主要是为了interceptor拦截器能从类实例化的时候自己声明一个外部的拦截器
export interface HYRequestInterceptors<T = AxiosResponse> {
  requestInterceptor?: (config: AxiosRequestConfig) => AxiosRequestConfig
  requestInterceptorCatch?: (error: any) => any
  responseInterceptor?: (res: T) => T
  responseInterceptorCatch?: (error: any) => any
}

// 声明接口 HYRequestConfig 是继承于Axios的类 AxiosRequestConfig 然后将我们需要的接口在写进接口
// 例如 interceptors , showLoading 后期就可以有需求就往里面加接口
// 泛型:后期可以传入自己的类型
export interface HYRequestConfig<T = AxiosResponse> extends AxiosRequestConfig {
  interceptors?: HYRequestInterceptors<T>
  showLoading?: boolean
}
二、utils/request.ts — 声明Class类 HYRequest
完成的功能如下:
1.封装的拦截器类型:对应的实例的拦截器、所有的实例都有的拦截器、每个请求单独的拦截器
2.在请求/响应拦截器中对错误进行处理:
1)失败类型一:HttpErrorCode->responseCatch:err->err.response.status【2xx:成功;4xx:失败;5xx:失败】
2)失败类型二:虽200->成功,但数据{data:‘’,success:false,returnCode:-1001}
具体使用哪种,看服务器提供的是哪种类型
3.对axios封装好的数据进行处理:res.data
4.在请求/响应拦截器中添加loading/移除loading【element-plus的一个组件】,可根据不同请求的需要决定是否添加loading
5.封装resquest请求,之后调用时直接get|post|delete即可
// 对axios二次封装
import axios from 'axios'
// 引入axios实例类型
import type { AxiosInstance } from 'axios'
// 引入自己封装的接口
import type { HYRequestConfig, HYRequestInterceptors } from './type'
// 引入loading
import { ElLoading } from 'element-plus/lib/index'
import { LoadingInstance } from 'element-plus/lib/components/loading/src/loading'

// 定义是否添加loading的初始值
const DEFAULT_LOADING = true

// 封装axios类
class HYRequest {
  instance: AxiosInstance
  interceptors?: HYRequestInterceptors
  showLoading: boolean
  loading?: LoadingInstance

  constructor(config: HYRequestConfig) {
    // 创建axios实例
    this.instance = axios.create(config)
    // 保存基本信息
    this.interceptors = config.interceptors
    // 若showLoading为null | undefined, 则默认加loading;否则不加
    this.showLoading = config.showLoading ?? DEFAULT_LOADING

    // 使用拦截器
    // 1.从config中取出的拦截器是对应的实例的拦截器
    this.instance.interceptors.request.use(
      this.interceptors?.requestInterceptor,
      this.interceptors?.requestInterceptorCatch
    )

    this.instance.interceptors.response.use(
      this.interceptors?.responseInterceptor,
      this.interceptors?.responseInterceptorCatch
    )

    // 2.添加所有的实例都有的拦截器
    this.instance.interceptors.request.use(
      (config) => {
        console.log('所有的实例都有的拦截器:请求成功拦截')

        // 添加loading
        if (this.showLoading) {
          this.loading = ElLoading.service({
            lock: true, // 是否使用蒙版
            text: '正在请求数据....',
            background: 'rgba(0,0,0,0.5)'
          })
        }
        return config
      },
      (err) => {
        console.log('所有的实例都有的拦截器:请求失败拦截')
        return err
      }
    )
    this.instance.interceptors.response.use(
      (res) => {
        console.log('所有的实例都有的拦截器:响应成功拦截')

        // 将loading移除【真正写项目的时候,后台返回数据成功之后,loading.close()即可,不需要添加定时器,此处只是做一个展示】
        setTimeout(() => {
          this.loading?.close()
        }, 1000)

        const data = res.data
        if (data.returnCode === '-1001') {
          console.log('请求失败~,错误信息')
        } else {
          return data
        }
      },
      (err) => {
        console.log('所有的实例都有的拦截器:响应失败拦截')
        // 将loading移除
        this.loading?.close()
        // 判断不同的HttpErrorCode显示不同的错误信息
        if (err.response.status === 404) {
          console.log('404的错误!')
        }
        return err
      }
    )
  }

  // 封装request请求
  // 声明接口泛型是从外部导入 , 但是在type.ts中已经初始化赋值了AxiosResponse类型
  request<T>(config: HYRequestConfig<T>): Promise<T> {
    return new Promise((resolve, reject) => {
      // 1.单个请求对请求config的处理
      if (config.interceptors?.requestInterceptor) {
        config = config.interceptors.requestInterceptor(config)
      }

      // 2.判断是否需要显示loading
      if (config.showLoading === false) {
        this.showLoading = config.showLoading
      }

      this.instance
        .request<any, T>(config)
        .then((res) => {
          // 1.单个请求对数据的处理
          if (config.interceptors?.responseInterceptor) {
            res = config.interceptors.responseInterceptor(res)
          }

          // 2.将showLoading设置为true,这样不会影响下一个请求
          this.showLoading = DEFAULT_LOADING
          // 3.将结果resolve返回出去
          resolve(res)
        })
        .catch((err) => {
          // 将showLoading设置为true,这样不会影响下一个请求
          this.showLoading = DEFAULT_LOADING
          reject(err)
          return err
        })
    })
  }

  get<T>(config: HYRequestConfig<T>): Promise<T> {
    return this.request<T>({ ...config, method: 'GET' })
  }
  post<T>(config: HYRequestConfig<T>): Promise<T> {
    return this.request<T>({ ...config, method: 'POST' })
  }
  delete<T>(config: HYRequestConfig<T>): Promise<T> {
    return this.request<T>({ ...config, method: 'DELETE' })
  }
  patch<T>(config: HYRequestConfig<T>): Promise<T> {
    return this.request<T>({ ...config, method: 'PATCH' })
  }
}
export default HYRequest
三、utils/config.ts — 模拟项目的环境变量配置
// 根据process.env.NODE_ENV的值区分不同环境
// 开发环境:development;生产环境:production;测试环境:test
let BASE_URL = ''
const TIME_OUT = 10000

if (process.env.NODE_ENV === 'development') {
  BASE_URL = 'http://123.207.32.32:8000/'
} else if (process.env.NODE_ENV === 'production') {
  BASE_URL = 'http://coderwhy.org/prod'
} else {
  BASE_URL = 'http://coderwhy.org/test'
}
export { BASE_URL, TIME_OUT }
四、utils/diaoyong.ts — Axios的主入口,实例化类HYRequest
多个url地址都可拥有独立的axios实例及拦截器
注:此处在请求拦截器中封装了每个请求携带的token
import HYRequest from './request'
import { BASE_URL, TIME_OUT } from './config'

const hyRequest = new HYRequest({
  baseURL: BASE_URL,
  timeout: TIME_OUT,
  interceptors: {
    requestInterceptor: (config) => {
      // 携带token的拦截
      const token = ''
      if (token) {
        config.headers.Authorization = `Bearer ${token}`
      }
      console.log('请求成功的拦截!')
      return config
    },
    requestInterceptorCatch: (err) => {
      console.log('请求失败的拦截!')
      return err
    },
    responseInterceptor: (res) => {
      console.log('响应成功的拦截!')
      return res
    },
    responseInterceptorCatch: (err) => {
      console.log('响应失败的拦截!')
      return err
    }
  }
})

export default hyRequest
五、main.ts
import { createApp } from 'vue'
import App from './App.vue'
import router from './router'
import store from './store'

import { registerApp } from '@/global'
import hyRequest from './utils/diaoyong'

const app = createApp(App)
registerApp(app)
app.use(router)
app.use(store)
app.mount('#app')

// 定义请求数据时,拿到的数据类型接口
// 接口DataType 类型的属性是根据接口反馈的属性
interface DataType {
  data: any
  returnCode: string
  success: boolean
}

//没有封装request请求时,做出的调用【需要有method方法】
// hyRequest
//   .request({
//     url: 'home/multidata',
//     method: 'GET',
//     // showLoading: false,
//     interceptors: {
//       requestInterceptor: (config) => {
//         console.log('单独请求的config')
//         return config
//       },
//       responseInterceptor: (res) => {
//         console.log('单独响应的response')
//         return res
//       }
//     }
//   })
//   .then((res) => {
//     console.log(res.data)
//     console.log(res.returnCode)
//     console.log(res.success)
//   })

hyRequest
  .get<DataType>({
    url: 'home/multidata',
    // showLoading: false,  //若写false,说明不需要添加loading
    interceptors: {
      requestInterceptor: (config) => {
        console.log('单独请求的config')
        return config
      },
      responseInterceptor: (res) => {
        console.log('单独响应的response')
        return res
      }
    }
  })
  .then((res) => {
    console.log(res.data)
    console.log(res.returnCode)
    console.log(res.success)
  })
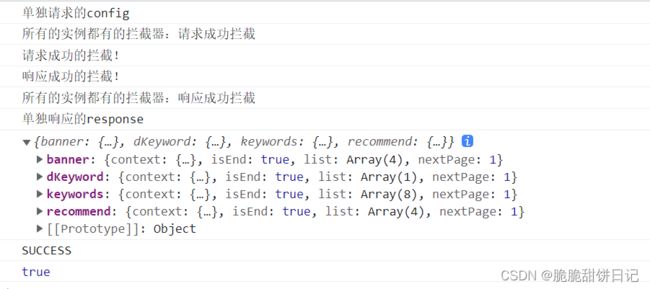
六、输出的结果:
七、备注:封装过程中出现的问题
1.类型问题:
出现的问题:如上图所示的config.headers的对象可能未定义
原因:先前版本的headers是any类型的,也就是说可以为任意类型,不会有undefined类型。
但config.headers确实有可能是undefined类型,先前版本不对
解决:把axios版本降低到没有对AxiosRequest的类型检测进行更新的版本即可【注:也可对headers进行判断】
具体解法可见:Vue3 + TypeScript axios处理拦截器interceptors中requestInterceptor存在config.headers存在未定义的可能
2.包引入问题:
在使用loading时,引入方式与之前大不相同,如下引入才不报错:
具体详情可见:Can‘t resolve ‘element-plus/lib/el-loading‘ in ‘/Users/982471938qq.com/Desktop/superSmall/shop-cms/s
import { ElLoading } from 'element-plus/lib/index'
import { LoadingInstance } from 'element-plus/lib/components/loading/src/loading'
小心得:刚刚接触ts,用它来封装axios会比较困难,多理解练习几遍,慢慢就会了解到ts的强大之处,重点是要突破固化思维,突破ts写法无用的思维定势。

