C++并发编程(第二版)笔记

2章节 线程管控

class background_task
{
public:
    void operator()() const
    {
        do_something();
        do_something_else();
    }
};
	background_task f;
	std::thread my_thread(f);
	//这里的疑惑是为什么f是调用oprator()(),我知道他重载了(),那正常不应该是代入()
	//std::thread my_thread(f())Error;
	
	std::thread my_thread((background_task ()));//Correct 
	
	std::thread my_thread{background_task()};//Correct 初始化列表
	
	//std::thread my_thread(background_task() ); Error
	//参数带入了临时变量,编译器误以为是为声明函数
	//返回值为std::thread 函数名为 my_thread  参数为background **这里注意写法**

**这里需要注意的是background_task f 传入的实参和形参是不一样的地址 **

#include
#include

class func
{
public:
	int& i;
	func(int& i_) :i(i_) {};
	void operator()() {
		for (unsigned j = 0; j < 100000; ++j) {
			do_something(i+j);
		}
	
	}
	void do_something(int i) {
		std::cout << i << std::endl;
	};

};

void oops() {
	int some_local_state = 0;
	func my_func(some_local_state);
	std::thread my_thread(my_func);
	my_thread.detach();
	//以上代码段注意一下`detach` 和join的区别
	//detach : 不等线程内代码执行继续往下运行。
	//join:		等线程内代码运行完再继续运行。  主要这里区别。
	
	//上图用到了deatch ,即表明了,等oops函数结束后。新线程 my_thread线程可能还没起来。
	//主要点是这里,毕竟新县城用到oops内的局部变量,涉及到了生命周期的问题。
}

int main() {

	oops();

	return 1;
}

在2.1.3中有讲叙到用try/catch 来进行一个异常保护的机制。但是此机制显得有点冗余。有点不太优雅。如下图

struct func;

void f{
	int some_local_state=0;
	func my_func(some_local_state);
	std::thread t(my_func);
	try{				//此处加了一个try保护,防止在当前线程的时候出现异常。然后t线程没join执行。
		do_something_in_current_thread();	
}
catch(...){
	t.join();
	throw;
}
t.join();
}

还有另外一种较为优雅点的方法就是使用RAII机制,即类资源回收。运用析构来进行join。

class thread_gurad
{
	std::thread& t;
public:
	explicit thread_guard(std::thread& _t):t(_t){};
		~thread_guard(){
			if(t.joinable()) //判断此函数是否能join 因为一个线程只能进行一次合并(join)
				t.join;	
	}
	
	thread_guard(thread_guard const&)=delete;
	thread_guard& operator=(thread_guard const&)=delete;
}

struct func;

void f(){
	int some_local_state=0;
	func my_func(some_local_state);
	std::thread t(my_func);		//传入线程函数然后供线程进行回调。
	thread_guard g(t);			//创建一个RAII 的线程类,进行管理,当此f函数走完的时候。g类析构自动调用join			
	do_something_in_current_thread();	//执行当前所在线程需要操作的事情。
}

此方法即便do_something_in_current_thread 抛出异常,函数f()退出,以上行为仍会发生。

这里有个细节性的需注意一下,例下图:

void f(int i,std::string const& s); 	//这里的线程回调函数需要的是一个string 类型
void oops(int some_param)
{
	char buffer[1024]; // 1
	sprintf(buffer, "%i",some_param);
	std::thread t(f,3,buffer); // 2		//这里传入的是一个指针,指向一个局部变量,很可能会出现
										//当oops函数运行完成时,buff指向的局部变量会销毁,从而导致一些未定义的行为。
									
	t.detach();														
}

向线程函数传递参数的错误细节


void f(int i, std::string const& s) {

	cout << s << endl;
};

void oops(int some_param)
{
	char buffer[1024]; // 1
	sprintf_s(buffer, "%i", some_param);
	std::thread t(f, 3, string(buffer)); // 2	
	std::thread t(f, 3,buffer); // 2	ERROR 这里需要注意一个错误点就是这里传入了一个指针,然后oopes 结束的时候地址内的信息已经回收
								//			  线程回调f函数的时候已经拷贝不到buff指针内的值了,所以这个时候程序能运行但是并不能得到想要的结果。
								//我们需要先提前转换成string(buffer);

	t.detach();
}

int main() {

	oops(3);

	system("pause");

	return 1;
}}

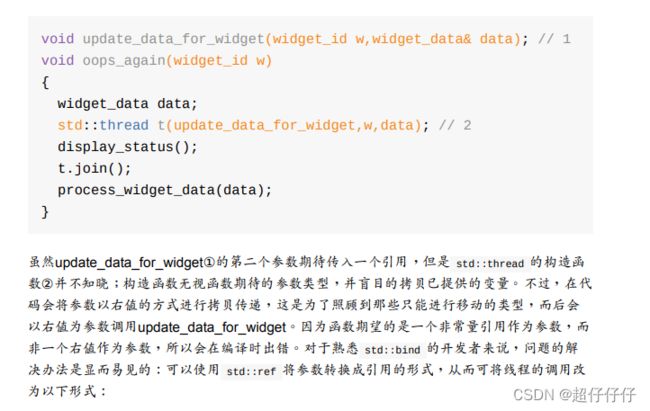
关于std::ref ,主要讲述的是在某些场景, 代入线程函数的时候线程需盲目的拷贝下列 int&a
但是const int&a 不允许拷贝,这个时候就需要用到std::ref了,这个就是将数值转换成引用类型

引用文中一句话:
C++并发编程(第二版)笔记_第1张图片


#include
#include
#include
#include

using namespace std;
void fun(const int& a)
{
	
	cout << std::hex << &a << "----" << a << endl;
	
}


int main() {

	int he = 10;
	cout << std::hex << &he << "----" << he << endl;
	thread t(fun, std::ref(he));		//!!!这里std:ref 的作用是转换成一个引用类型,而且还有一层作用类似于文本的剪切功能,
										//用于一些不允许拷贝的变量
	//thread t(fun, he); ERROR	因为fun函数期待引入一个引用类型,但是此时传入的是非常量引用。
	t.detach();
	system("pause");

	return 1;
}

如何传递参数为成员函数到线程中以及std::move 讲解也称作 移交线程归属权

#include
#include
#include
#include

using namespace std;


class X
{
public:
	void do_lengthy_work(int argc) {
		cout << argc << endl;
	};

};

int main() {

	X my_x;
	int num(10);
	std::thread t(&X::do_lengthy_work, &my_x, num);
	t.detach();
	
	std::shared_ptr<X>m_ptr(new X);
	std::thread w(&X::do_lengthy_work, m_ptr, num);
	//如若遇上不允许拷贝只可以移动的参数时候,例unique_ptr 这个时候就需要用move移动这个变数了,比较像在文本编辑的"剪切"操
	//使用"移动"转移原对象后,就会留下一个空指针(NULL)。即为本指针unique_ptr为nullptr,
	w.detach();
	system("pause");
	return 1;
}

个人小结:
这一章中主要是对于thread 的启动,等待的介绍。

3章节 线程间共享数据

3.1 互斥量

最基础的数据保存方式:互斥量
C++中通过实例化 std::mutex 创建互斥量实例,通过成员函数lock()对互斥量上锁,unlock() 进行解锁。。C++标准库为互斥量提供了一个RAII语法 的模板类 std::lock_guard,简单的互斥如下图

#include  
#include  
#include  
std::list<int> some_list; // 1  对std::list some_list; 读写进行保护
std::mutex some_mutex; // 2 
void add_to_list(int new_value) { 
	std::lock_guard<std::mutex> guard(some_mutex);
	some_list.push_back(new_value); 
	}
bool list_contains(int value_to_find) { 
	std::lock_guard<std::mutex> guard(some_mutex);// 4 return 	
	//std::lock_guard guard(some_mutex); 也可以写成这样,因为C++17上添加了类推导特性。	
	std::find(some_list.begin(),some_list.end(),value_to_find) != some_list.end(); }

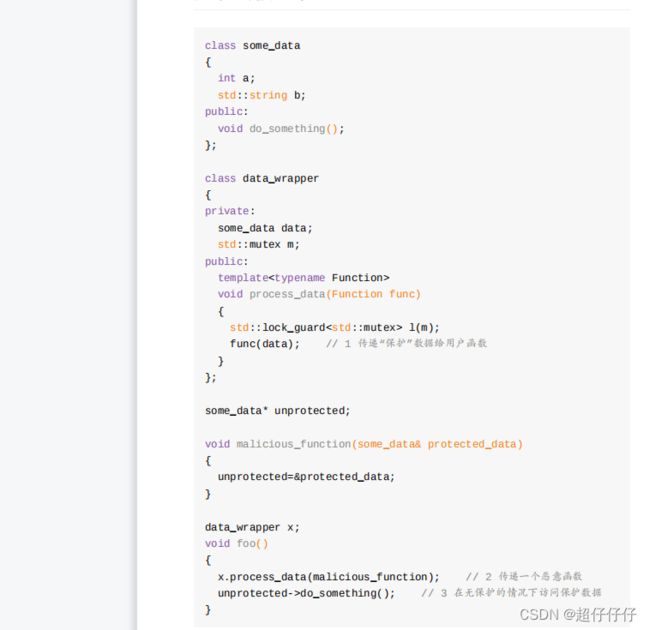
3.2 互斥保护,注意接口和指针破坏保护

C++并发编程(第二版)笔记_第2张图片

3.3 定位接口间的条件竞争

互斥也会存在接口漏洞。看下列代码

template<typename T,typename Container=std::deque<T> > 
class stack
{
public:
explicit stack(const Container&);
explicit stack(Container&& = Container());
template <class Alloc> explicit stack(const Alloc&);
template <class Alloc> stack(const Container&, const Alloc&); template <class Alloc> stack(Container&&, const Alloc&); template <class Alloc> stack(stack&&, const Alloc&);
bool empty() const;
size_t size() const;
T& top();
T const& top() const;
void push(T const&);
void push(T&&);
void pop();
void swap(stack&&);
template <class... Args> void emplace(Args&&... args);
};

也讲述到 智能上锁和解锁。std::unique_lock 以及std::lock_guard 的用法,unique_lock 相较于lock_guard 灵活。能自行进行加锁解锁的运行

下列这段代码中大概讲解了移动构造传递mutex 给lk的过程,可以大概了解下。

 #include
#include
#include
#include
#include
void process_data();
void do_something(); 
void prepare_data();

std::vector<int>m1;
std::mutex some_mutex;

std::unique_lock<std::mutex> get_lock()
{
	extern std::mutex some_mutex; 
	std::unique_lock<std::mutex> lk(some_mutex);	//共享
	prepare_data();
	return lk; // 1 
}
void process_data() {  
	std::unique_lock<std::mutex> lk(get_lock()); // 2 
	do_something();
}

void do_something() {
	for  (int var : m1)std::cout << var << std::endl;
}

void prepare_data() {
	for (int i = 0; i < 10; i++) {
		m1.push_back(i);
	}
}

int main() {

	std::thread th_(process_data);
	th_.join();
	return 1;
}

这里穿插下移动构造的概念:我自已暂时的理解是把临时对象内的东西,拷贝给另外一个新对象。
C++并发编程(第二版)笔记_第3张图片
详解:https://blog.csdn.net/sinat_25394043/article/details/78728504

下列代码展示的是双重检查锁。但是此方法会存在一定问题。

void undefined_behaviour_with_double_checked_locking()
{
  if(!resource_ptr)  // 1
  {
    std::lock_guard<std::mutex> lk(resource_mutex);
    //多线程情况下,很容易产生问题,因为线程A获得所有权,执行new未完成时。
    //线程B,这个时候知道resource_ptr不为nullptr ,然后直接执行do_something ,
    //但是这个时候由于线程A并未new完成,所以do_something 执行的时候会出现问题。
    //!!!!!!!!!!!!!!!!!!!!!!!!!!

    if(!resource_ptr)  // 2
    {
      resource_ptr.reset(new some_resource);  // 3
    }
  }
  resource_ptr->do_something();  // 4
}

详解:https://blog.csdn.net/qq_32907195/article/details/108714662

4章节 同步并发操作

4.1 等待一个事件(std::this_thread::sleep_for)

bool flag;
std::mutex m;
void wait_for_flag()
{
    std::unique_lock<std::mutex> lk(m);
    while(!flag)
    {
          lk.unlock();
          std::this_thread::sleep_for(std::chrono::milliseconds(100));
          lk.lock();
       }
       //代码片段中主要是讲述了 std::this_thread::sleep_for 线程休眠的用法。

4.1.1 等待条件达成 条件变量(std::condition_variable)

std::mutex mut;
std::queue<data_chunk> data_queue;
std::condition_variable data_cond;
void data_preparation_thread()
{
    while(more_data_to_prepare())
    {
        data_chunk const data=prepare_data();
        std::lock_guard<std::mutex> lk(mut);
        data_queue.push(data);
        data_cond.notify_one();
    }
}

void data_processing_thread()
{
    while(true)
    {
        std::unique_lock<std::mutex> lk(mut);
        data_cond.wait(
              lk,[]{return !data_queue.empty();});
        data_chunk data=data_queue.front();
        data_queue.pop();
        lk.unlock();
        process(data);
        if(is_last_chunk(data))
             break;
    }
}

这里可以记录下condition_variable的流程主要看wait 这个函数。
wait()成员函数 这里第二个参数缺省参数为false。
第二个参数为false时。wait对互斥量进行解锁,然后该段函数一直阻塞,等待notify_one 的唤醒。唤醒wait之后,会重新一直拿锁(mutex)如果拿不到则一直卡再wait()处拿锁,若拿到了,则继续往下执行。
第二个参数为true时,流程继续往下走,等该段程序结束时,再解锁。

4.21 后台任务的返回值(future,async)

async 大概意思是重新开辟一条异步线程。内部加载了std::promise、std::packaged_task加上std::thread。

#include 
#include 
int find_the_answer_to_ltuae()
{
    return 42;
}

void do_other_stuff()
{}

int main()
{
	//future 能获取异步async 的返回值,
    std::future<int> the_answer=std::async(find_the_answer_to_ltuae);
    do_other_stuff();
    std::cout<<"The answer is "<<the_answer.get()<<std::endl;
    //打印42
}

std::async 传参的方法

#include 
#include 

struct X
{
    void foo(int,std::string const&);
    std::string bar(std::string const&);
};


X x;
auto f1=std::async(&X::foo,&x,42,"hello");
auto f2=std::async(&X::bar,x,"goodbye");

struct Y
{
    double operator()(double);
};
Y y;
auto f3=std::async(Y(),3.141);
auto f4=std::async(std::ref(y),2.718);
X baz(X&);
auto f6=std::async(baz,std::ref(x));
class move_only
{
public:
    move_only();
    move_only(move_only&&);
    move_only(move_only const&) = delete;
    move_only& operator=(move_only&&);
    move_only& operator=(move_only const&) = delete;
    void operator()();
};
auto f5=std::async(move_only());

4.2.2 任务与期望值关联(std::packaged_task<>)

std::packaged_task 的简单理解的话就是用来包装于一个函数,然后返回一个future 对象,里面有函数的返回值。文中示例如下:

#include 
#include 
#include 
#include 
#include 

std::mutex m;
std::deque<std::packaged_task<void()> > tasks;

bool gui_shutdown_message_received();
void get_and_process_gui_message();

void gui_thread()
{
    while(!gui_shutdown_message_received())
    {
        get_and_process_gui_message();
        std::packaged_task<void()> task;
        {
            std::lock_guard<std::mutex> lk(m);
            if(tasks.empty())
                continue;
            task=std::move(tasks.front());
            tasks.pop_front();
        }
        task();
    }
}

std::thread gui_bg_thread(gui_thread);

template<typename Func>
std::future<void> post_task_for_gui_thread(Func f)
{
    std::packaged_task<void()> task(f);
    std::future<void> res=task.get_future();
    std::lock_guard<std::mutex> lk(m);
    tasks.push_back(std::move(task));
    return res;
}

4.2.3 使用(std::)promises

这个的理解是能作为一个储存的容器供线程使用

//参考别人的代码进行理解。
#include 
#include 
#include 
#include 
using namespace std;
void print_(std::promise<std::string>& p)
{
	this_thread::sleep_for(chrono::seconds(5));
	p.set_value("There is the result whitch you want.");
}
void do_some_other_things()
{
	std::cout << "Hello World" << std::endl;
}
int main()
{
	std::promise<std::string> promise;
	std::future<std::string> result = promise.get_future();
	//thread的时候传入引用必须使用std::ref()函数
	std::thread t(print_, std::ref(promise));//开始执行print函数 
	do_some_other_things();//打印“hellowworld”
	 
	this_thread::sleep_for(chrono::seconds(5));
	std::cout << result.get() << std::endl;//什么时候想要线程的返回值什么时候result.get()
	t.join();
	return 0;
}


4.2.4 将异常存与期望值中

没太看明白,~~~~~

4.2.5 多个线程的等待( std::shared_future)

我的理解是shard_future 和futute 的区别在于,future 是移动语义,只能wait调用一次,调用两次会抛异常,shard_future 是拷贝的,wait()可以多次调用。然后具体其他的区别暂时没分析到。

4.3 限定等待时间

C11 中提供了 时间函数用法内有三个函数。
std::chrono::steady_clock () 只记录时间增长,相当于一个教练的秒表

system_clock () 系统的时钟可以修改;甚至可以网络对时; 所以用系统时间计算时间差可能不准。

high_resolution_clock () 是当前系统能够提供的最高精度的时钟;它也是不可以修改的。相当于 steady_clock 的高精度版本。

#include 
#include 

long fibonacci(unsigned n)
{
	if (n < 2) return n;
	return fibonacci(n - 1) + fibonacci(n - 2); 
}

int main() 
{
	auto start = std::chrono::high_resolution_clock::now();
	std::cout << "f(42) = " << fibonacci(42) << '\n';
	auto end = std::chrono::high_resolution_clock::now();
	std::chrono::duration<double> elapsed_seconds = end - start;
	std::cout << "elapsed time: " << elapsed_seconds.count() << "s\n";
}

工作中我们可以写到宏上作为一个预处理指令,简化程序,

#define  _CRT_SECURE_NO_WARNINGS

#include 
#define TIMERSTART(tag) auto tag##_start = std::chrono::high_resolution_clock ::now()

#define TIMEREND(tag) 	auto tag##_end = std::chrono::high_resolution_clock ::now()

#define DURATION_s(tag) printf("%s costs %d s\n",#tag,std::chrono::duration_cast<std::chrono::seconds>(tag##_end - tag##_start).count())

#define DURATION_ms(tag) printf("%s costs %d ms\n",#tag,std::chrono::duration_cast<std::chrono::milliseconds>(tag##_end - tag##_start).count());

#define DURATION_us(tag) printf("%s costs %d us\n",#tag,std::chrono::duration_cast<std::chrono::microseconds>(tag##_end - tag##_start).count());

#define DURATION_ns(tag) printf("%s costs %d ns\n",#tag,std::chrono::duration_cast<std::chrono::nanoseconds>(tag##_end - tag##_start).count());

#include 
#include
#include 

int main(){
	TIMERSTART(TEST);
	for (int i = 0; i < 10000; i++) {
		int q=i* i;
	}
	TIMEREND(TEST);
	DURATION_s(TEST);
	decltype(TEST_end)b;//这个只是为了证明宏是全局TEST_end;
	return 0;
}


4.31 时钟( std::chrono::high_resolution_clock ::now())

介绍now 的用法,,获取当前时钟 now(),返回一个 std::chrono::time_point类型。;

4.32 时延( std::chrono::duration<>)

**第一个参数是变量类型,第二个参数是 用的是std::ratio 模板,缺省为std::ratio <1> 1s
C++并发编程(第二版)笔记_第4张图片

https://blog.csdn.net/t114211200/article/details/78029553**

4.4 使用同步操作简化代码

FP模式快排

#include 
#include 
#include
template<typename T>
std::list<T>sequential_quick_sort(std::list<T> input)
{
	if (input.empty())
	{
		return input;
	}
	std::list<T> result;

	//拷贝第一个数值到splice 内去
	result.splice(result.begin(), input, input.begin());
	
	//引用避免拷贝
	T const& pivot = *result.begin();
		
	//以pivot 作为分界线,然后进行重新排列 true 在前面,false 在后面。
	auto divide_point = std::partition(input.begin(), input.end(),
		[&](T const& t) {return t < pivot; });
	std::list<T> lower_part;


	// 从input 0~divide_point 的范围的数值剪裁到 lower_part内
	lower_part.splice(lower_part.end(), input, input.begin(),			
		divide_point);

	//进行一个递归,然后返回值给到new_lower
	auto new_lower(
		sequential_quick_sort(std::move(lower_part)));		

	//进行一个递归,然后返回值给到new_higher
	auto new_higher(
		sequential_quick_sort(std::move(input)));

	result.splice(result.end(), new_higher);

	result.splice(result.begin(), new_lower);

	return result;
}

FP并行模式的快排 这里暂未理解:https://blog.csdn.net/clh01s/article/details/78631369

//并发版本快排
/*
 * FP_sort.cpp
 *
 *  Created on: Nov 23, 2017
 *      Author: [email protected]
 *      FP模式的快速排序以及使用future的并发快速排序
 */
#include 
#include 
#include     // std::partition
#include       // std::move
#include 

template<typename T>
std::list<T> parallel_quick_sort_future(std::list<T> input)
{
    if(input.empty())
    {
        return input;
    }

    std::list<T> result;
    //取出第一个元素作为中轴,方法是用splice将其从列表前段切下
    result.splice(result.begin(),input,input.begin());
    //为了以后比较考虑对他进行引用避免复制
    T const& pivot = *result.begin();

    /* 使用partition对列表中的元素重新排列
     * 在此例中满足 t < pivot 则放置在前段不满足则放置在后端
     *
     * 这里使用了一个lambda函数;并且使用引用捕获以避免复制pivot值
     */
    auto divide_point = std::partition(input.begin(),input.end(),
            [&](T const& t){return t < pivot;});

    /* 现在列表中的值已经被分为大于pivot的一半和小于pivot的一半
     * 如果打算递归排序这两半的列表则需要创建两个列表,所以这里
     * 使用了splice()将input到divide_point的值移动到新的表
     * 剩下的值就保存在input中
     */
    std::list<T> lower_part;
    lower_part.splice(lower_part.end(),input,input.begin(),
            divide_point);

    //在这里使用std::async()开启一个新的线程对较小的那一半进行排序
    //程序返回future类行,在其他操作处理之后在需要的时候调用future的get函数获取结果
    std::future<std::list<T>> new_lower(
            std::async(&parallel_quick_sort_future<T>,std::move(lower_part)));
    //在当前线程对较大的那一部分进行排序
    auto new_higher(
            sequential_quick_sort(std::move(input)));

    //最后使用splice将正确的值连起来,new_higher在后new_lower在前
    result.splice(result.end(),new_higher);
    //调用get函数获取结构然后进行拼接
    result.splice(result.begin(),new_lower.get());

    return result;
}

/*int main()
{
    std::list l;
    l.push_back(1);
    l.push_back(2);
    l.push_back(5);
    l.push_back(8);
    l.push_back(3);
    l.push_back(9);
    l.push_back(11);
    l.push_back(4);
    l.push_back(6);
    l.push_back(10);
    l.push_back(7);
    l.push_back(12);
    std::list sort = parallel_quick_sort_future(l);
    for(auto it = sort.begin();it != sort.end();++it)
    {
        std::cout<<*it<

5章 C++内存模型和原子类型操作

前面有些过于啰嗦的就没去记录

5.2.2 std::atomic_flag的相关操作

atomic_flag 简单的例程。 而且在工程种用得相对较少
主要是test_and_set() 和 clear()这两个函数

#include        // std::cout
#include          // std::atomic_flag
#include          // std::thread
#include          // std::vector
#include        // std::stringstream

using namespace std;

atomic_flag lock_stream = ATOMIC_FLAG_INIT;
stringstream stream;

void append_number(int x)
{
	while (lock_stream.test_and_set())
	{
		;
	}

	stream << "thread #" << x << "::get lock" << '\n';
	this_thread::sleep_for(chrono::seconds(1));//sleep check for if over thread can get the lock
	stream << "thread #" << x << "::release lock" << '\n';

	lock_stream.clear();
}

int main()
{
	std::vector<std::thread> threads;

	for (int i = 1; i <= 10; ++i)
	{
		threads.push_back(thread(append_number, i));//create thread
	}

	for (auto& th : threads)
	{
		th.join();// wait thread return
	}

	cout << stream.str();

	return 0;
}

5.2.3 std::atomic 的相关操作

std::atomic<bool> b;  //默认为false
bool x = b.load(std::memory_order_acquire);			//加载操作,给bool x 加载原子操作b 
b.store(true);										//b读取 true;
x = b.exchange(true, std::memory_order_acq_rel);	//读写加载,返回原来的值

5.2.4 std::atomic :指针运算

	class Foo {};				//空类字节大小为1
	Foo some_array[5];
	std::atomic<Foo*> p(some_array);
	Foo* x = p.fetch_add(2);	// p加2,并返回原始值 
	assert(x == some_array);
	assert(p.load() == &some_array[2]);
	x = (p -= 1);				// p减1,并返回原始值 
	assert(x == &some_array[1]);
	assert(p.load() == &some_array[1]);

5.3.1 同步发生

5.3.2 先行发生

#include  
void foo(int a,int b) { 
	std::cout<<a<<","<<b<<std::endl; 
}

int get_num() { 
	static int i=0; return ++i; 
}

int main() {

	foo(get_num(), get_num()); // 无序调用
	get_num();
}

5.3.3 原子操作的内存顺序

//内存模型中的同步模式】 memory model synchronization modes
typedef enum memory_order {
	memory_order_relaxed,    // 【宽松模式】 不对执行顺序做保证
	memory_order_acquire,    // 【获得模式】本线程中,所有后续的读操作必须在本条原子操作完成后执行
	memory_order_release,    // 【释放模式】本线程中,所有之前的写操作完成后才能执行本条原子操作
	memory_order_acq_rel,    // 【获得/释放模式】 同时包含 memory_order_acquire 和 memory_order_release
	memory_order_consume,    // 【消费模式】本线程中,所有后续的有关本原子类型的操作,必须在本条原子操作完成之后执行
	memory_order_seq_cst    // 【顺序一致模式】 sequentially consistent,全部存取都按顺序执行
} memory_order;

上文6种内存模式从书本中不好理解。下面结合代码历程测试。

1- memory_order_relaxed

有点没想通先跳过。
5.3.4 释放队列与同步

你可能感兴趣的:(C++并发编程笔记,c++,开发语言)