【开发篇】十一、SpringBoot缓存底层实现技术的切换为Ehcache、Redis、Memcached
文章目录
- 0、补充:数据淘汰策略
- 1、切换为Ehcache
- 2、切换为Redis
- 3、切换为memcached--安装与启停
- 4、切换为memcached--整合
SpringBoot提供了缓存的统一整合接口,方便缓存技术的开发与管理:
- Generic
- JCache
- Ehcache
- Hazelcast
- Infinispan
- Couchbase
- Redis
- Caffeine
- Simple(默认)
- memcached
0、补充:数据淘汰策略
当遇到某些场景,如到达缓存最大内存时还有数据往进来写,此时就会按照配置的数据淘汰策略删数据,常用的淘汰策略有:
- volatile-lru:挑选最近最少使用的数据淘汰
- volatile-lfu:挑选最近使用次数最少的数据淘汰
- volatile-ttl:挑选将要过期的数据淘汰
- volatile-random:任意选择数据淘汰
简单说,LRU就是最近没怎么用到的数据,LFU就是使用最少的数据:

如上图,9s内,age这个key的数据最近一次使用是第5s的时候,其他数据则在第7、8、9秒时访问过,按LRU就淘汰它。但按LFU,最少使用的是gender这个key的数据,只用1次,LFU下淘汰它。
1、切换为Ehcache
首先引入Ehcache依赖:
<dependency>
	<groupId>net.sf.ehcachegroupId>
	<artifactId>ehcacheartifactId>
dependency>
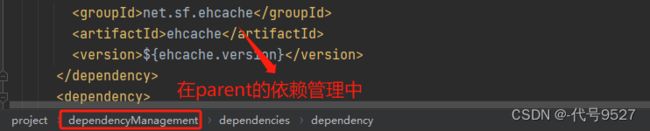
版本不用管,spring-boot-parent中依赖管理有这个依赖,用boot调好的版本就好:
再将缓存类型设置为ehcache:
spring:
  cache:
    type: ehcache
    ehcache:
      config: classpath:ehcache.xml

类路径resources下提供ehcache配置文件ehcache.xml:
<ehcache xmlns:xsi="http://www.w3.org/2001/XMLSchema-instance"
         xsi:noNamespaceSchemaLocation="http://ehcache.org/ehcache.xsd"
         updateCheck="false">


    <defaultCache
    	eternal="false"
    	diskPersistent="false"
    	maxElementsInMemory="1000"
    	overflowToDisk="false"
    	timeToIdleSeconds="60"
    	timeToLiveSeconds="60"
    	memoryStoreEvictionPolicy="LRU" />
ehcache>
为了适配之前代码里@Cacheable的value属性:
//不写value那就是defaultCache
@CachePut(value = "telCode",key = "#tel")
...
可在默认存储区外再加一块区域的定义:

重启服务,测试下上篇的验证码的生成与校验接口都正常,这就完成了底层缓存技术的切换,从默认的Simple切换为Ehcache。SpringBoot提供了一套标准的Cache解决方案接口,换底层的技术实现并不用去改动原先的代码实现,这就是设计优雅的地方!
2、切换为Redis
加入Redis坐标(缓存供应商实现):
<dependency>
	<groupId>org.springframework.bootgroupId>
	<artifactId>spring-boot-starter-data-redisartifactId>
dependency>
修改配置,这里除了redis.host,过期时间等配置也写在了配置文件里,其实应该用配置类,不同的key设置不同的过期时间:
spring:
  redis:
    host: localhost
    port: 6379
  cache:
    type: redis
    redis:
      use-key-prefix: true      # 是否使用前缀名(肯定要用,不用前缀,很容易重复,导致bug)
      key-prefix: sms_          # 追加自定义前缀名,除了代码里的前缀key,再统一加一个
      time-to-live: 10s         # 有效时长
      cache-null-values: false  # 是否允许存储空值
到此,切换完成,调用下之前生成验证码的接口:

3、切换为memcached–安装与启停
memcached的安装:https://www.runoob.com/memcached/window-install-memcached.html ,解压后进入memcached目录:

打开cmd窗口执行以下指令:
# 安装
memcached.exe -d install
可能报错安装失败:

搜索cmd,右键以管理员身份运行,重新打开cmd执行以上安装指令即可。

启动:
memcached.exe -d start
停止:
memcached.exe -d stop
4、切换为memcached–整合
关于memcached客户端选择:
- Memcached Client for Java:最早期客户端,稳定可靠,用户群广
- SpyMemcached:效率更高
- Xmemcached:并发处理更好
这里选择Xmemcached,SpringBoot未提供对memcached的整合,需要使用硬编码方式实现客户端初始化管理。首先导入Xmemcache坐标(缓存供应商实现):
<dependency>
	<groupId>com.googlecode.xmemcachedgroupId>
	<artifactId>xmemcachedartifactId>
	<version>2.4.7version>
dependency>
既然不受Spring管控,那在配置类中自己@Bean来创建一个客户端操作对象:
@Configuration
public class XMemcachedConfig {
	@Bean
	public MemcachedClient getMemcachedClinet() throws IOException {
		MemcachedClientBuilder builder = new XMemcachedClientBuilder("localhost:11211");
		MemcachedClient memcachedClient = builder.build();
		return memcachedClient;
	}
}
改造验证码的获取与校验方法:set存get取
@Service
public class SMSCodeServiceMemcacheImpl implements SMSCodeService {

	@Autowired
	private MemcachedClient memcachedClient;

	@Override
	public String sendCodeToSMS(String tele) {
		String code = CodeUtils.generator(tele);       //将数据加入memcache
		try {
			memcachedClient.set(tele,0,code);		// key,timeout,value
		} catch (Exception e) {
			e.printStackTrace();
		}
		return code;
	}
}
@Override
public boolean checkCode(String tel,String code) {
	String value = null;
	try {
		value = memcachedClient.get(tel) + "";      //Object转String,别toString,会空指针
	} catch (Exception e) {
		e.printStackTrace();
	}
	return code.equals(value);
}
有点low,虽然Spring容器不管控我,自然也不会读我写application.yaml中的配置,但我可以自己写,然后自己读取yaml,然后给代码中用,这样配置统一管理,优雅且合理(当然你也可以定义个变量,然后@Value从yaml中取,看配置的数量多不多吧)。首先在yaml中写配置文件:
memcached:
  # memcached服务器地址
  servers: localhost:11211
  # 连接池的数量
  poolSize: 10
  # 设置默认操作超时
  opTimeout: 3000
定义对应的接参实体类,加载yaml配置:
@Component
@ConfigurationProperties(prefix = "memcached")
@Data
public class XMemcachedProperties {

	private String servers;

	private Integer poolSize;

	private Long opTimeout;

}
此时,上面创建客户端操作Bean的代码可以优化为:
@Configuration
public class XMemcachedConfig {

	@Resource
	private XMemcachedProperties xMemcachedProperties;

	@Bean
	public MemcachedClient getMemcachedClinet() throws IOException {

		MemcachedClientBuilder builder = new XMemcachedClientBuilder(xMemcachedProperties.getServers());

  		builder.setConnectionPoolSize(xMemcachedProperties.getPoolSize());

		MemcachedClient memcachedClient = builder.build();

		return memcachedClient;

	}
}
切换完成,调用下之前的接口,验证码缓存的读写都正常。总结就是:
- 客户端操作Bean的初始化
- get、set读写
这地方要关注的重点是自己操作客户端对象,干Spring没干的事,以及yaml配置自己管理自己读取。