Go语言excelize包-03-行和列操作(可见性、指定列宽、指定行高、列删除、行删除、插入列、插入行、分级显示)
文章目录
- 1 可见性
-
- 1.1 设置列可见性
- 1.2 获取列可见性
- 1.3 设置行可见性
- 1.4 获取行可见性
- 2. 指定列列宽
-
- 2.1 设置指定列列宽
- 2.2 获取指定列列宽
- 3. 指定行行高
-
- 3.1 设置指定行行高
- 3.2 或者指定行行高
- 4. 列增删
-
- 4.1 插入空列
- 4.2 删除列
- 5. 行增删
-
- 5.1 插入空白行
- 5.2 复制行到指定位置
- 5.3 追加复制行到下一行
- 5.4 删除行
- 5.5 按行赋值
- 6. 分级显示
-
- 6.1 设置行分级显示
- 6.2 获取行的分级显示级别
- 6.3 设置列的分级显示
- 6.4 获取列的分级显示级别
1 可见性
1.1 设置列可见性
- 语法
func (f *File) SetColVisible(sheet string, columns string, visible bool) error
- 完整示例
package main

import (
	"fmt"
	"github.com/xuri/excelize/v2"
)

func main() {
	f := excelize.NewFile()

	// 向表中单元格写入数据
	f.SetCellValue("sheet1", "A1", "LiuBei")
	f.SetCellValue("sheet1", "B1", "GuanYu")
	f.SetCellValue("sheet1", "C1", "ZhangFei")
	f.SetColVisible("sheet1","B",false)
	// 根据指定路径保存文件
	if err := f.SaveAs("sanGuo.xlsx"); err != nil {
		fmt.Println(err)
	}
}
结果显示
如下可见,B列被隐藏

1.2 获取列可见性
- 语法
func (f *File) GetColVisible(sheet string, col string) (bool, error)
- 语法示例
status,_ := f.GetColVisible("sheet1","B")
- 完整示例
package main

import (
	"fmt"
	"github.com/xuri/excelize/v2"
)

func main() {
	f := excelize.NewFile()

	// 向表中单元格写入数据
	f.SetCellValue("sheet1", "A1", "LiuBei")
	f.SetCellValue("sheet1", "B1", "GuanYu")
	f.SetCellValue("sheet1", "C1", "ZhangFei")
	f.SetColVisible("sheet1","B",false)
	status,_ := f.GetColVisible("sheet1","B")
	fmt.Println(status)

}
1.3 设置行可见性
- 语法
func (f *File) SetRowVisible(sheet string, row int, visible bool) error
- 语法示例
err := f.SetRowVisible("Sheet1", 2, false)
1.4 获取行可见性
- 语法
func (f *File) GetRowVisible(sheet string, row int) (bool, error)
- 语法示例
err := f.GetRowVisible("Sheet1", 2)
2. 指定列列宽
2.1 设置指定列列宽
- 语法示例
func (f *File) SetColWidth(sheet string, startCol string, endCol string, width float64) error
- 完整示例
package main

import (
	"fmt"
	"github.com/xuri/excelize/v2"
)

func main() {
	f := excelize.NewFile()

	// 向表中单元格写入数据
	f.SetCellValue("sheet1", "A1", "LiuBei")
	f.SetCellValue("sheet1", "B1", "GuanYu")
	f.SetCellValue("sheet1", "C1", "ZhangFei")
	f.SetColWidth("sheet1","B","C",30)
	// 根据指定路径保存文件
	if err := f.SaveAs("sanGuo.xlsx"); err != nil {
		fmt.Println(err)
	}
}
2.2 获取指定列列宽
- 语法
func (f *File) GetColWidth(sheet, col string) (float64, error)
3. 指定行行高
3.1 设置指定行行高
- 语法
func (f *File) SetRowHeight(sheet string, row int, height float64) error
- 语法示例
f.SetRowHeight("sheet1",5,30)
- 完整示例
package main

import (
	"fmt"
	"github.com/xuri/excelize/v2"
)

func main() {
	f := excelize.NewFile()

	// 向表中单元格写入数据
	f.SetCellValue("sheet1", "A1", "LiuBei")
	f.SetCellValue("sheet1", "B1", "GuanYu")
	f.SetCellValue("sheet1", "C1", "ZhangFei")
	f.SetRowHeight("sheet1",5,30)
	// 根据指定路径保存文件
	if err := f.SaveAs("sanGuo.xlsx"); err != nil {
		fmt.Println(err)
	}
}
3.2 或者指定行行高
- 语法
func (f *File) GetRowHeight(sheet string, row int) (float64, error)
- 语法示例
height, err := f.GetRowHeight("Sheet1", 1)
4. 列增删
4.1 插入空列
- 语法
func (f *File) InsertCol(sheet string, col string) error
- 完整示例
package main

import (
	"fmt"

	"github.com/xuri/excelize/v2"
)

func main() {
	f := excelize.NewFile()
	// 向表中单元格写入数据
	f.SetCellValue("Sheet1", "A1", "liuBei")
	f.SetCellValue("Sheet1", "B1", "guanYu")
	f.SetCellValue("Sheet1", "C1", "zhangFei")
    f.InsertCol("sheet1","B")
	if err := f.SaveAs("sanGuo.xlsx"); err != nil {
		fmt.Println(err)
	}
}
- 结果显示
如下可见,插入了B列。

4.2 删除列
- 语法
func (f *File) RemoveCol(sheet string, col string) error
5. 行增删
5.1 插入空白行
- 语法
func (f *File) InsertRow(sheet string, row int) error
- 语法示例
err := f.InsertRow("Sheet1", 3)
5.2 复制行到指定位置
- 语法
func (f *File) DuplicateRowTo(sheet string, row, row2 int) error
- 语法示例
f.DuplicateRowTo("sheet1",2,6)
- 完整示例
package main

import (
	"fmt"

	"github.com/xuri/excelize/v2"
)

func main() {
	f := excelize.NewFile()
	// 向表中单元格写入数据
	f.SetCellValue("Sheet1", "A1", "liuBei")
	f.SetCellValue("Sheet1", "A2", "guanYu")
	f.SetCellValue("Sheet1", "A3", "zhangFei")
    f.DuplicateRowTo("sheet1",2,6)
	if err := f.SaveAs("sanGuo.xlsx"); err != nil {
		fmt.Println(err)
	}
}
- 显示结果

5.3 追加复制行到下一行
- 语法
将第n行复制,并插入到该行之后。
func (f *File) DuplicateRow(sheet string, row int) error
- 完整示例
package main

import (
	"fmt"

	"github.com/xuri/excelize/v2"
)

func main() {
	f := excelize.NewFile()
	// 向表中单元格写入数据
	f.SetCellValue("Sheet1", "A1", "liuBei")
	f.SetCellValue("Sheet1", "A2", "guanYu")
	f.SetCellValue("Sheet1", "A3", "zhangFei")
	f.DuplicateRow("Sheet1",2)
	if err := f.SaveAs("sanGuo.xlsx"); err != nil {
		fmt.Println(err)
	}
}
结果显示
如下可见,第二行被复制并插入到了第二行之后

5.4 删除行
- 语法
func (f *File) RemoveRow(sheet string, row int) error
5.5 按行赋值
- 语法
func (f *File) SetSheetRow(sheet string, axis string, slice interface{}) error
- 完整代码
package main

import (
	"fmt"
	"github.com/xuri/excelize/v2"
)

func main() {
	f := excelize.NewFile()

	// 向表中单元格写入数据
	f.SetSheetRow("Sheet1","B1",&[]interface{}{"姓名","年龄","性别"})
	f.SetSheetRow("Sheet1","B2",&[]interface{}{"liuBei",25,"男"})

	if err := f.SaveAs("sanGuo.xlsx"); err != nil {
		fmt.Println(err)
	}
}
- 结果

6. 分级显示
6.1 设置行分级显示
- 语法
func (f *File) SetRowOutlineLevel(sheet string, row int, level uint8) error
- 语法示例
f.SetRowOutlineLevel("sheet1",2,1)
- 完整示例
package main
import (
"fmt"
"github.com/xuri/excelize/v2"
)
func main() {
f := excelize.NewFile()
// 向表中单元格写入数据
f.SetCellValue("Sheet1", "A1", "name:")
f.SetCellValue("Sheet1", "A2", "- xiShu")
f.SetCellValue("Sheet1", "A3", "liuBei")
f.SetCellValue("Sheet1", "A4", "GuanYu")
f.SetCellValue("Sheet1", "A5", "zhangFei")
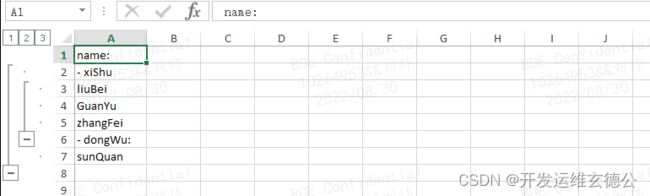
f.SetCellValue("Sheet1", "A6", "- dongWu:")
f.SetCellValue("Sheet1", "A7", "sunQuan")
f.SetRowOutlineLevel("sheet1",2,1)
f.SetRowOutlineLevel("sheet1",6,1)
f.SetRowOutlineLevel("sheet1",3,2)
f.SetRowOutlineLevel("sheet1",4,2)
f.SetRowOutlineLevel("sheet1",5,2)
f.SetRowOutlineLevel("sheet1",7,2)
if err := f.SaveAs("sanGuo.xlsx"); err != nil {
fmt.Println(err)
}
}
- 结果显示
6.2 获取行的分级显示级别
- 语法
func (f *File) GetRowOutlineLevel(sheet string, row int) (uint8, error)
- 语法示例
level,_ := f.GetRowOutlineLevel("Sheet1", 3)
- 完整示例
package main

import (
	"fmt"

	"github.com/xuri/excelize/v2"
)

func main() {
	f := excelize.NewFile()
	// 向表中单元格写入数据
	f.SetCellValue("Sheet1", "A1", "name:")
	f.SetCellValue("Sheet1", "A2", "- xiShu")
	f.SetCellValue("Sheet1", "A3", "liuBei")
	f.SetCellValue("Sheet1", "A4", "GuanYu")
	f.SetCellValue("Sheet1", "A5", "zhangFei")
	f.SetCellValue("Sheet1", "A6", "- dongWu:")
	f.SetCellValue("Sheet1", "A7", "sunQuan")
    f.SetRowOutlineLevel("sheet1",2,1)
	f.SetRowOutlineLevel("sheet1",6,1)
	f.SetRowOutlineLevel("sheet1",3,2)
	f.SetRowOutlineLevel("sheet1",4,2)
	f.SetRowOutlineLevel("sheet1",5,2)
	f.SetRowOutlineLevel("sheet1",7,2)
	level,_ := f.GetRowOutlineLevel("Sheet1", 3)
	fmt.Printf("第三行的级别是:%d\n",level)
}
- 结果显示
第二行的级别是:2
6.3 设置列的分级显示
- 语法
func (f *File) SetColOutlineLevel(sheet, col string, level uint8) error
- 示例
参考行的分级显示
6.4 获取列的分级显示级别
- 语法
func (f *File) GetRowOutlineLevel(sheet string, row int) (uint8, error)
