Helm-chart学习-简单介绍与使用
目录
为什么需要Helm?直接kubectl有什么问题吗?
Helm介绍
Helm基本使用
Helm模板设置
流程控制
Chart模板:命名模板
写一个通用的Chart
使用Harbor作为Chart仓库
为什么需要Helm?直接kubectl有什么问题吗?
Deployment.yaml
apiVersion: apps/v1
kind: Deployment
metadata:
  name: web
  namespace: default
spec:
  replicas: 3
  selector:
    matchLabels:
      app: web
  template:
    metadata:
      labels:
        app: web
    spec:
      containers:
      - name: web
        image: nginx:1.19
        ports:
        - containerPort: 80
Service.yaml
apiVersion: v1
kind: Service
metadata:
  labels:
    app: web
  name: web
spec:
  ports:
  - port: 80
    protocol: TCP
    targetPort: 8080
  selector:
    app: web
Ingress.yaml
apiVersion: networking.k8s.io/v1
kind: Ingress
metadata:
  name: web
spec:
  rules:
  - host: web.linux.com
    http:
      paths:
      - path: /
        pathType: Prefix
        backend:
          service:
            name: web
            port:
number: 80Helm介绍
| completion | 命令补全,source <(helm completion bash) |
| create | 创建一个chart并指定名字 |
| history | 获取release历史 |
| install | 安装一个chart |
| list | 列出release |
|
template
|
本地呈现渲染模板
|
|
uninstall
|
卸载一个release
|
|
rollback
|
从之前版本回滚
|
|
upgrade
|
更新一个release
|
| package | 将chart目录打包到chart存档文件中 |
| pull | 从远程仓库中下载chart并解压到本地 # helm pull stable/mysql --untar |
| repo | 添加,列出,移除,更新和索引chart仓库。可用子命令:add、index、list、remove、update |
|
search
|
根据关键字搜索chart。可用子命令:hub、repo
|
|
show
|
查看chart详细信息。可用子命令:all、chart、readme、values
|
|
status
|
显示已命名版本的状态
|
|
version
|
查看helm客户端版本
|
| help | 命令的帮助文档 |
| dependency | 管理chart依赖 |
| get | 下载一个release。可用子命令:all、hooks、manifest、notes、values |
下面我们来直接使用它:
使用helm前这里插个故障我之前遇到的,因为集群是二进制搭建的 k8s的config文件并不在~/.kube目录下,所以使用时报错:![]()

Helm基本使用

charts:目录里存放这个chart依赖的所有子chart。 #这个我没有使用
Chart.yaml:用于描述这个 Chart的基本信息,包括名字、描述信息以及版本等。#只用于描述。
values.yaml :用于存储 templates 目录中模板文件中用到变量的值。
templates: 目录里面存放所有yaml模板文件。
![]()
NOTES.txt :用于介绍Chart帮助信息, helm install 部署后展示给用户。例如:如何使用这个 Chart、列出缺省的设置等。
_helpers.tpl:放置模板的地方,可以在整个chart中重复使用。
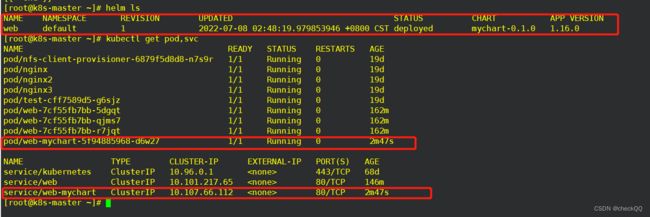
helm install web mychart #部署一个示例chart,示例这里是一个nginx。

这是一个官方的chart,演示示例。
我这边不用它的示例,我们自己动手写一个chart。
mkdir  test-chart

cd test-chart

touch values.yaml  #先创建后面添加变量

mkdir templates

cat > Chart.yaml < deployment.yaml
#创建一个service用NodePort方式暴露方便测试,因为我是用的iptables转发没用使用ipvs模式,不能直接访问。
kubectl expose deployment web --port=80 --target-port=80 --type=NodePort --dry-run=client -o yaml > service.yaml

echo hello! > NOTES.txt
#这就已经完成了一个基础的chart,部署之后可以查看版本。
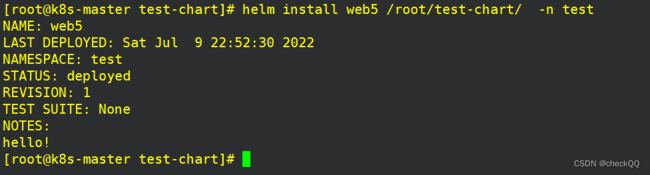
helm install web /root/test-chart/ -n test #指定在test名称空间部署 helm ls -n test #查看chart列表
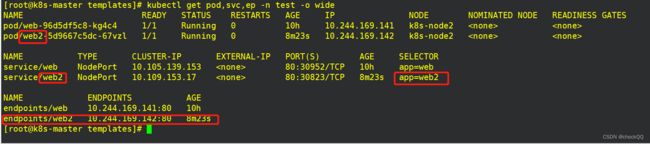
kubectl get pod,svc,ep -n test -o wide #查看资源部署情况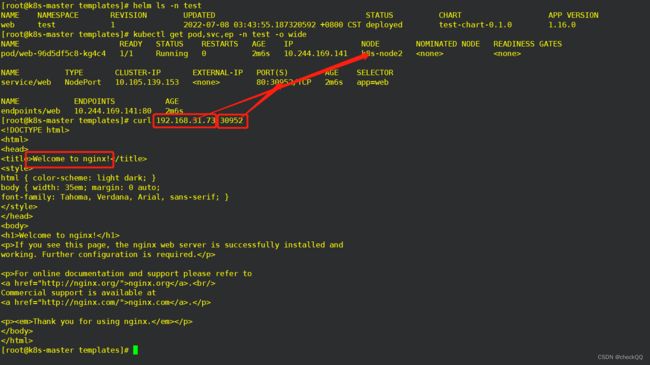
#更新与回滚测试
sed -i "s/1.16.0/1.17.0/" /root/test-chart/Chart.yaml
helm upgrade web /root/test-chart/ -n test
sed -i "s/1.17.0/1.18.0/" /root/test-chart/Chart.yaml
helm upgrade web /root/test-chart/ -n test
#这里做2个版本升级用于测试回滚
helm history web -n test
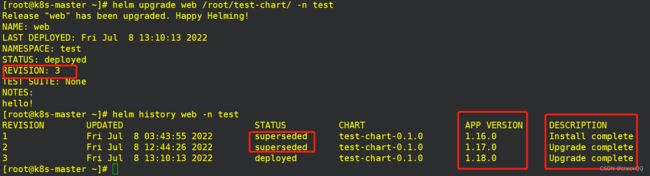
helm rollback web 1 -n test#默认不指定版本是回滚到上一个版本,我这里指定了版本号“1”。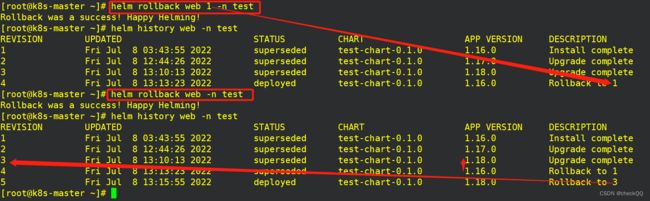
#到这里已经学会了helm的基本使用,但是这个不是我们使用helm的最终目的,helm的强大之处在于它的模板渲染功能,下面我们学习模板使用。
--------------------------------------------------------------------------------------------------------------------------------
Helm模板设置
在做模板之前,我们要知道每个yaml文件的差异化信息,这里大致整理了一下以下几点:
1.应用名称
2.标签
3.镜像和tag
4.端口
5.命名空间
6.数据卷
7.副本数量
8.资源限制
|
内置
|
作用 |
|
Release.Name
|
release 名称
|
|
Release.Time
|
release 的时间
|
|
Release.Namespace
|
release 的命名空间
|
|
Release.Service
|
release 服务的名称
|
|
Release.Revision
|
release 的修订版本号,从1开始累加
|
#helm 动态传参演示。
#/root/test-chart/values.yaml
#存储yaml文件渲染时的默认值,以后部署只修改这个文件的参数。
#参考刚刚我们使用helm create mychart 的目录里的values.yaml
#默认副本数
replicaCount: 1
#默认使用的镜像
image:
repository: nginx
tag: "latest"
---
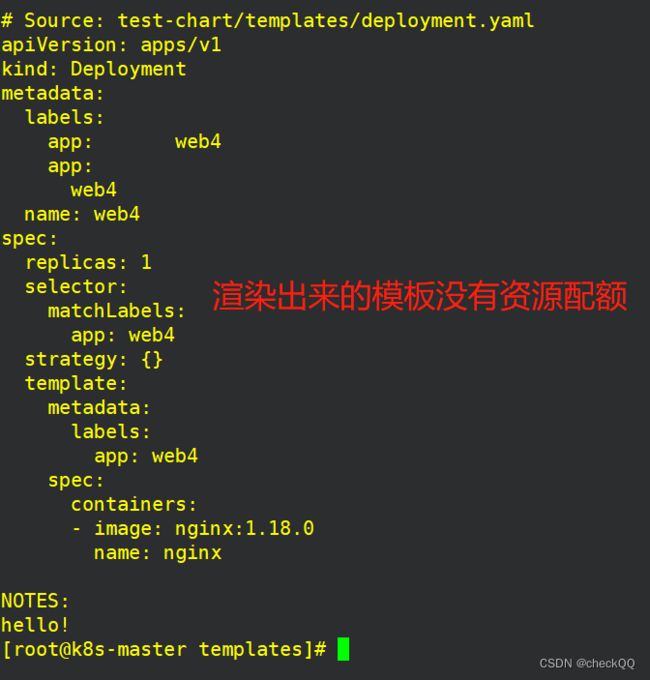
#/root/test-chart/templates/deployment.yaml
apiVersion: apps/v1
kind: Deployment
metadata:
labels:
app: {{ .Release.Name }}
name: {{ .Release.Name }}
spec:
replicas: {{ .Values.replicaCount }}
selector:
matchLabels:
app: {{ .Release.Name }}
strategy: {}
template:
metadata:
labels:
app: {{ .Release.Name }}
spec:
containers:
- image: {{ .Values.image.repository }}:{{ .Values.image.tag }}
name: nginx
resources: {}
---
#/root/test-chart/templates/service.yaml
apiVersion: v1
kind: Service
metadata:
name: {{ .Release.Name }}
spec:
ports:
- port: 80
protocol: TCP
targetPort: 80
selector:
app: {{ .Release.Name }}
type: NodePort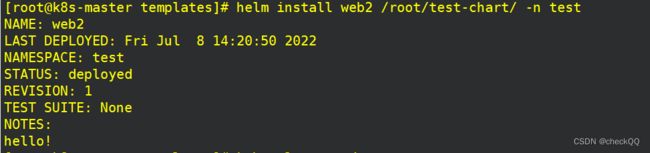
#这里默认values文件里使用的nginx镜像,使用set命令将它更改成httpd。
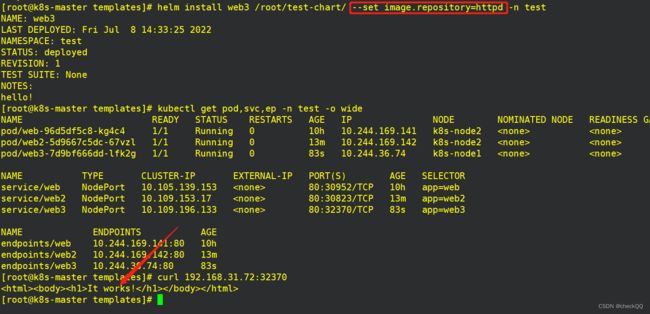
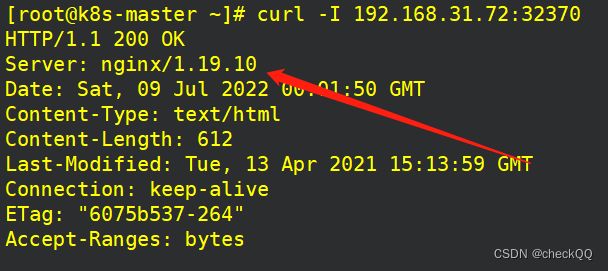
如果执行helm upgrade web3 /root/test-chart/ --set image.tag=1.19 -n test
我这里web3是一个httpd,在执行完指定版本更新后,是否会变更release的镜像?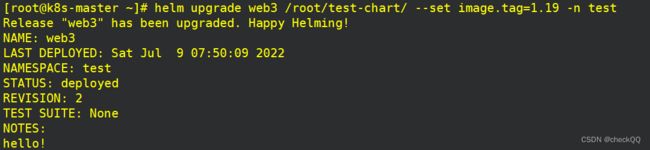
做到这里时会发现,如果用命令行执行了set变更了values的值,我又没有写入到文件,我该怎么查询我做的更改?
这里可以使用get命令获取:
helm get values web3 -n test
helm get manifest web3 -n test 则可以获取这个release部署的所有yaml文件内容: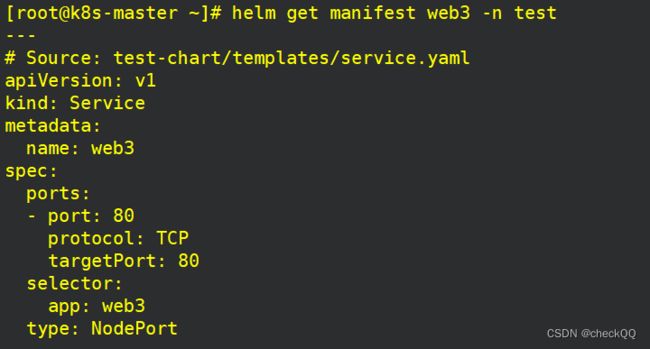
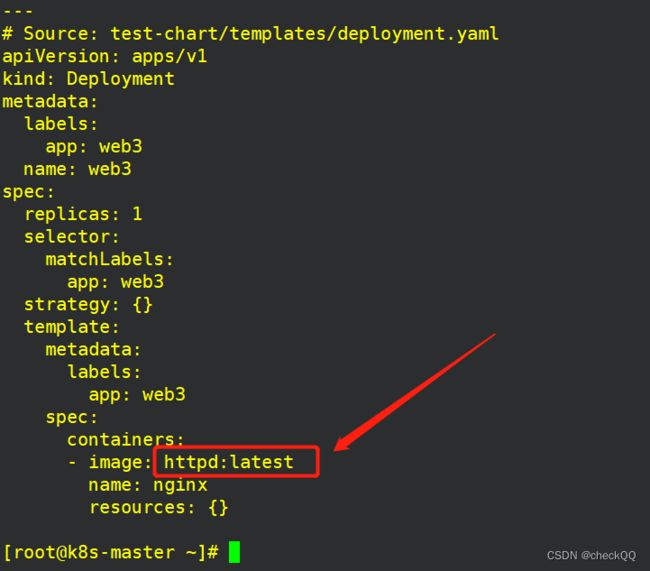
然后会发现我获取的是我当前版本的yaml,那我需要获取的是某个部署失败或者部署错误的yaml文件来拍错,例如我之前部署的httpd版本yaml文件我该怎么查询?
这里可以是用参数 --revesion ,通history查询到报错的版本,我这里是版本号1.
helm history -n test web3 #查询到版本号
helm get manifest --revision=1 web3 -n test #指定版本号查询release所渲染的yaml文件。
我们会发现在使用set命令,只指定了values.yaml里的的tag参数时,默认也会读取image的信息,当我不想让它读取默认values.yaml里的其他参数时,我们也可以指定一个自定义需要变更的values文件来更新,不要对原有values.yaml来操作。
cat >/tmp/test.yaml <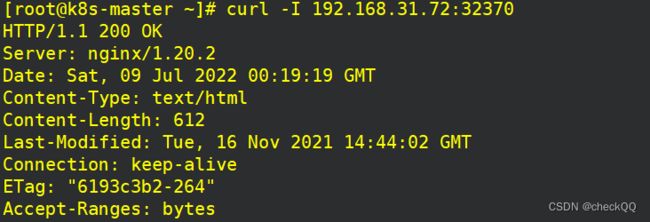
| yaml | set |
| name: value | --set name=value |
| a:b c:d |
--set a=b,c=d |
| outer: inner: value |
--set outer.inner=value |
| name: - a - b - c |
--set name={a,b,c} |
| servers: - port: 80 |
--set servers[0].port=80 |
| servers: - port: 80 host: example |
--set servers[0].port=80,servers[0].host=example |
| name: "value1,value2" | --set name=value1\,value2 |
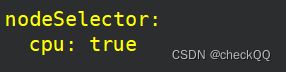
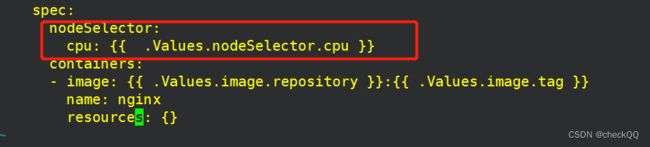
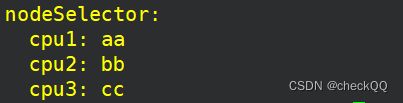
| nodeSelector: kubernetes.io/role: master |
--set nodeSelector."kubernetes\.io/role"=master |
Chart模板:调试
我们在创建完chart时往往不确定渲染出来的yaml是否是自己所需要的,这是可以使用调试命令查看所渲染的yaml文件。
helm template /root/test-chart/ #直接本地渲染,使用了Releaes.Name处使用占位符显示,因为我们没有提供release的名称。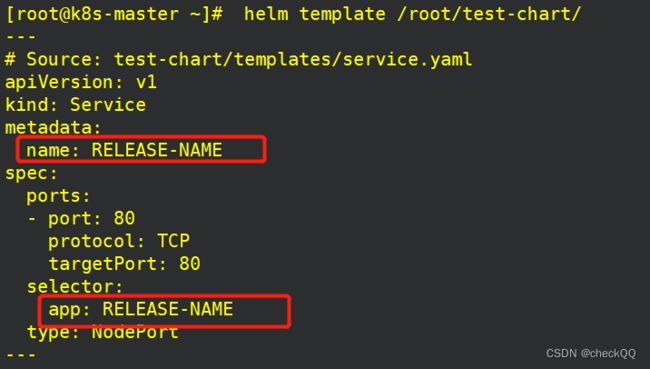
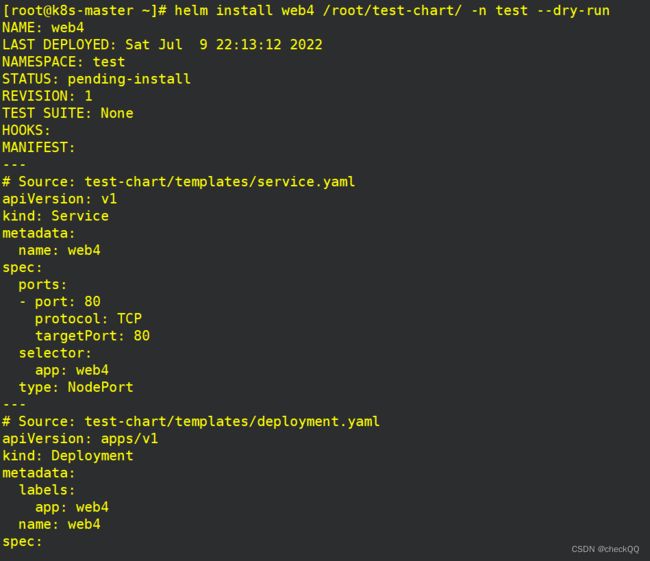
helm install web4 /root/test-chart/ -n test --dry-run #使用--dry-run 则会直接完整显示release所渲染的结果。
Chart模板:函数与管道
部署时会发现报错:

在deployment.yaml增加函数quote 解决


 渲染结果:
渲染结果: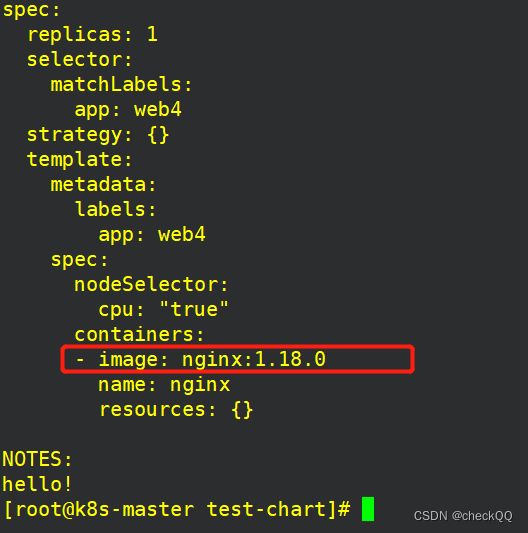
indent和nindent:都是缩进字符串,主要区别在于nindent会在缩进前多添加一个换行符。
kind: Deployment
metadata:
labels:
app: {{ .Release.Name |indent 6}}
app: {{ .Release.Name |nindent 6}}
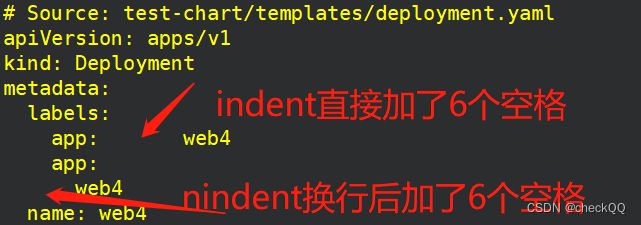
所以常用的是nindent,因为indent直接按空格就能实现。

渲染结果:
cat > /root/test-chart/templates/configmap.yaml  << EOF
apiVersion: v1
kind: ConfigMap
metadata:
  name: configmap-test
data:
  config.yaml: |
{{ .Files.Get "redis.properties" | indent 4 }} #引用chart根目录下的redis.properties文件内容
EOF

cat > /root/test-chart/redis.properties << EOF
redis.host=127.0.0.1
redis.port=6379
redis.passwd=123456
EOF

helm install web4  /root/test-chart/ -n test --dry-run #渲染测试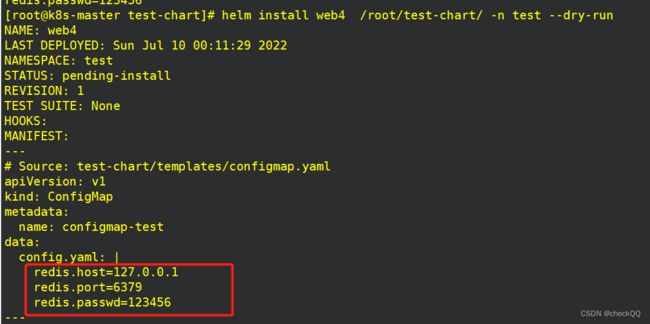
Files.Glob方法返回所有匹配的文件路径列表,当多个文件时,可以更灵活提取某些文件。
mkdir /root/test-chart/files
mv /root/test-chart/redis.properties /root/test-chart/files
cat >/root/test-chart/files/mysql.properties << EOF
mysql.host=127.0.0.1
mysql.port=3306
EOF
cat >/root/test-chart/templates/configmap << EOF
apiVersion: v1
kind: ConfigMap
metadata:
name: configmap-test
data:
{{- $root := . }} #设置作用域为chart根目录
{{- range $path,$bytes := .Files.Glob "files/*.properties" }} #将文件名称赋值给path
{{ base $path }}: | #打印出文件名称
{{ $root.Files.Get $path |indent 4 }} #获取文件内容
{{- end -}} #循环结束符
EOF
helm install web4 /root/test-chart/ -n test --dry-run #渲染模板
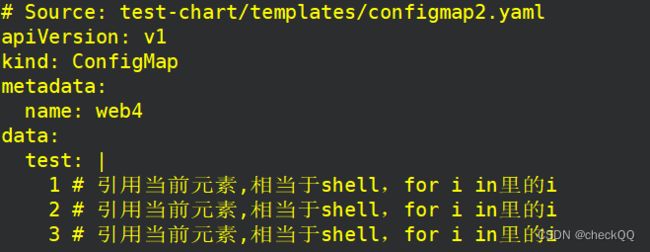
#这个步骤我留了一个坑,做到这里就会发现^^ 测试渲染结果:
流程控制
流程控制之if/else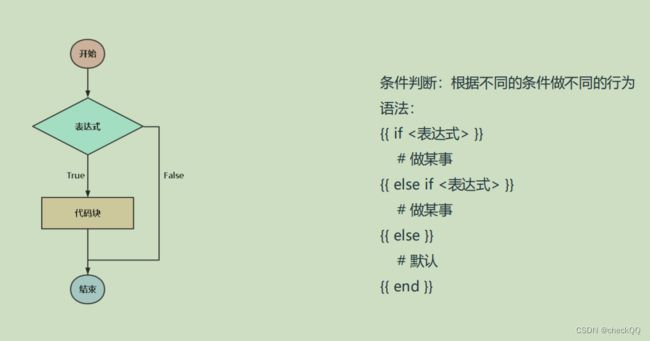
在values增加:

在templates目录下创建ingress.yaml,并在yaml文件增加if判断,为true时执行。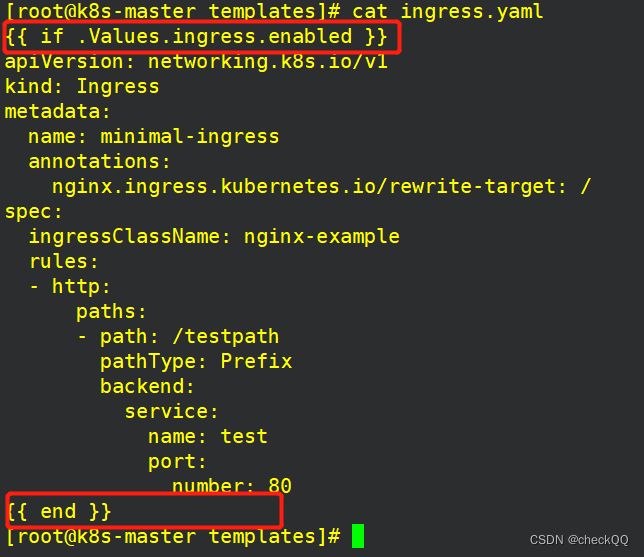
helm install web4 /root/test-chart/ -n test --dry-run --set ingress.enabled=true#默认不部署ingress,执行ingress.enabled=true则部署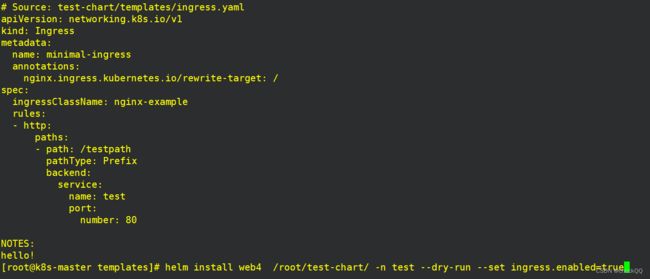 如果值为以下几种情况则为false:
一个布尔类型 false
一个数字 0
一个空的字符串
一个 nil(空或 null)
一个空的集合( map、 slice、 tuple、 dict、 array)
条件表达式也支持操作符:
eq 等于
ne 不等于
lt 小于
gt 大于
and 逻辑与
or 逻辑或
values.yaml:

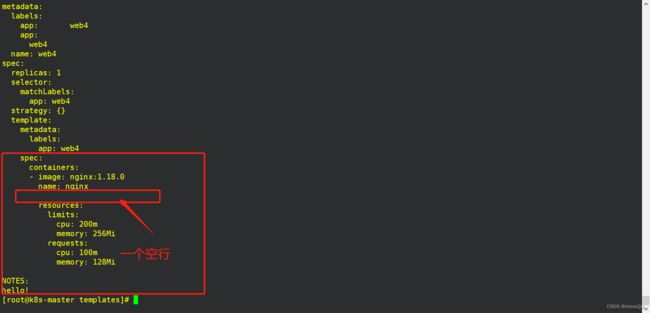
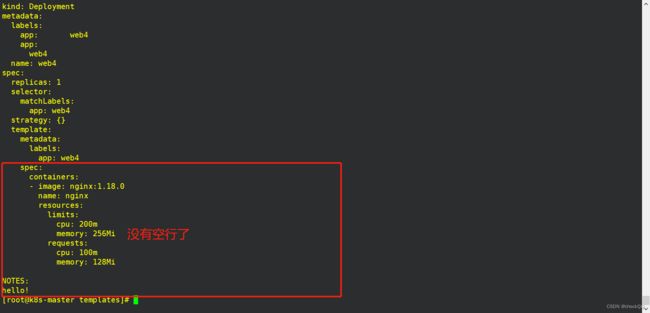
#增加if判断后,渲染出来的模板有空行,增加减号删除空行。

流程控制之range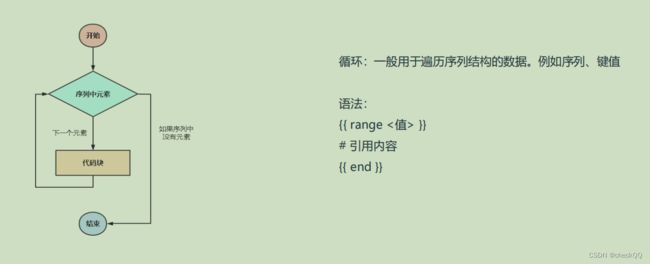
range相当于shell的for循环。
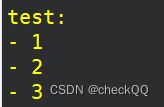
configmap.yaml: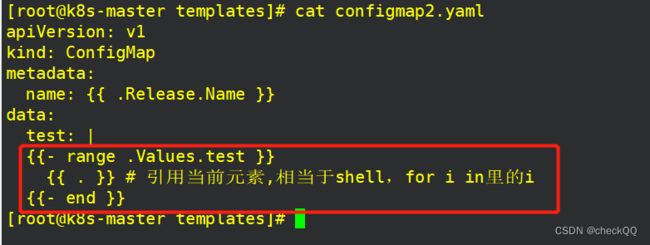
流程控制之with
deployment.yaml
渲染结果:
变量:
# values.yaml
env:
  NAME: "wang"
  CLASS: "graduate"
#deployment.yaml
env:
        {{- range $k,$v := .Values.env }}
          - name: {{ $k }}
            value: {{ $v }}
        {{- end }}
渲染结果: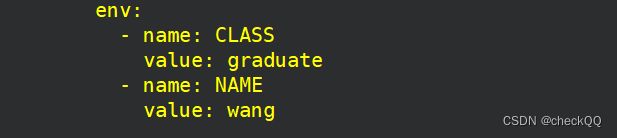
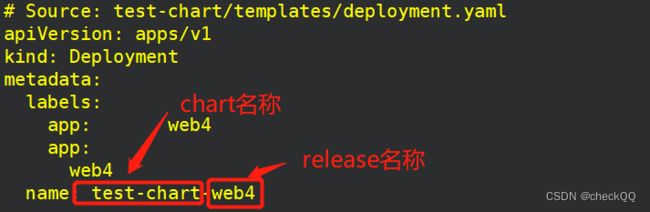
Chart模板:命名模板
# cat templates/_helpers.tpl
{{- define "fullname" -}}
{{- .Chart.Name -}}-{{ .Release.Name }}
{{- end -}}

# cat templates/deployment.yaml
apiVersion: apps/v1
kind: Deployment
metadata:
  labels:
    app: {{ .Release.Name |indent 6}}
    app: {{ .Release.Name |nindent 6}}
  name: {{ include "fullname" . }}
渲染结果:
写一个通用的Chart
[root@k8s-master ~]# mkdir example-chart/templates -p
[root@k8s-master ~]# cp mychart/Chart.yaml example-chart/
[root@k8s-master ~]# touch example-chart/values.yaml
[root@k8s-master ~]# touch example-chart/templates/{_helpers.tpl,NOTES.txt}
#Chart.yaml 删除空行与注释文件就保留以下信息,修改name字段为自己的chart名字----------
[root@k8s-master ~]# cat example-chart/Chart.yaml
apiVersion: v2
name: example-chart
description: A Helm chart for Kubernetes
type: application
version: 0.1.0
appVersion: "1.16.0"
#为chart设置所有yaml都通用的模板资源-------------------------------
root@k8s-master templates]# cat _helpers.tpl
{{/*
注释模板
*/}}
{{/*
这个chart资源的名字
*/}}
{{- define "fullname" -}}
{{ .Chart.Name }}-{{.Release.Name }}
{{- end -}}
{{/*
标签
*/}}
{{- define "labels" -}}
chart_name: {{ .Chart.Name }}
instance_name: {{ .Release.Name }}
{{- end -}}
#为values设置常用参数------------------------------------
[root@k8s-master templates]# cat ../values.yaml
#副本数
replicaCount: 1
#镜像选择
image:
repository: nginx
tag: "latest"
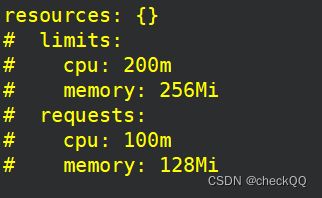
#资源配额
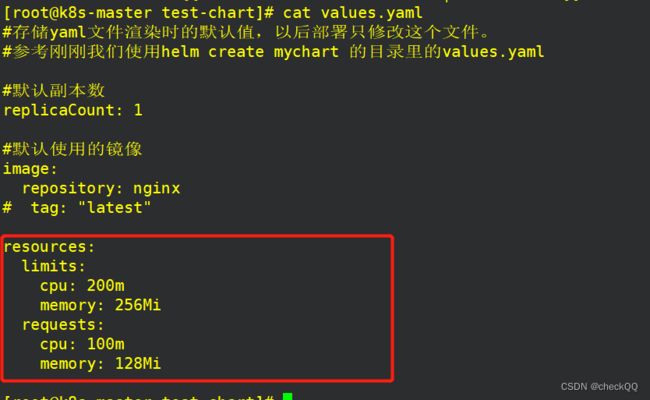
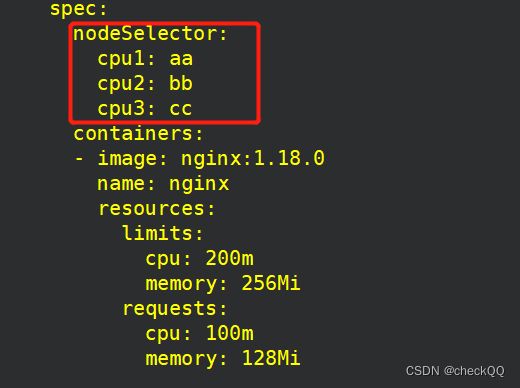
resources:
limits:
cpu: 200m
memory: 256Mi
requests:
cpu: 100m
memory: 128Mi
#configmap开关,默认关闭
configmap:
enabled: false
#ingress开关,默认关闭
ingress:
enabled: false
annotations:
nginx.ingress.kubernetes.io/rewrite-target: /
kubernetes.io/ingress.class: nginx
host: www.checkqq.com
path: /
#service端口模式
service:
port: 80
targetport: 80
type: ClusterIP
#环境变量
env:
NAME: "wang"
CLASS: "graduate"
#存活检查
livenessProbe:
httpGet:
path: /
port: 80
#就绪检查
readinessProbe:
httpGet:
path: /
port: 80
#为configmap设置配置文件-----------------------------------
[root@k8s-master templates]# cat ../files/redis.properties ../files/mysql.properties
redis.host=127.0.0.1
redis.port=6379
----------------------------------分割线,前面为redis,后面为mysql
redis.passwd=123456
mysql.host=127.0.0.1
mysql.port=3306
#configmap.yaml 最终模板------------------------------------
[root@k8s-master templates]# cat configmap.yaml
apiVersion: v1
kind: ConfigMap
metadata:
name: {{ include "fullname" . }}
data:
{{- $root := . }} #设置作用域为chart根目录
{{- range $path,$bytes := .Files.Glob "files/*.properties" }} #将文件名称赋值给path
{{ base $path }}: | #打印出文件名称
{{ $root.Files.Get $path |indent 4 }} #获取文件内容
{{- end -}}
#deployment.yaml 最终模板------------------------------------
#[root@k8s-master templates]# cat deployment.yaml
apiVersion: apps/v1
kind: Deployment
metadata:
name: {{ include "fullname" . }}
spec:
replicas: {{ .Values.replicaCount }}
selector:
matchLabels:
{{- include "labels" . | nindent 6 }}
strategy: {}
template:
metadata:
labels:
{{- include "labels" . | nindent 8 }}
spec:
containers:
- image: {{ .Values.image.repository }}:{{ .Values.image.tag }}
name: web
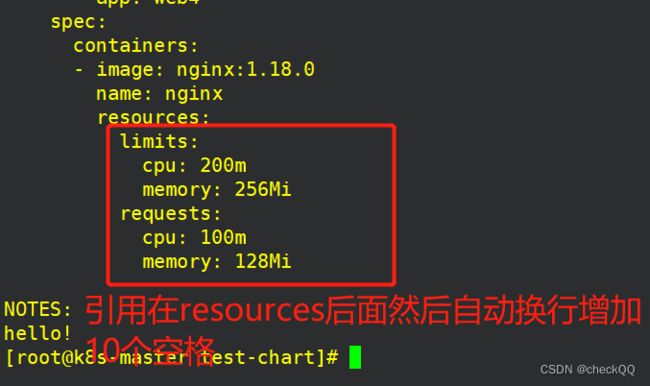
resources: {{ toYaml .Values.resources | nindent 10 }}
env:
{{- range $k,$v := .Values.env }}
- name: {{ $k }}
value: {{ $v }}
{{- end }}
{{- if .Values.livenessProbe }}
livenessProbe: {{ toYaml .Values.livenessProbe | nindent 10 }}
{{- end }}
{{- if .Values.readinessProbe }}
readinessProbe: {{ toYaml .Values.readinessProbe | nindent 10 }}
{{- end }}
#service.yaml 最终模板------------------------------------
[root@k8s-master templates]# cat service.yaml
apiVersion: v1
kind: Service
metadata:
name: {{ include "fullname" . }}
spec:
ports:
- port: {{ .Values.service.port }}
protocol: TCP
targetPort: {{ .Values.service.targetport }}
selector:
{{- include "labels" . | nindent 4}}
type: {{ .Values.service.type }}
#ingress.yaml 最终模板------------------------------------
[root@k8s-master templates]# cat ingress.yaml
{{ if .Values.ingress.enabled }} #如果ingress值为真启用ingress
apiVersion: networking.k8s.io/v1
kind: Ingress
metadata:
name: {{ include "fullname" . }}
annotations:
{{- toYaml .Values.ingress.annotations | nindent 4 }}
spec:
rules:
- host: {{ .Values.ingress.host }}
http:
paths:
- path: {{ .Values.ingress.path }}
pathType: Prefix
backend:
service:
name: {{ include "fullname" . }}
port:
number: {{ .Values.service.port }}
{{- end }}
#####最后的最后为我们的chart写入使用说明########
echo "这家伙很懒,什么也没写" > NOTES.txt到这里,我们的chart已经书写完毕,接下来是平常该怎么使用的说明。
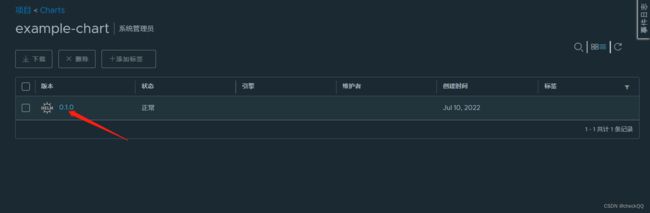
#对我们的chart进行打包
[root@k8s-master ~]# helm package example-chart/
Successfully packaged chart and saved it to: /root/example-chart-0.1.0.tgz
[root@k8s-master ~]# ls
anaconda-ks.cfg  example-chart                   ingress-controller-1.1.yaml  nfs-external-provisioner      test-chart
calico.yaml      example-chart-0.1.0.tgz         linux-amd64                  nfs-external-provisioner.zip
deployment.yaml  helm-v3.6.0-linux-amd64.tar.gz  mychart                      service.yaml


也就是这个example-chart-0.1.0.tgz,后续使用是直接用这个chart包

例如:[root@k8s-master templates]# helm install web /root/example-chart-0.1.0.tgz --dry-run  -n test --dry-run --set ingress.enabled=true  --set configmap.enabled=true --set replicaCount=3 --set image.tag=1.19 --set livenessProbe=false --set readinessProbe=false

#--set ingress.enabled=true      values默认不启用部署ingress
#--set configmap.enabled=true    values默认不启用部署configmap
#--set replicaCount=3            设置pod的副本数为3
#--set image.tag=1.19            设置镜像版本标签为1.19
#--set livenessProbe=false       不启用存活检查
#--set readinessProbe=false      不启用就绪检查
使用Harbor作为Chart仓库
mkdir -p  /root/.local/share/helm/plugins/helm-push
cd /root/.local/share/helm/plugins/helm-push
tar zxvf helm-push_0.9.0_linux_amd64.tar.gz[root@k8s-master ~]# helm repo add --username admin --password Harbor12345 myrepo http://192.168.31.90/chartrepo/library
"myrepo" has been added to your repositories
[root@k8s-master helm-push]# helm repo list
NAME URL
myrepo http://192.168.31.90/chartrepo/library
[root@k8s-master ~]# helm repo list
NAME URL
myrepo http://192.168.31.90/chartrepo/library
[root@k8s-master ~]# helm repo update
[root@k8s-master ~]# helm push example-chart-0.1.0.tgz --username=admin --password=Harbor12345 http://192.168.31.90/chartrepo/library
Pushing example-chart-0.1.0.tgz to http://192.168.31.90/chartrepo/library...
Done.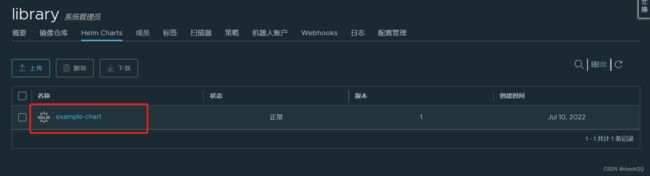
[root@k8s-master ~]# helm install web2  --version 0.1.0 myrepo/example-chart  --set image.repository=nginx --set ingress.enabled=true   -n test
NAME: web2
LAST DEPLOYED: Mon Jul 11 01:08:15 2022
NAMESPACE: test
STATUS: deployed
REVISION: 1
TEST SUITE: None
NOTES:
这家伙很懒,什么也没写
[root@k8s-master ~]# kubectl get pod,svc,ep -o wide -n test
NAME                                      READY   STATUS    RESTARTS   AGE   IP             NODE        NOMINATED NODE   READINESS GATES
pod/example-chart-web-f7bc75db4-572hn     1/1     Running   0          11m   10.244.36.78   k8s-node1
pod/example-chart-web2-7455c75b88-754xn   1/1     Running   0          38s   10.244.36.79   k8s-node1

NAME                         TYPE        CLUSTER-IP      EXTERNAL-IP   PORT(S)   AGE   SELECTOR
service/example-chart-web    ClusterIP   10.102.212.0            80/TCP    11m   chart_name=example-chart,instance_name=web
service/example-chart-web2   ClusterIP   10.102.255.92           80/TCP    38s   chart_name=example-chart,instance_name=web2

NAME                           ENDPOINTS         AGE
endpoints/example-chart-web    10.244.36.78:80   11m
endpoints/example-chart-web2   10.244.36.79:80   38s
[root@k8s-master ~]#
这里我遇到个故障顺便记录下。
Error: Internal error occurred: failed calling webhook"validate.nginx.ingress.kubernetes.io": Post "https://ingress-nginx-controller-admission.ingress-nginx.svc:443/networking/v1/ingresses?timeout=10s": dial tcp 10.108.0.150:443: i/o timeout
#部署ingress报错删除ValidatingWebhookConfiguration。
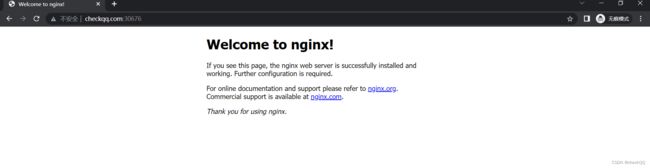
kubectl delete -A ValidatingWebhookConfiguration ingress-nginx-admission最后通过部署的ingress测试刚刚部署的chart,域名+ingress的端口