matplotlib + cartopy 画空间趋势图并标注显著性
matplotlib + cartopy 画空间趋势图并标注显著性
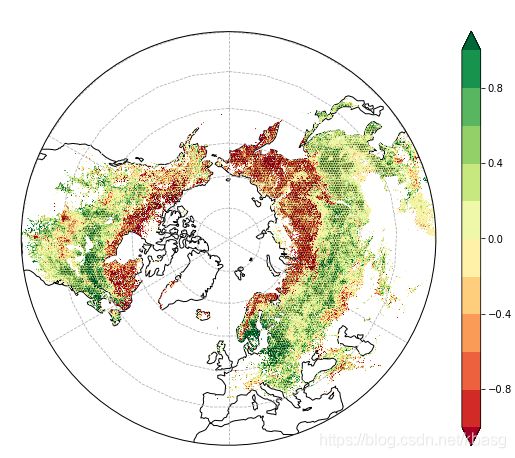
使用matplotlib+cartopy画一些空间数据的年际变化趋势,并标注显著性
主要是自己学习的过程,因此可能会存在一些问题
因为在自己查资料的过程中,发现相关的内容好难找,所以希望能对有需要的人有用,也希望更多的分享让大家的学习过程越来越方便
使用的包
import glob
import xarray as xr
import cartopy.crs as ccrs
import numpy as np
import matplotlib.pyplot as plt
import matplotlib.path as mpath
import statsmodels.api as sm
from scipy import stats
读取数据
使用glob包获取数据的路径,然后通过xarray包读取
files = r'存放数据的路径'
paths = glob.glob(files + '\*.tif')

data_list = []
for path in paths:
    with xr.open_rasterio(path) as data_:
        data_list.append(data_)
data = xr.concat(data_list,dim='band')   # 合并数据

eos_nh = xr.DataArray(data,coords = [range(1,34),data['y'],data['x']],dims = ['year','lat','lon'])

eos_nh.values[eos_nh.values == eos_nh.nodatavals[0]] = np.nan  # 缺失值
计算变化趋势
由于从xarray的polyfit方法中没有找到p值,所以自己计算
使用for循环逐栅格计算会非常慢,所以使用xarray的apply_ufunc方法
# 定义拟合线性方程,获取趋势和p值的函数
def lm_trend(x):
    if np.isnan(x).sum() > 25:
        return (np.nan ,np.nan)
    else :
        years = np.arange(1,34)
        years = sm.add_constant(years)
        model = sm.OLS(x,years)
        result = model.fit()
        #print(result.summary())
        slope = result.params[1]
        p = result.pvalues[1]
        return(slope , p )

# 使用xarray的apply_ufunc方法计算
data_lm_trend = xr.apply_ufunc(
    lm_trend,
    data,
    input_core_dims = [['year']],
    output_core_dims = [[],[]],
    vectorize=True
)
作图
fig = plt.figure(figsize=(8,8))
fig.suptitle('Trend in NH ',fontsize=20)

ax = plt.axes([0.05,0.05,0.9,0.9],
              projection=ccrs.NorthPolarStereo())  # 设置投影

# 创建一个圆形作为图像边界
theta = np.linspace(0, 2*np.pi, 100)
center, radius = [0.5, 0.5], 0.5
verts = np.vstack([np.sin(theta), np.cos(theta)]).T
circle = mpath.Path(verts * radius + center)

ax.coastlines()
ax.gridlines(linestyle = '--')
ax.set_extent([-180,180,30,90], crs =ccrs.PlateCarree())
ax.set_boundary(circle,transform = ax.transAxes)
cbar_kwargs ={ 'shrink':0.8}

## 变化趋势使用 imshow画图,会快一些,但是 contourf 的效果貌似会好些
trend = data_lm_trend[0].plot.imshow(ax=ax,cmap='RdYlGn',
                                  transform=ccrs.PlateCarree(),levels=11,
                                  vmax=1,vmin=-1,cbar_kwargs = cbar_kwargs,
                                  zorder=2)
## 添加显著性标注
## hatches参数:显著性打点,参数中点的个数表示密度
p = data_lm_trend[1].plot.contourf(ax=ax,transform=ccrs.PlateCarree(),levels=[0,0.05,1],
                              hatches=['.....', None],colors="none",add_colorbar=False,
                              zorder=3)
plt.savefig('eos_trend_with_sig.png')
关于变化趋势的计算,还可以使用mk方法
同样定义函数,然后使用apply_ufunc方法,以下只给出函数作为参考,作图和上文相同
import pymannkendall as mk
def mk_trend_ve(x):
    if np.isnan(x).sum() > 25:
        return (np.nan ,np.nan)
    else :
        mk_result = mk.original_test(x)
        slope = mk_result.slope
        p = mk_result.p
        return (slope ,p)
因为也是边查东西边做出来的,很多地方可能都还存在一些问题
