一、新建项目
使用vue-cli3构建一个初始的Vue项目:Cli3 官方文档
以下配置是我在项目中常用的,大家可自己斟酌是否需要使用!
1、环境变量
主要用于区分 开发、测试、正式环境的
(1) 在根目录新建三个文件:.env.dev.env.test.env.prod
(2).env.dev写入
NODE_ENV = 'development'VUE_APP_CURRENTMODE = 'test'
(3).env.test写入
NODE_ENV = 'production'VUE_APP_CURRENTMODE = 'test'
(4).env.prod写入
NODE_ENV = 'production'VUE_APP_CURRENTMODE = 'prod'
(5) 修改package.json的script
"scripts": { "serve": "vue-cli-service serve", "build": "vue-cli-service build", "lint": "vue-cli-service lint"}
修改为
"scripts":{"serve":"vue-cli-service serve --mode dev",// 本地运行"btest":"vue-cli-service build --mode test",// 测试环境打包"build":"vue-cli-service build --mode prod",// 正式环境打包"lint":"vue-cli-service lint"}
(5) 在main.js写入
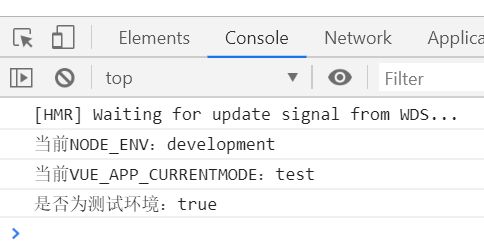
// 是否为测试环境Vue.prototype.$istest=process.env.VUE_APP_CURRENTMODE==='test'console.log('当前NODE_ENV:'+process.env.NODE_ENV)console.log('当前VUE_APP_CURRENTMODE:'+process.env.VUE_APP_CURRENTMODE)console.log('是否为测试环境:'+Vue.prototype.$istest)
(6) 重启npm run serve,这里就不要使用vue ui启动项目了,反正我通过它启动后,无法获取process.env.VUE_APP_CURRENTMODE的值,只能通过命令行运行npm run serve启动
控制台打印结果:
image
2、别名设置
(1) 在vue.config.js顶部新增
// path依赖constpath=require('path')// 查找文件方法constresolve=dir=>{returnpath.join(__dirname,dir)}
(2) 在vue.config.jsmodule.exportschainWebpack新增
// 别名配置config.resolve.alias.set('assets',resolve('src/assets')).set('components',resolve('src/components'))
(3) 重启npm run serve生效
若你使用的别名是图片路径的话
1、普通引入图片:需要这样使用 ,不能省略~
2、动态引入图片:需要这样使用,不能加上~
3、css背景图:background-image: url('~assets/img1.jpg'),不能省略~
3、全局Sass配置
在使用sass时,难免会书写一些常用的变量、函数、混合等,除了变量可以继承外,其他的只能在当前文件生效,那岂不是我需要在每一个.vue里面的
5、基础组件的自动化全局注册
(1) 在src/components新建global.js
importVuefrom'vue'// 找到components文件夹下以.vue命名的文件constRC=require.context('.',true,/\.vue$/)RC.keys().forEach(fileName=>{constcomponentConfig=RC(fileName)// 因为得到的filename格式是: './baseButton.vue', 所以这里我们去掉头和尾,只保留真正的文件名letcomponentName=fileName.replace(/^\.\//,'').replace(/\.\w+$/,'')letindex=componentName.indexOf('/')if(index!==-1)componentName=componentName.substr(index+1)Vue.component(componentName,componentConfig.default||componentConfig)})
(2) 在main.js里面引入
import'./components/global'
(3) 不用重启,直接在.vue里面template写组件即可
6、Vuex配置
(1) 安装依赖:cnpm i -S vuex-persistedstate
vuex在刷新后会重新更新状态,但是有时候我们并不希望如此。例如全局相关的,如登录状态、token、以及一些不常更新的状态等,我们更希望能够固化到本地,减少无用的接口访问,以及更佳的用户体验。
vuex-persistedstate:即可解决,可将值放到sessionStorage或localStorage中
(2) 在src/store.js修改
importVuefrom'vue'importVuexfrom'vuex'Vue.use(Vuex)exportdefaultnewVuex.Store({state:{},mutations:{},actions:{}})
修改为
importVuefrom'vue'importVuexfrom'vuex'importcreatePersistedStatefrom'vuex-persistedstate'Vue.use(Vuex)exportdefaultnewVuex.Store({state:{// token信息token:''},mutations:{save(state,[key,data,local=false]){if(!key)thrownewError('mutations save need key!')constkeyPath=key.split('.')constlen=keyPath.lengthconstlastKey=keyPath.pop()letneedSave=statefor(leti=0;i (3) 无需重启,直接刷新页面即可成功使用vuex (4) 在.vue中,执行 this.$store.commit('save',['token','token2']) 即可改变 state.token 的值 7、Vue-Router配置 (1) 安装依赖:cnpm i -S vue-router-auto vue-router-auto:将项目文件自动转为相应的路由配置 (2) 在src/route.js修改 importVuefrom'vue'importRouterfrom'vue-router'importHomefrom'./views/Home.vue'Vue.use(Router)exportdefaultnewRouter({mode:'history',base:process.env.BASE_URL,routes:[{path:'/',name:'home',component:Home},{path:'/about',name:'about',// route level code-splitting// this generates a separate chunk (about.[hash].js) for this route// which is lazy-loaded when the route is visited.component:()=>import(/* webpackChunkName: "about" */'./views/About.vue')}]}) 修改为 importVuefrom'vue'importRouterfrom'vue-router'importautoRouterfrom'vue-router-auto'// 引入依赖if(!window.VueRouter)Vue.use(Router)// 自动生成路由数据constroutes=autoRouter({redirect:'/home',rc:require.context('@/views',true,/\.vue$/)})// 将生成的路由数据,挂载到 new RouterexportdefaultnewRouter({mode:'history',base:process.env.BASE_URL,routes}) 8、api请求配置 (1) 安装依赖:cnpm i -S axios hzq-axios hzq-axios:对 axios 请求的二次封装,封装成 Vue 插件 this.$api ,并支持Axios请求、响应拦截 (2) 在src下,新建apiurl文件夹,在apiurl文件夹下新建index.js exportdefault[{name:'GetImageCaptcha',url:'/Captcha/GetImageCaptcha'}] (3) 在main.js里引入并使用: importhzqAxiosfrom'hzq-axios'Vue.use(hzqAxios,require.context('@/apiurl',true,/\.js$/),{baseURL:'/api',// 请求拦截之前beforeRequest(config){console.log(config)returnconfig},// 接口响应成功事件respSuccess(res){console.log(res)},// 接口响应失败事件respError(e){console.log(e)}}) (4) 在vue.config.jsmodule.exports新增devServer的设置 devServer:{// 代理proxy:{'/giftapi':{target:'http://***.***.com',ws:true,changeOrigin:true}}} (5) 重启npm run serve生效 (6) 在.vue中,这样使用 this.$api.GetImageCaptcha().then(res=>{if(res.code===1){console.log(res.data)}}) 9、Vue全局方法、变量配置 (1) 安装依赖:cnpm i -S hzq-tool hzq-tool:基于 Vue 对一些常用的工具函数进行封装,通过this.$tool调用 (2) 在main.js引入并使用 importhzqToolfrom'hzq-tool'Vue.use(hzqTool) (3) 无需重启,在.vue里面使用 constb={name:'12'}consta=this.$tool.copy(b)// 深拷贝方法this.$setItem('id','123456')// 往sessionStorage存入数据 原文链接:https://www.jianshu.com/p/d7250d185532