Android 活动Activity
目录
- 一、启停活动页面
-
- 1.1 Activity的启动和结束
- 1.2 Activity的生命周期
- 1.3 Activity的启动模式
- 二、在活动之间传递消息
-
- 2.1 显式Intent和隐式Intent
- 2.2 向下一个Activity发送数据
- 2.3 向上一个Activity返回数据
- 三、补充附加信息
-
- 3.1 利用资源文件配置字符串
- 3.2 利用元数据传递配置信息
- 3.3 给应用页面注册快捷方式
一、启停活动页面
1.1 Activity的启动和结束
1.启动
当activity启动时就会触发onCreate()方法,里面一般执行一些初始化操作,可以通过startActivity()方法跳转页面
代码示例:
xml
<LinearLayout xmlns:android="http://schemas.android.com/apk/res/android"
    android:layout_width="match_parent"
    android:layout_height="match_parent"
    android:orientation="vertical"
    android:gravity="center"
    >
    <Button
        android:id="@+id/btn_act_next"
        android:layout_width="300dp"
        android:layout_height="wrap_content"
        android:gravity="center"
        android:text="点击进入下一页"
        />
LinearLayout>
java代码:
public class ActStartActivity extends AppCompatActivity implements View.OnClickListener{
    private static final String TAG = "ning";
    @Override
    protected void onCreate(Bundle savedInstanceState) {
        super.onCreate(savedInstanceState);
        Log.d(TAG,"ActStartActivity onCreate");
        setContentView(R.layout.activity_act_start);
        findViewById(R.id.btn_act_next).setOnClickListener(this);
    }
    public void onClick(View v) {
        //设置意图:第一种方式
        //Intent intent = new Intent(this, ActFinishActivity.class);
        //第二种方式;调用意图对象的setClass方法指定
        Intent intent = new Intent();
        //intent.setClass(this,ActFinishActivity.class);
        //第三种方式:调用意图对象的setComponent.方法指定
        ComponentName component = new ComponentName(this,ActFinishActivity.class);
        intent.setComponent(component);
        //跳转页面
        startActivity(intent);
    }
}
2.结束
通过finish()结束当前页面
代码示例:
public class ActFinishActivity extends AppCompatActivity implements View.OnClickListener{

    @Override
    protected void onCreate(Bundle savedInstanceState) {
        super.onCreate(savedInstanceState);
        setContentView(R.layout.activity_act_finish);
        findViewById(R.id.tv_back).setOnClickListener(this);
        findViewById(R.id.btn_back).setOnClickListener(this);
    }
    @Override
    public void onClick(View v) {
        if (v.getId() == R.id.tv_back || v.getId() == R.id.btn_back){
            finish();
        }
    }
}
1.2 Activity的生命周期
- onCreate:创建活动。此时会把页面布局加载进内存,进入了初始状态。
- onStart:开启活动。此时会把活动页面显示在屏幕上,进入了就绪状态。
- onResume:恢复活动。此时活动页面进入活跃状态,能够与用户正常交互,例如允许响应用户的点击动作、允许用户输入文字等。
- onPause:暂停活动。此时活动页面进入暂停状态(也就是退回就绪状态),无法与用户正常交
互。 - onStop:停止活动。此时活动页面将不在屏幕上显示。
- onDestroy:销毁活动。此时回收活动占用的系统资源,把页面从内存中清除掉。
- onRestart:重启活动。处于停止状态的活动,若想重新开启的话,无须经历onCreate的重复创建
过程,而是走onRestart的重启过程。 - onNewIntent:重用已有的活动实例。

代码示例:
public class ActStartActivity extends AppCompatActivity implements View.OnClickListener{
    private static final String TAG = "ning";
    @Override
    protected void onCreate(Bundle savedInstanceState) {
        super.onCreate(savedInstanceState);
        Log.d(TAG,"ActStartActivity onCreate");
    }
    @Override
    protected void onStart() {
        super.onStart();
        Log.d(TAG,"ActStartActivity onStart");
    }

    @Override
    protected void onResume() {
        super.onResume();
        Log.d(TAG,"ActStartActivity onResume");
    }

    @Override
    protected void onPause() {
        super.onPause();
        Log.d(TAG,"ActStartActivity onPause");
    }

    @Override
    protected void onStop() {
        super.onStop();
        Log.d(TAG,"ActStartActivity onStop");
    }

    @Override
    protected void onDestroy() {
        super.onDestroy();
        Log.d(TAG,"ActStartActivity onDestroy");
    }

    @Override
    protected void onRestart() {
        super.onRestart();
        Log.d(TAG,"ActStartActivity onRestart");
    }
}
1.3 Activity的启动模式
系统给每个app分配内存栈,栈里面装着已创建并且为销毁的活动信息,栈的结构是先进后出,比如A活动跳到B活动,在按返回键就回返回到A页面,而不是返回到桌面,这是默认的启动模式。

可以通过两种方式改变app的启动模式:
-
修改AndroidManifest.xml,在指定的activity节点添加属性android:launchMode,表示本活动以哪个启动模式运行,standard为标准模式(静态设置)
        <activity
            android:name=".LoginInputActivity"
            android:launchMode="standard"
            android:exported="true">
        activity>
launchMode取值如下:
模式 含义 standard 默认启动模式,依照启动顺序被依次压入 singleInstance 全局唯一模式,为目标 Activity 创建一个新的 Task 栈,将目标 Activity 放入新的 Task,并让目标Activity获得焦点。 singleInstancePerTask 如果不存在包含目标Activity的栈,则创建一个新的Task,这个Task中是目标Activity所独有的,并且只会创建一次,后续如果在启动其它的Activity,这些新的Acitivty仍然当前的task栈。 singleTask 栈内复用模式,task 栈内存在目标 Activity 实例,则将 task 内的对应 Activity 实例之上的所有 Activity 弹出栈,并将对应 Activity 置于栈顶,获得焦点 singleTop 栈顶复用模式,如果栈顶 Activity 为我们要新建的 Activity(目标Activity),那么就不会重复创建新的Activity。 -
调用Intent的setFlags方法,表示后续启动的活动采用该启动标志 (动态设置)
        //栈中存在待跳转的活动实例时,则重新创建该活动的实例,并清除原实例上方的所有实例
        intent.setFlags(Intent.FLAG_ACTIVITY_CLEAR_TOP);
        //开辟一个新的任务栈,如果原来不存在活动栈,则会创建一个新栈
        intent.setFlags(Intent.FLAG_ACTIVITY_NEW_TASK);
        //当栈顶为待跳转的活动实例时,则会重用栈顶的实例
        intent.setFlags(Intent.FLAG_ACTIVITY_SINGLE_TOP);
        //与standard 类似,但栈中不保存新启动的活动实例
        intent.setFlags(Intent.FLAG_ACTIVITY_NO_HISTORY);
        //跳转到新页面时,栈中的原有实例都被清除,该标志需要结合FLAG_ACTIVITY_NEW_TASK使用,即:
        // intent.setFlags(Intent.FLAG_ACTIVITY_CLEAR_TASK | FLAG_ACTIVITY_NEW_TASK);
        intent.setFlags(Intent.FLAG_ACTIVITY_CLEAR_TASK);
二、在活动之间传递消息
2.1 显式Intent和隐式Intent
- 显示Intent,直接指明来源活动与目标活动,属于精准匹配
第一种方式
Intent intent = new Intent(this, ActNextActivity.class); // 创建一个目标确定的意图
第二种方式
Intent intent = new Intent(); // 创建一个新意图
intent.setClass(this, ActNextActivity.class); // 设置意图要跳转的目标活动
第三种方式
Intent intent = new Intent(); // 创建一个新意图
// 创建包含目标活动在内的组件名称对象
ComponentName component = new ComponentName(this, ActNextActivity.class);
intent.setComponent(component); // 设置意图携带的组件信息 - 隐式Intent,没用明确要跳转的目标,只给出一个动作字符串让系统自动匹配,属于模糊匹配
 下面是一个调用系统拨号程序的代码例子,其中就用到了Uri:
String phoneNo = "12345";
Intent intent = new Intent(); // 创建一个新意图
intent.setAction(Intent.ACTION_DIAL); // 设置意图动作为准备拨号
Uri uri = Uri.parse("tel:" + phoneNo); // 声明一个拨号的Uri
intent.setData(uri); // 设置意图前往的路径
startActivity(intent); // 启动意图通往的活动页面
隐式Intent还用到了过滤器的概念,把不符合匹配条件的过滤掉,剩下符合条件的按照优先顺序调用。
例如AndroidManifest.xml里面的首页活动:
<activity android:name=".MainActivity">
	<intent-filter>
		<action android:name="android.intent.action.MAIN" />
		<category android:name="android.intent.category.LAUNCHER" />
	intent-filter>
activity>
Intent组成元素的列表说明:
| 元素名称 | 设置方法 | 说明 |
|---|---|---|
| Component | setComponent | 组件,它指定意图的来源与目标 |
| Action | setAction | 动作,它指定意图的动作行为 |
| Data | setData | 即Uri,它指定动作要操纵的数据路径 |
| Category | addCategory | 类别,它指定意图的操作类别 |
| Type | setType | 数据类型,它指定消息的数据类型 |
| Extras | putExtras | 扩展信息,它指定装载的包裹信息 |
| Flags | setFlags | 标志位,它指定活动的启动标志 |
2.2 向下一个Activity发送数据
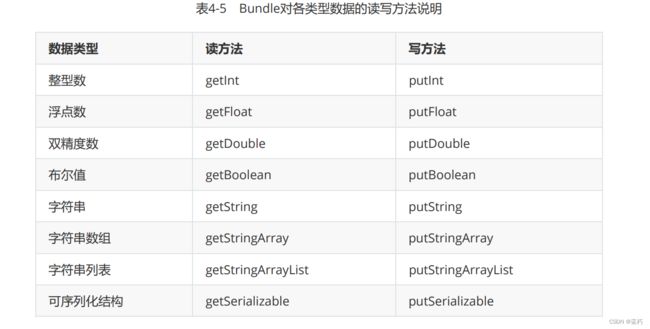
第一步创建Bundle消息包裹,用来存放数据
Bundle bundle = new Bundle();
bundle.putString("time", DateUtil.getNowTime());
bundle.putString("text",textView.getText().toString());
第二步 把快递包裹塞给意图
intent.putExtras(bundle);
//跳转页面
startActivity(intent);
另一个页面获取消息
//获取消息
Bundle bundle = getIntent().getExtras();
String time = bundle.getString("request_time");
String text = bundle.getString("request_text");
2.3 向上一个Activity返回数据
第一步:上一个页面打包好请求数据,调用startActivityForResult方法执行跳转动作,表示需要处理下
一个页面的应答数据,该方法的第二个参数表示请求代码,它用于标识每个跳转的唯一性。
       ActivityResultLauncher<Intent> register = registerForActivityResult(new ActivityResultContracts.StartActivityForResult(), new ActivityResultCallback<ActivityResult>() {
            //从另一个页面返回来数据时执行
            public void onActivityResult(ActivityResult result) {
                if (result!=null){
                    Intent intent = result.getData();
                    if(intent != null && result.getResultCode() == Activity.RESULT_OK){
                        //获取消息
                        Bundle bundle = intent.getExtras();
                        System.out.println(bundle);
                        String time = bundle.getString("response_time");
                        String text = bundle.getString("response_text");
                        String s = String.format("收到返回消息,请求时间:%s,请求内容:%s",time,text);
                        tv_response.setText(s);
                    }
                }
            }
        });
        Intent intent = new Intent(this,ActResponseActivity.class);
        //创建包裹
        Bundle bundle = new Bundle();
        bundle.putString("request_time", DateUtil.getNowTime());
        bundle.putString("request_text",mRequest);
        intent.putExtras(bundle);
        register.launch(intent);
第二步:下一个页面接收并解析请求数据,进行相应处理。
		//获取消息
        Bundle bundle = getIntent().getExtras();
        String time = bundle.getString("request_time");
        String text = bundle.getString("request_text");
        String s = String.format("收到请求消息:请求时间:%s,请求内容:%s",time,text);
        tv_request.setText(s);
第三步:调用setResult方法返回数据,第一个参数代表应答代码,第二个参数为意图对象
Intent intent = new Intent();
Bundle bundle = new Bundle();
bundle.putString("response_time", DateUtil.getNowTime());
bundle.putString("response_text",mResponse);
intent.putExtras(bundle);
//携带意图返回上一个页面
setResult(Activity.RESULT_OK,intent);
//结束当前页面
finish();
三、补充附加信息
3.1 利用资源文件配置字符串
在res/values/strings.xml文件中配置
<resources>
    <string name="app_name">MyApplication_03_Activitystring>
    <string name="weather">天气热死string>
    <string name="first_short">firststring>
    <string name="first_long">start_activitystring>
    <string name="second_short">secondstring>
    <string name="second_long">Jump_secondstring>
    <string name="three_short">threestring>
    <string name="three_long">login_backstring>
resources>
通过java代码读取
String value = getString(R.string.weather_str);
3.2 利用元数据传递配置信息
不希望其他活动也能获取该参数,就可以设置元数据。
AndroidManifest.xml,在测试活动的activity节点内部添加meta-data标签,通过属性name指定元数据
的名称,通过属性value指定元数据的值。
        <activity
            android:name=".ActStartActivity"
            android:exported="true">
            <intent-filter>
                <action android:name="android.intent.action.MAIN" />
                <category android:name="android.intent.category.LAUNCHER" />
            intent-filter>

              <meta-data android:name="weather" android:value="晴天" />
        activity>
配置好了activity节点的meta-data标签,再回到Java代码获取元数据信息,获取步骤分为下列3步:
- 调用getPackageManager方法获得当前应用的包管理器。
- 调用包管理器的getActivityInfo方法获得当前活动的信息对象。
- 活动信息对象的metaData是Bundle包裹类型,调用包裹对象的getString即可获得指定名称的参数值
public class MetaDataActivity extends AppCompatActivity {

    @Override
    protected void onCreate(Bundle savedInstanceState) {
        super.onCreate(savedInstanceState);
        setContentView(R.layout.activity_meta_data);
        TextView tv_meta = findViewById(R.id.tv_meta);
        //获取应用包管理器
        PackageManager pm = getPackageManager();
        try {
            //从应用包管理器中获取当前的活动信息
            ActivityInfo info = pm.getActivityInfo(getComponentName(), PackageManager.GET_META_DATA);
            //获取活动附加的元数据信息
            Bundle bundle = info.metaData;
            String s = bundle.getString("weather");
            tv_meta.setText(s);
        } catch (PackageManager.NameNotFoundException e) {
            e.printStackTrace();
        }
    }
}
3.3 给应用页面注册快捷方式
元数据不单单能传递简单的字符串参数,还能传送更复杂的资源数据
第一步:在res中创建xml包,里面创建shortcuts.xml文件
第二步:配置strings.xml,一共三对,每一对有个长名称和短名称,当长名称显示不下就会显示短名称
<resources>
    <string name="app_name">MyApplication_03_Activitystring>
    <string name="first_short">firststring>
    <string name="first_long">start_activitystring>
    <string name="second_short">secondstring>
    <string name="second_long">Jump_secondstring>
    <string name="three_short">threestring>
    <string name="three_long">login_backstring>
resources>
第三步:配置shortcuts.xml文件
<shortcuts xmlns:android="http://schemas.android.com/apk/res/android">
    <shortcut
        android:shortcutId="first"
        android:enabled="true"
        android:icon="@mipmap/ic_launcher"
        android:shortcutShortLabel="@string/first_short"
        android:shortcutLongLabel="@string/first_long"
        >
        <intent
            android:action="android.intent.action.VIEW"
            android:targetPackage="com.example"
            android:targetClass="com.example.ActStartActivity"
            />
        <categories android:name="android.shortcut.conversation"/>
    shortcut>
    <shortcut
        android:shortcutId="first"
        android:enabled="true"
        android:icon="@mipmap/ic_launcher"
        android:shortcutShortLabel="@string/second_short"
        android:shortcutLongLabel="@string/second_long"
        >
        <intent
            android:action="android.intent.action.VIEW"
            android:targetPackage="com.example"
            android:targetClass="com.example.JumpFirstActivity"
            />
        <categories android:name="android.shortcut.conversation"/>
    shortcut>
    <shortcut
        android:shortcutId="first"
        android:enabled="true"
        android:icon="@mipmap/ic_launcher"
        android:shortcutShortLabel="@string/three_short"
        android:shortcutLongLabel="@string/three_long"
        >
        <intent
            android:action="android.intent.action.VIEW"
            android:targetPackage="com.example"
            android:targetClass="com.example.LoginInputActivity"
            />
        <categories android:name="android.shortcut.conversation"/>
    shortcut>
shortcuts>
每个shortcut节点都代表了一个菜单项,该节点的各属性说明如下:
- shortcutId:快捷方式的编号。
- enabled:是否启用快捷方式。true表示启用,false表示禁用。
- icon:快捷菜单左侧的图标。
- shortcutShortLabel:快捷菜单的短标签。
- shortcutLongLabel:快捷菜单的长标签。优先展示长标签的文本,长标签放不下时才展示短标签
的文本。
第四步:配置AndroidManifest.xml
<activity android:name=".MainActivity">
	<intent-filter>
		<action android:name="android.intent.action.MAIN" />
		<category android:name="android.intent.category.LAUNCHER" />
	intent-filter>

	<meta-data
		android:name="android.app.shortcuts"
		android:resource="@xml/shortcuts" />
activity>
