MyBatisPlus
MyBatis-Plus
一、MyBatis-Plus 简介
官方文档帮助文档: 简介 | MyBatis-Plus (baomidou.com)
MyBatis-Plus (opens new window)(简称 MP)是一个 MyBatis (opens new window)的增强工具,在 MyBatis 的基础上只做增强不做改变,为简化开发、提高效率而生。
MyBatis-Plus 提供了 通用 mapper 接口 和 service ,不需要写sql 语句,直接生成 sql 语句。
特性
- 无侵入:只做增强不做改变,引入它不会对现有工程产生影响,如丝般顺滑
- 损耗小:启动即会自动注入基本 CURD,性能基本无损耗,直接面向对象操作
- 强大的 CRUD 操作:内置通用 Mapper、通用 Service,仅仅通过少量配置即可实现单表大部分 CRUD 操作,更有强大的条件构造器,满足各类使用需求
- 支持 Lambda 形式调用:通过 Lambda 表达式,方便的编写各类查询条件,无需再担心字段写错
- 支持主键自动生成:支持多达 4 种主键策略(内含分布式唯一 ID 生成器 - Sequence),可自由配置,完美解决主键问题
- 支持 ActiveRecord 模式:支持 ActiveRecord 形式调用,实体类只需继承 Model 类即可进行强大的 CRUD 操作
- 支持自定义全局通用操作:支持全局通用方法注入( Write once, use anywhere )
- 内置代码生成器:采用代码或者 Maven 插件可快速生成 Mapper 、 Model 、 Service 、 Controller 层代码,支持模板引擎,更有超多自定义配置等您来使用
- 内置分页插件:基于 MyBatis 物理分页,开发者无需关心具体操作,配置好插件之后,写分页等同于普通 List 查询
- 分页插件支持多种数据库:支持 MySQL、MariaDB、Oracle、DB2、H2、HSQL、SQLite、Postgre、SQLServer 等多种数据库
- 内置性能分析插件:可输出 SQL 语句以及其执行时间,建议开发测试时启用该功能,能快速揪出慢查询
- 内置全局拦截插件:提供全表 delete 、 update 操作智能分析阻断,也可自定义拦截规则,预防误操作
支持数据库
任何能使用
MyBatis进行 CRUD, 并且支持标准 SQL 的数据库,具体支持情况如下,如果不在下列表查看分页部分教程 PR 您的支持。
- MySQL,Oracle,DB2,H2,HSQL,SQLite,PostgreSQL,SQLServer,Phoenix,Gauss ,ClickHouse,Sybase,OceanBase,Firebird,Cubrid,Goldilocks,csiidb
- 达梦数据库,虚谷数据库,人大金仓数据库,南大通用(华库)数据库,南大通用数据库,神通数据库,瀚高数据库
框架结构
-
右边部分是 MyBatis-Plus 的场景,包含了四种jar包。
-
mybatis-plus 操作数据库中的表是由实体类决定的,字段名是由实体类中的属性决定的。
二、MyBatis-Plus 入门案例
a、引入mybatis-plus依赖
        <dependency>
            <groupId>com.baomidougroupId>
            <artifactId>mybatis-plus-boot-starterartifactId>
            <version>3.5.1version>
        dependency>
b、使用 SpringBoot自带的数据源 com.zaxxer.hikari.HikariDataSource 也行,使用Druid数据源也可以
        <dependency>
            <groupId>com.alibabagroupId>
            <artifactId>druid-spring-boot-starterartifactId>
            <version>1.2.8version>
        dependency>
c、配置数据库信息
spring:
  datasource:
    driver-class-name: com.mysql.jdbc.Driver
    url: jdbc:mysql://localhost:3306/test
    password: root
    username: root
    type: com.alibaba.druid.pool.DruidDataSource
d、创建实体类
@Data
//MyBatis-Plus自动根据实体类小写去对应数据库中的表。可以通过 @TableName 指定表名
@TableName("t_user")
public class User {
    private Long id ;
    private String userName ;
    private String password ;
    private String realName ;
}
e、mapper接口
public interface UserMapper extends BaseMapper<User> {

    //不需要编写 sql 方法,直接继承 BaseMapper 。

}
f、主程序中【配置类上】,配置 Mapper接口扫描【或者在 mapper 接口上加上 @Mapper 注解】
//扫描mapper包下的所有mapper接口
@MapperScan("com.example.mapper")
g、测试
class MybatisPlusApplicationTests {

    @Autowired
    //userMapper 会报错
    //运行时是没问题,因为 在 SpringBoot 中默认接口是无法实例化的。但实际上 mapper 交给了 动态代理类了。
    private UserMapper userMapper ;

    @Test
    @DisplayName("查询")
    void contextLoads() {
        //queryWrapper: 条件构造器,如果没有条件就 null
        List<User> users = userMapper.selectList(null);
        for (User user : users) {
            System.out.println(user);
        }
    }
}
h、增加日志功能
mybatis-plus:
  configuration:
    map-underscore-to-camel-case: false #不使用驼峰命名转换。默认是开启的。
#    开启日志功能
    log-impl: org.apache.ibatis.logging.stdout.StdOutImpl
注意:
mybatis 会自动将实体类中的属性名转换为符合数据库的字段名
比如:属性名= userName ====> 自动转换为:user_name
如果你数据库该字段名为 userName 是会报错的。
Cause: com.mysql.jdbc.exceptions.jdbc4.MySQLSyntaxErrorException: Unknown column ‘user_name’ in ‘field list’
三、实现增删改查的基本功能
1、增加
BaseMapper 里提供的方法:
    /**
     * 插入一条记录
     *
     * @param entity 实体对象
     */
    int insert(T entity);
直接调用即可
    @Test
    @DisplayName("增加")
    void test_insert() {
        //INSERT INTO t_user ( id, userName, password, realName ) VALUES ( ?, ?, ?, ? )
        int res = userMapper.insert(new User(null, "markbolo", "0000", "马克波罗"));
        //断言
        //id = 1504988968188436481  是通过雪花算法生成的iD
        Assertions.assertEquals(1,res);
    }
2、删除
    /**
     * 根据 ID 删除
     *
     * @param id 主键ID
     */
    int deleteById(Serializable id);


    /**
     * 根据 map 集合 条件,删除记录
     *
     * @param columnMap 表字段 map 对象
     */
    int deleteByMap(@Param(Constants.COLUMN_MAP) Map<String, Object> columnMap);


    /**
     * 删除(根据ID或实体 批量删除)
     *
     * @param idList 主键ID列表或实体列表(不能为 null 以及 empty)
     */
    int deleteBatchIds(@Param(Constants.COLLECTION) Collection<?> idList);
    @Test
    @DisplayName("根据ID删除")
    void test_deleteById() {
        // DELETE FROM t_user WHERE id=?
        int res = userMapper.deleteById(1504988968188436481L); //超出 int 类型范围,加个  L 表示long类型
        //断言
        Assertions.assertEquals(1,res);
    }

    @Test
    @DisplayName("根据条件删除")
    void test_deleteByMap() {
        // DELETE FROM t_user WHERE realName = ? AND password = ?
        Map<String,Object> map = new HashMap<>();
        //将查询条件封装到map集合中
        map.put("realName","老五");
        map.put("password","0000");
        int res = userMapper.deleteByMap(map);
        //断言
        Assertions.assertEquals(1,res);
    }

    @Test
    @DisplayName("根据ID批量删除")
    void test_deleteBatch() {
        // DELETE FROM t_user WHERE realName = ? AND password = ?
        List<Long> list = Arrays.asList(1504988968188436482L, 1504988968188436483L, 1504988968188436484L);//转换成一个list集合

        int res = userMapper.deleteBatchIds(list);
        //断言
        Assertions.assertEquals(3,res);
    }
ID 是通过雪花算法生成的 long 类型。
3、修改
    /**
     * 根据 ID 修改
     *
     * @param entity 实体对象
     */
    int updateById(@Param(Constants.ENTITY) T entity);
    @Test
    @DisplayName("根据ID修改")
    void test_updateByID() {
        //UPDATE t_user SET userName=?, password=?, realName=? WHERE id=?
        //根据实体类ID 进行修改
        int res = userMapper.updateById(new User(1504988968188436485L,"rose","0000","rose"));
        //断言
        Assertions.assertEquals(1,res);
    }
4、查询
   @Test
    @DisplayName("根据ID查询单个用户信息")
    void test_selectForOne() {
        //SELECT id,userName,password,realName FROM t_user WHERE id=?
        User user= userMapper.selectById(23L);
        System.out.println(user);
    }

    @Test
    @DisplayName("根据ID查询多个用户信息")
    void test_selectForMore() {
        //SELECT id,userName,password,realName FROM t_user WHERE id IN ( ? , ? , ? )
        List<Long> ids = Arrays.asList(23L, 35L, 30L);
        List<User> users = userMapper.selectBatchIds(ids);
        System.out.println(users);
    }

    @Test
    @DisplayName("根据map和查询用户信息")
    void test_selectForMap() {
        //SELECT id,userName,password,realName FROM t_user WHERE id = ? AND userName = ?
        Map<String,Object> map = new HashMap<>();
        //将查询条件封装在 map集合中
        map.put("userName","rose");
        map.put("id",1504988968188436485L);
        List<User> users = userMapper.selectByMap(map);
        System.out.println(users);
    }

    @Test
    @DisplayName("查询所有用户信息")
    void test_selectForList() {
        //SELECT id,userName,password,realName FROM t_user
        List<User> users = userMapper.selectList(null);
        System.out.println(users);
    }
如果 baseMapper 提供的方法不满足需求,可以自定义sql。
和 mybatis 一样。在 mapper 接口写 sql 方法。mapper 映射文件里 sql 语句。
和 mybatis 不一样的是,在SpringBoot 中 mapper映射文件有默认位置: classpath*:/mapper/**/*.xml
也可以通过:mybatis-plus-mapper-locations: 指定mapper映射文件位置
四、Service 接口
说明:
- 通用 Service CRUD 封装 IService 接口,进一步封装 CRUD 采用
get 查询单行remove 删除list 查询集合save 插入page 分页前缀命名方式区分Mapper层避免混淆。 在 mapper 中: select 查询,delete 删除,insert 增加 ,update 修改- 泛型
T为任意实体对象 - 建议如果存在自定义通用 Service 方法的可能,建议自己创建
service接口 和实现类 ,继承 MyBatis-Plus 提供的IService和ServiceImpl - 对象
Wrapper为 条件构造器
MyBatis-Plus 提供了 service 接口 和 实现类,但是为了满足开发需要,
public interface UserService extends IService<User> {
    // IService :泛型为 实体类类型。
}
public class UserServiceImpl extends ServiceImpl<UserMapper, User> implements UserService {
    // ServiceImpl : MyBatis-Plus 提供的 IService 的实现类。
    //第一个泛型:mapper 接口
    //第二个泛型“:实体类对象
}
IService 提供的 批量增加功能:
    @Autowired
    UserService userService ;

    @Test
    @DisplayName("批量增加")
    void test_saveBatch() {
        List<User> users = Arrays.asList(
                new User(null, "aaa", "000", "aaa"),
                new User(null, "bbb", "000", "bbb"),
                new User(null, "ccc", "000", "ccc"));
        //参数是一个list集合
        boolean saveBatch = userService.saveBatch(users);
        System.out.println(saveBatch);
    }
五、MyBatis-Plus 中常用的注解
1、@TableName : MyBatis-Plus 默认根据实体类名找数据库中的表,如果不一致,可通过 此注解指定表名。
@TableName("t_user") : 表示对应数据库表名为:t_user
还可以通过 全局配置 指定表名前缀:
#    设置数据库表名的前缀
mybatis-plus:
  global-config:
    db-config:
      table-prefix: t_user
2、@TableId : 标注在属性上,将该属性对应的 字段名 看做主键。
-
value 属性:
@TableId(value = " ") 指定 主键 id 名 -
type 属性 :主键生成策略
- AUTO
- 自增,使用条件:数据库中的主键也必须设置为 自增。
- NONE
- 未设置生成策略
- INPUT
- 自己输入
- ASSIGN_ID
- 雪花算法,分配ID。当 ID 填 null 的时候,自动使用该策略
- ASSIGN_UUID
- 分配 UUID
- AUTO
可以通过全局配置设置所有主键为自增:
mybatis-plus:
  global-config:
    db-config:
#      设置全局 id 自增功能
      id-type: auto
IdType 源码:
@Getter
public enum IdType {
    /**
     * 数据库ID自增
     * 该类型请确保数据库设置了 ID自增 否则无效
     */
    AUTO(0),
    /**
     * 该类型为未设置主键类型(注解里等于跟随全局,全局里约等于 INPUT)
     */
    NONE(1),
    /**
     * 用户输入ID
     * 该类型可以通过自己注册自动填充插件进行填充
     */
    INPUT(2),

    /* 以下3种类型、只有当插入对象ID 为空,才自动填充。 */
    /**
     * 分配ID (主键类型为number或string),
     * 默认实现类 {@link com.baomidou.mybatisplus.core.incrementer.DefaultIdentifierGenerator}(雪花算法)
     *
     * @since 3.3.0
     */
    ASSIGN_ID(3),
    /**
     * 分配UUID (主键类型为 string)
     * 默认实现类 {@link com.baomidou.mybatisplus.core.incrementer.DefaultIdentifierGenerator}(UUID.replace("-",""))
     */
    ASSIGN_UUID(4);

    private final int key;

    IdType(int key) {
        this.key = key;
    }
}
3、**@TableField ** : 设置属性名对应的字段名。
@TableField(value = "user_name") 当属性名和字段名不一致时,可通过 @TableField 注解指定字段名。
4、@TableLogic :
- 物理删除:真实删除,将对应数据从数据库中删除,之后查询不到此条被删除的数据
- 逻辑删除:假删除,将对应数据中代表是否被删除字段的状态修改为“被删除状态”,之后在数据库 中仍旧能看到此条数据记录
- 使用场景:可以进行数据恢复
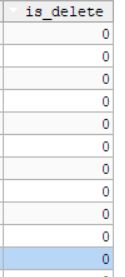
在数据库中增加 is_delete 字段,用来表示删除状态。 mp默认 1 表示逻辑删除 0 表示未删除,可通过配置修改
mybatis-plus:
  global-config:
    db-config:
      logic-delete-value: 1 # 逻辑已删除值(默认为 1)
      logic-not-delete-value: 0 # 逻辑未删除值(默认为 0)
//逻辑删除语句,其实是修改语句,将删除的数据的删除状态 更改为 1
UPDATE t_user SET is_delete=1 WHERE uid IN ( ? , ? , ? ) AND is_delete=0
数据库中仍然有删除后的数据,但是使用查询语句 是查询不出来的。
在执行查询语句时,会增加一个is_delete = 0 的查询条件
六、条件构造器 Wrapper
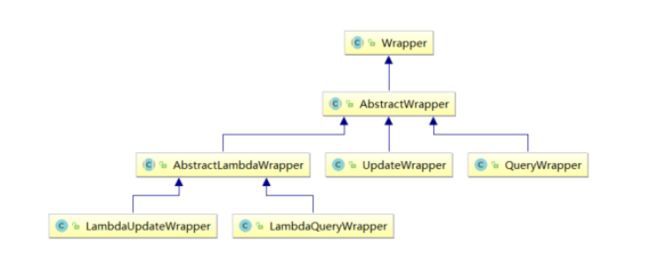
- Wrapper : 顶级类构造器
- AbstractLambdaWrapper : 支持 lambda 表达式
- LambdaUpdateWrapper : 使用 lambda 进行修改的条件构造器
- LambdaQueryWrapper : 使用 lambda 进行查询的条件构造器
- UpdateWrapper : 修改 的条件构造器
- QueryWrapper : 查询 的条件构造器,删除 也用 QueryWrapper
在使用条件构造器时,默认用 and 拼接
6.1 QueryWrapper
1、组装条件查询
    @Test
    @DisplayName("条件构造器")
    public void test01(){
        //比如:需要查询 用户名带 a 并且 密码不为空  的用户信息
        QueryWrapper<User> queryWrapper = new QueryWrapper<>();
        queryWrapper.like("user_name","a").isNotNull("password");

        List<User> list = userService.list(queryWrapper);
        list.forEach(System.out::println);
    }
条件构造器支持链式增加,并且方法名的意思和数据库中的 关键字 的意思一样。
参考: 条件构造器 | MyBatis-Plus (baomidou.com)
2、组装排序条件
    @Test
    @DisplayName("组装排序条件")
    public void test02(){
        //比如:按照id的降序查询
        QueryWrapper<User> queryWrapper = new QueryWrapper<>();
        queryWrapper.orderByDesc("uid");
        // queryWrapper.orderByAsc("uid");   升序

        List<User> list = userService.list(queryWrapper);
        list.forEach(System.out::println);
    }
3、组装删除条件
    @Test
    @DisplayName("组装删除条件")
    public void test03(){
        //比如:删除密码为空的数据
        QueryWrapper<User> queryWrapper = new QueryWrapper<>();
        queryWrapper.isNull("password");
        boolean remove = userService.remove(queryWrapper);
        System.out.println(remove);
    }
4、组装修改条件
    @Test
    @DisplayName("组装修改条件--queryWrapper")
    public void test04(){
        //比如:修改 用户名中带有 a 或者 密码为 0000 的真实姓名为  小明
        QueryWrapper<User> queryWrapper = new QueryWrapper<>();
        queryWrapper.like("user_name","a")
                //默认组装是由 and 拼接的。 使用 or() 用 or 拼接
                .or()
                .eq("password","0000");
        //update() 中有俩个参数:
        //1、实体类 用来修改信息
        //2、queryWrapper:用来获取可以修改的用户信息。
        User user = new User();
        user.setUserName("小明");
        boolean update = userService.update(user, queryWrapper);
        System.out.println(update);
    }
5、条件优先级
使用 and(Consumer consumer) 方法,会将 ( ) 里面的条件用 括号 括起来。提高优先级。
里面的 参数就是一个 wrapper 。
以下代码执行的 sql 语句:
UPDATE t_user SET real_name=? WHERE is_delete=0 AND (user_name LIKE ? AND (password = ? OR real_name IS NULL))
    @Test
    @DisplayName("条件优先级")
    public void test05(){
        //比如:修改 1、用户名中带有 a 并且 2、(密码为 0000 或者 真实姓名为 null ) 的真实姓名为  小红
        QueryWrapper<User> queryWrapper = new QueryWrapper<>();
        queryWrapper.like("user_name","a")
                //MyBaits中的 lambda表达式是优先执行的。
                .and(i -> i.eq("password","0000").or().isNull("real_name"));
        User user = new User();
        user.setRealName("小红");
        boolean update = userService.update(user, queryWrapper);
        System.out.println(update);
    }
6、组装 select 子句
目前位置默认查询出来的字段是所有字段,如何查询出来为指定的字段
QueryWrapper
    @Test
    @DisplayName("组装 select 子句")
    public void test06(){

        QueryWrapper<User> queryWrapper = new QueryWrapper<>();
        //指定查询字段
        queryWrapper.select("user_name","real_name");

        List<Map<String, Object>> maps = userService.listMaps(queryWrapper);
        maps.forEach(System.out::println);
    }
6.2 UpdateWrapper
前面在进行修改时: 使用 queryWrapper 用来设置修改条件,实体类用来设置修改内容
updateWrapper : 既可以 用来设置 修改条件,又可以设置修改的内容。
    @Test
    @DisplayName("组装修改条件 --- updateWrapper  ")
    public void test08(){
        比如:修改 用户名中带有 a 或者 密码为 0000 的真实姓名为  小明
        UpdateWrapper<User> userUpdateWrapper = new UpdateWrapper<>();
        //修改条件
        userUpdateWrapper.like("user_name","a").or().eq("password","0000");
        //进行修改
        userUpdateWrapper.set("real_name","小明");
        boolean update = userService.update(userUpdateWrapper);
        System.out.println(update);
    }
6.3 使用condition 组装条件
下面模拟以下 在开发中的场景:
    @Test
    @DisplayName("condition")
    public void test09(){
        //假设以下条件参数是从浏览器传送过来的。
        String userName = "小明" ;
        String password = "0000" ;
        String realName = "";

        //进行查询。但是不需要将 空的参数作为查询条件,就需要增加判断
        QueryWrapper<User> queryWrapper = new QueryWrapper<>();
        if (StringUtils.isNotBlank(userName)){
            //如果userName不为空,就作为查询条件
            queryWrapper.like("user_name",userName) ;
        }
        if (StringUtils.isNotBlank(password)){
            //如果 password 不为空,就作为查询条件
            queryWrapper.like("password",password) ;
        }
        if (StringUtils.isNotBlank(realName)){
            //如果 realName 不为空,就作为查询条件
            queryWrapper.like("real_name",realName) ;
        }
        List<User> list = userService.list(queryWrapper);
        list.forEach(System.out::println);
    }
这样判断是非常麻烦的,可以通过 condition 这个参数用来判断。
每一个 方法里都会提供一个 condition 参数,这个参数就是用来 判断该条件是否组装在sql语句后面
    @Test
    @DisplayName("condition")
    public void test010(){
        //假设以下参数是从浏览器传送过来的。
        String userName = "小明" ;
        String password = "0000" ;
        String realName = "";
        QueryWrapper<User> queryWrapper = new QueryWrapper<>();
        //第一个参数:condition : 组装条件
        //第二个参数:字段名
        //第三个参数:条件
        queryWrapper.like(StringUtils.isNotBlank(userName),"user_name",userName)
                .like(StringUtils.isNotBlank(password),"password",password)
                .like(StringUtils.isNotBlank(realName),"real_name",realName) ;

        List<User> list = userService.list(queryWrapper);
        list.forEach(System.out::println);
    }
七、MyBatis-Plus 插件
1、分页插件
开启分页功能:
    //开启分页功能
    @Bean
    public MybatisPlusInterceptor mybatisPlusInterceptor (){
        MybatisPlusInterceptor interceptor = new MybatisPlusInterceptor() ;
        interceptor.addInnerInterceptor(new PaginationInnerInterceptor(DbType.MYSQL));
        return  interceptor ;
    }
分页使用:
    @Test
    public void test01(){
        // limit start,size  start :表示起始索引,size:显示条数
        //current : 当前页码 。  (当前页码 -1) * size = start
        // size :每页显示条数
        Page<User> page = new Page<>(1,3);
        //查询并且分页
        userService.page(page);
        System.out.println(page);
    }
page 中的属性:
records : 每页的数据
pages : 总页数
total : 总记录数
current : 当前页码
size :每页显示条数
hasNext :是否有下一页
hasPrevious : 是否有上一页
2、乐观锁和悲观锁
有这样一个场景:
一件商品,成本价是80元,售价是100元。老板先是通知小李,说你去把
商品价格增加50元。小李正在玩游戏,耽搁了一个小时。正好一个小时后,老板觉得商品价格增加到150元,价格太
高,可能会影响销量。又通知小王,你把
商品价格降低30元。此时,
小李和小王同时操作商品后台系统。小李操作的时候,系统先取出商品价格100元;小王也在操作,取出的商品价格也是100元。小李将价格加了50元,并将100+50=150元存入了数据
库;小王将商品减了30元,并将100-30=70元存入了数据库。是的,如果没有锁,小李的操作就
完全被小王的覆盖了。
现在商品价格是70元,比成本价低10元。几分钟后,这个商品很快出售了1千多件商品,老板亏1
万多
也就是说当俩个人同时操作数据库时,都是对同一条数据同时进行的修改。和 银行取钱的场景类似
上面的故事
如果是乐观锁,小王保存价格前,会检查下价格是否被人修改过了。如果被修改过了,则重新取出的被修改后的价格,150元,这样他会将120元存入数据库。
如果是悲观锁,小李取出数据后,小王只能等小李操作完之后,才能对价格进行操作,也会保证
最终的价格是120元。
模拟修改冲突:
    @Test
    public void test11(){
        //小李查询价格
        Product productLi = productMapper.selectById(1);
        System.out.println("小李查询的价格 :" + productLi.getPrice());
        //小王查询价格
        Product productWang = productMapper.selectById(1);
        System.out.println("小王查询的价格 :" + productWang.getPrice());
        //小王和小李获取的价格都是 100

        //小李修改价格 150
        productLi.setPrice(productLi.getPrice()+50);
        productMapper.updateById(productLi);
        System.out.println("小李修改完价格:" + productLi.getPrice());
        //小王修改价格 70 小王修改的价格会覆盖小李修改的价格
        productWang.setPrice(productWang.getPrice()-30);
        productMapper.updateById(productWang);
        System.out.println("小王修改完价格:" + productWang.getPrice());

        //老板查询价格  70
        Product productBoss = productMapper.selectById(1);
        System.out.println("老板查询的价格:" + productBoss.getPrice());
        //
    }
在老板查询的时候,商品价格为 70 ,小王的修改已经覆盖了小李的修改。
乐观锁实现流程 :
实现乐观锁一般是在数据库中 增加
version字段,表示版本号,在修改数据前获取版本号。修改数据时不仅要修改数据,还要修改版本号。【version+1】比如:小王和小李第一次获取价格和版本号时,
price=100, version=1小李在修改数据时,先获取版本号=1,和第一次获取价格时的版本号一致,就可以修改:
price 100 + 50 = 150,version: 1+1=2配小王在修改数据时,先获取
version = 2【因为小李在修改时将版本号增加了 1 】,由于版本号和之前获取的不一致,所以小王的修改操作就不会成功。最后price=150
增加乐观锁插件 :
a、在属性上增加 @Version 注解
    @Version //表示乐观锁版本号字段
    private Integer version ;
b、增加乐观锁插件
    @Bean
    public MybatisPlusInterceptor mybatisPlusInterceptor (){
        MybatisPlusInterceptor interceptor = new MybatisPlusInterceptor() ;
        //增加分页插件
        interceptor.addInnerInterceptor(new PaginationInnerInterceptor(DbType.MYSQL));
        //增加乐观锁插件
        interceptor.addInnerInterceptor(new OptimisticLockerInnerInterceptor());
        return  interceptor ;
    }
最后 老板查询的价格:150.0
因为在小王想要修改价格的时候,获取到的版本号和第一次获取的时候不一致,所以并没有修改成功。
优化修改流程,使小王的操作成功:
在小王进行修改时,修改失败后在重新查询,修改价格。
    @Test
    public void test11(){
        //小李查询价格
        Product productLi = productMapper.selectById(1);
        System.out.println("小李查询的价格 :" + productLi.getPrice());
        //小王查询价格
        Product productWang = productMapper.selectById(1);
        System.out.println("小王查询的价格 :" + productWang.getPrice());
        //小王和小李获取的价格都是 100

        //小李修改价格 150
        productLi.setPrice(productLi.getPrice()+50);
        productMapper.updateById(productLi);
        System.out.println("小李修改完价格:" + productLi.getPrice());

        //小王修改价格 70 小王修改的价格会覆盖小李修改的价格
        productWang.setPrice(productWang.getPrice()-30);
        int res = productMapper.updateById(productWang);

        if (res ==0 ){
            //结果=0,说明小王操作失败。就重新查新,重新修改
            Product newProduct = productMapper.selectById(1);
            newProduct.setPrice(newProduct.getPrice() - 30);
            productMapper.updateById(newProduct) ;
        }
        System.out.println("小王修改完价格:" + productWang.getPrice());

        //老板查询价格
        Product productBoss = productMapper.selectById(1);
        System.out.println("老板查询的价格:" + productBoss.getPrice());
    }
因此乐观锁在修改之前要执行一次查询操作!!!
八、通用枚举
在表中有些字段值是固定的,比如性别:只有 男和女,这时候就可以通过枚举来实现。
@EnumValue + type-enums-package 实现该功能
增加枚举类:
@Getter
public enum SexEnum {
    MALE(1, "男"),
    FEMALE(2, "女");

    //将注解标识的属性值存储到数据库。
    @EnumValue
    private Integer sex;
    private String sexName;

    SexEnum(Integer sex, String sexName) {
        this.sex = sex;
        this.sexName = sexName;
    }
}
配置全局文件扫描枚举:
mybatis-plus:
	type-enums-package: com.example.enums
测试:
    @Test
    public void test01(){
        User user = new User();
        user.setUserName("lisi");
        user.setRealName("李四");
        user.setPassword("0000");
        //使用枚举赋值
        user.setSex(SexEnum.MALE);
        int insert = userMapper.insert(user);
        System.out.println(insert);
    }
九、代码生成器
a、引入依赖
        <dependency>
            <groupId>com.baomidougroupId>
            <artifactId>mybatis-plus-generatorartifactId>
            <version>3.5.2version>
        dependency>

        <dependency>
            <groupId>org.freemarkergroupId>
            <artifactId>freemarkerartifactId>
            <version>2.3.30version>
        dependency>
b、自动生成代码,可直接拷贝
                FastAutoGenerator.create(
                        "jdbc:mysql://localhost:3306/book",
                        "root",
                        "root")
                        .globalConfig(builder -> {
                            builder.author("yang") // 设置作者
                                    .enableSwagger() // 开启 swagger 模式
                                    .fileOverride() // 覆盖已生成文件
                                    .outputDir("C://user//"); // 指定输出目录
                        })
                        .packageConfig(builder -> {
                            builder.parent("com.example") // 设置父包名
                                    .moduleName("") // 设置父包模块名
                                    .pathInfo(Collections.singletonMap(OutputFile.xml, "C://user//")); // 设置mapperXml生成路径
                        })
                        .strategyConfig(builder -> {
                            builder.addInclude("t_book") // 设置需要生成的表名
                                    .addTablePrefix("t_", "c_"); // 设置过滤表前缀
                        })
                        .templateEngine(new FreemarkerTemplateEngine()) // 使用Freemarker引擎模板,默认的是Velocity引擎模板
                        .execute();
十、多数据源
适用于多种场景:纯粹多库、 读写分离、 一主多从、 混合模式等
a、引入依赖
        <dependency>
            <groupId>com.baomidougroupId>
            <artifactId>dynamic-datasource-spring-boot-starterartifactId>
            <version>3.5.0version>
        dependency>
b、增加配置
spring:
  datasource:
    dynamic:
      primary: master #设置默认的数据源或者数据源组,默认值即为master
      strict: false #严格匹配数据源,默认false. true未匹配到指定数据源时抛异常,false使用默认数据源
      datasource:
        master:
          url: jdbc:mysql://localhost:3306/test
          username: root
          password: root
          driver-class-name: com.mysql.jdbc.Driver # 3.2.0开始支持SPI可省略此配置
        slave_1:
          url: jdbc:mysql://localhost:3306/book
          username: root
          password: root
          driver-class-name: com.mysql.jdbc.Driver
c、只需要在 service 使用 @DS() 注解指定数据源即可。
@DS 可以标注在方法上或者类上【就近原则,方法优先】
@Service
@DS("master") //指定master数据源
public class UserServiceImpl extends ServiceImpl<UserMapper, User> implements IUserService {

}
@Service
@DS("slave_1") //指定数据源
public class BookServiceImpl extends ServiceImpl<BookMapper, Book> implements IBookService {

}
十一、MyBatis-X 插件
IDEA里下载插件: MyBatis-X 插件
自动生成实体类,mapper 接口…
- 建立数据库连接
- 配置
十二、自动填充
首先 表中增加俩个字段,创建时间以及修改时间。实体类添加这俩个属性
    @Test
    @DisplayName("演示自动填入")
    void autoInput(){
        User user = new User();
        user.setName("zs");
        user.setAge(20);
        user.setEmail("[email protected]");

        // 手动设置时间
        // user.setCreateTime(new Date());
        // user.setUpdateTime(new Date());

        int insert = userMapper.insert(user);
        System.out.println(insert);
    }
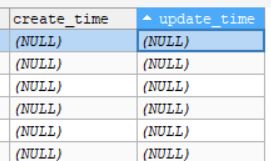
此时如果我们想要填入 create_time 这个字段,需要我们手动去 填入。
而自动填入可以自动帮我们填入时间信息。
官网: 自动填充功能 | MyBatis-Plus (baomidou.com)
步骤:
- 为自动填充的字段加上 @TableFIeld 注解、
@Data
public class User {

    @TableId(type = IdType.ASSIGN_ID)
    private Long id;

    private String name;
    private Integer age;
    private String email;

    // 设置自动填充字段
    @TableField(fill = FieldFill.INSERT)
    private Date createTime ;
    @TableField(fill = FieldFill.UPDATE)
    private Date UpdateTime;
}
- 创建类 实现
MetaObjectHandler接口,并重写方法。@Component public class AutoInputConfig implements MetaObjectHandler { @Override public void insertFill(MetaObject metaObject) { // 增加时自动填充 // metaObject 原数据对象 // createTime 自动填充的字段名 // Date.class 填充内容的类型 // new Date() 填充的内容 this.strictInsertFill(metaObject,"createTime", Date.class,new Date()); this.strictInsertFill(metaObject,"updateTime", Date.class,new Date()); } @Override public void updateFill(MetaObject metaObject) { // 修改时自动填充 this.strictUpdateFill(metaObject,"updateTime", Date.class,new Date()); } }不要忘记注入到容器中~
- 测试
    @Test
    @DisplayName("演示自动填入")
    void autoInput(){
        User user = new User();
        // user.setId(1554755038218317825L);
        user.setName("ty");
        user.setAge(01111);
        user.setEmail("[email protected]");

        // user.setCreateTime(new Date());
        // user.setUpdateTime(new Date());

        int insert = userMapper.insert(user);
        // int insert = userMapper.updateById(user);

        System.out.println(insert);
    }
测试结果 :
注意事项:
- 填充原理是直接给
entity的属性设置值!!!- 注解则是指定该属性在对应情况下必有值,如果无值则入库会是
nullMetaObjectHandler提供的默认方法的策略均为:如果属性有值则不覆盖,如果填充值为null则不填充- 字段必须声明
TableField注解,属性fill选择对应策略,该声明告知Mybatis-Plus需要预留注入SQL字段- 填充处理器
MyMetaObjectHandler在 Spring Boot 中需要声明@Component或@Bean注入- 要想根据注解
FieldFill.xxx和字段名以及字段类型来区分必须使用父类的strictInsertFill或者strictUpdateFill方法- 不需要根据任何来区分可以使用父类的
fillStrategy方法- update(T t,Wrapper updateWrapper)时t不能为空,否则自动填充失效
十三、MyBatis-Plus 性能分析
该功能依赖
p6spy组件,完美的输出打印 SQL 及执行时长3.1.0以上版本
- 增加依赖
        <dependency>
            <groupId>p6spygroupId>
            <artifactId>p6spyartifactId>
            <version>3.9.1version>
        dependency>
- 修改原有的数据库驱动以及 url
spring:
    datasource:
#        指明 sql 语句分析驱动
        driver-class-name: com.p6spy.engine.spy.P6SpyDriver
        username: root
        password: 1234
        url: jdbc:p6spy:mysql://localhost:3306/mybatis_plus?serverTimezone=GMT%2B8
- 在 resource 文件夹下创建 spy.properties 文件
#3.2.1以上使用
modulelist=com.baomidou.mybatisplus.extension.p6spy.MybatisPlusLogFactory,com.p6spy.engine.outage.P6OutageFactory
#3.2.1以下使用或者不配置
#modulelist=com.p6spy.engine.logging.P6LogFactory,com.p6spy.engine.outage.P6OutageFactory
# 自定义日志打印
logMessageFormat=com.baomidou.mybatisplus.extension.p6spy.P6SpyLogger
#日志输出到控制台
appender=com.baomidou.mybatisplus.extension.p6spy.StdoutLogger
# 使用日志系统记录 sql
#appender=com.p6spy.engine.spy.appender.Slf4JLogger
# 设置 p6spy driver 代理
deregisterdrivers=true
# 取消JDBC URL前缀
useprefix=true
# 配置记录 Log 例外,可去掉的结果集有error,info,batch,debug,statement,commit,rollback,result,resultset.
excludecategories=info,debug,result,commit,resultset
# 日期格式
dateformat=yyyy-MM-dd HH:mm:ss
# 实际驱动可多个
#driverlist=org.h2.Driver
# 是否开启慢SQL记录
outagedetection=true
# 慢SQL记录标准 2 秒
outagedetectioninterval=2
Consume Time : SQL 语句执行时间


