Django打造大型企业官网-项目实战
一、项目环境搭建
1、新建虚拟环境:mkvirtualenv project_name
2、pycharm 新建 Django 项目:xfz
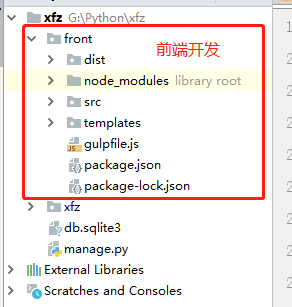
3、 删除 xfz 项目中的 templates 目录,新建 front 目录。项目 xfz 初始目录如下:
4、front 前端环境初始化
1)进入front目录,打开终端,执行命名:npm init ,进行npm 初始化,执行完成会生成一个 package.json 跟一个 package_lock.json 文件
2)当前项目下安装 gulp :npm install gulp --save-dev , 安装完成后会生成一个 node_modules 包
3)在front 目录下,新建js文件:gulpfile.js
4)我们将之前安装过的 gulp 插件命令,拿到本项目中用:
{
  "name": "xfz_front",
  "version": "1.0.0",
  "description": "",
  "main": "index.js",
  "scripts": {
    "test": "echo \"Error: no test specified\" && exit 1"
  },
  "author": "",
  "license": "ISC",
  "devDependencies": {
    "browser-sync": "^2.26.3",
    "gulp": "^4.0.0",
    "gulp-cache": "^1.1.1",
    "gulp-concat": "^2.6.1",
    "gulp-cssnano": "^2.1.3",
    "gulp-imagemin": "^5.0.3",
    "gulp-rename": "^1.4.0",
    "gulp-uglify": "^3.0.2"
  }
}
5)终端下执行命令:npm install , 对 package.json 中 devDependencies 下的所有插件进行安装。
至此便完成了前端环境的初始化,接下来需要在 gulpfile.js 文件中,对 一些源文件进行相应的预处理(压缩)
5、编写 gulpfile.js 文件
创建处理 css 的任务
创建处理 js 的任务
创建处理 images 的任务
创建处理 html 的任务
创建监听任务
实现指定文件内容修改时,自动刷新浏览器内容
var gulp = require("gulp");                    // gulp 插件
var cssnano = require("gulp-cssnano");        // css 压缩
var rename = require("gulp-rename");        // 重命名,加后缀等
var uglify = require("gulp-uglify");        // js 压缩
var concat = require("gulp-concat");        // 文件拼接 合并
var cache = require("gulp-cache");            // 缓存
var imagemin = require("gulp-imagemin");    // 图片压缩
var bs = require("browser-sync").create();    // 浏览器自动刷新
var sass = require("gulp-sass");            // sass 压缩
var util = require("gulp-util");            // 这个插件中有一个 log 方法,可以用来打印当前 js 错误信息。需安装


// 定义全局路径
var path = {
    'html':'./templates/**/',
    'css':'./src/css/**/',
    'js':'./src/js/**/',
    'images':'./src/images',
    'css_dist':'./dist/css/',
    'js_dist':'./dist/js/',
    'images_dist':'./dist/images'
};


// 初始化 browser-sync 的任务
gulp.task("bs",function(){
    bs.init({
        'server':{
            'baseDir':'./'
        }
    });
});


// 定义处理 HTML 文件的任务
gulp.task("html",function () {
    gulp.src(path.html + '*.html')
    .pipe(bs.stream())   // html文件更改时,浏览器会自动刷新
});

// 定义处理 css 的任务
gulp.task("css",function(){
    gulp.src(path.css + '*.scss')
    .pipe(sass().on("error",sass.logError))    // 将 scss 文件转换成 css 文件,如果出错则打印错误信息
    .pipe(cssnano())      // 压缩 css 文件
    .pipe(rename({"suffix":".min"}))
    .pipe(gulp.dest(path.css_dist))
    .pipe(bs.stream())
});


// 定义处理 js 的任务
gulp.task("js",function () {
    gulp.src(path.js + '*.js')
    .pipe(uglify().on("error",util.log))        // js 文件压缩错误时打印错误信息
    .pipe(rename({"suffix":".min"}))
    .pipe(gulp.dest(path.js_dist))
    .pipe(bs.stream())
});


// 定义处理图片文件的任务
gulp.task("images",function () {
    gulp.src(path.images + '*.*')
    .pipe(cache(imagemin()))
    .pipe(gulp.dest(path.images_dist))
    .pipe(bs.stream())
});


// 定义监听文件修改的任务
gulp.task("watch",function () {
    gulp.watch(path.html + '*.html',['html']);
    gulp.watch(path.css + '*.scss',['css']);
    gulp.watch(path.js + '*.js',['js']);
    gulp.watch(path.images + '*.*',['images']);
});


// 创建一个默认的任务,在终端执行时只需要执行命令:gulp
gulp.task("default",["bs",'watch']);
注:gulpfile.js文件内容只适合在 gulp 3的版本中使用,因 gulp 3 和 gulp 4 版本有些不同,如直接运行上述 gulpfile.js 会报错。 当前项目安装 gulp 时,默认会安装 gulp 最新版本,即 gulp 4版本,我们可以通过下述命令让 gulp 4版本回退到 gulp 3 版本(3.9.1):
npm install gulp@3 --save-dev
此时,我们可以在终端执行命令:gulp 来启动我们的前端程序,启动成功终端显示如下图,同时会跳出一个本地ip:3000端口的网页,即我们的前端显示页面。我们可以在浏览器输入网址:http://localhost:3000/templates/news/index.html ,来访问我们的新闻首页。
注:如果报错:Cannon find module "lodash.assign" 错误,直接安装lodash即可,目前package.json依赖如下:
{
  "name": "xfz_front",
  "version": "1.0.0",
  "description": "",
  "main": "index.js",
  "scripts": {
    "test": "echo \"Error: no test specified\" && exit 1"
  },
  "author": "",
  "license": "ISC",
  "devDependencies": {
    "browser-sync": "^2.26.3",
    "gulp": "^3.9.1",
    "gulp-cache": "^1.1.1",
    "gulp-concat": "^2.6.1",
    "gulp-cssnano": "^2.1.3",
    "gulp-imagemin": "^5.0.3",
    "gulp-rename": "^1.4.0",
    "gulp-sass-china": "^3.1.0",
    "gulp-uglify": "^3.0.2",
    "gulp-util": "^3.0.8",
    "lodash": "^4.17.11"
  },
  "dependencies": {}
}
二、后端开发
前端开发不累述。
在我们借助 gulp 完成前端页面的开发后,正式进入到我们的后端开发。开始后端开发前,需要在 settings.py 中做好以下几步配置工作:
- 配置好数据库
- 配置好模板文件的路径
- 配置好静态文件的路径
- 配置好时区
- 配置好模板的static标签
1)配置好数据库,如下:
Navicat:
数据库配置:
DATABASES = {
    'default': {
        'ENGINE': 'django.db.backends.mysql',
        'NAME': "xfz",
        'HOST': "127.0.0.1",
        'POST': "3306",
        'USER': "root",
        'PASSWORD': '***'
    }
}
配置好数据库好,我们还需要进入虚拟环境(workon xfz)中安装 mysqlclient ,这是数据库的依赖包,安装后才能正常连接数据库。
2)配置好模板文件的路径:
templates原配置:
    'DIRS': [os.path.join(BASE_DIR, 'templates')]

新:
   'DIRS': [os.path.join(BASE_DIR, 'front', 'templates')]  # 在front目录下的templates目录
3)配置好静态文件的路径:
STATIC_URL = '/static/'
STATICFILES_DIRS = [
    os.path.join(BASE_DIR, 'front', 'dist')
]
4)配置好时区:
LANGUAGE_CODE = 'en-us'

TIME_ZONE = 'Asia/Shanghai'

USE_I18N = True

USE_L10N = True

USE_TZ = True
5)配置好模板的静态 static 标签 ,这样在模板中使用static语法时就不需要在每个相应的模板页面中 {% load static %} 了 :
TEMPLATES = [
    {
        'BACKEND': 'django.template.backends.django.DjangoTemplates',
        'DIRS': [os.path.join(BASE_DIR, 'front', 'templates')]
        ,
        'APP_DIRS': True,
        'OPTIONS': {
            'context_processors': [
                'django.template.context_processors.debug',
                'django.template.context_processors.request',
                'django.contrib.auth.context_processors.auth',
                'django.contrib.messages.context_processors.messages',
            ],
            'builtins':[    # static 标签配置
                'django.templatetags.static'
            ]
        },
    },
]
settings.py 相关配置配置完成后,我们新建个apps目录,用来存放所有app ,同时将 apps 目录设为 Sources Root、templates目录设为 Template Folder
接着新建app:news ,并将该app添加进settings.py 中的 INSTALLED_APPS 中:
INSTALLED_APPS = [
    'django.contrib.admin',
    'django.contrib.auth',
    'django.contrib.contenttypes',
    'django.contrib.sessions',
    'django.contrib.messages',
    'django.contrib.staticfiles',
    'apps.news',  # 新增
]
然后,将template模板中设计的的文件/图片路径均改成动态路径,即{% static '...' %}格式。
完成上述步骤后,我们就可以正式进入到后端开发中。
1、使用 xadmin 后台管理系统,而不使用django自带的admin后台系统。xadmin 相关介绍请参考:https://www.cnblogs.com/Eric15/articles/9527556.html
1)依赖包安装:
pip install django-crispy-forms django-reversion django-formtools future httplib2 six  # 多个依赖包一起安装

pip install django-import-export

pip install xlwt xlsxwriter
2)将xadmin 及 DjangoUeditor 包复制,放到extra_apps(新建)中,在apps中的每个app(创建的app)都添加一个adminx文件
3)在settings.py 中将 apps 、extre_apps 路径配置进去:
# settings.py
import sys
sys.path.insert(0,BASE_DIR)
sys.path.insert(0,os.path.join(BASE_DIR, 'apps'))
sys.path.insert(0,os.path.join(BASE_DIR, 'extra_apps'))
3)将xadmin、crispy_forms、DjangoUeditor(富文本编辑器),在setting中进行注册:
INSTALLED_APPS = [
    'django.contrib.auth',
    'django.contrib.contenttypes',
    'django.contrib.sessions',
    'django.contrib.messages',
    'django.contrib.staticfiles',
    'apps.news.apps.NewsConfig'   # 创建的app 用这种形式注册
   'xadmin',
   'crispy_forms',
   'DjangoUeditor',

 ]
关于 DjangoUeditor → ueditor 富文本使用,可查看博文:https://www.cnblogs.com/Eric15/articles/9589396.html
4)settings.py 中语言改为中文:
# 语言改为中文
LANGUAGE_CODE = 'zh-hans'
5)静态文件/上传文件设置:
# 设置静态文件路径,上面已经设置过
STATIC_URL = '/static/'

STATICFILES_DIRS = [
    os.path.join(BASE_DIR, "front", "dist"),
]
# 用户上传文件存放路径
MEDIA_URL = "/media/"

MEDIA_ROOT = os.path.join(BASE_DIR, "media")
6)app 名称中文化:
# news/apps.py
class GoodsConfig(AppConfig):
    name = 'news'
    verbose_name = "新闻"
7)配置 xadmin 、ueditor 路由:
# xfz/urls.py

import xadmin

from django.urls import path,include

urlpatterns = [
    path('xadmin/', xadmin.site.urls),
    path('ueditor/', include('DjangoUeditor.urls')),
]
8)makemigrations / migrate :生成数据库表
9)创建超级管理员:
python manager.py createsuperuser ,创建超级用户,登录(127.0.0.1:8000/xadmin)xadmin后台管理查看详情
2、系统登录/注册功能,使用django自带的登录功能,实现自定义用户名(邮箱、手机等)登录/注册
2.1、注册功能
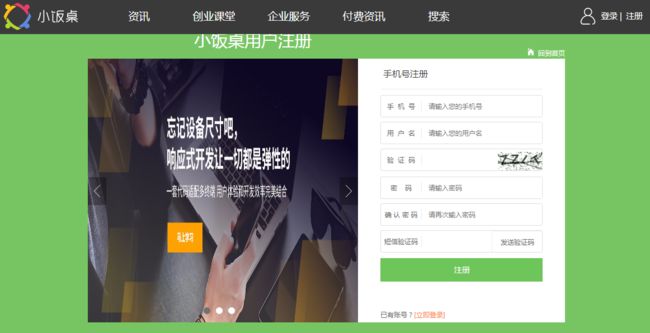
主要用到手机号码、用户名、随机验证码、密码及短信验证码等字段,随机验证码我们可以借用第三方库 Captcha 来实现,短信验证码需要另外生成一个表来处理,下面先单独设计用户表,继承于Django 自带的 AbstractUser :
注意:在 AbstractUser 中:REQUIRED_FIELDS = ['mobile'] , 指定创建用户时需输入某个字段,如这里就是要求创建用户时必须输入mobile,另外username、password 是默认必须要输入的字段。
class UserProfile(AbstractUser):
    """用户"""
    gender_choices = (
        ('male', '男'),
        ('female', '女')
    )

    nick_name = models.CharField('昵称', max_length=32, default='', null=True, blank=True)
    birthday = models.DateField('生日', null=True, blank=True)
    gender = models.CharField('性别', max_length=8, choices=gender_choices, default='female')
    mobile = models.CharField('手机号', max_length=11, null=True, unique=True)
    image = models.ImageField(upload_to='image/%Y/%m', default='image/default.png', max_length=100)
    email = models.EmailField('邮箱', blank=True, unique=True, null=True)  # 重写email字段,加上'唯一'标识
    is_active = models.BooleanField(default=False)  # AbstractUser 类中该字段默认为True
   is_staff = models.BooleanField(default=True)   # AbstractUser 类中该字段默认为False ,为了让前端注册成功后能正常登录后台管理系统,需设为True,同时后续还需要处理权限问题
    REQUIRED_FIELDS = ['mobile', 'email']  # 通过manage.py...创建用户/管理员时,会提醒输入此字段(必输入)

    class Meta:
        verbose_name = '用户信息'
        verbose_name_plural = verbose_name

    def __str__(self):
        return self.username
要想登录xadmin后台系统,需要同时满足:is_active为True、is_staff为True 两个条件。在AbstractUser 类中默认,is_active=True,is_staff=False ,在下面我们处理的注册相关操作中我们选择通过使用is_active来控制注册用户是否有效可用,因此在这里我们需要重载该字段并设置为 is_active=False、is_staff=True,如上述代码所示 , 这样,通过前端注册并成功激活的用户便能登录前端界面及后端管理后台,这类用户是没有后台任何权限的,我们后续需要配置权限相关操作。接着,我们也需要对 auth/models.py(django内置)中的 UserManager 类下create_superuser 方法进行如下代码优化,目的还是实现:在后台创建超级用户时,超级用户拥有is_active=True、is_staff=True 两个条件,可以登录后台并拥有后台所有权限。
如果要创建能登录后台的普通用户,方法一:可以通过超级用户登录到后台,再创建新普通用户并赋予指定权限就可以了;也可以前端直接注册,成功后照样能登录后台。 当然,如果用户注册时不需要用到is_active条件,在models.py中我们就只需要重载is_staff字段就可以,后续的UserManager 类中我们就不需要更改任何代码了。
# auth/models.py
class UserManager(BaseUserManager):
    use_in_migrations = True

    def _create_user(self, username, email, password, **extra_fields):
        """
        Create and save a user with the given username, email, and password.
        """
        if not username:
            raise ValueError('The given username must be set')
        email = self.normalize_email(email)
        username = self.model.normalize_username(username)
        user = self.model(username=username, email=email, **extra_fields)
        user.set_password(password)
        user.save(using=self._db)
        return user

    def create_user(self, username, email=None, password=None, **extra_fields):
        extra_fields.setdefault('is_staff', False)
        extra_fields.setdefault('is_superuser', False)
        return self._create_user(username, email, password, **extra_fields)

    def create_superuser(self, username, email, password, **extra_fields):
        extra_fields.setdefault('is_staff', True)
        extra_fields.setdefault('is_active', True)   # 新增
        extra_fields.setdefault('is_superuser', True)

        if extra_fields.get('is_staff') is not True:
            raise ValueError('Superuser must have is_staff=True.')
        if extra_fields.get('is_superuser') is not True:
            raise ValueError('Superuser must have is_superuser=True.')

        return self._create_user(username, email, password, **extra_fields)
用户表中用到 ImageField,因此我们需要安装下第三方库:pillow
pip install pillow
用户注册时,需要用到图形验证码及短信验证码,我们先来处理这两个问题
1)图形验证码
1. 使用第三方库:django-simple-captcha
虚拟环境下安装:
注意,使用django-simple-captcha第三方库时会涉及到image,此时如果未安装pillow,则需同时安装pillow:pip install pillow
pip install django-simple-captcha
2. 在项目的setting.py中的INSTALLED_APPS需要注册captcha。同时注册后,需要经过makemigrations、migrate生成对应的表数据(反经过这种注册的app都需要进行 makemigrations 、migrate 操作)
INSTALLED_APPS = [
    ……
    'captcha',
    ……
]
3. 在urls.py中配置:
from django.urls import path,include,re_path


urlpatterns = [
    # 验证码
    re_path(r'^captcha', include('captcha.urls')),
]
4. 后台中,需要用到captcha 的地方中使用:
from captcha.fields import CaptchaField

class RegisterForm(forms.Form):
    """注册表单验证"""

    captcha = CaptchaField(error_messages={'invalid':'验证码错误'})
5. 前端展示 captcha 图形验证码:
{{ register_form.captcha }}
前端中生成的captcha 代码:
6. 在 js 文件中实现点击图形验证码即时更新:
//刷新验证码
function refresh_captcha(event){
    $.get("/captcha/refresh/?"+Math.random(), function(result){
        $('#'+event.data.form_id+' .captcha').attr("src",result.image_url);
        $('#id_captcha_0').attr("value",result.key);
    });
    return false;
}

// 绑定点击事件,点击刷新验证码
$(function() {
     $('#email_register_form .captcha-refresh').click({'form_id':'email_register_form'},refresh_captcha);   // email_register_form 是表单的id
    $('#email_register_form .captcha').click({'form_id':'email_register_form'},refresh_captcha);
})
在 form.py 中进行表单验证时,添加的 captcha 字段是由第三方库 Captcha 内部定义的,内部已经完成验证码验证,即不需要我们再额外判断用户输入图形验证码是否正确
django-simple-captcha 使用时,在settings.py 中的部分可选择配置:
# 格式
CAPTCHA_OUTPUT_FORMAT = u'%(text_field)s %(hidden_field)s %(image)s'
# 噪点样式
CAPTCHA_NOISE_FUNCTIONS = (
    'captcha.helpers.noise_null',       # 没有样式
    # 'captcha.helpers.noise_arcs',     # 线
    'captcha.helpers.noise_dots',       # 点
)
# 图片大小
CAPTCHA_IMAGE_SIZE = (100, 30)
# 字符个数
CAPTCHA_LENGTH = 4
# 超时(minutes)
CAPTCHA_TIMEOUT = 1
# 文字倾斜
CAPTCHA_LETTER_ROTATION = (-10,10)
# 背景颜色
CAPTCHA_BACKGROUND_COLOR = '#FFFFFF'
# 文字颜色
CAPTCHA_FOREGROUND_COLOR = '#0A12E5'
# 验证码类型
# 图片中的文字为随机英文字母,如 mdsh ,默认就是这种
CAPTCHA_CHALLENGE_FUNCT = 'captcha.helpers.random_char_challenge'
# 图片中的文字为数字表达式,如1+2=
# CAPTCHA_CHALLENGE_FUNCT = 'captcha.helpers.math_challenge'
2)短信验证码
1. 前端注册页面代码:
{% extends 'front_base.html' %}

    {% block title %}小饭桌注册{% endblock %}
    {% block front-css %}
    <link rel="stylesheet" type="text/css" href="{% static 'css/news_auth/reset.min.css' %}">
    <link rel="stylesheet" type="text/css" href="{% static 'css/news_auth/login.min.css' %}">
    {% endblock %}
    {% block front-js %}
    <script src="{% static 'js/unslider.min.js' %}" type="text/javascript">script>
    <script src="{% static 'js/login.min.js' %}"  type="text/javascript">script>
    <script src="{% static 'js/validateDialog.min.js' %}"  type="text/javascript">script>
    {% endblock %}

{% block body %}
<section>
    <div class="c-box bg-box">
        <div class="login-box clearfix">
            <div class="hd-login clearfix">
                <a class="index-logo" href="/index/">a>
                <h1>小饭桌用户注册h1>
                <a class="index-font" href="/index/">回到首页a>
            div>
            <div class="fl slide">
                <div class="imgslide">
                    <ul class="imgs">

                        <li><a href=""><img width="483" height="472" src="{% static 'images/auth/57aa86a0000145c512000460.jpg' %}" />a>li>

                        <li><a href=""><img width="483" height="472" src="{% static 'images/auth/57a801860001c34b12000460.jpg' %}" />a>li>

                        <li><a href=""><img width="483" height="472" src="{% static 'images/auth/57a801860001c34b12000460.jpg' %}" />a>li>

                    ul>
                div>
                <div class="unslider-arrow prev">div>
                <div class="unslider-arrow next">div>
            div>
            <div class="fl form-box">
                <div class="tab">

                    <h2>手机号注册h2>
                div>
                <div class="tab-form">
                    <form id="email_register_form" method="post" autocomplete="off">
                    {% csrf_token %}
                        <div class="form-group marb8 {% if register_form.errors.mobile.0 %} errorput {% endif %}">
                            <label>手  机  号label>
                            <input  type="text" id="id_mobile" name="mobile" {% if register_form.errors.mobile.0 %} placeholder="{{ register_form.errors.mobile.0 }}" {% elif register_form.mobile.value %} value="{{ register_form.mobile.value }}" {% else %} placeholder="请输入您的手机号" {% endif %}/>
                        div>

                        <div class="form-group marb8 {% if register_form.errors.username.0 %} errorput {% endif %}">
                            <label>用  户  名label>
                            <input type="text" class="form-control" name="username" {% if register_form.errors.username.0 %} placeholder="{{ register_form.errors.username.0 }}" {% elif register_form.username.value %} value="{{ register_form.username.value }}" {% else %} placeholder="请输入您的用户名" {% endif %}>
                        div>

                        <div class="form-group marb8 captcha1 {% if register_form.errors.captcha.0 %} errorput {% endif %}">
                            <label>验  证  码label>
                            {{ register_form.captcha }}
                        div>
                        <div class="error btns" id="jsEmailTips">{{ register_form.errors.captcha.0 }}div>
                        <div class="form-group marb8 {% if register_form.errors.password1.0 %} errorput {% endif %}">
                            <label>密    码label>
                            <input type="text" class="form-control" name="password1" {% if register_form.errors.password1.0 %} placeholder="{{ register_form.errors.password1.0 }}" {% else %} placeholder="请输入密码" {% endif %}>
                        div>

                        <div class="form-group marb8 {% if register_form.errors.password2.0 %} errorput {% endif %}">
                            <label>确 认 密 码label>
                            <input type="text" class="form-control" name="password2" {% if register_form.errors.password2.0 %} placeholder="{{ register_form.errors.password2.0 }}" {% else %} placeholder="请再次输入密码" {% endif %}>
                        div>

                        <div class="form-group marb8 sms_captcha {% if register_form.errors.captcha.0 %} errorput {% endif %}">
                            <label>短信验证码label>
                            <div class="short-input-group">
                                <input type="text" class="form-control" name="sms_captcha">
                            div>
                            <div class="input-group-addon">
                                <span class="sms-captcha-btn">发送验证码span>
                            div>
                        div>
                        <div class="error btns" id="jsEmailTips">{{ register_form.errors.sms_captcha.0 }}div>
                        <input class="auth-btn btn-green" id="jsEmailRegBtn" type="submit" value="注册" />
                    form>
                div>
                <p class="form-p">已有账号?<a href="{% url 'auth_login' %}">[立即登录]a>p>
            div>
        div>
    div>
section>

{% endblock %}
2. js 代码,给'发送验证码' 控件绑定点击事件(发送验证码事件),同时实现发送验证码时,该控件显示验证码发送倒计时:
function Auth(){
    var self = this;
    self.smsCaptcha = $('.sms-captcha-btn');
}


// 短信验证码 发送短信 绑定点击事件
Auth.prototype.listenSmsCaptchaEvent = function (){
    var self = this;
    var smsCaptcha = $(".sms-captcha-btn");
    smsCaptcha.click(function () {  // 给 '发送验证码'按钮 绑定点击事件
        var token = $('input[name=csrfmiddlewaretoken]').val();
        var mobileVal = $("#id_mobile").val();
        if(mobileVal.length == 0){   // 判断手机号位数是否为0
            alert("请输入手机号码!");
        }else if(mobileVal.length == 11) {
            $.ajax({
                cache: false,
                type: 'post',
                async: true,
                // dataType: 'json',
                url: "/sms_captcha/",
                data:{
                    'mobile': mobileVal,
                    csrfmiddlewaretoken: token
                },
                'success': function (result) {
                    if(result['code'] == 200){  // 表示发送成功
                        // result:{code: 200, message: ""}
                        self.smsSuccessEvent();
                    }
                },
                'fail': function (error) {
                    console.log(error);
                }
            })
        }
        else{
            alert("请输入正确的手机号!")
        }
    })
};


// 短信验证码倒计时
Auth.prototype.smsSuccessEvent = function(){
    var self = this;
    alert("短信验证码发送成功");
    self.smsCaptcha.addClass('disabled');  // 短信发送成功,令该按钮不能再点响应击事件
    var count = 60;
    self.smsCaptcha.unbind('click');    // 解绑点击事件
    var timer = setInterval(function () {
        self.smsCaptcha.text("已发送"+count+"s");  // 验证码倒计时
        count -= 1;
        if(count <= 0){
            clearInterval(timer);   // 倒计时满1分钟,清除倒计时
            self.smsCaptcha.removeClass('disabled');
            self.smsCaptcha.text("发送验证码");   // 清除倒计时后,文本改回'发送验证码'
            self.listenSmsCaptchaEvent();  // 重新绑定点击事件
        }
    },1000)
};


// 页面加载完成时执行下述内容
$(function () {
    // 发送短信验证码
    var auth = new Auth();
    auth.listenSmsCaptchaEvent();
});
3)使用缓存存储短信验证码:完成短信验证码相关功能之前,我们先完成缓存相关的一些配置
1. 下载 memcached
网上下载 memcached (win版),下载完成打开是这样的:
安装 memcached,进入终端,执行以下命名:
C:/memcached-1.2.1-win32/memcached.exe -d install # 前面是 下载后的memcached 存放的目录
安装完成后,通过以下命名启动 memcached:
C:/memcached-1.2.1-win32/memcached.exe -d start
在任务管理器中可以看到 memcached 服务已经启动:
![]()
此时的 memcached 便是安装完成,以后只要开启,就能正常用于各个项目中。
2. 在python - django 项目中使用
memcached 安装完成后,我们要在python - django 项目中使用,需要在项目中安装 python-memcached ,安装完成即可正常使用
pip install python-memcached # 虚拟环境
3. memcached 在项目settings.py 中配置:
# 缓存配置
CACHES = {
    'default': {
        'BACKEND': 'django.core.cache.backends.memcached.MemcachedCache',
        'LOCATION': '127.0.0.1:11211'
    }
}
测试:
# pycharm Django console 环境下

>>> from django.core.cache import cache
>>> cache.set("haha",1234,60)
>>> cache.get("haha")
1234    # 获取到的结果
4)完善短信验证码后端相关功能
views.py:
从前端点击 '发送验证码' 后,后端需要起一个函数来处理前端提交过来的信息,及返回数据(发送短信)
from django.http import JsonResponse
from django.core.cache import cache

from utils.random_code import generate_code
from utils.aliyunsdk import aliyun_send_sms


# @csrf_exempt  # 短信验证码,可以不需要csrf_token验证
def sms_captcha(request):
    """注册-发送短信验证码"""
    # /sms_captcha/?mobile=136***
    if request.method == "POST":
        mobile = request.POST.get('mobile')
        code = generate_code()  # 四位数验证码
        cache.set(mobile, code, 5*60)  # 以mobile为key,code为value,保存到缓存中,过期时间为5分钟
        print(cache.get(mobile))  # 查看是否已保存到缓存中
        send_sms_status = aliyun_send_sms(mobile=mobile, code=code)  # 发送短信验证码
        if send_sms_status == 'OK':
            # {"code":400,"message":""} 返回json格式
            return JsonResponse({"code": 200, "message": ""})
        else:
            return JsonResponse({"code": 400, "message": "短信发送不成功!"})
urls.py配置:
from django.urls import path, include, re_path
from xfz.views import sms_captcha

urlpatterns = [

    path("sms_captcha/", sms_captcha, name='sms_captcha'),

]
aliyun_send_sms.py:
阿里云短信验证码使用参考教程:https://www.cnblogs.com/Eric15/p/10925460.html
import json from aliyunsdkcore.client import AcsClient from aliyunsdkcore.request import CommonRequest from utils.random_code import generate_code def aliyun_send_sms(mobile=None, code=None): """阿里云发送短信""" client = AcsClient('******', '********', 'default') #、 request = CommonRequest() request.set_accept_format('json') request.set_domain('dysmsapi.aliyuncs.com') request.set_method('POST') request.set_protocol_type('https') # https | http request.set_version('2017-05-25') request.set_action_name('SendSms') request.add_query_param('PhoneNumbers', mobile) request.add_query_param('SignName', "小饭桌网站") request.add_query_param('TemplateCode', "SMS_******") request.add_query_param('TemplateParam', json.dumps({'code': code})) # 以json 格式传递code参数 response = client.do_action(request) # 发送短信 response = str(response, encoding='utf-8') # 返回的response 为类型,将其转换成str字符串类型 response = json.loads(response) # 再通过json.loads,将str类型的 response 转换成dict 格式 # print(response) # response:{'Message': 'OK', 'RequestId': 'F07A40C3-539C-453B-BE52-4B60FF8DF58E', 'BizId': '431121158876223912^0', 'Code': 'OK'} # print(response['Code']) # 获取 Code 值 return response['Code']
random_code.py:
import random


def generate_code():
    """生成四位数的验证码"""
    seeds = "1234567890"
    random_str = []
    for i in range(4):
        random_str.append(random.choice(seeds))
    return "".join(random_str)
4)处理好图形验证码、短信验证码之后,接下来可以来完善注册相关的功能了。
1. forms.py:
import re
from django import forms
from django.core.exceptions import ValidationError
from django.core.cache import cache

from captcha.fields import CaptchaField


class RegisterFrom(forms.Form):
    """用户注册form表单"""
    mobile = forms.CharField(required=True,
                             max_length=11,
                             min_length=11,
                             error_messages={'min_length': '手机号只能是11位数!',
                                             'max_length': '手机号只能是11位数!'
                                             })
    username = forms.CharField(required=True,
                               max_length=20)
    # 生成验证码图片及输入框
    captcha = CaptchaField(required=True,
                           error_messages={'invalid': '验证码错误',
                                           'required': '验证码不能为空'})
    password1 = forms.CharField(required=True,
                                min_length=8,
                                error_messages={'required': '密码不能为空',
                                                'min_length': '密码不能低于8个字符'}
                                )
    password2 = forms.CharField(required=True,
                                min_length=8,
                                error_messages={'required': '密码不能为空'})
    sms_captcha = forms.CharField(min_length=4, max_length=4)

    def clean_password1(self):
        if self.cleaned_data.get('password1').isdigit() or self.cleaned_data.get('password1').isalpha():
            raise ValidationError('密码必须包含数字和字母')
        else:
            return self.cleaned_data['password1']

    def clean_mobile(self):
        mobile_re = re.compile(r'^(13[0-9]|15[012356789]|17[678]|18[0-9]|14[57])[0-9]{8}$')
        mobile_value = self.cleaned_data.get('mobile')
        if not mobile_re.match(mobile_value):
            raise ValidationError('手机号码格式错误')
        else:
            return self.cleaned_data['mobile']

    def clean_sms_captcha(self):
        """短信验证码存于cache中, 验证短信验证码是否正确"""
        mobile = self.cleaned_data.get('mobile')
        sms_captcha = self.cleaned_data.get('sms_captcha')
        cached_sms_captcha = cache.get(mobile)
        if not cached_sms_captcha or cached_sms_captcha != sms_captcha:
            raise ValidationError('短信验证码错误!')
        else:
            return self.cleaned_data['sms_captcha']

    def clean(self):
        cleaned_data = super(RegisterFrom, self).clean()
        if cleaned_data.get('password1') != cleaned_data.get('password2'):
            raise ValidationError('密码不一致')
        else:
            return self.cleaned_data
2. views.py:
from django.shortcuts import render, redirect, HttpResponse
from django.contrib.auth import authenticate, login, logout

from .forms import RegisterFrom
from users.models import UserProfile


def xfz_register(request):
    """注册"""
    if request.method == "POST":
        register_form = RegisterFrom(request.POST)
        if register_form.is_valid():
            mobile = request.POST.get('mobile', None)
            if UserProfile.objects.filter(mobile=mobile):
                # 用户已经存在,不需要再注册
                return render(request, 'register.html', {'msg': '用户已经存在', 'register_form': register_form})
            pwd = request.POST.get('password1', None)
            username = request.POST.get('username', None)
            # 将密码加密后再保存
            pwd = make_password(pwd)
            user = UserProfile.objects.create(
                mobile=mobile,
                username=username,
                is_active=True,
                password=pwd
            )
            login(request, user)
            return redirect('/index/')
        else:
            return render(request, 'register.html', {'msg': '注册输入的数据有误', 'register_form': register_form})
    else:
        register_form = RegisterFrom()
        return render(request, "register.html", locals())
3. urls.py:
from django.urls import path, include, re_path
from xfz.views import xfz_register


urlpatterns = [

    path("register/", xfz_register, name='auth_register'),

]
4. html:相关代码上面已经给出。
至此,注册的功能便完成了!
2.2、登录功能
1)users/models.py:
from django.db import models
from django.contrib.auth.models import AbstractUser
from datetime import datetime


class UserProfile(AbstractUser):
    """用户"""
    gender_choices = (
        ('male','男'),
        ('female','女')
    )

    nick_name = models.CharField('昵称', max_length=32, default='', null=True, blank=True)
    birthday = models.DateField('生日', null=True, blank=True)
    gender = models.CharField('性别', max_length=8, choices=gender_choices, default='female')
    mobile = models.CharField('手机号', max_length=11, null=True, unique=True)
    image = models.ImageField(upload_to='image/%Y/%m', default='image/default.png', max_length=100)
    email = models.EmailField('邮箱', blank=True, unique=True, null=True)  # 重写email字段,加上'唯一'标识

    REQUIRED_FIELDS = ['mobile', 'email']  # 通过manage.py...创建用户/管理员时,会提醒输入此字段(必输入)

    class Meta:
        verbose_name = '用户信息'
        verbose_name_plural = verbose_name

    def __str__(self):
        return self.username
2)form.py:
import re
from django import forms
from django.core.exceptions import ValidationError


class LoginForm(forms.Form,common_forms.FormMixin):
    """登录验证"""
    mobile = forms.CharField(required=True,
                             max_length=11,
                             min_length=11,
                             error_messages={'min_length': '手机号只能是11位数!',
                                             'max_length': '手机号只能是11位数!'
                                             })
    password = forms.CharField(required=True,
                               min_length=8,
                               error_messages={'min_length': '密码最少不能少于8个字符!'}
                               )
    remember = forms.IntegerField(required=False)
common_forms.py: 也可以像注册那样,直接在forms中写,不需要另外处理error
class FormMixin(object):
    """
    用于获取表单验证失败时的错误信息,存进字典里
    """
    def get_error(self):
        if hasattr(self, 'errors'):
            # 如果有errors这个属性
            errors = self.errors.get_json_data()
            new_errors = {}
            for key, message_dicts in errors.items():
                messages = []
                for message in message_dicts:
                    messages.append(message['message'])
                new_errors[key] = messages
            return new_errors
        else:
            return {}
3)views.py:
from django.db.models import Q
from django.shortcuts import render, redirect
from  django.contrib.auth.backends import ModelBackend
from django.contrib.auth import authenticate, login, logout
from django.contrib.auth.hashers import make_password


from .forms import LoginForm
from users.models import UserProfile


class CustomBackend(ModelBackend):
    """
    用于login用户登录验证
    需在settings中配置好authenticate验证方式(即在此进行authenticate的相关验证)
    """
    def authenticate(self, request, username=None, password=None, **kwargs):
        # 重写authenticate方法
        try:
            user = UserProfile.objects.get(Q(username=username)|Q(mobile=username))
            if user.check_password(password):
                """
                1.在注册时,我们对密码使用了加密处理(django下的make_password),因此在登录验证密码时需要先将明文密码加密
                后才能跟数据库中已加密后的密码进行比较
                2.check_password()是AbstractUser类中的方法,UserProfile继承于AbstractUser,check_password会加密明文密
                码后,与数据库密码做对比,再进行判断两密码是否一致
                3.验证如果为True,表示密码一致;为False,表示密码不一致
                """
                return user
            else:
                return None
        except Exception as e:
            return None


def xfz_login(request):
    """登录"""
    login_form = LoginForm()
    if request.method == 'POST':
        login_form = LoginForm(request.POST)
        if login_form.is_valid():
            mobile = login_form.cleaned_data.get('mobile')
            password = login_form.cleaned_data.get("password")
            remember = login_form.cleaned_data.get('remember')
            user = authenticate(request, username=mobile, password=password)
            if user:
                if user.is_active:
                    login(request, user)
                    if remember:
                        request.session.set_expiry(None)
                    else:
                        request.session.set_expiry(0)
                    return redirect('/news/')
                else:
                    return render(request, 'login.html', {'msg': '用户未激活', 'login_form': login_form})
            else:
                return render(request, 'login.html', {'msg': '用户名或密码错误', 'login_form': login_form})
        else:
            return render(request, 'login.html', {'msg': '用户名或密码格式错误,请重新输入!', 'login_form': login_form})

    return render(request, 'login.html')
4)login.html:
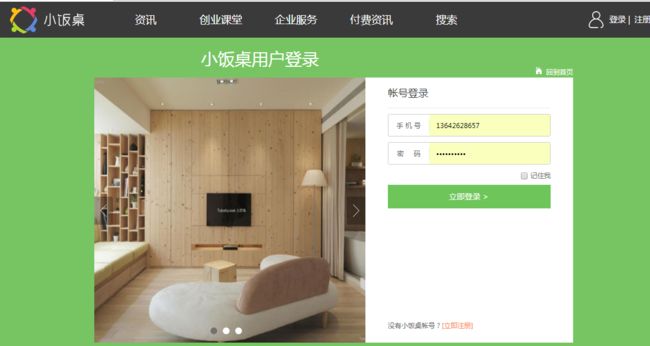
{% extends 'front_base.html' %}
{% block title %}小饭桌登录{% endblock %}
{% block front-css %}
"stylesheet" type="text/css" href="{% static 'css/news_auth/reset.min.css' %}">
"stylesheet" type="text/css" href="{% static 'css/news_auth/login.min.css' %}">
{% endblock %}
{% block front-js %}
{% endblock %}
{% block body %}
class="c-box bg-box">
class="login-box clearfix">
class="hd-login clearfix">
class="index-logo" href="{% url 'index' %}">
小饭桌用户登录
class="index-font" href="{% url 'index' %}">回到首页
class="fl slide">
class="imgslide">
class="unslider-arrow prev">
class="unslider-arrow next">
{% endblock %}
5)继承:front_base.html
"en"> "UTF-8">{% block title %}小饭桌{% endblock %} "stylesheet" href="{% static 'css/news/index.min.css' %}"> {% block front-css %}{% endblock %} {% block front-js %}{% endblock %}class="header"> {% block body %}class="container">class="nav">class="daohangtiao">
- if request.path|slice:'5' == '/news' %}class="active"{% endif %} >"{% url 'index' %}">资讯
- if request.path|slice:'8' == '/courses' %}class="active"{% endif %} >class="chuangyeketang" href="{% url 'course' %}">创业课堂
- class="qiyefuwu" href="#">企业服务
- if request.path|slice:'8' == '/payinfo' %}class="active"{% endif %} >"{% url 'payinfo' %}">付费资讯
- if request.path|slice:'7' == '/search' %}class="active"{% endif %} >"{% url 'search' %}">搜索
class="auth-box"> {% if request.user.is_authenticated%}class="auth-login">class="personal">class="user">class="current-user">{{ request.user }}
class="top-down">"{% static 'images/auth/top_down.png' %}"/> class="touxiang">
"45" height="45" src="{{ MEDIA_URL }}{{ request.user.image }}"/>
class="userdetail">{% else %}class="personal-info">"60" height="60" src="{{ MEDIA_URL }}{{ request.user.image }}"/>
class="user-info">{{ request.user }}
{{ request.user.nick_name }}111
class="personal-center"> class="personcenter" href="#">进入个人中心 class="fr" href="{% url 'auth_logout' %}">退出class="personal-p">
{% endif %}class="main">{% endblock %}class="wrapper"> {% block left-content %}class="main-content-wrapper">{% endblock %} {% block right-wrapper %}class="banner-group" id="banner-group">class="banner-ul" id="banner-ul">
class="left-btn btn">‹ class="right-btn btn">›- "#">
"{% static 'images/banners/lunbo_2.jpeg' %}" alt="">
- "#">
"{% static 'images/banners/lunbo_3.jpg' %}" alt="">
- "#">
"{% static 'images/banners/lunbo_4.jpg' %}" alt="">
- "#">
"{% static 'images/banners/lunbo_5.png' %}" alt="">
class="news-list-group">class="news-inner">class="news-list">
"http://static-image.xfz.cn/1516169692_914.jpg-website.news.list" alt="">
class="news-group">class="title"> "#">王健林卖掉进军海外首个项目:17亿售伦敦ONE六成股权
class="desc"> 外界关于万达要出售此前在海外投资项目的消息一直不断。
class="more"> class="category">深度报道 class="pub-time">1小时前 class="author">知了课堂
"http://static-image.xfz.cn/1516169692_914.jpg-website.news.list" alt="">
class="news-group">class="title"> "#">王健林卖掉进军海外首个项目:17亿售伦敦ONE六成股权
class="desc"> 外界关于万达要出售此前在海外投资项目的消息一直不断。
class="more"> class="category">深度报道 class="pub-time">1小时前 class="author">知了课堂
class="load-more-group">class="sidebar-wrapper">{% endblock %}class="platform-group">class="online-class"> class="class-title">关注小饭桌class="focus-group">class="left-group">
- class="zhihu"> "#" target="_blank">小饭桌创业课堂
- class="weibo"> "#" target="_blank">小饭桌创业课堂
- class="toutiao"> "#" target="_blank">小饭桌
class="right-group">class="desc">扫码关注小饭桌微信公众平台xfz008
class="hot-news-group">class="online-class"> class="class-title">热门推荐class="hot-list-group">
class="title"> "#">王健林卖掉进军海外首个项目:17亿售伦敦ON...
class="more"> class="category">"#">深度报道 class="pub-time">1小时前
class="title"> "#">王健林卖掉进军海外首个项目:17亿售伦敦ON...
class="more"> class="category">"#">深度报道 class="pub-time">1小时前
6)urls.py:
from django.urls import path,include, re_path
from xfz.views import xfz_logout


urlpatterns = [

    path("login/", xfz_login, name='auth_login'),

]
2.3、退出登录功能
退出登录功能比较简单,只需要views.py 及 urls.py相关代码处理即可,如下
1. views.py:
from django.contrib.auth import logout

def xfz_logout(request):
    logout(request)
    return render(request, 'news/index.html')
2. urls.py:
from django.urls import path, include, re_path
from xfz.views import xfz_logout


urlpatterns = [

    path("logout/", xfz_logout, name='auth_logout'),

]
至此,小饭桌登录及注册相关的功能实现到这就算完成了!


