SpringBoot源码解析(十九)启动内置tomcat
SpringBoot最初开始流行的时候,一个很重要的区别就是,我们不需要单独配置tomcat了,在传统的SSM项目中,我们要为项目指定tomcat目录,开发完上线的时候,要把项目打成一个war包,部署到tomcat中,而SpringBoot已经默认为我们的web项目内置了一个tomcat
这个内置tomcat的启动流程,也在容器的refresh方法中,其中有个onRefresh的方法调用
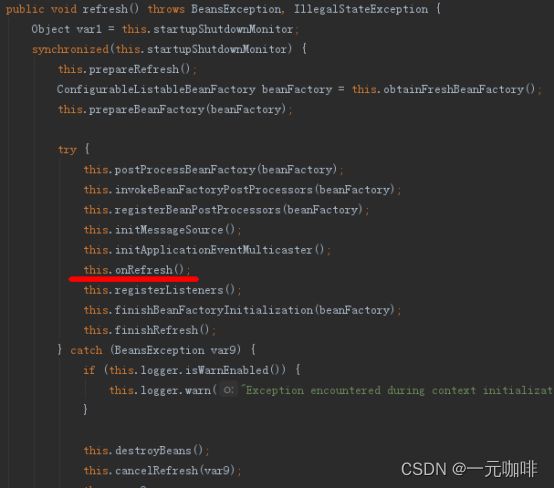
在个方法定义在父类AbstractApplicationContext中,是一个空方法
    protected void onRefresh() throws BeansException {
    }
在传统比较常用的Spring容器中,比如AnnotationConfigApplicationContext,并没有重写这个方法,依然是一个空实现,而SpringBoot的容器重写了这个方法,在其中完成了内置tomcat的启动
我们先点进去看下有哪些子类对这个方法做了重写

之前分析过,默认情况下,SpringBoot启动的容器是AnnotationConfigServletWebServerApplicationContext,而这里的ServletWebServerApplicationContext就是其父类,所以我们进入这个类中查看onRefresh方法的实现
    protected void onRefresh() {
        super.onRefresh();

        try {
            this.createWebServer();
        } catch (Throwable var2) {
            throw new ApplicationContextException("Unable to start web server", var2);
        }
    }
先调用了父类的onRefresh方法
    protected void onRefresh() {
        this.themeSource = UiApplicationContextUtils.initThemeSource(this);
    }
initThemeSource主要是初始化了web项目的UI主题,它检查了容器中是否存在名为themeSource的Bean,如果不存在的话,就初始化一个ResourceBundleThemeSource
如果项目用了一些模板引擎像thymeleaf或freemarker等,可以通过设置ThemeSource,配合视图解析器调整UI风格,这个东西基本是没什么人使用的,毕竟现在前端的UI框架太多了,而且大多项目都做了前后分离,Spring自带的这种针对UI的组件,基本可以忽略不计了,所以我们主要关注下面的createWebServer方法
    private void createWebServer() {
        WebServer webServer = this.webServer;
        ServletContext servletContext = this.getServletContext();
        if (webServer == null && servletContext == null) {
            ServletWebServerFactory factory = this.getWebServerFactory();
            this.webServer = factory.getWebServer(new ServletContextInitializer[]{this.getSelfInitializer()});
        } else if (servletContext != null) {
            try {
                this.getSelfInitializer().onStartup(servletContext);
            } catch (ServletException var4) {
                throw new ApplicationContextException("Cannot initialize servlet context", var4);
            }
        }

        this.initPropertySources();
    }
正常情况代码初始化走到这里,servlet容器还是空的,会进入第一个分支,尝试获取一个ServletWebServerFactory,然后由它来创建一个servlet容器
进入getWebServerFactory方法
    protected ServletWebServerFactory getWebServerFactory() {
        String[] beanNames = this.getBeanFactory().getBeanNamesForType(ServletWebServerFactory.class);
        if (beanNames.length == 0) {
            throw new ApplicationContextException("Unable to start ServletWebServerApplicationContext due to missing ServletWebServerFactory bean.");
        } else if (beanNames.length > 1) {
            throw new ApplicationContextException("Unable to start ServletWebServerApplicationContext due to multiple ServletWebServerFactory beans : " + StringUtils.arrayToCommaDelimitedString(beanNames));
        } else {
            return (ServletWebServerFactory)this.getBeanFactory().getBean(beanNames[0], ServletWebServerFactory.class);
        }
    }
它尝试从容器中获取ServletWebServerFactory类型的Bean,当我们在pom文件里引入了spring-boot-starter-web依赖后,这里就可以找到一个TomcatServletWebServerFactory,至于这个bean怎么来的,我们后面再分析

同时在这个bean初始化的时候,它会被一个名为WebServerFactoryCustomizerBeanPostProcessor的BeanPostProcessor处理,将配置文件中的server.port绑定给它,也就是在这个Bean初始化的时候就完成了端口绑定
有了这个webServerFactory后,继续调用其getWebServer方法
可以看到这个ServletWebServerFactory是一个接口,除了tomcat的实现外,还有其他常用Servet容器如jetty的实现,可以调整pom依赖切换为jetty容器,默认情况下SpringBoot使用的是tomcat容器,正如上面的beanNames中只有一个tomcatServletWebServerFactory
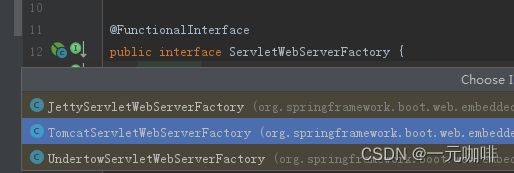
所以进入tomcatServletWebServerFactory这个实现类中
    public WebServer getWebServer(ServletContextInitializer... initializers) {
        Tomcat tomcat = new Tomcat();
        File baseDir = this.baseDirectory != null ? this.baseDirectory : this.createTempDir("tomcat");
        tomcat.setBaseDir(baseDir.getAbsolutePath());
        Connector connector = new Connector(this.protocol);
        tomcat.getService().addConnector(connector);
        this.customizeConnector(connector);
        tomcat.setConnector(connector);
        tomcat.getHost().setAutoDeploy(false);
        this.configureEngine(tomcat.getEngine());
        Iterator var5 = this.additionalTomcatConnectors.iterator();

        while(var5.hasNext()) {
            Connector additionalConnector = (Connector)var5.next();
            tomcat.getService().addConnector(additionalConnector);
        }

        this.prepareContext(tomcat.getHost(), initializers);
        return this.getTomcatWebServer(tomcat);
    }
可以看到这个方法new了一个Tocmat,并完成了一些初始化配置
最后调用getTomcatWebServer,创建webServer实例
    protected TomcatWebServer getTomcatWebServer(Tomcat tomcat) {
        return new TomcatWebServer(tomcat, this.getPort() >= 0);
    }
进入构造方法
    public TomcatWebServer(Tomcat tomcat, boolean autoStart) {
        this.monitor = new Object();
        this.serviceConnectors = new HashMap();
        Assert.notNull(tomcat, "Tomcat Server must not be null");
        this.tomcat = tomcat;
        this.autoStart = autoStart;
        this.initialize();
    }
将创建好的tomcat赋给webServer后,最后调用了初始化方法initialize
private void initialize() throws WebServerException {
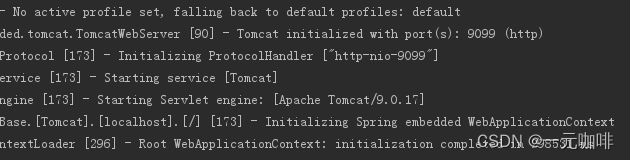
logger.info("Tomcat initialized with port(s): " + this.getPortsDescription(false));
Object var1 = this.monitor;
synchronized(this.monitor) {
try {
this.addInstanceIdToEngineName();
Context context = this.findContext();
context.addLifecycleListener((event) -> {
if (context.equals(event.getSource()) && "start".equals(event.getType())) {
this.removeServiceConnectors();
}
});
this.tomcat.start();
this.rethrowDeferredStartupExceptions();
try {
ContextBindings.bindClassLoader(context, context.getNamingToken(), this.getClass().getClassLoader());
} catch (NamingException var5) {
;
}
this.startDaemonAwaitThread();
} catch (Exception var6) {
this.stopSilently();
throw new WebServerException("Unable to start embedded Tomcat", var6);
}
}
}
我们在这个initialize方法中,找到了一行代码:this.tomcat.start()
也就是到这里,SpringBoot内置的tomcat就启动起来了,日志里也会打印tomcat启动的相关信息
在整个流程中,非常关键的一步就是spring要从容器中根据ServletWebServerFactory类型,找到TomcatServletWebServerFactory的实现,那么接下来,我们就分析下这个类是怎么进入容器的
我们上篇文章分析过SpringBoot自动装配的原理了,它到classpath下的META-INF/spring.factories中找到了一系列的EnableAutoConfiguration的配置类,配合条件注解完成了装配,其中在spring-boot-autoconfigure的文件中,配置了一个类ServletWebServerFactoryAutoConfiguration

@Configuration
@AutoConfigureOrder(-2147483648)
@ConditionalOnClass({ServletRequest.class})
@ConditionalOnWebApplication(
    type = Type.SERVLET
)
@EnableConfigurationProperties({ServerProperties.class})
@Import({ServletWebServerFactoryAutoConfiguration.BeanPostProcessorsRegistrar.class, EmbeddedTomcat.class, EmbeddedJetty.class, EmbeddedUndertow.class})
public class ServletWebServerFactoryAutoConfiguration {
	......
	......
}
这个类通过Import导入了EmbeddedTomcat,同时还有其他内嵌servlet容器如EmbeddedJetty,我们看下EmbeddedTomcat的实现
    @Configuration
    @ConditionalOnClass({Servlet.class, Tomcat.class, UpgradeProtocol.class})
    @ConditionalOnMissingBean(
        value = {ServletWebServerFactory.class},
        search = SearchStrategy.CURRENT
    )
    public static class EmbeddedTomcat {
        public EmbeddedTomcat() {
        }

        @Bean
        public TomcatServletWebServerFactory tomcatServletWebServerFactory() {
            return new TomcatServletWebServerFactory();
        }
    }
若项目中存在Tomcat的class,且此时容器中还没有注入ServletWebServerFactory,就会向容器注入一个TomcatServletWebServerFactory的实现
一般我们SpringBoot项目要提供web服务,都会导入web的starter
    <dependency>
        <groupId>org.springframework.boot</groupId>
        <artifactId>spring-boot-starter-web</artifactId>
    </dependency>
我们点进去这个依赖的内部,它又引入了tomcat的starter
    <dependency>
      <groupId>org.springframework.boot</groupId>
      <artifactId>spring-boot-starter-tomcat</artifactId>
      <version>2.1.4.RELEASE</version>
      <scope>compile</scope>
    </dependency>
从而将Tomcat类引入到项目中,满足了EmbeddedTomcat的条件,向容器注入了TomcatServletWebServerFactory,然后就像上面分析的流程,在spring容器refresh的过程中,启动内置的tomcat提供web服务