1. Bootstrap介绍
1.1 简介
Bootstrap: 是一个开源的前端框架, 它提供了一套用于快速构建网页和Web应用程序的CSS和JavaScript组件.
它由Twitter开发并在2011年首次发布, Bootstrap的目标是使网页开发变得更加简单, 快速和一致.

Bootstrap提供了丰富的CSS样式和预定义的CSS类, 使得开发者可以轻松地创建各种常见的网页元素和布局, 例如: 按钮, 导航栏, 表格, 表单等.
它还提供了灵活的响应式网格系统, 使得网页可以自动适应不同的屏幕尺寸和设备类型.

此外, Bootstrap还包含一系列的JavaScript插件, 用于实现一些常见的交互功能, 如轮播图, 模态框,下拉菜单等.
这些插件可以通过简单的HTML标记和CSS类来使用, 无需编写复杂的JavaScript代码.

使用Bootstrap可以极大地提高网页开发的效率和一致性, 因为它提供了一套标准化的样式和组件, 可以减少开发者的样式调整和兼容性问题.
1.2 优点
Bootstrap具有以下几个主要的优点:

* 1. 快速开发: Bootstrap提供了一整套预定义的CSS样式和组件, 让开发者能够快速构建网页和Web应用程序.
     通过使用预定义的类, 开发者可以轻松地创建各种常见的元素和布局, 无需从头编写样式.

* 2. 响应式设计: Bootstrap具有强大的响应式设计能力, 可以自动适应不同的屏幕尺寸和设备类型.
     使用Bootstrap的响应式网格系统, 开发者可以轻松地构建出适配各种屏幕大小的布局, 保证用户在不同设备上都能够获得良好的体验.

* 3. 统一的设计风格: Bootstrap拥有一套标准化的样式和组件, 使得不同的页面和应用程序可以具备一致的外观和交互风格.
     这有助于提升用户体验, 并减少开发者在样式调整上的工作量.

* 4. 兼容性良好: Bootstrap经过充分的测试和优化, 以确保在各种主流浏览器和设备上都能够正常运行.
     这意味着开发者可以放心地使用Bootstrap来构建网页, 而不需要过多考虑兼容性问题.

* 5. 社区支持: Bootstrap拥有庞大的开发者社区, 有许多开发者积极贡献并分享自己的经验和资源.
     这使得开发者可以通过查找文档, 教程和示例来解决问题, 加快开发过程.

总的来说, Bootstrap是一个易于使用, 快速开发和具有响应式设计能力的前端框架,
它能够帮助开发者构建出漂亮, 一致性和兼容性良好的网页和Web应用程序.
1.3 版本
以下是自Bootstrap发布以来每个版本的简要介绍:
* 1. Bootstrap 1 (2011年): 这是最初的Bootstrap版本.
     提供了基本的网格系统, CSS样式和JavaScript插件, 用于快速构建响应式网页.

* 2. Bootstrap 2 (2012年): 在第二个版本中.
     Bootstrap加入了更多的组件和工具, 包括导航, 标签页, 按钮等, 为开发者提供了更多的选择和功能.

* 3. Bootstrap 3 (2013年): Bootstrap 3进行了重大改进, 引入了响应式设计和移动优先原则, 使得网页能够更好地适应不同尺寸的设备.
     此外, 引入了Sass预处理器, 使定制更加灵活.

* 4. Bootstrap 4 (2018年): 这是一个重大的更新, Bootstrap 4完全重写了代码,
    引入了Flexbox作为默认的布局工具,  以更好地实现灵活的网页排版.
    同时, 更新了各种组件和插件, 提供了更好的定制选项.

* 5. Bootstrap 5 (2020年): Bootstrap 5继续建立在Bootstrap 4的基础上, 以更小的文件大小和更好的性能为目标进行了优化.
     它移除了对jQuery的依赖, 并引入了一些新的CSS样式类.
     此外, 引入了一些新的组件和改进的网格系统, 以适应移动优先的设计.
目前, Bootstrap的最新版本是Bootstrap 5, 以下是该版本的介绍:
* 1. 移除jQuery依赖: Bootstrap 5移除了对jQuery的依赖, 改用纯JavaScript实现.
     这意味着开发者不再需要额外引入jQuery库即可使用Bootstrap.

* 2. 更小的文件大小: Bootstrap 5优化了代码结构, 使得整个框架的文件大小更小.
     这有助于提升网页的加载速度和性能.

* 3. 新的CSS样式类: Bootstrap 5引入了一些新的CSS样式类, 如'rounded'用于添加圆角样式, 'overflow-auto'用于自动添加滚动条等.
     这些样式类使得开发者能够更方便地为元素应用常见的样式效果.

* 4. 更新的网格系统: Bootstrap 5继续使用了响应式网格系统, 但进行了一些改进.
     其中包括新增的网格间距工具类, 更灵活的列宽定义和更好的混合使用网格和Flexbox等.

* 5. 移动优先设计: Bootstrap一直以移动优先的自适应设计为特色, Bootstrap 5进一步强化了这一特点.
     通过使用新的断点和CSS类, 开发者可以更简单地创建在不同屏幕尺寸上优雅适配的网页和应用程序.
     (注: 其核心理念是首先关注并优化移动设备上的用户体验, 然后逐步适配更大屏幕尺寸的设备.)

* 6. 升级文档和工具: Bootstrap 5重新调整了官方文档的结构和内容, 以更好地满足开发者的需求.
     此外, 还提供了更新的工具和样式定制选项, 使得开发者能够更灵活地定制和构建自己的Bootstrap项目.
1.4 使用方式
1.4.1 CDN引用
使用CDN方式引用Bootstrap5, 国内推荐使用Staticfile CDN上的库:
<link rel="stylesheet" href="https://cdn.staticfile.org/twitter-bootstrap/5.1.1/css/bootstrap.min.css">


<script src="https://cdn.staticfile.org/popper.js/2.9.3/umd/popper.min.js">script>


<script src="https://cdn.staticfile.org/twitter-bootstrap/5.1.1/js/bootstrap.min.js">script>
1.4.2 本地引用
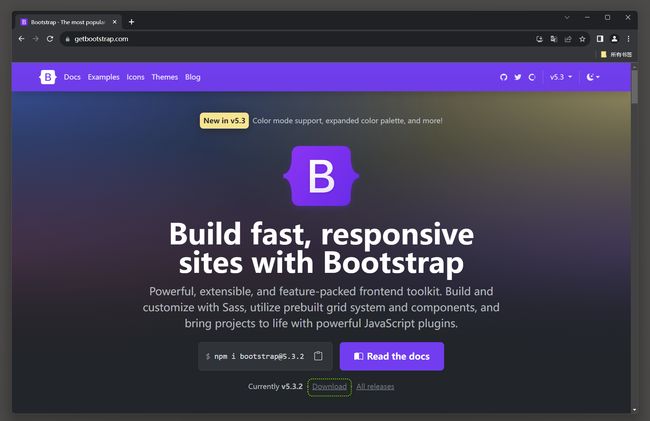
* 1. 打开bootstrap官网: getbootstrap.com .
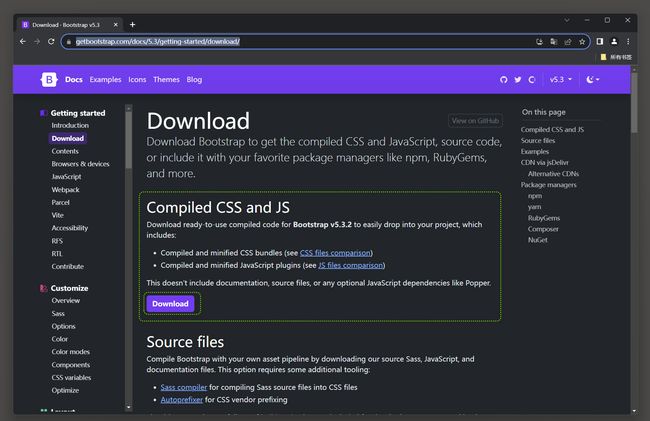
* 2. 下载编译好的CSS和JS.
* 3. 下载后, 解压缩压缩文件夹.

文件结构示例:
bootstrap/
    ├── css/
    │   ├── bootstrap-grid.css
    │   ├── bootstrap-grid.css.map
    │   ├── bootstrap-grid.min.css
    │   ├── bootstrap-grid.min.css.map
    │   ├── bootstrap-grid.rtl.css
    │   ├── bootstrap-grid.rtl.css.map
    │   ├── bootstrap-grid.rtl.min.css
    │   ├── bootstrap-grid.rtl.min.css.map
    │   ├── bootstrap-reboot.css
    │   ├── bootstrap-reboot.css.map
    │   ├── bootstrap-reboot.min.css
    │   ├── bootstrap-reboot.min.css.map
    │   ├── bootstrap-reboot.rtl.css
    │   ├── bootstrap-reboot.rtl.css.map
    │   ├── bootstrap-reboot.rtl.min.css
    │   ├── bootstrap-reboot.rtl.min.css.map
    │   ├── bootstrap-utilities.css
    │   ├── bootstrap-utilities.css.map
    │   ├── bootstrap-utilities.min.css
    │   ├── bootstrap-utilities.min.css.map
    │   ├── bootstrap-utilities.rtl.css
    │   ├── bootstrap-utilities.rtl.css.map
    │   ├── bootstrap-utilities.rtl.min.css
    │   ├── bootstrap-utilities.rtl.min.css.map
    │   ├── bootstrap.css
    │   ├── bootstrap.css.map
    │   ├── bootstrap.min.css
    │   ├── bootstrap.min.css.map
    │   ├── bootstrap.rtl.css
    │   ├── bootstrap.rtl.css.map
    │   ├── bootstrap.rtl.min.css
    │   └── bootstrap.rtl.min.css.map
    └── js/
    ├── bootstrap.bundle.js
    ├── bootstrap.bundle.js.map
    ├── bootstrap.bundle.min.js
    ├── bootstrap.bundle.min.js.map
    ├── bootstrap.esm.js
    ├── bootstrap.esm.js.map
    ├── bootstrap.esm.min.js
    ├── bootstrap.esm.min.js.map
    ├── bootstrap.js
    ├── bootstrap.js.map
    ├── bootstrap.min.js
    └── bootstrap.min.js.map
* 4. 在html中的<head>标签中添加CSS与JS的引用.
     请确保将'path'替换为你解压缩的Bootstrap文件夹的正确路径, 以确保正确引用这些文件.
<link rel="stylesheet" href="path/css/bootstrap.min.css">

<script src="path/js/bootstrap.min.js">script>
完成以上步骤后, HTML文件将能够使用Bootstrap框架提供的样式和功能.
可以在文档中的其他元素中使用Bootstrap的CSS类和JavaScript组件, 来构建响应式和美观的网页.
2.Bootstrap页面
2.1 doctype声明
Bootstrap要求使用HTML5文件类型, 所以需要添加HTML5 doctype声明.
HTML5 doctype在文档头部声明, 并设置对应编码:
DOCTYPE html>
<html>
  <head>
    <meta charset="utf-8">
  head>
html>
2.2 移动设备优先
<meta>标签是HTML中的一个元数据标签, 用于描述和提供关于文档(网页)的元信息(元数据).
它不会直接显示在页面上, 而是用于给浏览器和搜索引擎提供有关网页的信息.

<meta>标签常见的用途和作用:
* 1. 指定字符编码: 通过 <meta charset="编码方式">, 指定网页使用的字符编码方式, 以确保正确显示特殊字符和语言.

* 2. 定义视口设置: 通过 <meta name="viewport" content="参数值">, 设置网页在移动设备上的可视区域和缩放行为,
     以实现响应式设计和适配移动设备的展示效果.
...
为了确保使用Bootstrap开发的网站在移动设备上具有友好的展示效果和良好的交互体验,
需要在网页的<meta>标签中添加name属性与content属性, 用于指定网页在移动设备上的可视区域和缩放行为.
* 这是适用于响应式网页设计的重要标签之一.

<meta>用作定义视口设置时的参数说明:
* 1. name属性: 用于指定元数据的名称.
     属性值为"viewport", 作用是告诉浏览器这个<meta>标签的用途是定义网页的视口设置.
     这样浏览器就会根据该标签的内容来正确渲染和显示网页.

* 2. content属性: 用于定义移动设备上网页的可视区域和缩放行为的参数值, 例如:
     width=device-width: 将可视区域的宽度设置为设备的宽度, 使网页能够根据设备屏幕自动适应.
     initial-scale=1: 设置初始缩放比例为1, 确保加载页面时不进行缩放.
<meta charset="utf-8" name="viewport" content="width=device-width, initial-scale=1">
3. 响应式容器
响应式(Responsive)指的是一种网页设计和开发的方法, 使网站能够自适应不同屏幕尺寸和设备类型, 以提供更好的用户体验.
通过响应式设计, 网页能够根据访问设备的屏幕大小和分辨率进行动态布局和调整,
以适应不同的显示环境, 包括桌面电脑, 笔记本电脑, 平板电脑和手机等.

响应式设计的目标是确保网页在不同屏幕尺寸和设备上都能够提供最佳的用户体验.
具体而言, 响应式设计包括以下几个关键方面:
* 1. 弹性布局: 响应式设计使用弹性的网格系统和相对单位(例如百分比)来实现灵活的布局.
     网页元素的大小和位置可以根据屏幕尺寸的变化而自动调整.

* 2. 媒体查询: 通过使用CSS的媒体查询功能, 可以根据屏幕宽度和其他条件来应用不同的样式规则.
     这样可以根据屏幕特性提供不同的布局和样式, 以适应不同设备.

* 3. 图片和媒体自适应: 响应式设计中, 图片和媒体元素(如视频和音频)可以使用CSS或JavaScript来自适应不同的屏幕尺寸.
     通常会使用自适应图片或响应式媒体插件来实现这一功能.

* 4. 移动优先设计: 响应式设计的一种方法是从移动设备开始设计, 然后逐渐适配更大的屏幕.
     这种设计方法确保网页在小屏幕上有良好的可用性和可读性, 并逐渐添加更复杂的布局和功能以适应更大的屏幕.

响应式设计的优点包括提供一致的用户体验, 减少维护工作, 提高页面加载速度和支持多种设备及未来的设备.
它能够使网站适应不断变化的设备和屏幕尺寸, 并确保用户在任何设备上都能够获得最佳的访问体验.

响应式容器(Responsive container): 指的是可以根据屏幕尺寸自适应调整宽度的容器.
Bootstrap 5 需要一个容器元素来包裹网站的内容.
常用的两个容器类:
* 1. .container: 用于创建一个固定宽度的容器.
     作用是为容器元素设置一个最大宽度, 并在屏幕宽度变大时居中对齐.

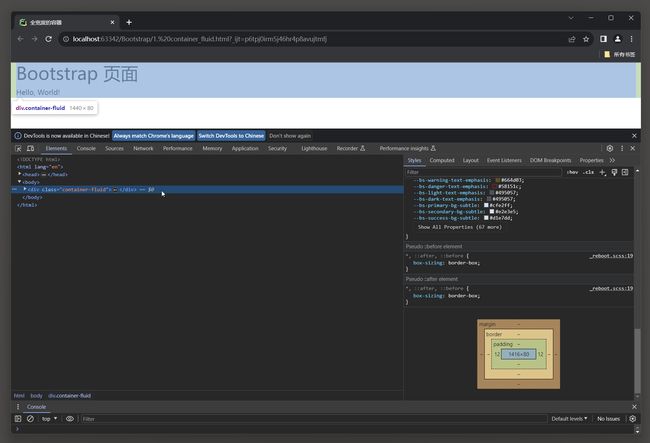
* 2. .container-fluid: 用于创建一个全宽度的容器(类用于100%宽度, 占据全部视口(viewport)的容器).
     作用是使容器元素的宽度铺满整个屏幕.

3.1 固定宽度容器
DOCTYPE html>
<html lang="en">
<head>
    <meta charset="utf-8">
    <meta name="viewport" content="width=device-width, initial-scale=1">
    <title>固定宽度的容器title>
    <link href="bootstrap-5.3.2-dist/css/bootstrap.min.css" rel="stylesheet">
    <script src="bootstrap-5.3.2-dist/js/bootstrap.bundle.min.js">script>
head>
<body>
<div class="container">
    <h1>Bootstrap 页面h1>
    <p>Hello, World!p>
div>
body>
html>
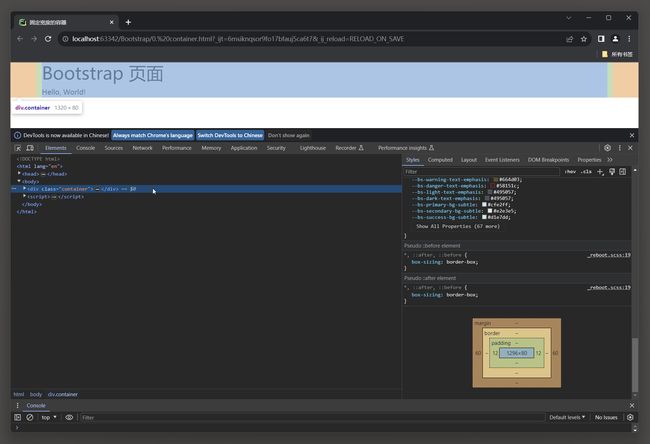
注意: 宽度(max-width)会根据屏幕宽度同比例放大或缩小.
| 屏幕尺寸 |
超级小屏幕 <576px |
小屏幕 ≥576px |
中等屏幕 ≥768px |
大屏幕 ≥992px |
特大屏幕 ≥1200px |
超级大屏幕 ≥1400px |
| max-width |
100% |
540px |
720px |
960px |
1140px |
1320px |
3.2 全宽度的容器
DOCTYPE html>
<html lang="en">
<head>
    <meta charset="utf-8">
    <meta name="viewport" content="width=device-width, initial-scale=1">
    <title>全宽度的容器title>
    <link href="bootstrap-5.3.2-dist/css/bootstrap.min.css" rel="stylesheet">
    <script src="bootstrap-5.3.2-dist/js/bootstrap.bundle.min.js">script>
head>
<body>
<div class="container-fluid">
    <h1>Bootstrap 页面h1>
    <p>Hello, World!p>
div>
body>
html>
容器始终跨越整个屏幕宽度(width 始终为 100%).
3.3 其他容器类型
其他类型容器类:
* 1. .container-sm: 这是针对小屏幕的容器模式.
     它在小屏幕设备(如手机)上设置容器的宽度, 并在其他屏幕大小上保持默认.

* 2. .container-md: 这是针对中等屏幕的容器模式.
     它在中等屏幕设备(如平板电脑)上设置容器的宽度,并在其他屏幕大小上保持默认.

* 3. .container-lg: 这是针对大屏幕的容器模式.
     它在大屏幕设备上(如台式机显示器)设置容器的宽度, 并在其他屏幕大小上保持默认.

* 4. .container-xl: 这是针对特大屏幕的容器模式.
     它在特大屏幕设备上设置容器的宽度, 并在其他屏幕大小上保持默认.
| Class |
超小屏幕 <576px |
小屏幕 ≥576px |
中等屏幕 ≥768px |
大屏幕 ≥992px |
特大屏幕 ≥1200px |
超级大屏幕 ≥1400px |
| .container-sm |
100% |
540px |
720px |
960px |
1140px |
1320px |
| .container-md |
100% |
100% |
720px |
960px |
1140px |
1320px |
| .container-lg |
100% |
100% |
100% |
960px |
1140px |
1320px |
| .container-xl |
100% |
100% |
100% |
100% |
1140px |
1320px |
| .container-xxl |
100% |
100% |
100% |
100% |
100% |
1320px |
3.4 容器边距
3.4.1 内边距
在Bootstrap中, 可以使用内置的内边距类来设置容器的内边距.
这些类名以p开头, 后跟一个数字(0 到 5)来表示内边距的大小.

p-*:  为元素的四个边添加相同大小的内边距.
px-*: 设置水平方向(左右)的内边距.
py-*: 设置垂直方向(上下)的内边距.
pt-*: 设置顶部(上方)内边距.
pb-*: 设置底部(下方)内边距.
其中, * 可以是数字0到5, 表示内边距的大小, 数字越大, 内边距越大.
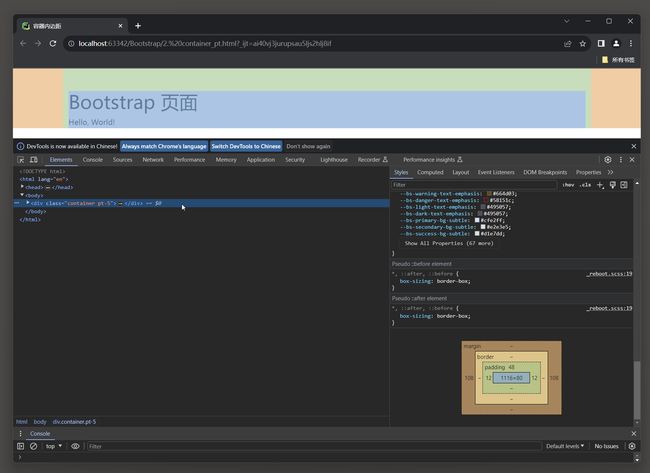
默认情况下, 容器都有填充左右内边距, 顶部和底部没有填充内边距.
Bootstrap提供了一些间距类用于填充边距, 例如: '.pt-1 ~ .pt-5'用于填充顶部内边距.
DOCTYPE html>
<html lang="en">
<head>
    <meta charset="utf-8">
    <meta name="viewport" content="width=device-width, initial-scale=1">
    <title>容器内边距title>
    <link href="bootstrap-5.3.2-dist/css/bootstrap.min.css" rel="stylesheet">
    <script src="bootstrap-5.3.2-dist/js/bootstrap.bundle.min.js">script>
head>
<body>
<div class="container pt-5">
    <h1>Bootstrap 页面h1>
    <p>Hello, World!p>
div>
body>
html>
3.4.2 外边距
在Bootstrap中, 可以使用内置的外边距类来设置容器的外边距.
这些类名以m开头, 后跟一个数字(0 到 5)表示外边距的大小.

m-*:  表示为元素的四个边添加相同大小的外边距.
mx-*: 表示在水平方向(左右)上添加外边距.
my-*: 表示在垂直方向(上下)上添加外边距.
mt-*: 表示在顶部(上方)添加外边距.
mb-*: 表示在底部(下方)添加外边距.
其中, 数字表示外边距的大小, 数字越大, 外边距越大.
外边距在下一小节示例中使用(有了边框能直观感受外边距的变化).
3.5 容器的边框和背景颜色
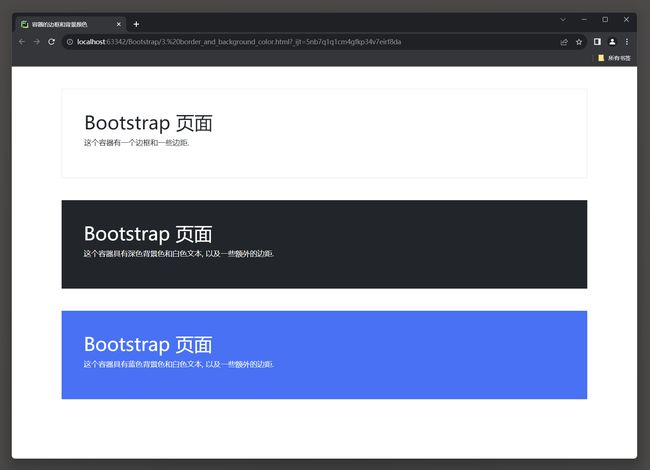
Bootstrap提供了一些边框(border)和颜色(bg-*)类, 用于快速设置容器的样式.

下面是一些常见的类名和用法:
* 1. 边框类(Border Classes):
     - .border: (必须)添加一个默认的边框样式.
     - .border-{width}: 为边框指定不同的宽度大小, 其中{width}可以是1, 2, 3, 4或5, 分别代表不同的像素边框宽度.
     - .border-*:例如: .border-primary, 使用指定颜色(primary)设置边框样式.
     - .border-{side}: 为指定的边添加边框样式, 其中{side}可以是 top, bottom, left或right.
     - .rounded: 为容器添加圆角边框样式.
     - .rounded-*: 例如: .rounded-circle, 为容器添加指定形状的圆角边框, 比如圆形.


* 2. 背景色类(Background Color Classes):
     - .bg-*: 设置容器的背景色.
     以下是一些常见的背景颜色示例:
     bg-primary: 使用主要的背景颜色.
     bg-secondary: 使用次要的背景颜色.
     bg-success: 使用成功的背景颜色.
     bg-info: 使用信息的背景颜色.
     bg-warning: 使用警告的背景颜色.
     bg-danger: 使用危险的背景颜色.
     bg-light: 使用浅色的背景颜色.
     bg-dark: 使用深色的背景颜色.

这些类可以用于设置容器的边框样式和背景色, 使页面元素更加丰富和吸引人.
DOCTYPE html>
<html lang="en">
<head>
    <meta charset="UTF-8">
    <meta name="viewport" content="width=device-width, initial-scale=1">
    <title>容器的边框和背景颜色title>
    <link href="bootstrap-5.3.2-dist/css/bootstrap.min.css" rel="stylesheet">
    <script src="bootstrap-5.3.2-dist/js/bootstrap.bundle.min.js">script>
head>
<body>


<div class="container p-5 my-5 border">
    <h1>Bootstrap 页面h1>
    <p>这个容器有一个边框和一些边距.p>
div>


<div class="container p-5 my-5 bg-dark text-white">
    <h1>Bootstrap 页面h1>
    <p>这个容器具有深色背景色和白色文本, 以及一些额外的边距.p>
div>

<div class="container p-5 my-5 bg-primary text-white">
    <h1>Bootstrap 页面h1>
    <p>这个容器具有蓝色背景色和白色文本, 以及一些额外的边距.p>
div>
body>
html>
4. 网格系统
4.1 网格系统介绍
网格系统: 是一种快速, 灵活和响应式的布局方法, 可以帮助开发者在不同屏幕尺寸下创建自适应的网页布局.

Bootstrap的网格系统基于响应式设计原则, 将页面布局划分为12列.
开发者可以通过在HTML标记中使用预定义的CSS类来指定每个元素应该占据多少列.
通过这种方式, 可以轻松地创建自适应的网页布局.

4.2 网络系统类
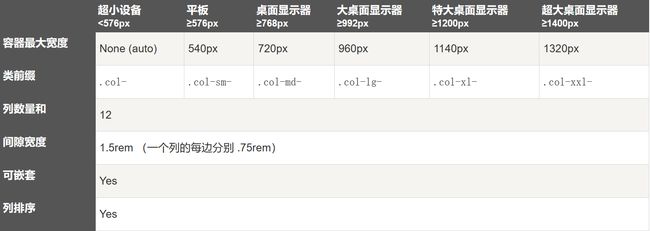
Bootstrap5 网格系统有以下6个类:
- .col-x:     针对所有设备.
- .col-sm-x:  平板 - 屏幕宽度等于或大于576px.
- .col-md-x:  桌面显示器 - 屏幕宽度等于或大于768px.
- .col-lg-x:  大桌面显示器 - 屏幕宽度等于或大于992px.
- .col-xl-x:  特大桌面显示器 - 屏幕宽度等于或大于1200px.
- .col-xxl-x: 超大桌面显示器 - 屏幕宽度等于或大于1400px.
4.3 网络系统规则
Bootstrap5 网格系统规则:
- 网格每一行需要放在设置了'.container'(固定宽度)或'.container-fluid'(全屏宽度)类的容器中,
  这样就可以自动设置一些外边距与内边距.

- 使用行来创建水平的列组.

- 内容需要放置在列中, 并且只有列可以是行的直接子节点.

- 预定义的类如'.row'和'.col-sm-4'可用于快速制作网格布局.

- 列通过填充创建列内容之间的间隙.
  这个间隙是通过'.rows'类上的负边距设置第一行和最后一列的偏移.

- 网格列是通过跨越指定的12个列来创建.
  例如, 设置三个相等的列, 需要使用三个'.col-sm-4'来设置.
  超过12列, 多出的列会占用下一行的空间.

- Bootstrap 5和Bootstrap 4使用flexbox(弹性盒子)而不是浮动.
  Flexbox的一大优势是, 没有指定宽度的网格列将自动设置为等宽与等高列.
  如果您想了解有关Flexbox的更多信息, 可以阅读CSS Flexbox教程.
4.4 网格的基本结构
4.4.1 网格系统类
在Bootstrap的网格系统中, row和col是两个关键的CSS类, 它们用于创建网页布局的基本结构.
row: 是用于创建行的CSS类, 表示一行中的一组列.
每个行都应该被包含在container或container-fluid类中, 以便提供外边距和响应式的特性.

col: 是用于创建列的CSS类, 用于指定元素在行中占据的列数.
网格系统默认划分为12列, 因此col类的后面跟着一个数字(1 到 12), 表示元素占据的列数.
如果不带数字, 那么col类会均匀地将列分割为等宽的列.
4.4.2 自定义宽度的列
<div class="container">
    <div class="row">
        <div class="col-*-*">div>
    div>
    <div class="row">
        <div class="col-*-*">div>
        <div class="col-*-*">div>
        <div class="col-*-*">div>
    div>
 div>
使用(<div class="row">)创建一行.
然后, 添加需要的列('.col-*-*'类中设置).
第一个星号(*)表示响应的设备: sm, md, lg或xl, 第二个星号(*)表示一个数字, 同一行的数字相加为12.
DOCTYPE html>
<html lang="en">
<head>
    <meta charset="UTF-8">
    <meta name="viewport" content="width=device-width, initial-scale=1">
    <title>自定义宽度的列title>
    <link href="bootstrap-5.3.2-dist/css/bootstrap.min.css" rel="stylesheet">
    <script src="bootstrap-5.3.2-dist/js/bootstrap.bundle.min.js">script>

head>
<body>
<div class="container my-5">
    <div class="row">
        <div class="col-2 p-3 bg-primary text-white">.col-2div>
        <div class="col-8 p-3 bg-dark text-white">.co8div>
        <div class="col-2 p-3 bg-primary text-white">.col-2div>
    div>
div>
body>
html>

浏览器页面的最小宽度是500px.
4.4.3 宽度相等的列
<div class="container">

    <div class="row">
        <div class="col">div>
        <div class="col">div>
        <div class="col">div>
    div>
div>
使用(<div class="row">)创建一行.
不在每个col上添加数字, 让bootstrap自动处理布局, 同一行的每个列宽度相等: 两个"col" , 每个就为 50% 的宽度.
三个"col"每个就为33.33%的宽度, 四个"col"每个就为25%的宽度, 以此类推.
DOCTYPE html>
<html lang="en">
<head>
    <meta charset="UTF-8">
    <meta name="viewport" content="width=device-width, initial-scale=1">
    <title>宽度相等的列title>
    <link href="bootstrap-5.3.2-dist/css/bootstrap.min.css" rel="stylesheet">
    <script src="bootstrap-5.3.2-dist/js/bootstrap.bundle.min.js">script>
head>
<body>
<div class="container my-5">
    <div class="row">
        <div class="col p-3 bg-primary text-white">.coldiv>
        <div class="col p-3 bg-dark text-white">.coldiv>
        <div class="col p-3 bg-primary text-white">.coldiv>
    div>
div>
body>
html>

浏览器页面的最小宽度是500px.
4.4.4 不等宽响应式列
以下实例演示了如何在平板及更大屏幕上创建等宽度的响应式列.
在移动设备上, 即屏幕宽度小于576px时, 3个列将会上下堆叠排版:
DOCTYPE html>
<html lang="en">
<head>
    <meta charset="UTF-8">
    <meta name="viewport" content="width=device-width, initial-scale=1">
    <title>不等宽响应式列title>
    <link href="bootstrap-5.3.2-dist/css/bootstrap.min.css" rel="stylesheet">
    <script src="bootstrap-5.3.2-dist/js/bootstrap.bundle.min.js">script>

head>
<body>
<div class="container my-5">
    <div class="row">
        <div class="col-sm-2 p-3 bg-primary text-white">.col-sm-2div>
        <div class="col-sm-8 p-3 bg-dark text-white">.col-sm-8div>
        <div class="col-sm-2 p-3 bg-primary text-white">.col-sm-2div>
    div>
div>
body>
html>
4.4.5 等宽响应式列
以下实例演示了如何在平板及更大屏幕上创建等宽度的响应式列.
在移动设备上, 即屏幕宽度小于576px时, 3个列将会上下堆叠排版.
DOCTYPE html>
<html lang="en">
<head>
    <meta charset="UTF-8">
    <meta name="viewport" content="width=device-width, initial-scale=1">
    <title>等宽响应式列title>
    <link href="bootstrap-5.3.2-dist/css/bootstrap.min.css" rel="stylesheet">
    <script src="bootstrap-5.3.2-dist/js/bootstrap.bundle.min.js">script>
head>
<body>
<div class="container my-5">
    <div class="row">
        <div class="col-sm  p-3 bg-primary text-white">.coldiv>
        <div class="col-sm  p-3 bg-dark text-white">.coldiv>
        <div class="col-sm  p-3 bg-primary text-white">.coldiv>
    div>
div>
body>
html>
4.5 设置某一列宽度
如果只设置一列的宽度, 其他列会自动均分剩下的宽度.
以下实例将列宽度为25%, 50%, 25%.
DOCTYPE html>
<html lang="en">
<head>
    <meta charset="UTF-8">
    <meta name="viewport" content="width=device-width, initial-scale=1">
    <title>只设置某一个列宽度title>
    <link href="bootstrap-5.3.2-dist/css/bootstrap.min.css" rel="stylesheet">
    <script src="bootstrap-5.3.2-dist/js/bootstrap.bundle.min.js">script>

head>
<body>
<div class="container">
    <div class="row">
        <div class="col    p-3 bg-primary text-white">.coldiv>
        <div class="col-6  p-3 bg-dark text-white">.col-6div>
        <div class="col    p-3 bg-primary text-white">.coldiv>
    div>
div>
body>
html>

4.6 响应式网页设计
同时设置多个布局的方式被称为响应式网页设计(Responsive Web Design).
响应式设计的目标是通过使用CSS媒体查询和弹性布局来自动适应不同的屏幕大小和设备类型, 以提供一致的用户体验.
通过指定不同的CSS类(如col-sm-3, col-md-6, col-lg-4)可以根据设备的屏幕宽度应用不同的样式和布局规则, 从而实现页面的响应式布局.
这种方式使网页在不同设备上都能够以最佳的方式展示内容, 提高了用户体验和适应性.
以下实例演示了在使用大桌面显示器时两个列的占比为: 16.67%: 83.33%;
使用桌面显示器时两个列的占比为: 50%: 50%.
使用平板端时两个列的占比为: 25%: 75%.
使用移动手机等小型设备时会堆叠显示.
DOCTYPE html>
<html lang="en">
<head>
    <meta charset="UTF-8">
    <meta name="viewport" content="width=device-width, initial-scale=1">
    <title>平板与桌面的网格布局title>
    <link href="bootstrap-5.3.2-dist/css/bootstrap.min.css" rel="stylesheet">
    <script src="bootstrap-5.3.2-dist/js/bootstrap.bundle.min.js">script>

head>
<body>
<div class="container">
    <div class="row">

        <div class="col-sm-3 col-md-6 col-lg-4 col-xl-2 p-3 bg-primary text-white">.coldiv>
        <div class="col-sm-9 col-md-6 col-lg-8 col-xl-10 p-3 bg-dark text-white">.coldiv>
    div>
div>
body>
html>
4.7 嵌套列
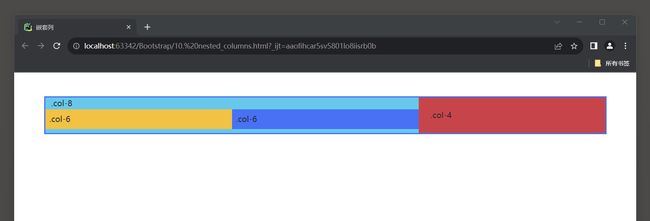
在响应式网页设计中, 可以使用嵌套列(Nested Columns)来创建更复杂的布局结构.
嵌套列是指在一个列(Column)内部再次创建列的结构, 以实现更精细的布局控制.

嵌套列的使用可以帮助我们实现更灵活的布局, 例如在一个大列(Parent Column)中创建两个或多个小列(Child Columns), 进一步划分内容区域.
需要注意的是, 在使用嵌套列时, 需要确保总列数不超过父容器的列数.
例如, 在一个大列(col-md-6)中, 嵌套的列数之和不能超过12列(根据Bootstrap的默认网格系统, 一个行(row)最多只能包含12列).
DOCTYPE html>
<html lang="en">
<head>
    <meta charset="UTF-8">
    <meta name="viewport" content="width=device-width, initial-scale=1">
    <title>嵌套列title>
    <link href="bootstrap-5.3.2-dist/css/bootstrap.min.css" rel="stylesheet">
    <script src="bootstrap-5.3.2-dist/js/bootstrap.bundle.min.js">script>

head>
<body>
<div class="container">

    <div class="row mt-5 border border-3 border-primary">

        <div class="col-8 bg-info"> .col-8

            <div class="row">
                <div class="col-6 bg-warning p-2"> .col-6div>
                <div class="col-6 bg-primary p-2"> .col-6div>
            div>
        div>

        <div class="col-4 bg-danger p-4"> .col-4div>

    div>
div>
<div>div>
div>
div>
body>
html>
4.8 偏移列
在Bootstrap栅格系统中, offset类是一组用于对列进行偏移的类.
它们可以用来在水平方向上调整列的位置, 从而创建布局中的空白区域.

通过将offset-[网格数]类应用于列元素, 可以将该列向右偏移指定数量的网格.
例如, offset-2类将使列向右偏移2个网格.

可以通过(offset-*-*)类进行响应式设置.
第一个星号(*)可以是sm, md, lg, xl, 表示屏幕设备类型, 第二个星号(*)可以是1到11的数字.
这些类会把一个列的左外边距(margin)增加*列, 其中*范围是从1到11.

这些偏移类只能与列(col-*类)一起使用, 并且只能用于row元素的直接子元素.
注意: Bootstrap栅格系统网格总数为12, 在同一行中的列宽加上列偏移之和不能超过12.
DOCTYPE html>
<html lang="en">
<head>
    <meta charset="UTF-8">
    <meta name="viewport" content="width=device-width, initial-scale=1">
    <title>偏移量title>
    <link href="bootstrap-5.3.2-dist/css/bootstrap.min.css" rel="stylesheet">
    <script src="bootstrap-5.3.2-dist/js/bootstrap.bundle.min.js">script>

head>
<body>
<div class="container mt-3">

    <div class="row mt-3 border">
        <div class="col-md-4  bg-primary text-white">.col-md-4div>

        <div class="col-md-4 offset-md-4 bg-dark text-white">.col-md-4 .offset-md-4div>
    div>

    <div class="row mt-3 border">

        <div class="col-md-3 offset-md-3 bg-primary text-white">.col-md-3 .offset-md-3div>

        <div class="col-md-3 offset-md-3 bg-dark text-white">.col-md-3 .offset-md-3div>
    div>

    <div class="row mt-3 border">

        <div class="col-md-6 offset-md-3 bg-primary text-white">.col-md-6 .offset-md-3div>
    div>
div>

body>
html>

5. 文字排版
5.1 默认设置
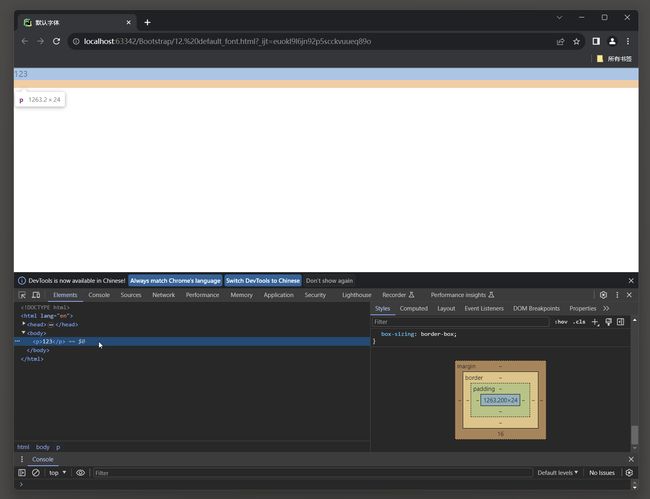
在Bootstrap 5中, 默认的font-size值为16px, line-height值为 1.5(24px).
这意味着文本的字体大小为 16px, 行高为字体大小的1.5倍.

在字体方面, Bootstrap 5默认使用的字体系列是"Helvetica Neue", Helvetica, Arial, sans-serif.
这意味着如果操作系统中没有安装"Helvetica Neue"字体, Bootstrap 5会尝试使用Helvetica字体,
如果还没有则使用Arial字体, 最后才会使用操作系统的默认无衬线字体.

<p>元素的margin-top设置为 0, margin-bottom设置为 1rem(相当于 16px).
这样的设置可确保段落之间有一定的间距, 同时顶部的空白被消除, 使得内容更加紧凑.
DOCTYPE html>
<html lang="en">
<head>
<meta charset="UTF-8">
<meta name="viewport" content="width=device-width, initial-scale=1">
<title>默认字体title>
<link href="bootstrap-5.3.2-dist/css/bootstrap.min.css" rel="stylesheet">
<script src="bootstrap-5.3.2-dist/js/bootstrap.bundle.min.js">script>
head>
<body>
<p id="d0">123p>
<script>
let element = document.getElementById('d0');
let computedStyle = window.getComputedStyle(element);
let fontFamily = computedStyle.getPropertyValue('font-family');
console.log(fontFamily);
script>
body>
html>
打印的结果是(不同的系统和浏览器可能有自己的默认字体设置):
system-ui, -apple-system, "Segoe UI", Roboto, "Helvetica Neue", "Noto Sans", "Liberation Sans", Arial,
sans-serif, "Apple Color Emoji", "Segoe UI Emoji", "Segoe UI Symbol", "Noto Color Emoji" .
system-ui: 这是一个通用的字体系列, 它会根据操作系统的默认字体进行替换. 可以用于呈现操作系统默认字体.
-apple-system: 这是苹果公司自有的字体系列, 用于在苹果设备上显示文本. 它会自动根据操作系统版本和区域设置选择适当的字体.
"Segoe UI": 这是微软公司设计的字体系列, 用于在Windows操作系统上显示文本.
Roboto: 这是谷歌公司设计的开源字体系列, 用于在Android操作系统上显示文本.
"Helvetica Neue": 这是一种流行的无衬线字体, 常用于macOS和其他操作系统.
"Noto Sans": 这是谷歌开源的字体系列, 支持广泛的语言字符集.
"Liberation Sans": 这是一种开源字体系列, 被设计为替代Arial字体.
Arial: 这是一种常见的无衬线字体, 可在多个操作系统和浏览器中使用.
sans-serif: 这是一个通用的无衬线字体系列, 如果前面的字体都不可用, 将会使用操作系统的默认无衬线字体.

此外, 还有几个 Emoji 字体系列用于显示彩色表情符号:
"Apple Color Emoji": 在苹果设备中显示彩色表情符号.
"Segoe UI Emoji": 在 Windows 设备中显示彩色表情符号.
"Segoe UI Symbol": 在 Windows 设备上显示一些图标和特殊符号.
"Noto Color Emoji": 在支持的设备上显示彩色表情符号.
5.2 标题样式
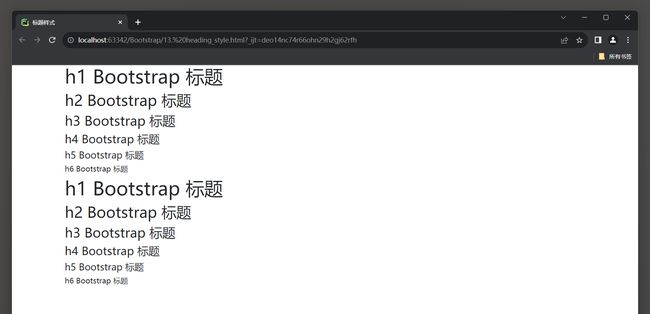
Bootstrap确实定义了所有HTML标题标签(h1到h6)的样式.
Bootstrap使用了一系列CSS类来设置标题的外观, 并为每个标题级别提供了不同的样式.

以下是Bootstrap中标题标签的默认类名和样式:
h1 标题的类名: h1, 默认样式为大字体, 粗体.
h2 标题的类名: h2, 默认样式为稍小的字体, 粗体.
h3 标题的类名: h3, 默认样式为更小的字体, 粗体.
h4 标题的类名: h4, 默认样式为较小的字体, 粗体.
h5 标题的类名: h5, 默认样式为小字体, 粗体.
h6 标题的类名: h6, 默认样式为更小的字体, 粗体.
DOCTYPE html>
<html lang="en">
<head>
    <meta charset="UTF-8">
    <meta name="viewport" content="width=device-width, initial-scale=1">
    <title>标题样式title>
    <link href="bootstrap-5.3.2-dist/css/bootstrap.min.css" rel="stylesheet">
    <script src="bootstrap-5.3.2-dist/js/bootstrap.bundle.min.js">script>

head>
<body>
<div class="container">
    <h1>h1 Bootstrap 标题h1>
    <h2>h2 Bootstrap 标题h2>
    <h3>h3 Bootstrap 标题h3>
    <h4>h4 Bootstrap 标题h4>
    <h5>h5 Bootstrap 标题h5>
    <h6>h6 Bootstrap 标题h6>

    <p class="h1">h1 Bootstrap 标题p>
    <p class="h2">h2 Bootstrap 标题p>
    <p class="h3">h3 Bootstrap 标题p>
    <p class="h4">h4 Bootstrap 标题p>
    <p class="h5">h5 Bootstrap 标题p>
    <p class="h6">h6 Bootstrap 标题p>
div>
body>
html>
5.3 Display 标题类
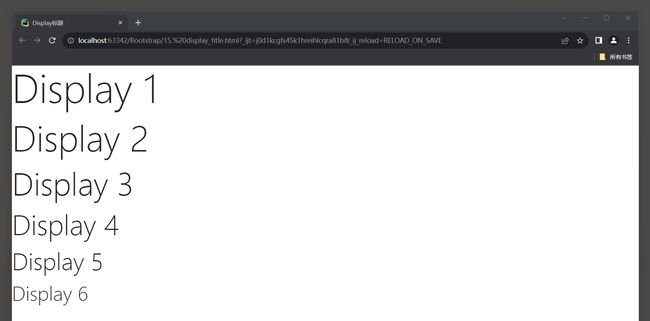
Bootstrap还提供了6个额外的Display类(.display-1 ~ display-6)来控制标题的样式, 可以输出更大更粗的字体样式.
DOCTYPE html>
<html lang="en">
<head>
    <meta charset="UTF-8">
    <meta name="viewport" content="width=device-width, initial-scale=1">
    <title>Display标题title>
    <link href="bootstrap-5.3.2-dist/css/bootstrap.min.css" rel="stylesheet">
    <script src="bootstrap-5.3.2-dist/js/bootstrap.bundle.min.js">script>

head>
<body>
<p class="display-1">Display 1p>
<p class="display-2">Display 2p>
<p class="display-3">Display 3p>
<p class="display-4">Display 4p>
<p class="display-5">Display 5p>
<p class="display-6">Display 6p>
body>
html>
5.4 小号文本
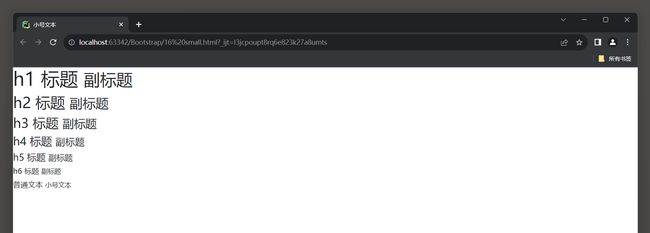
Bootstrap 5重新定义了<small>标签的样式, 为其添加了.mar类(为父元素的 85%).

<small>标签: 用于表示较小或次要的文本.
它可以用于更小的字号, 解释性文本或法律声明等方面.
DOCTYPE html>
<html lang="en">
<head>
    <meta charset="UTF-8">
    <meta name="viewport" content="width=device-width, initial-scale=1">
    <title>小号文本title>
    <link href="bootstrap-5.3.2-dist/css/bootstrap.min.css" rel="stylesheet">
    <script src="bootstrap-5.3.2-dist/js/bootstrap.bundle.min.js">script>

head>
<body>
<h1>h1 标题 <small>副标题small>h1>
<h2>h2 标题 <small>副标题small>h2>
<h3>h3 标题 <small>副标题small>h3>
<h4>h4 标题 <small>副标题small>h4>
<h5>h5 标题 <small>副标题small>h5>
<h6>h6 标题 <small>副标题small>h6>
<p>普通文本 <small>小号文本small>p>
body>
html>
5.5 突出显示
Bootstrap 5重新定义了<mark>标签的样式, 为其添加了.mar类(黄色背景及有一定的内边距).

<mark>标签: 是HTML5中的一个内置标签, 用于在文本中突出显示一个或多个关键字或短语.
通过向关键字或短语周围添加<mark>标签, 可以使它们以黄色背景和黑色文字的形式在页面上突出显示.

.mark类: 它是Bootstrap框架提供的一种CSS类, 它可以应用于任何HTML元素.
通过将.mark类应用于元素, 可以将其样式设置为Bootstrap中定义的突出显示样式.
例如, 可以通过使用class="mark"将一个文本段落的文字突出显示为黄色背景和黑色文字.

需要注意的是, <mark>标签和.mark类只是通过样式化来实现高亮显示的效果, 它们并不会对HTML文档的语义或结构产生实质性的影响.
使用它们可以很方便地实现样式统一和可视化效果.
DOCTYPE html>
<html lang="en">
<head>
    <meta charset="UTF-8">
    <meta name="viewport" content="width=device-width, initial-scale=1">
    <title>突出显示title>
    <link href="bootstrap-5.3.2-dist/css/bootstrap.min.css" rel="stylesheet">
    <script src="bootstrap-5.3.2-dist/js/bootstrap.bundle.min.js">script>
head>
<body>

<p>
    <mark>Hello,mark>
    World!
p>

<p>
    <span class="mark">Hello,span>
    World!
p>
body>
html>

5.6 底部虚线
Bootstrap 5重新定义HTML的<abbr>元素样式, 在文本底部显示一条虚线边框.

<abbr>标签: 用于定义缩写或首字母缩略词, 并可为其提供扩展的解释.
它通常以缩写形式出现在文本中, 并在用户将鼠标悬停在缩写上时显示完整的解释.
设置title属性之后, 才会出现虚线.

例如: <abbr title="Cascading Style Sheets"> CSS </abbr>, 鼠标悬浮在CSS时显示title属性的值.
DOCTYPE html>
<html lang="en">
<head>
    <meta charset="UTF-8">
    <meta name="viewport" content="width=device-width, initial-scale=1">
    <title>底部虚线title>
    <link href="bootstrap-5.3.2-dist/css/bootstrap.min.css" rel="stylesheet">
    <script src="bootstrap-5.3.2-dist/js/bootstrap.bundle.min.js">script>

head>
<body>
<!- 鼠标悬浮时展示title的值--->
<p>Hello, <abbr title="怎么了?">Worldabbr>!p>
body>
html>

5.7 引用块元素
可以在Bootstrap 5中使用.blockquote类来给<blockquote>元素添加样式.

.blockquote类: 是Bootstrap中预定义的一个类, 用于样式化引用块元素.
它会为<blockquote>元素应用一些默认样式, 如边框, 背景颜色以及一些内边距等.

blockquote-footer类: 用作块引用的底部来源标识.
DOCTYPE html>
<html lang="en">
<head>
    <meta charset="UTF-8">
    <meta name="viewport" content="width=device-width, initial-scale=1">
    <title>引用块元素title>
    <link href="bootstrap-5.3.2-dist/css/bootstrap.min.css" rel="stylesheet">
    <script src="bootstrap-5.3.2-dist/js/bootstrap.bundle.min.js">script>

head>
<body>
<div class="container mt-5">
    <p>写一首搞怪Python的诗:p>
    <blockquote class="blockquote">
        <p>在代码的海洋中飘荡,
            Python的魔力无人能挡.
            Tab and space, 缩进有道,
            让代码结构井然有序.

            import this, 程序员的禅宗,
            莫忘初心, 保持激情.
            万物皆对象, 一切可调用,
            函数与类, 无穷创造.

            Print("Hello, World!"), 第一步,
            踏入编程的奇妙世界.
            循环与判断, 征服难题,
            对抗异常, 犹如英雄.

            模块与库, 无限娱乐,
            调试代码, 寻找bug.
            Python, 你是程序员的良友,
            让我们编写出伟大的航船.

            从Python开始, 魔法展开,
            引号里逗号加个空格.
            用代码创造幽默的瞬间,
            Python, 这就是我们的乐园.p>
        <footer class="blockquote-footer">Chat-gpt3.5footer>
    blockquote>
div>
body>
html>

5.8 定义列表
Bootstrap 5重新定义了HTML的<dl>元素的样式.
<dl>: 定义列表(Definition List), 用于标记一组术语及其对应的定义.
<dt>: 定义术语(Definition Term), 用于标记术语.
<dd>: 定义描述(Definition Description), 用于标记术语的定义.

通常情况下, <dl>标签内部会包含一组<dt>和<dd>组合, 每个<dt>用于定义一个术语, 而对应的<dd>用于给出该术语的定义.
DOCTYPE html>
<html lang="en">
<head>
    <meta charset="UTF-8">
    <meta name="viewport" content="width=device-width, initial-scale=1">
    <title>定义列表title>
    <link href="bootstrap-5.3.2-dist/css/bootstrap.min.css" rel="stylesheet">
    <script src="bootstrap-5.3.2-dist/js/bootstrap.bundle.min.js">script>

head>
<body>

<div class="container">
    <dl>
        <dt>HTMLdt>
        <dd> - HyperText Markup Language, 用于创建网页的标记语言.dd>

        <dt>CSSdt>
        <dd> - Cascading Style Sheets, 用于描述网页的样式和布局.dd>

        <dt>JavaScriptdt>
        <dd> - 用于为网页添加交互和动态效果的脚本语言.dd>
    dl>
div>
body>
html>

5.9 代码元素
Bootstrap 5重新定义了HTML的<code>元素的样式.

<code>标签: 用于将文本包裹在内, 并将其显示为代码样式.
DOCTYPE html>
<html lang="en">
<head>
    <meta charset="UTF-8">
    <meta name="viewport" content="width=device-width, initial-scale=1">
    <title>代码元素title>
    <link href="bootstrap-5.3.2-dist/css/bootstrap.min.css" rel="stylesheet">
    <script src="bootstrap-5.3.2-dist/js/bootstrap.bundle.min.js">script>

head>
<body>
<div class="container">
  <h1 cl>代码片段h1>
  <p>可以将一些代码元素放到 code 元素里面:p>
  <p>以下 HTML 元素: <code>spancode>, <code>sectioncode>, 和 <code>divcode> 用于定义部分文档内容.p>
div>
body>
html>

5.9 快捷键样式
Bootstrap 5重新定义了HTML的<kbd>元素的样式.

<kbd>标签: 用于表示键盘输入或用户输入的文本的标签.
它通常用于显示按键或命令.
DOCTYPE html>
<html lang="en">
<head>
    <meta charset="UTF-8">
    <meta name="viewport" content="width=device-width, initial-scale=1">
    <title>快捷键样式title>
    <link href="bootstrap-5.3.2-dist/css/bootstrap.min.css" rel="stylesheet">
    <script src="bootstrap-5.3.2-dist/js/bootstrap.bundle.min.js">script>

head>
<body>
<div class="container mt-5">
    <p>使用 <kbd>ctrl + ckbd> 复制选中的文本.p>
div>
body>
html>

5.10 固定文本格式
Bootstrap 5重新定义了HTML的<pre>元素的样式.

<pre>标签: 用于定义预格式化的文本, 即以固定的字体和间距显示文本内容, 保留文本中的空格和换行符.
它常用于显示源代码或其他需要保留格式的文本内容.
DOCTYPE html>
<html lang="en">
<head>
    <meta charset="UTF-8">
    <meta name="viewport" content="width=device-width, initial-scale=1">
    <title>固定文本格式title>
    <link href="bootstrap-5.3.2-dist/css/bootstrap.min.css" rel="stylesheet">
    <script src="bootstrap-5.3.2-dist/js/bootstrap.bundle.min.js">script>

head>
<body>
<div class="container">
    <p>For multiple lines of code, use the pre element:p>
    <pre>
Text in a pre element
is displayed in a fixed-width
font, and it preserves
both      spaces and
line breaks.
pre>
div>
body>
html>

5.11 段落突出
Bootstrap 5中定义了.lead类: 作用是让段落突出显示.
DOCTYPE html>
<html lang="en">
<head>
    <meta charset="UTF-8">
    <meta name="viewport" content="width=device-width, initial-scale=1">
    <title>段落突出显示title>
    <link href="bootstrap-5.3.2-dist/css/bootstrap.min.css" rel="stylesheet">
    <script src="bootstrap-5.3.2-dist/js/bootstrap.bundle.min.js">script>

head>
<body>
<div class="container">
    <h3>冬夜读书示子聿h3>
    <h6>[作者] 陆游h6>
    <p>古人学问无遗力,p>
    <p>少壮工夫老始成.p>
    <p class="lead">纸上得来终觉浅,p>
    <p>绝知此事要躬行.p>

div>
body>
html>

5.12 文本对齐
Bootstrap框架中用于设置文本对齐的类类名和其作用:
* 1. .text-start: 将文本左对齐.
* 2. .text-center: 将文本居中对齐.
* 3. .text-end: 将文本右对齐.
* 4. .text-justify: 将文本两端对齐, 段落中超出屏幕部分文字自动换行.
* 5. .text-nowrap: 使段落中的文本不换行, 即超出屏幕部分不自动换行(超出后不显示).
DOCTYPE html>
<html lang="en">
<head>
    <meta charset="UTF-8">
    <meta name="viewport" content="width=device-width, initial-scale=1">
    <title>文本对齐title>
    <link href="bootstrap-5.3.2-dist/css/bootstrap.min.css" rel="stylesheet">
    <script src="bootstrap-5.3.2-dist/js/bootstrap.bundle.min.js">script>

head>
<body>
<div class="container mt-3 border">
    <p class="text-start">左对齐p>
    <p class="text-center">居中对齐p>
    <p class="text-end">右对齐p>

    <p class="text-justify">111111111111111111111111111111111, 段落中超出屏幕部分文字自动换行.p>
    <p class="text-nowrap">1111111111111111111111111111111111, 段落中超出屏幕部分不换行.p>
div>
body>
html>
5.13 文本大小写
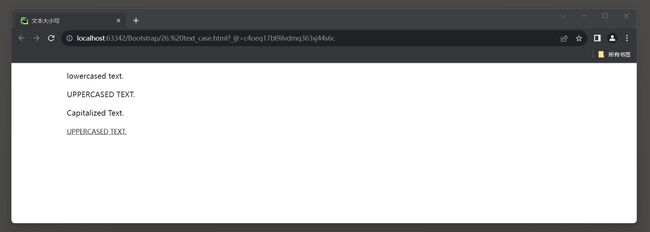
在Bootstrap中, 可以使用以下类来改变文本的大小写和样式:
* 1. .text-lowercase: 将文本转换为小写.
* 2. .text-uppercase: 将文本转换为大写.
* 3. .text-capitalize: 将文本的每个单词首字母转换为大写.
* 4. .initialism: 在<abbr>元素中可以将小写字母转换为大写字母以提高可读性.
DOCTYPE html>
<html lang="en">
<head>
    <meta charset="UTF-8">
    <meta name="viewport" content="width=device-width, initial-scale=1">
    <title>文本大小写title>
    <link href="bootstrap-5.3.2-dist/css/bootstrap.min.css" rel="stylesheet">
    <script src="bootstrap-5.3.2-dist/js/bootstrap.bundle.min.js">script>

head>
<body>
<div class="container mt-3">
    <p class="text-lowercase">lowercased text.p>
    <p class="text-uppercase">uppercased text.p>
    <p class="text-capitalize">capitalized text.p>
    <abbr class="initialism" title="转为大写">uppercased text.abbr>
div>
body>
html>
5.13 无序列表样式
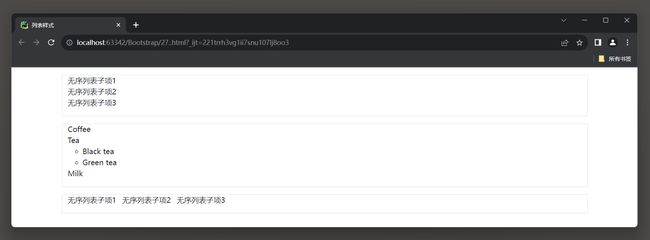
Bootstrap提供了一些无序列表样式类:
* 1. .list-unstyled: 移除默认的列表样式, 并将列表项左对齐. 可以给<ul>或<li>元素使用.
      这个类适用于直接子列表项, 移除嵌套列表项的样式, 需要在嵌套的列表中使用该类.

*2  .list-inline: 在<ul>中使用, 将所有列表项放置在同一行, 水平排列.
     需要在<li>元素中搭配.list-inline-item类.
DOCTYPE html>
<html lang="en">
<head>
    <meta charset="UTF-8">
    <meta name="viewport" content="width=device-width, initial-scale=1">
    <title>无序列表样式title>
    <link href="bootstrap-5.3.2-dist/css/bootstrap.min.css" rel="stylesheet">
    <script src="bootstrap-5.3.2-dist/js/bootstrap.bundle.min.js">script>

head>
<body>
<div class="container mt-3 border">

    <ul class="list-unstyled">
        <li>无序列表子项1li>
        <li>无序列表子项2li>
        <li>无序列表子项3li>
    ul>
div>
<div class="container mt-3 border">

    <ul class="list-unstyled">
        <li>Coffeeli>
        <li>Tea
            <ul>
                <li>Black teali>
                <li>Green teali>
            ul>
        li>
        <li>Milkli>
    ul>
div>
<div class="container mt-3 border">

    <ul class="list-inline">
        <li class="list-inline-item">无序列表子项1li>
        <li class="list-inline-item">无序列表子项2li>
        <li class="list-inline-item">无序列表子项3li>
    ul>
div>

div>
body>
html>
6. 颜色设置
6.1 文本颜色
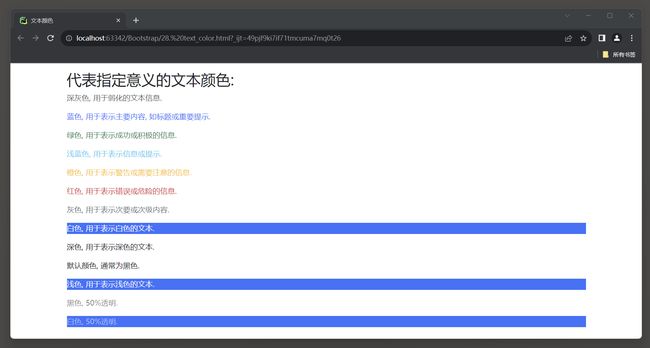
Bootstrap 5提供了一些有代表性的颜色类, 可以用于修改文本的颜色.

这些颜色类的描述如下:
.text-muted:     深灰色, 用于弱化的文本信息.
.text-primary:   蓝色, 用于表示主要内容, 如标题或重要提示.
.text-success:   绿色, 用于表示成功或积极的信息.
.text-info:      浅蓝色, 用于表示信息或提示.
.text-warning:   橙色, 用于表示警告或需要注意的信息.
.text-danger:    红色, 用于表示错误或危险的信息.
.text-secondary: 灰色, 用于表示次要或次级内容.
.text-white:     白色, 用于表示白色的文本(白色背景完全看不见).
.text-dark:      深色, 用于表示深色的文本.
.text-body:      默认颜色, 通常为黑色. 具体取决于浏览器的默认设置.
.text-light:     浅色, 用于表示浅色的文本(白色背景几乎看不见).
.text-black:     黑色, 用于普通文本.

文本颜色透明度类:
.text-black-50:  黑色, 并设置透明度为50%.
.text-white-50:  白色, 并设置透明度为50%.
DOCTYPE html>
<html lang="en">
<head>
    <meta charset="UTF-8">
    <meta name="viewport" content="width=device-width, initial-scale=1">
    <title>文本颜色title>
    <link href="bootstrap-5.3.2-dist/css/bootstrap.min.css" rel="stylesheet">
    <script src="bootstrap-5.3.2-dist/js/bootstrap.bundle.min.js">script>
head>
<body>
<div class="container mt-3">
    <h2>代表指定意义的文本颜色:h2>
    <p class="text-muted">深灰色, 用于弱化的文本信息.p>
    <p class="text-primary">蓝色, 用于表示主要内容, 如标题或重要提示.p>
    <p class="text-success">绿色, 用于表示成功或积极的信息.p>
    <p class="text-info">浅蓝色, 用于表示信息或提示.p>
    <p class="text-warning">橙色, 用于表示警告或需要注意的信息.p>
    <p class="text-danger">红色, 用于表示错误或危险的信息.p>
    <p class="text-secondary">灰色, 用于表示次要或次级内容.p>
    <p class="text-white bg-primary">白色, 用于表示白色的文本.p>
    <p class="text-dark">深色, 用于表示深色的文本.p>
    <p class="text-body">默认颜色, 通常为黑色.p>
    <p class="text-light">浅色, 用于表示浅色的文本.p>


div>
body>
html>
6.2 背景颜色
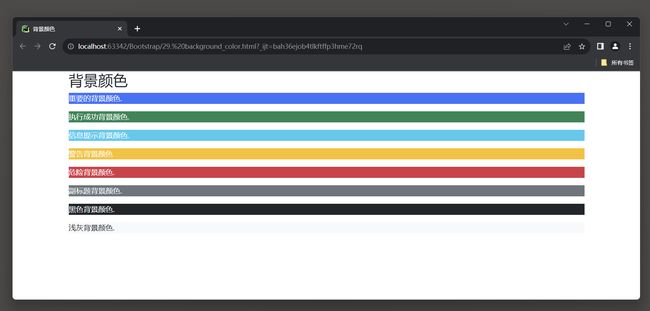
Bootstrap 5提供了一些有代表性的颜色类, 可以用于修改背景颜色.

这些颜色类的描述如下:
.bg-primary:   蓝色, 重要的背景颜色.
.bg-success:   绿色, 执行成功背景颜色.
.bg-info:      浅蓝色, 信息提示背景颜色.
.bg-warning:   橙色, 警告背景颜色.
.bg-danger:    红色, 危险背景颜色.
.bg-secondary: 灰色, 副标题背景颜色.
.bg-dark       深色, 黑色背景颜色.
.bg-light      浅色, 浅灰背景颜色.
DOCTYPE html>
<html lang="en">
<head>
    <meta charset="UTF-8">
    <meta name="viewport" content="width=device-width, initial-scale=1">
    <title>背景颜色title>
    <link href="bootstrap-5.3.2-dist/css/bootstrap.min.css" rel="stylesheet">
    <script src="bootstrap-5.3.2-dist/js/bootstrap.bundle.min.js">script>

head>
<body>
<div class="container">
    <h2>背景颜色h2>
    <p class="bg-primary text-white">重要的背景颜色.p>
    <p class="bg-success text-white">执行成功背景颜色.p>
    <p class="bg-info text-white">信息提示背景颜色.p>
    <p class="bg-warning text-white">警告背景颜色p>
    <p class="bg-danger text-white">危险背景颜色.p>
    <p class="bg-secondary text-white">副标题背景颜色.p>
    <p class="bg-dark text-white">黑色背景颜色.p>
    <p class="bg-light text-dark">浅灰背景颜色.p>
div>
body>
html>
