单例模式及原型模式
文章目录
- 前言
- 单例模式
-
- 单例模式的应用
-
- 饿汉式
- 懒汉式
- 通过内部类初始化
- IDEA下多线程的调试
- 反射暴力攻击单例解决方案及原理分析
- 序列化破坏单例的原理及解决方案。
-
- 序列化破坏单例的原理
- 解决办法 注册式单例
- 原型模式
-
- 原型模式的应用场景
- 简单克隆
- 深度克隆
前言
单例模式(Singleton Pattern)是指确保一个类在任何情况下都绝对只有一个实例,并提供一个全局访问点。单例模式是创建型模式。
例如ServletContext、ServletContextConfig在 Spring 框架应用中 ApplicationContext,数据库的连接池都是单例模式
单例模式
单例模式的应用
单例模式又分为饿汉式和懒汉式
饿汉式
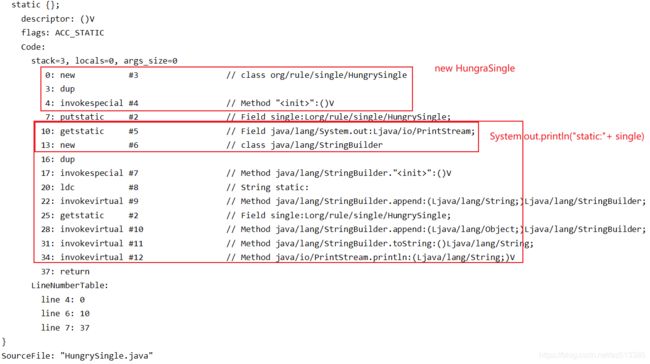
饿汉式单例模式通过在类加载的时候初始化,通过static{}赋值,由于static{}只在类记载的时候调用一次,所以线程安全全局唯一.
例如
public class HungrySingle {
	//先静态、后动态 //先属性、后方法 //先上后下
    public static final HungrySingle single = new HungrySingle();
    static {
        System.out.println("static:"+single);
    }
        //避免正常创建方式
    private HungrySingle () { }
    public static HungrySingle getSingle() {
        return single;
    }
}
上面这段代码虽然赋值语句并不在static{}中,但是通过javap -c -v查看编译后的class文件可以发现赋值依旧是在静态块中处理的,且一定在自定义的静态块内容之前处理

测试代码和结果
 public static void main(String[] args) {
        for (int i = 0; i < 5; i++) {
            new Thread(() -> {
                System.out.println(HungrySingle.getSingle());
            }).start();
        }
    }
static:org.rule.single.HungrySingle@206cd157
org.rule.single.HungrySingle@206cd157
org.rule.single.HungrySingle@206cd157
org.rule.single.HungrySingle@206cd157
org.rule.single.HungrySingle@206cd157
org.rule.single.HungrySingle@206cd157
优点:没有加任何的锁、执行效率比较高,在用户体验上来说,比懒汉式更好。
缺点:类加载的时候就初始化,不管用与不用都占着空间,浪费了内存.
懒汉式
通过双重检查锁确保全局唯一,代码如下:
public class LazySingle {
    public static volatile LazySingle single = null;
    //避免正常创建方式
    private LazySingle() { }
	//添加局部变量,确保变量在被初始化后,每次方法执行时只被读取一次(LazySingle lazySingle = single;)
	//因为字段添加了volatile关键字,确保每次读写都去内存中进行,这
	//抛弃了CPU自带的高速多级缓存,使字段可以被在其它cpu中执行的线程
	//察觉到变化.通过减少读取的次数,更多的利用到了高速多级缓存,使程序
	//获得硬件上的速度提升
    public static LazySingle getSingle() {
        LazySingle lazySingle = single;
        if (lazySingle == null) {
            synchronized (LazySingle.class) {
                if (single == null) {
                    single = lazySingle = new LazySingle();
                }
            }
        }
        return single;
    }
}
测试代码
        for (int i = 0; i < 5; i++) {
            new Thread(() -> {
                System.out.println(LazySingle.getSingle());
            }).start();
        }
结果
org.rule.single.LazySingle@55080cc6
org.rule.single.LazySingle@55080cc6
org.rule.single.LazySingle@55080cc6
org.rule.single.LazySingle@55080cc6
org.rule.single.LazySingle@55080cc6
双重检查锁:
第二个检查是因为虽然字段通过volatile修饰使得变量在线程间可见,但是在一开始获取的时候,可能多个线程携带的初始值都是null进入的方法,这样虽然通过synchronized确保了一次只能有一个线程执行,但是还是会创建多个对象.
虽然去掉第一个检查也能保证单例,但是增加了获取锁和释放锁的消耗,在CPU繁忙时可能导致大量的线程阻塞.
通过内部类初始化
    //避免正常创建方式
    private LazySingle() { }
    //确保不会被重写
    public static final LazySingle getSingle1() {
        return LazyHold.single;
    }

    private static class LazyHold {
        public static final LazySingle single = new LazySingle();
    }
         for (int i = 0; i < 5; i++) {
            new Thread(() -> {
                System.out.println(LazySingle.getSingle1());
            }).start();
        }
结果
org.rule.single.LazySingle@7330523d
org.rule.single.LazySingle@7330523d
org.rule.single.LazySingle@7330523d
org.rule.single.LazySingle@7330523d
org.rule.single.LazySingle@7330523d
优点:可能兼顾了饿汉式的内存浪费,也避免了synchronized的性能消耗
缺点:多创建了类,虚拟机多加载了类(虚拟机不区分内部类或者外部类,都按正常类处理,只是存在一些变量作为标注),不一定避免了内存浪费.因为会创建新的Class对象到堆中.

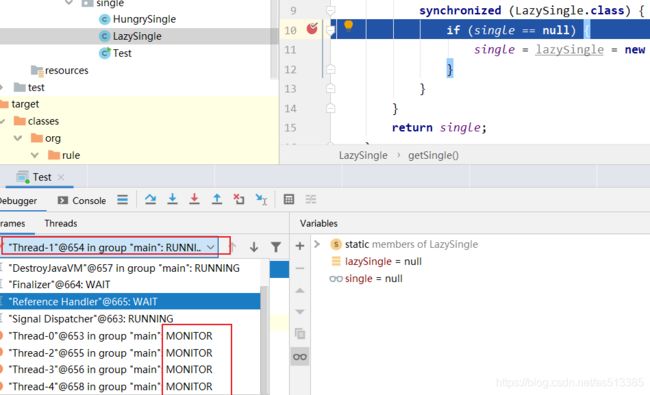
IDEA下多线程的调试
反射暴力攻击单例解决方案及原理分析
虽然构造方法通过设置私有访问符,确保了正常情况下不会被无意识破坏单例模式,但是可以通过反射调用的方式强制创建
    public static void reflectCreate() {
        try {
            Constructor<LazySingle> defaultConstructor = LazySingle.class.getDeclaredConstructor(null);
            defaultConstructor.setAccessible(true);
            for (int i = 0; i < 3; i++) {
                System.out.println(defaultConstructor.newInstance());
            }
        } catch (Exception e) {
            e.printStackTrace();
        }
    }
结果
org.rule.single.LazySingle@1b6d3586
org.rule.single.LazySingle@4554617c
org.rule.single.LazySingle@74a14482
为了避免这种情况,可以通过在构造中抛异常的方式,当单例变量不为null时,再次访问抛出异常
	//避免正常创建方式
    private LazySingle() {
    	//添加判断,当尝试创建多个时,报错
        if (LazyHold.single!=null){
            throw new RuntimeException("实例只能唯一");
        }
    }
序列化破坏单例的原理及解决方案。
序列化破坏单例的原理
案例代码如下:
//反序列化时导致单例破坏
public class SerialSingle implements Serializable {
    //序列化就是说把内存中的状态通过转换成字节码的形式
    //从而转换一个 IO 流,写入到其他地方(可以是磁盘、网络 IO)
    //将内存中状态给永久保存下来了

    //反序列化
    //将已经持久化的字节码内容,转换为 IO 流
    //通过 IO 流的读取,进而将读取的内容转换为 Java 对象
    //在转换过程中会重新创建对象 new
    private static final SerialSingle single = new SerialSingle();

    private SerialSingle() {
    }

    public static SerialSingle getSingle() {
        return single;
    }

  /*  private Object readResolve() {
        return single;
    }*/
}

    public static void serial() {
        SerialSingle s1 = null;
        SerialSingle s2 = SerialSingle.getSingle();
        try (
                FileOutputStream fos = new FileOutputStream("serialSingle.obj");
                ObjectOutputStream oos = new ObjectOutputStream(fos);
                FileInputStream fis = new FileInputStream("serialSingle.obj");
                ObjectInputStream ois = new ObjectInputStream(fis);
        ) {
            oos.writeObject(s2);
            s1= ((SerialSingle) ois.readObject());
            System.out.println(s1);
            System.out.println(s2);
        } catch (Exception e) {
            e.printStackTrace();
        }
    }
结果:
org.rule.single.SerialSingle@6d03e736
org.rule.single.SerialSingle@4dd8dc3
对于这种情况,可以为类添加一个readResolve()方法返回单例,这个方法会在反序列化的时候调用
可调用方法:
public class ObjectStreamClass implements Serializable {
...
/** class-defined writeObject method, or null if none */
    private Method writeObjectMethod;
    /** class-defined readObject method, or null if none */
    private Method readObjectMethod;
    /** class-defined readObjectNoData method, or null if none */
    private Method readObjectNoDataMethod;
    /** class-defined writeReplace method, or null if none */
    private Method writeReplaceMethod;
    /** class-defined readResolve method, or null if none */
    private Method readResolveMethod;
...
}
调用流程
虽然,增加 readResolve()方法返回实例,解决了单例被破坏的问题。但是,通过分析源码以及调试,可以看到实际上每次调用readObject还是会创建对象,只不过新创建的对象没有被返回而已。当然这种超出方法后不再可达的对象(obj)之后会被虚拟机垃圾回收掉,但是当这样创建对象的频率增大时,不可避免的增大垃圾回收频率
解决办法 注册式单例
注册式单例又称为登记式单例,就是将每一个实例都登记到某一个地方,使用唯一的标识获取实例。注册式单例有两种写法:一种为容器缓存,一种为枚举登记。先来看枚举式单例的写法,来看代码,创建 EnumSingleton 类:
public enum EnumSingleton {
    INSTANCE;
    private Object data;

    public Object getData() {
        return data;
    }

    public void setData(Object data) {
        this.data = data;
    }

    public static EnumSingleton getInstance() {
        return INSTANCE;
    }
}
调用
public static void serialEnum() {
        EnumSingleton s1 = null;
        EnumSingleton s2 = EnumSingleton.getInstance();
        s2.setData(new Object());
        try (
                FileOutputStream fos = new FileOutputStream("EnumSingleton.obj");
                ObjectOutputStream oos = new ObjectOutputStream(fos);
                FileInputStream fis = new FileInputStream("EnumSingleton.obj");
                ObjectInputStream ois = new ObjectInputStream(fis);
        ) {
            oos.writeObject(s2);
            s1 = ((EnumSingleton) ois.readObject());
            System.out.println(s1.getData());
            System.out.println(s2.getData());
        } catch (Exception e) {
            e.printStackTrace();
        }
    }
结果
java.lang.Object@568db2f2
java.lang.Object@568db2f2
没有做任何处理,运行结果和预期的一样。那么枚举式单例如此神奇,它是如何实现的.
下面代码由反编辑工具生成
public enum EnumSingleton
{
    INSTANCE;

    private Object data;
    private static final /* synthetic */ EnumSingleton[] $VALUES;

    public static EnumSingleton[] values() {
        return EnumSingleton.$VALUES.clone();
    }

    public static EnumSingleton valueOf(final String name) {
        return Enum.<EnumSingleton>valueOf(EnumSingleton.class, name);
    }

    public Object getData() {
        return this.data;
    }

    public void setData(final Object data) {
        this.data = data;
    }

    public static EnumSingleton getInstance() {
        return EnumSingleton.INSTANCE;
    }

    static {
        $VALUES = new EnumSingleton[] { EnumSingleton.INSTANCE };
    }
}
原来,枚举式单例在静态代码块中就给 INSTANCE 进行了赋值,是饿汉式单例的实现。
而序列化之所以无法破坏枚举单例是因为
private Object readObject0(boolean unshared) throws IOException {
...
case TC_ENUM:
return checkResolve(readEnum(unshared));
...
}
    private Enum<?> readEnum(boolean unshared) throws IOException {
        if (bin.readByte() != TC_ENUM) {
            throw new InternalError();
        }

        ObjectStreamClass desc = readClassDesc(false);
        if (!desc.isEnum()) {
            throw new InvalidClassException("non-enum class: " + desc);
        }

        int enumHandle = handles.assign(unshared ? unsharedMarker : null);
        ClassNotFoundException resolveEx = desc.getResolveException();
        if (resolveEx != null) {
            handles.markException(enumHandle, resolveEx);
        }

        String name = readString(false);
        Enum<?> result = null;
        Class<?> cl = desc.forClass();
        if (cl != null) {
            try {
                @SuppressWarnings("unchecked")
                Enum<?> en = Enum.valueOf((Class)cl, name);
                result = en;
            } catch (IllegalArgumentException ex) {
                throw (IOException) new InvalidObjectException(
                    "enum constant " + name + " does not exist in " +
                    cl).initCause(ex);
            }
            if (!unshared) {
                handles.setObject(enumHandle, result);
            }
        }

        handles.finish(enumHandle);
        passHandle = enumHandle;
        return result;
    }
枚举类型其实是通过类名和 Class 对象类找到一个唯一的枚举对象。因此,枚举对象不可能被类加载器加载多次。
那么反射是否能破坏枚举式单例呢?
java.lang.reflect.Constructor#newInstance
public T newInstance(Object ... initargs)
        throws InstantiationException, IllegalAccessException,
               IllegalArgumentException, InvocationTargetException
    {
...
        if ((clazz.getModifiers() & Modifier.ENUM) != 0)
            throw new IllegalArgumentException("Cannot reflectively create enum objects");
...
可以看到对于ENUM类做了一个保护,如果是枚举类就直接抛出异常
枚举式单例也是《Effective Java》书中推荐的一种单例实现写法。在 JDK 枚举的语法特殊性,以及反射也为枚举保 驾护航,让枚举式单例成为一种比较优雅的实现。
Spring 中的容器式单例的实现代码:
  public abstract class AbstractAutowireCapableBeanFactory extends AbstractBeanFactory implements AutowireCapableBeanFactory {
        /**
         * Cache of unfinished FactoryBean instances: FactoryBean name --> BeanWrapper
         */
        private final Map<String, BeanWrapper> factoryBeanInstanceCache = new ConcurrentHashMap<>(16); ...
    }
原型模式
原型模式的应用场景
当遇到过大篇幅 getter、setter 赋值的场景。例如这样的代码:
//试卷主键
public void setParam(ExamPaperVo vo){
        examPaper.setExaminationPaperId(vo.getExaminationPaperId());
        //剩余时间
        curForm.setLeavTime(examPaper.getLeavTime());
        //单位主键
        curForm.setOrganizationId(examPaper.getOrganizationId());
        //考试主键
        curForm.setId(examPaper.getId());
        //考场主键
        curForm.setExamroomId(examPaper.getExamroomId());
        //用户主键
        curForm.setUserId(examPaper.getUserId());
        //专业
        curForm.setSpecialtyCode(examPaper.getSpecialtyCode());
        //岗位
        curForm.setPostionCode(examPaper.getPostionCode());
        //等级
        curForm.setGradeCode(examPaper.getGradeCode());
        //考试开始时间
        curForm.setExamStartTime(examPaper.getExamStartTime());
        //考试结束时间
        curForm.setExamEndTime(examPaper.getExamEndTime());
        //单选题重要数量
        curForm.setSingleSelectionImpCount(examPaper.getSingleSelectionImpCount());
        //多选题重要数量
        curForm.setMultiSelectionImpCount(examPaper.getMultiSelectionImpCount());
        //判断题重要数量
        curForm.setJudgementImpCount(examPaper.getJudgementImpCount());
        //考试时间
        curForm.setExamTime(examPaper.getExamTime());
        //总分
        curForm.setFullScore(examPaper.getFullScore());
        //及格分
        curForm.setPassScore(examPaper.getPassScore());
        //学员姓名
        curForm.setUserName(examPaper.getUserName());
        //分数
        curForm.setScore(examPaper.getScore());
        //是否及格
        curForm.setResult(examPaper.getResult());
        curForm.setIsPassed(examPaper.getIsPassed());
        //单选答对数量
        curForm.setSingleOkCount(examPaper.getSingleOkCount());
        //多选答对数量
        curForm.setMultiOkCount(examPaper.getMultiOkCount());
        //判断答对数量
        curForm.setJudgementOkCount(examPaper.getJudgementOkCount());

        //提交试卷
        service.submit(examPaper);
}
虽然代码很工整,注释也很整齐,命名也很规范.但是这是纯体力劳动.
而原型模式,通过克隆对象的方式,解决了这样的问题
原型模式(Prototype Pattern)是指原型实例指定创建对象的种类,并且通过拷贝这些 原型创建新的对象。 原型模式主要适用于以下场景:
1、类初始化消耗资源较多。
2、new 产生的一个对象需要非常繁琐的过程(数据准备、访问权限等)
3、构造函数比较复杂。
4、循环体中生产大量相同变量值对象时。
简单克隆
public class CloneClient {
    private Prototype prototype;

    public CloneClient(Prototype prototype) {
        this.prototype = prototype;
    }

    public Prototype startClone() {
        return prototype.clone();
    }
}
//Cloneable 用于标注这个类可以被clone
public interface Prototype extends Cloneable  {
    Prototype clone();
}

public class ConcretePrototypeA implements Prototype {
    int id;
    String name;
    List hobbies;

    public ConcretePrototypeA() {
    }

    public ConcretePrototypeA(int id, String name, List hobbies) {
        this.id = id;
        this.name = name;
        this.hobbies = hobbies;
    }

    public String toOrginalString() {
        return super.toString();
    }

    @Override
    public String toString() {
        return "ConcretePrototypeA{" +
                "id=" + id +
                ", name='" + name + '\'' +
                ", hobbies=" + hobbies +
                '}';
    }

    @Override
    public Prototype clone() {
        try {
            return (Prototype) super.clone();
        } catch (CloneNotSupportedException e) {
            e.printStackTrace();
        }
        return null;
    }
}

    public static void main(String[] args) {
        //创建一个需要克隆的类
        ConcretePrototypeA prototypeA = new ConcretePrototypeA(1, "1", new ArrayList());
        ConcretePrototypeA prototypeB = ((ConcretePrototypeA) new CloneClient(prototypeA).startClone());
        System.out.println(prototypeA);
        System.out.println(prototypeB);
        System.out.println(prototypeA.toOrginalString());
        System.out.println(prototypeB.toOrginalString());
        System.out.println(prototypeA.hobbies==prototypeB.hobbies);
    }
输出值
ConcretePrototypeA{id=1, name='1', hobbies=[]}
ConcretePrototypeA{id=1, name='1', hobbies=[]}
org.rule.prototype.ConcretePrototypeA@1b6d3586
org.rule.prototype.ConcretePrototypeA@4554617c
true
可以看到通过clone创建了一个基本类型值相同,引用类型引用相同的新对象,这明显不符合一个全新对象的预期.
这样修改其中一个的引用变量就会影响到所有被克隆出来的对象.
这也就是常说的浅克隆,通过实现Cloneable接口,调用Object.clone实现.
深度克隆
通过序列化保存对象信息,反序列化根据对象信息生成新的对象
public class Computer implements Serializable, Cloneable {
    String name;
    double price;
    Keyboard keyboard;

    public Computer(String name, double price, Keyboard keyboard) {
        this.name = name;
        this.price = price;
        this.keyboard = keyboard;
    }

    @Override
    protected Object clone() throws CloneNotSupportedException {
        return super.clone();
    }

    public Object deepClone() {
        ByteArrayInputStream bis = null;
        ObjectInputStream ois = null;
        try (ByteArrayOutputStream bos = new ByteArrayOutputStream();
             ObjectOutputStream oos = new ObjectOutputStream(bos);
        ) {
            oos.writeObject(this);
            bis = new ByteArrayInputStream(bos.toByteArray());
            ois = new ObjectInputStream(bis);
            return ois.readObject();
        } catch (IOException | ClassNotFoundException e) {
            e.printStackTrace();
        } finally {
            close(bis,ois);
        }
        return null;
    }

    void close(Object... objects) {
        try {
            for (Object object : objects) {
                if (object instanceof AutoCloseable) ((AutoCloseable) object).close();
                if (object instanceof Flushable) ((Flushable) object).flush();
            }
        } catch (Exception e) {
            e.printStackTrace();
        }
    }
}
public class Lenovo extends Computer   {
    LocalDate dateInProduced;

    public Lenovo(String name, double price, Keyboard keyboard, LocalDate dateInProduced) {
        super(name, price, keyboard);
        this.dateInProduced = dateInProduced;
    }

    @Override
    public String toString() {
        return "Lenovo{" +
                "dateInProduced=" + dateInProduced +
                ", name='" + name + '\'' +
                ", price=" + price +
                ", keyboard=" + keyboard +
                '}';
    }
}
public class Keyboard implements Serializable {
    boolean isMachinery;

    public Keyboard(boolean isMachinery) {
        this.isMachinery = isMachinery;
    }

    @Override
    public String toString() {
        return "Keyboard{" +
                "isMachinery=" + isMachinery +
                '}';
    }
}
public class Test {
    public static void main(String[] args) throws CloneNotSupportedException {
        Lenovo computer= new Lenovo("Lenovo",
                5000,new Keyboard(true), LocalDate.now());
        Lenovo lenovo = ((Lenovo) computer.deepClone());
        System.out.println(lenovo);
        System.out.println(computer);
        System.out.println(lenovo.dateInProduced==computer.dateInProduced);
        System.out.println("深克隆"+(lenovo.keyboard==computer.keyboard));
        Lenovo lenovo1= ((Lenovo) computer.clone());
        System.out.println("浅克隆"+(lenovo1.keyboard==computer.keyboard));
    }
}
结果
Lenovo{dateInProduced=2020-11-25, name='Lenovo', price=5000.0, keyboard=Keyboard{isMachinery=true}}
Lenovo{dateInProduced=2020-11-25, name='Lenovo', price=5000.0, keyboard=Keyboard{isMachinery=true}}
false
深克隆false
浅克隆true
可以看到这些连引用类型变量都是新的了,这是因为反序列化生成对象的机制,就是根据序列化的对象信息新建一个对象.
克隆破坏单例模式
如果我们克隆的目标的对象是单例对象,那意味着,深克隆就会破坏单例。实际上防止 克隆破坏单例解决思路非常简单,禁止深克隆便可。要么你我们的单例类不实现 Cloneable 接口;要么我们重写 clone()方法,在 clone 方法中返回单例对象即可,具体 代码如下:
@Override
protected Object clone() throws CloneNotSupportedException {
return INSTANCE;
}
Cloneable 源码分析 先看我们常用的 ArrayList 就实现了 Cloneable 接口,来看代码 clone()方法的实现:
    public Object clone() {
        try {
            ArrayList<?> v = (ArrayList<?>) super.clone();
            v.elementData = Arrays.copyOf(elementData, size);
            v.modCount = 0;
            return v;
        } catch (CloneNotSupportedException e) {
            // this shouldn't happen, since we are Cloneable
            throw new InternalError(e);
        }
    }
可以看到是先浅克隆一个实例,然后通过 Arrays.copyOf(elementData, size);复制新建一个值对象数组(内部数据复制由system.arraycopy()实现),覆盖浅克隆生成的对象的值对象数组.


