Android Input系统之事件分发机制
/ 今日科技快讯 /
近日,微软对来自169个国家的用户进行了为期一周的必应搜索引擎人工智能新功能测试。微软在旗下必应搜索引擎和Edge浏览器中整合人工智能聊天机器人功能的举措成效初显,71%的测试者认可人工智能优化后的必应搜索结果。
/ 作者简介 /
明天就是周六啦,大家好好休息,咱们下周再见!
本篇文章转载自小余的自习室的博客,文章从底层分享了事件分发机制,相信会对大家有所帮助!
原文地址:
https://juejin.cn/post/7169835311868936222
/ 前言 /
上周的文章里我们讲解了《Android Input系统机制,从底层聊起》,这里再来回顾下:
开机后SystemServer启动过程中创建了InputManagerService,InputManagerService构造方法中在native层创建了NativeInputManager对象。
NativeInputManager构造方法中又创建了一个InputManager对象,InputManager构造方法中又创建了InputDispatcher和InputReader对象以及他们两个工作对应的线程 InputDispatcherThread和InputReaderThread。
InputManagerService在实例化完成后,SystemServer启动过程会继续调用其start方法启动IMS,实际是启动InputDispatcherThread和InputReaderThread线程。
在InputReaderThread线程中使用EventHub的getEvents方法去设备节点/dev/input下面获取节点数据。并在事件加工完成后并唤醒InputDispatcherThread线程去处理。
以上就是整个输入事件读取的过程,用一张总结关系:
本篇文章主要讲解关于IMS的输入事件分发的过程
/ 事件分发流程 /
为了让大家不会迷失在源码中,笔者先抛出几个问题,然后带着问题去看源码。
问题1:窗口什么时候传入IMS输入系统的?IMS是如何找到对应的Window窗口的?
问题2:IMS和WMS是通过什么方式通讯将事件分发出去的?
下面正式开始分析源码:
事件分发入口确定
上篇文章我们讲到事件读取流程将事件放入封装为KeyEntry放入到mInboundQueue队列的尾部tail,并唤醒InputDispatcherThread线程,就以这里为入口
void InputDispatcher::notifyKey(const NotifyKeyArgs* args) {
    ...
    KeyEntry* newEntry = new KeyEntry(args->eventTime,args->deviceId, ...);//1

    needWake = enqueueInboundEventLocked(newEntry); //2
    if (needWake) {
        mLooper->wake();//3
    }

}
bool InputDispatcher::enqueueInboundEventLocked(EventEntry* entry) {
    ...
    mInboundQueue.enqueueAtTail(entry);
}
事件分发线程唤醒
进入InputDispatcherThread的threadLoop方法:关于Thread的threadLoop方法解释已经在上篇文章讲过,这里不再重复。
bool InputDispatcherThread::threadLoop() {
    mDispatcher->dispatchOnce();//mDispatcher 是InputDispatcher类型对象
    return true;
}
void InputDispatcher::dispatchOnce() {
    ...
    if (!haveCommandsLocked()) {//1
        dispatchOnceInnerLocked(&nextWakeupTime);
    }
    ...
    if (runCommandsLockedInterruptible()) {//2
        nextWakeupTime = LONG_LONG_MIN;
    }
    mLooper->pollOnce(timeoutMillis);
}注释1处判断是否有指令需要执行,如果没有,则调用dispatchOnceInnerLocked去处理输入事件,如果有,则优先调用runCommandsLockedInterruptible处理事件, 为了让线程可以立即进入事件处理,将nextWakeupTime 设置为LONG_LONG_MIN,这样线程在指令执行完毕后可以立即被唤醒去处理输入事件。
从这里可以看出dispatchOnce主要是做了两个功能:1.执行指令 2.处理输入事件,且指令执行优先级高于输入事件处理。这里的指令例如:对waitQueue中的事件进行出栈,后面会讲到。
进入注释2输入事件处理:dispatchOnceInnerLocked
void InputDispatcher::dispatchOnceInnerLocked(nsecs_t* nextWakeupTime) {
    switch (mPendingEvent->type) {
    ...
    case EventEntry::TYPE_KEY: {
        KeyEntry* typedEntry = static_cast(mPendingEvent);
        ...
        done = dispatchKeyLocked(currentTime, typedEntry, &dropReason, nextWakeupTime);
        break;
    }

    case EventEntry::TYPE_MOTION: {
        MotionEntry* typedEntry = static_cast(mPendingEvent);
        ...
        done = dispatchMotionLocked(currentTime, typedEntry,
                &dropReason, nextWakeupTime);
        break;
    }
    if (done) {
        ...
        releasePendingEventLocked();
        *nextWakeupTime = LONG_LONG_MIN;  // force next poll to wake up immediately
    }

} dispatchOnceInnerLocked方法主要是根据事件的类型调用不同的处理方法。我们拿TYPE_KEY 按键事件来作为主线,关于TYPE_MOTION触摸事件处理逻辑都是差不过的,感兴趣的同学可以自行阅读源码。在事件处理分发完毕后会调用releasePendingEventLocked里面会释放对应的内存资源
mPendingEvent代表当前需要处理的输入事件,传递给dispatchKeyLocked去处理
bool InputDispatcher::dispatchKeyLocked(nsecs_t currentTime, KeyEntry* entry,
        DropReason* dropReason, nsecs_t* nextWakeupTime) {
    ...
    Vector inputTargets;
    int32_t injectionResult = findFocusedWindowTargetsLocked(currentTime,
            entry, inputTargets, nextWakeupTime); //1
    if (injectionResult == INPUT_EVENT_INJECTION_PENDING) {
        return false;
    }
    ...
    addMonitoringTargetsLocked(inputTargets);//2

    // Dispatch the key.
    dispatchEventLocked(currentTime, entry, inputTargets);  //3

} dispatchKeyLocked在注释1处获取按键事件对于的Window窗口,在注释2处放入一个监听input通道,注释3处实际处理事件处。
在讲解注释1处获取窗口逻辑前我们先来看下我们窗口是如何传入到InputDispatcher对象中的以及InputChannel概念。
事件分发通道注册
在之前一篇文章讲解Window体系的文章中讲过,我们Window是在ViewRootImpl的setView方法中传入WMS的。
public void setView(View view, WindowManager.LayoutParams attrs, View panelParentView) {
    ...
    mInputChannel = new InputChannel();
    res = mWindowSession.addToDisplay(mWindow, mSeq, mWindowAttributes,
                            getHostVisibility(), mDisplay.getDisplayId(),
                            mAttachInfo.mContentInsets, mAttachInfo.mStableInsets,
                            mAttachInfo.mOutsets, mInputChannel);
    if (mInputChannel != null) {
        mInputEventReceiver = new       WindowInputEventReceiver(mInputChannel,Looper.myLooper());
    }
}
mWindowSession是IWindowSession在app端的代理对象。实际执行的是Session类
frameworks\base\services\core\java\com\android\server\wm\Session.java
public int addToDisplay(IWindow window,...InputChannel outInputChannel) {
    return mService.addWindow(this, window, seq, attrs, viewVisibility, displayId,
            outContentInsets, outStableInsets, outOutsets, outInputChannel);
}
这里的mService是WMS对象,重点记住最后一个参数outInputChannel
WMS:
public int addWindow(Session session, IWindow client...InputChannel outInputChannel) {
    ...
    final WindowState win = new WindowState(this, session, client, token, parentWindow,
                    appOp[0], seq, attrs, viewVisibility, session.mUid,
                    session.mCanAddInternalSystemWindow);
    ...
    win.openInputChannel(outInputChannel);  //1
    if (focusChanged) {
        mInputMonitor.setInputFocusLw(mCurrentFocus, false /*updateInputWindows*/);//2
    }
}addWindow的注释1处调用WindowState打开InputChannel通道,什么是InputChannel通道呢?
进入WindowState的openInputChannel看看:
void openInputChannel(InputChannel outInputChannel) {
    ...
    String name = getName();
    InputChannel[] inputChannels = InputChannel.openInputChannelPair(name);//1
    mInputChannel = inputChannels[0];
    mClientChannel = inputChannels[1];
    mInputWindowHandle.inputChannel = inputChannels[0];
    if (outInputChannel != null) {
        mClientChannel.transferTo(outInputChannel);
        mClientChannel.dispose();
        mClientChannel = null;
    }
    ...
    mService.mInputManager.registerInputChannel(mInputChannel, mInputWindowHandle);//2
}
InputChannel.java:
public static InputChannel[] openInputChannelPair(String name) {
    ...
    return nativeOpenInputChannelPair(name);
}
android_view_InputChannel.cpp:
static jobjectArray android_view_InputChannel_nativeOpenInputChannelPair(JNIEnv* env...) {
    ...
    sp serverChannel;
    sp clientChannel;
    status_t result = InputChannel::openInputChannelPair(name, serverChannel, clientChannel);


    jobjectArray channelPair = env->NewObjectArray(2, gInputChannelClassInfo.clazz, NULL);
    jobject serverChannelObj = android_view_InputChannel_createInputChannel(env,
            std::make_unique(serverChannel));
    jobject clientChannelObj = android_view_InputChannel_createInputChannel(env,
            std::make_unique(clientChannel));
    ...
    env->SetObjectArrayElement(channelPair, 0, serverChannelObj);
    env->SetObjectArrayElement(channelPair, 1, clientChannelObj);
    return channelPair;

}

status_t InputChannel::openInputChannelPair(const String8& name,
        sp& outServerChannel, sp& outClientChannel) {
    int sockets[2];
    if (socketpair(AF_UNIX, SOCK_SEQPACKET, 0, sockets)) {
        ...
        return result;
    }
    ...
    outServerChannel = new InputChannel(serverChannelName, sockets[0]);
    outClientChannel = new InputChannel(clientChannelName, sockets[1]);
    return OK;
} 通过以上代码可以看出InputChannel使用的是sockets通讯,且WindowState的openInputChannel中注释1处:InputChannel[] inputChannels = InputChannel.openInputChannelPair(name),返回的inputChannels是一个服务端和客户端的输入通道数组 其中:下标0:表示服务端的InputChannel 下标1:表示客户端的InputChannel
有了这些基础我们再来细细品味下这段代码:为什么registerInputChannel传递的是mInputChannel而不是mClientChannel
void openInputChannel(InputChannel outInputChannel) {
    ...
    String name = getName();
    InputChannel[] inputChannels = InputChannel.openInputChannelPair(name);//1
    mInputChannel = inputChannels[0];
    mClientChannel = inputChannels[1];
    mInputWindowHandle.inputChannel = inputChannels[0];
    if (outInputChannel != null) {
        mClientChannel.transferTo(outInputChannel);
        mClientChannel.dispose();
        mClientChannel = null;
    }
    ...
    mService.mInputManager.registerInputChannel(mInputChannel, mInputWindowHandle);//2
}
通过前面分析知:
mInputChannel:服务端的InputChannel
mClientChannel:客户端的InputChannel
outInputChannel:app层传递进来的InputChannel
Channel模型
1. 调用mService.mInputManager.registerInputChannel
将wms在服务端的InputChannel注册到IMS中。这样在IMS输入系统就可以给服务端的InputChannel写入数据,在WMS的客户端InputChannel就可以读取数据
2. 调用mClientChannel.transferTo(outInputChannel)
将app端的InputChannel和wms的客户端InputChannel关联 这样就可以向客户端InputChannel中写入数据然后通知app端的InputChannel,实际传递给ViewRootImpl对象处理,接着就是View层面的处理了。
这里我们继续看注释2处:
mService.mInputManager.registerInputChannel 最终会进入native层:
frameworks\base\services\core\jni\com_android_server_input_InputManagerService.cpp
static void nativeRegisterInputChannel(JNIEnv* env, jclass /* clazz */,
        jlong ptr, jobject inputChannelObj, jobject inputWindowHandleObj, jboolean monitor) {
    NativeInputManager* im = reinterpret_cast(ptr);
    ...
    status_t status = im->registerInputChannel(
            env, inputChannel, inputWindowHandle, monitor);//1

}
frameworks/base/services/core/jni/com_android_server_input_InputManagerService.cpp
status_t NativeInputManager::registerInputChannel(JNIEnv* /* env */,
        const sp& inputChannel,
        const sp& inputWindowHandle, bool monitor) {
    return mInputManager->getDispatcher()->registerInputChannel(
            inputChannel, inputWindowHandle, monitor);
}

frameworks/native/services/inputflinger/InputDispatcher.cpp
status_t InputDispatcher::registerInputChannel(const sp& inputChannel,
        const sp& inputWindowHandle, bool monitor) {
        ...
        sp connection = new Connection(inputChannel, inputWindowHandle, monitor);

        int fd = inputChannel->getFd();
        mConnectionsByFd.add(fd, connection);
        ...

        // registerInputChannel里面传入的monitor是false --> nativeRegisterInputChannel(mPtr, inputChannel, inputWindowHandle, false);
        // 所以这个流程不会将窗口的channel放到mMonitoringChannels里面
        if (monitor) {
            mMonitoringChannels.push(inputChannel);
        }
        ...

}
im->registerInputChannel参数说明:
inputChannel:WMS在服务端InputChannel
inputWindowHandle:WMS内的一个包含Window所有信息的实例。
monitor:值为false,表示不加入监控
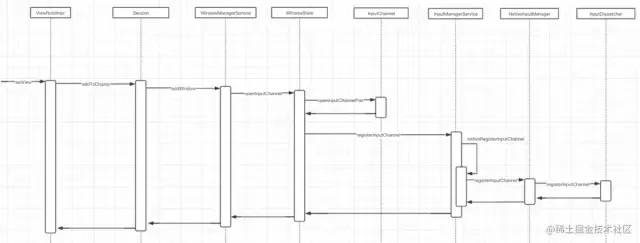
InputChannel时序图如下:
最后阶段在InputDispatcher中创建一个Connection并加入到mConnectionsByFd队列中,key为当前inputChannel的fd。获取的时候也是通过inputChannel的fd去获取
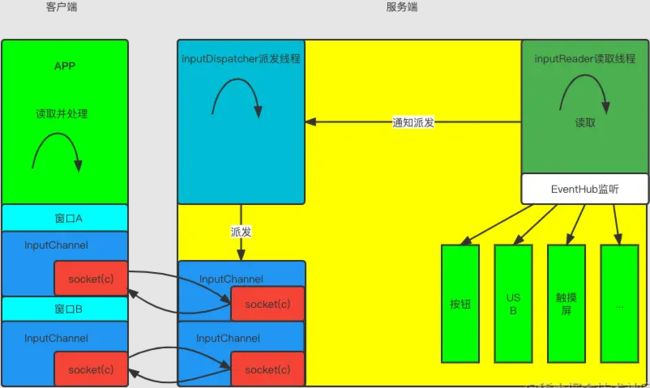
大概的通讯原理图如下:
通过上面的分析我们知道了,WMS和输入系统InputDispatcher使用的socket通讯,在View端,WMS端以及IMS端都有一个InputChannel。
哪个部分有数据需要分发就是将数据写入通道中。那么接下来我们看看IMS是如何选取对应的通道的。
事件分发窗口确认
回到InputDispatcher::dispatchKeyLocked方法
bool InputDispatcher::dispatchKeyLocked(nsecs_t currentTime, KeyEntry* entry,
        DropReason* dropReason, nsecs_t* nextWakeupTime) {
    ..
    int32_t injectionResult = findFocusedWindowTargetsLocked(currentTime,
            entry, inputTargets, nextWakeupTime); //1


    dispatchEventLocked(currentTime, entry, inputTargets);  //2

}进入findFocusedWindowTargetsLocked:这个方法就是用来确认当前需要传递事件的窗口。重点看inputTargets的赋值操作
int32_t InputDispatcher::findFocusedWindowTargetsLocked(...inputTargets){
    ...
    addWindowTargetLocked(mFocusedWindowHandle,
            InputTarget::FLAG_FOREGROUND | InputTarget::FLAG_DISPATCH_AS_IS, BitSet32(0),
            inputTargets);
    ...
}

void InputDispatcher::addWindowTargetLocked(const sp& windowHandle,
        int32_t targetFlags, BitSet32 pointerIds, Vector& inputTargets) {
    inputTargets.push();

    const InputWindowInfo* windowInfo = windowHandle->getInfo();
    InputTarget& target = inputTargets.editTop();
    target.inputChannel = windowInfo->inputChannel;
    target.flags = targetFlags;
    target.xOffset = - windowInfo->frameLeft;
    target.yOffset = - windowInfo->frameTop;
    target.scaleFactor = windowInfo->scaleFactor;
    target.pointerIds = pointerIds;

}
这里可以看出findFocusedWindowTargetsLocked方法中对inputTargets的头部数据进行了赋值 其中将windowInfo->inputChannel通道赋值给了target.inputChannel。那么这个windowInfo是个什么?怎么获取?
windowInfo是InputWindowHandle的属性,而InputWindowHandle传入的是一个mFocusedWindowHandle对象。从名字也可以大概看出这是一个包含焦点Window信息的对象。
那么这个焦点Window是在哪里赋值的呢?
事件分发窗口注册
我们回到WMS的addWindow步骤。
// frameworks/base/services/core/java/com/android/server/wm/WindowManagerService.java
@Override
public int addWindow(Session session, IWindow client, int seq,
            WindowManager.LayoutParams attrs, int viewVisibility, int displayId,
            Rect outContentInsets, Rect outStableInsets, Rect outOutsets,
            InputChannel outInputChannel) {
    ...
    if (focusChanged) {
        mInputMonitor.setInputFocusLw(mCurrentFocus, false /*updateInputWindows*/);
    }
    mInputMonitor.updateInputWindowsLw(false /*force*/);
    ...
}
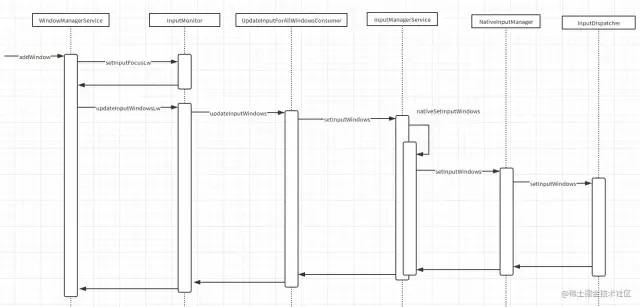
在焦点发生改变的时候会调用setInputFocusLw方法和updateInputWindowsLw updateInputWindowsLw经过层层调用最终会走到InputDispatcher::setInputWindows中
// frameworks/native/services/inputflinger/InputDispatcher.cpp
void InputDispatcher::setInputWindows(const Vector >& inputWindowHandles) {
    ...
    mWindowHandles = inputWindowHandles;

    sp newFocusedWindowHandle;
    ...
    for (size_t i = 0; i < mWindowHandles.size(); i++) {
        const sp& windowHandle = mWindowHandles.itemAt(i);
        ...
        if (windowHandle->getInfo()->hasFocus) {
            newFocusedWindowHandle = windowHandle;
        }
        ...
        mFocusedWindowHandle = newFocusedWindowHandle;
    }
    ...

}
看到了这里对mWindowHandles和mFocusedWindowHandle做了赋值。
mWindowHandles:代表所有Window的Handler对象
mFocusedWindowHandle:表示焦点Window的Handler对象 通过这些代码就让我们IMS中获取到了需要处理的焦点Window。
window窗口赋值时序图如下:
事件分发最终处理
继续回到回到InputDispatcher::dispatchKeyLocked方法的注释2
dispatchEventLocked(currentTime, entry, inputTargets); //2
void InputDispatcher::dispatchEventLocked(nsecs_t currentTime,
        EventEntry* eventEntry, const Vector& inputTargets) {
    ...
    for (size_t i = 0; i < inputTargets.size(); i++) {
        const InputTarget& inputTarget = inputTargets.itemAt(i);

        ssize_t connectionIndex = getConnectionIndexLocked(inputTarget.inputChannel);
        if (connectionIndex >= 0) {
            sp connection = mConnectionsByFd.valueAt(connectionIndex);
            prepareDispatchCycleLocked(currentTime, connection, eventEntry, &inputTarget);
        }
        ...
    }

}

ssize_t InputDispatcher::getConnectionIndexLocked(const sp& inputChannel) {
    ssize_t connectionIndex = mConnectionsByFd.indexOfKey(inputChannel->getFd());
    if (connectionIndex >= 0) {
        sp connection = mConnectionsByFd.valueAt(connectionIndex);
        if (connection->inputChannel.get() == inputChannel.get()) {
            return connectionIndex;
        }
    }

    return -1;

} dispatchEventLocked主要作用:轮询inputTargets,根据inputTarget.inputChannel获取其在mConnectionsByFd中的索引,根据索引获取Connection对象,并调用prepareDispatchCycleLocked进行处理。prepareDispatchCycleLocked方法内部调用了enqueueDispatchEntriesLocked方法
void InputDispatcher::enqueueDispatchEntriesLocked(connection,..){
    // Enqueue dispatch entries for the requested modes.
    enqueueDispatchEntryLocked(connection, eventEntry, inputTarget,...);//1
    ...
    // If the outbound queue was previously empty, start the dispatch cycle going.
    if (wasEmpty && !connection->outboundQueue.isEmpty()) {//2
        startDispatchCycleLocked(currentTime, connection);//3
    }
}

void InputDispatcher::enqueueDispatchEntryLocked(
        const sp& connection, EventEntry* eventEntry, const InputTarget* inputTarget,
        int32_t dispatchMode) {
    ...
    DispatchEntry* dispatchEntry = new DispatchEntry(eventEntry,
            inputTargetFlags, inputTarget->xOffset, inputTarget->yOffset,
            inputTarget->scaleFactor);

    switch (eventEntry->type) {
        case EventEntry::TYPE_KEY: {
            KeyEntry* keyEntry = static_cast(eventEntry);
            dispatchEntry->resolvedAction = keyEntry->action;
            dispatchEntry->resolvedFlags = keyEntry->flags;
            ...
            break;
        }
        ...
    }
    ...
    connection->outboundQueue.enqueueAtTail(dispatchEntry);
    ...

} 在注释1处enqueueDispatchEntryLocked方法中会将输入事件重新封装为一个DispatchEntry并压入connection的outboundQueue队列中。然后在注释2处判断如果事件不为空,则调用startDispatchCycleLocked循环发送输入事件。
void InputDispatcher::startDispatchCycleLocked(nsecs_t currentTime,
        const sp& connection) {
    while (connection->status == Connection::STATUS_NORMAL
            && !connection->outboundQueue.isEmpty()) {
        DispatchEntry* dispatchEntry = connection->outboundQueue.head;
        ...
        EventEntry* eventEntry = dispatchEntry->eventEntry;
        switch (eventEntry->type) {
        case EventEntry::TYPE_KEY: {
            KeyEntry* keyEntry = static_cast(eventEntry);

            // Publish the key event.
            status = connection->inputPublisher.publishKeyEvent(dispatchEntry->seq,
                    keyEntry->deviceId, keyEntry->source,
                    dispatchEntry->resolvedAction, dispatchEntry->resolvedFlags,
                    keyEntry->keyCode, keyEntry->scanCode,
                    keyEntry->metaState, keyEntry->repeatCount, keyEntry->downTime,
                    keyEntry->eventTime);
            break;
        }
        ...
        connection->outboundQueue.dequeue(dispatchEntry);
        connection->waitQueue.enqueueAtTail(dispatchEntry)
    }
    ...

}
startDispatchCycleLocked方法中调用publishKeyEvent,其内部会将事件写入到WMS传递下来的InputChannel通道中。这样WMS端的InputChannel就可以通过socket获取到事件信息。在发送完毕后会将事件移出connection->outboundQueue队列,并放入到waitQueue等待队列中,等待事件处理完毕后再移出
waitQueue用来监听当前分发给WMS的输入事件是否已经被处理完毕。什么时候知道事件处理完毕呢?
在InputDispatcher::registerInputChannel方法里面注册了handleReceiveCallback回调:
status_t InputDispatcher::registerInputChannel(...) {
        ...
        mLooper->addFd(fd, 0, ALOOPER_EVENT_INPUT, handleReceiveCallback, this);
        ...
}
当app层的事件处理完毕之后就会回调handleReceiveCallback
int InputDispatcher::handleReceiveCallback(int fd, int events, void* data) {
    InputDispatcher* d = static_cast(data);
    ...
    d->finishDispatchCycleLocked(currentTime, connection, seq, handled);
    ...
    d->runCommandsLockedInterruptible();
    ...
}
这里会先调用InputDispatcher::finishDispatchCycleLocked去往mCommandQueue里面加入一个执行InputDispatcher:: doDispatchCycleFinishedLockedInterruptible的Command:
void InputDispatcher::doDispatchCycleFinishedLockedInterruptible(
        CommandEntry* commandEntry) {
    sp connection = commandEntry->connection;
    ...
    DispatchEntry* dispatchEntry = connection->findWaitQueueEntry(seq);
    ...
    if (dispatchEntry == connection->findWaitQueueEntry(seq)) {
        connection->waitQueue.dequeue(dispatchEntry);
        ...
    }
}
doDispatchCycleFinishedLockedInterruptible中会将connection->waitQueue出栈,这样整个输入系统的分发过程就闭环了。
事件分发流程小结
下面对流程做一个总结:
1.ViewRootImpl在setView方法会创建一个InputChannel通道,并在将Window添加给WMS的过程时,以参数传递给WMS。
2.WMS在添加Window的过程中会调用updateInputWindows,这个方法最终会调用到InputDispatcher::setInputWindows中, 并给InputDispatcher的Window队列以及焦点Window赋值,这样IMS就可以找到对应的Window了
3.在WMS在添加Window的过程中还会创建一个socketpair通道的InputChannel,其中客户端的socket与app层的InputChannel关联,用于WMS与app通讯 服务端的socket传递给IMS,用于IMS和WMS通讯。
4.客户端在接收到输入事件后,会根据当前焦点Window的的InputChannel找到对应的Connection连接,这个Connection用于与WMS进行通讯,内部其实就是使用前面的socket通讯。
5.事件分发后将输入事件放入到waitQueue中,等待事件处理完毕后,将事件移出waitQueue
/ 问题复盘 /
那么关于开头的两个问题:
问题1:窗口什么时候传入IMS输入系统的?IMS又是如何找到对应的Window窗口的?
ViewRootImpl在setView方法中,调用addToDisplay将Window传递给WMS的时候,这个时候会调用InputMonitor.updateInputWindowsLw方法,最终会调用到InputDispatcher::setInputWindows,这里面会对IMS的WIndow属性进行赋值。IMS根据前面赋值的Window属性,就可以找到对应的焦点Window
问题2:IMS和WMS是通过什么方式通讯将事件分发出去的?
IMS和WMS是通过InputChannel通道进行通讯的,WMS在Window添加过程中会创建一个socket通道,将server端通道传递给IMS,而client端通道用于WMS中接收server端事件,server端根据对应的Window,找到对应的Connection,然后使用Connection进行通讯,而Connection内部就是通过socket进行通讯的
推荐阅读:
我的新书,《第一行代码 第3版》已出版!
LeakCanary是怎么检测到内存泄露的,看完这篇你就懂了
Kotlin Flow响应式编程,StateFlow和SharedFlow
欢迎关注我的公众号
学习技术或投稿
![]()
长按上图,识别图中二维码即可关注


