element-ui文件上传el-upload
element-ui官网中有文件上传
首先先展示一下我页面的实现效果,如下图所示:
从图中可以看出,我这边实现的是一个可显示进度条的文件上传操作,而且如果上传的文件很大等,还可以中断文件上传。
值得注意的是,如果有添加进度条,那就会存在一个bug,在文件没上传完时在点击重新上传文件进度条及百分比就会不停闪,原因是上个上传请求在同时进行。
当然这些代码也会在接下来的讲解中进行解决
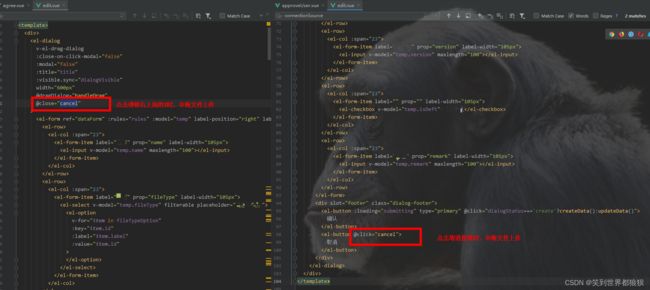
【解决方法】只需要在下图位置操作时中断请求即可
1.在弹框点击取消和右上角X的时候中断文件上传请求
2.页面上添加取消上传按钮,文件选择按钮点击后,文件选择按钮置灰,直到文件上传成功后才启用。或者用户可以点击取消上传,此时中断当前上传请求,文件上传按钮启用,用户可以点击按钮继续上传文件
接下来看看代码的大致结构:
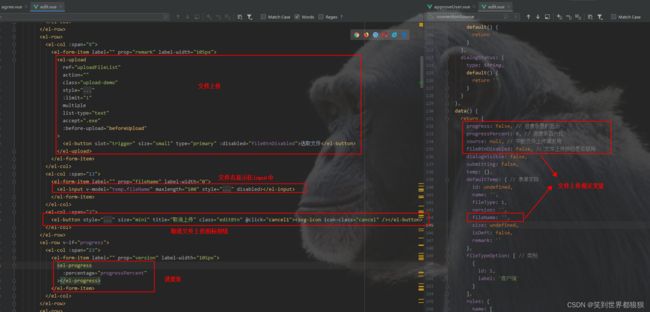
1.页面标签和变量声明
选取文件
progress: false, // 进度条是的显示
progressPercent: 0, // 进度条百分比
source: null, // 中断文件上传请求用
fileBtnDisabled: false, // 文件上传按钮是否禁用
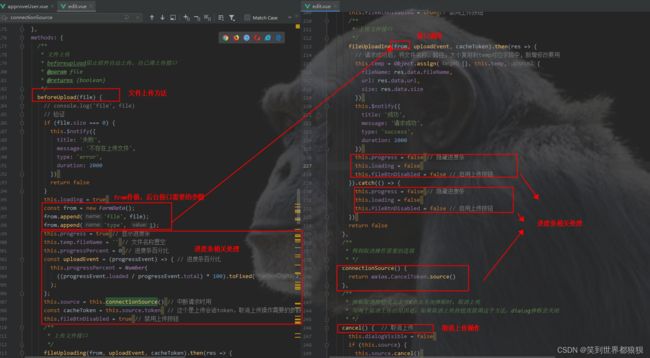
2.页面方法实现
/**
     * 文件上传
     * beforeupload阻止组件自动上传,自己调上传接口
     * @param file
     * @returns {boolean}
     */
    beforeUpload(file) {
      // console.log('file', file)
      // 验证
      if (file.size === 0) {
        this.$notify({
          title: '失败',
          message: '不存在上传文件',
          type: 'error',
          duration: 2000
        })
        return false
      }
      this.loading = true
      const from = new FormData();
      from.append('file', file);
      from.append('type', 1);
      this.progress = true // 显示进度条
      this.temp.fileName = '' // 文件名称置空
      this.progressPercent = 0 // 进度条百分比
      const uploadEvent = (progressEvent) => { // 进度条百分比
        this.progressPercent = Number(
          ((progressEvent.loaded / progressEvent.total) * 100).toFixed(2)
        );
      };
      this.source = this.connectionSource() // 中断请求时用
      const cacheToken = this.source.token  // 这个是上传会话token,取消上传操作需要的参数
      this.fileBtnDisabled = true // 禁用上传按钮
      /**
       * 上传文件接口
       */
      fileUploading(from, uploadEvent, cacheToken).then(res => {
        // 请求成功后,将文件名称,路径,大小复制到temp对应字段中,新增修改要用
        this.temp = Object.assign({}, this.temp, {
          fileName: res.data.fileName,
          url: res.data.url,
          size: res.data.size
        })
        this.$notify({
          title: '成功',
          message: '请求成功',
          type: 'success',
          duration: 2000
        })
        this.progress = false // 隐藏进度条
        this.loading = false
        this.fileBtnDisabled = false // 启用上传按钮
      }).catch(() => {
        this.progress = false // 隐藏进度条
        this.loading = false
        this.fileBtnDisabled = false // 启用上传按钮
      })
      return false
    },
    /**
     * 得到取消操作需要的连接
     * */
    connectionSource() {
      return axios.CancelToken.source()
    },
    /**
     * 弹框取消按钮或右上方X点击关闭弹框时,取消上传
     * 写两个取消上传的原因是,如果取消上传按钮直接调这个方法,dialog弹框会关闭
     * */
    cancel() {  // 取消上传
      this.dialogVisible = false
      if (this.source) {
        this.source.cancel()
        this.fileBtnDisabled = false
      }
    },
    /**
     * 取消上传按钮
     * */
    cancel1() {  // 取消上传
      if (this.source) {
        this.source.cancel()
        this.fileBtnDisabled = false
      }
    },
3.dialog弹框关闭时,中断文件上传
取消
4.中断请求还需要用到axios
import axios from 'axios' // 中断文件上传请求时使用5.接口修改
/**
 * 文件上传
 * (添加文件上传进度条和中断请求,对接口进行修改)
 * @returns {AxiosPromise}
 * type: 类型
 */
export function fileUploading(data, onUploadProgress, token) {
  return request.post('/file/upload', data, { 'Content-Type': 'multipart/form-data', timeout: 0, onUploadProgress, cancelToken: token })
  // return request({
  //   url: '/file/upload',
  //   method: 'post',
  //   data
  // })
}
经过上面一系列操作后,文件上传的功能就实现了,如果还有不清楚的话,我把edit.vue的代码全部附上,但是真正文件上传能用到的部分只有我上面代码抠出来的部分。附上全部代码只是为了方便大家查看具体一点的代码结构而已。
edit.vue完整代码:
选取文件
xx
好了,到此就结束了,希望这篇文章能帮助到大家


