vue 缩略图 多张图片上传
首先先上效果图
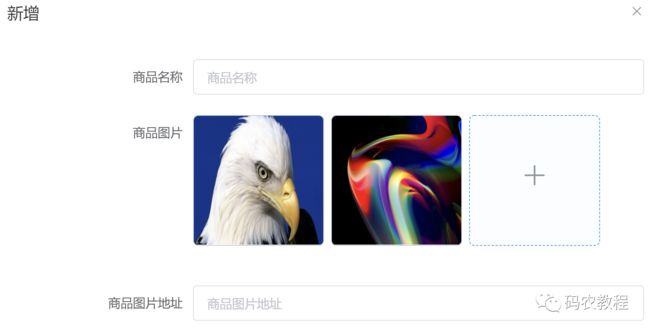
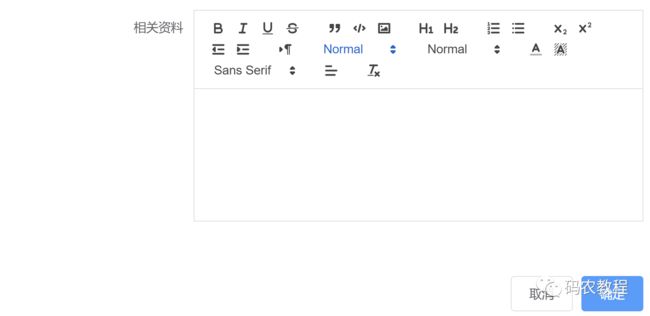
前台代码,只上与缩略图上传有关的。
![]()
![]()
![]()
export default {
data () {
return {
fileList: [],
dialogImageUrl: '',
dialogVisible: false,
formData: {
id: '',
goodsname: '',
fileaddress: '',
projectno: '',
overprice: '',
targetaddress: '',
releasetime: '',
project: '',
contacts: '',
relevant: '',
deleted: '',
createDate: '',
updateDate: '',
creator: '',
updater: '',
thumb: []
},
visible: false,
quillEditor: null,
uploadUrl: '',
dataForm: {
id: '',
goodsname: '',
fileaddress: '',
projectno: '',
overprice: '',
targetaddress: '',
releasetime: '',
project: '',
contacts: '',
relevant: '',
deleted: '',
createDate: '',
updateDate: '',
creator: '',
updater: '',
thumb: []
}
}
},
methods: {
// 上传图片涉及到的方法 删除图片目前还没有实现后台
handleRemove (file, fileList) {
this.fileList = fileList
// console.log(fileList);
this.$message({
type: 'info',
message: '已删除原有图片',
duration: 1000
})
},
handlePreview (file) {
this.dialogImageUrl = file.url
this.dialogVisible = true
},
handleChange (file, fileList) {
this.fileList = fileList
},
// 表单提交
create () {
console.log(this.fileList)
const set = this.$refs
this.formData = new FormData()
// eslint-disable-next-line no-unused-vars
for (const x in this.dataForm) {
if (x === 'id' && typeof this.dataForm[x] === 'undefined') {
this.formData.append(x, '')
} else {
this.formData.append(x, this.dataForm[x])
}
console.log(x + '>>>>' + this.dataForm[x])
}
for (let i = 0; i < this.fileList.length; i++) {
this.formData.append('files', this.fileList[i].raw)
}
// 页面参数赋值到页面中
// this.formData.releasetime = this.dataForm.releasetime
console.log(this.formData)
this.$http[!this.dataForm.id ? 'post' : 'put']('/businessapi/eccommodities/imgUploadList', this.formData,
{
headers: {
'Content-Type': 'multipart/form-data'
}
}
).then(({ data: res }) => {
if (res.code !== 0) {
return this.$message.error(res.msg)
}
this.$message({
message: this.$t('prompt.success'),
type: 'success',
duration: 500,
onClose: () => {
this.visible = false
this.$emit('refreshDataList')
}
})
}).catch(() => {})
},
// 下面方法 是点击新增初始化,与上传图片无关。
init () {
this.visible = true
this.$nextTick(() => {
if (this.quillEditor) {
this.quillEditor.deleteText(0, this.quillEditor.getLength())
} else {
this.quillEditorHandle()
}
this.$refs.dataForm.resetFields()
if (this.dataForm.id) {
this.getInfo()
}
})
},
// 获取信息
getInfo () {
this.$http.get('/businessapi/eccommodities/' + this.dataForm.id).then(({ data: res }) => {
if (res.code !== 0) {
return this.$message.error(res.msg)
}
this.dataForm = {
...this.dataForm,
...res.data
}
this.quillEditor.root.innerHTML = this.dataForm.relevant
}).catch(() => {})
},
// 上传图片之前
uploadBeforeUploadHandle (file) {
if (file.type !== 'image/jpg' && file.type !== 'image/jpeg' && file.type !== 'image/png' && file.type !== 'image/gif') {
this.$message.error('只支持jpg、png、gif格式的图片!')
return false
}
}
}
}对上面代码简单解释,细心的老铁会发现里面有一个dataForm,和formData。
1、dataForm 是vue 双向绑定用的。而 formData 是上面72行初始化后,将图片List (fileList) 以参数名 files 赋值。
2、88行 this.$http 这个是每个vue 请求后台的封装,每个项目封装的名称可能都不相同。
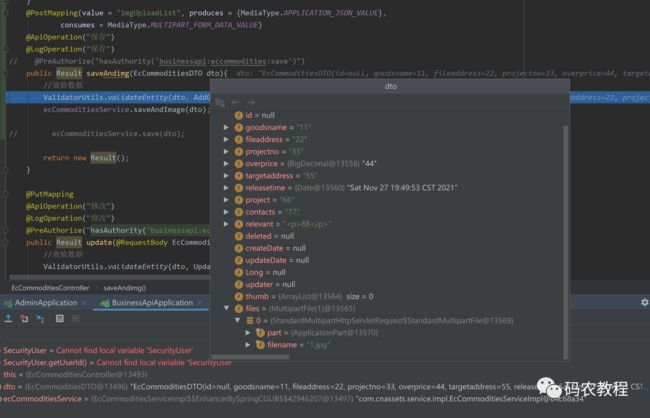
后台 Controller
@PostMapping(value = "imgUploadList", produces = {MediaType.APPLICATION_JSON_VALUE},
consumes = MediaType.MULTIPART_FORM_DATA_VALUE)
@ApiOperation("保存")
@LogOperation("保存")
// @PreAuthorize("hasAuthority('businessapi:eccommodities:save')")
public Result saveAndimg(EcCommoditiesDTO dto){
//效验数据
ValidatorUtils.validateEntity(dto, AddGroup.class, DefaultGroup.class);
ecCommoditiesService.saveAndImage(dto);
// ecCommoditiesService.save(dto);
return new Result();
}接收 的 dto(EcCommoditiesDTO)
@Data
@ApiModel(value = "招商商品")
public class EcCommoditiesDTO implements Serializable {
private static final long serialVersionUID = 1L;
@ApiModelProperty(value = "id")
private Long id;
@ApiModelProperty(value = "商品名称")
private String goodsname;
@ApiModelProperty(value = "商品图片地址")
private String fileaddress;
@ApiModelProperty(value = "项目编号")
private String projectno;
@ApiModelProperty(value = "转让价格")
private BigDecimal overprice;
@ApiModelProperty(value = "标的所在地")
private String targetaddress;
@ApiModelProperty(value = "发布时间")
@JsonFormat(pattern = DateUtils.DATE_TIME_PATTERN)
private Date releasetime;
@ApiModelProperty(value = "项目概况")
private String project;
@ApiModelProperty(value = "联系人")
private String contacts;
@ApiModelProperty(value = "相关资料")
private String relevant;
@ApiModelProperty(value = "删除标示")
private Integer deleted;
@ApiModelProperty(value = "创建时间")
private Date createDate;
@ApiModelProperty(value = "修改时间")
private Date updateDate;
@ApiModelProperty(value = "创建人")
private String Long;
@ApiModelProperty(value = "修改人")
private Long updater;
private List thumb;
private MultipartFile[] files;
} Service 省略... ....
下面是实现类impl
@Autowired
private ImagUtils imagUtils;
@Override
    public void saveAndImage(EcCommoditiesDTO dto) {
        Long userId = SecurityUser.getUserId();
        EcCommoditiesEntity ecCommoditiesEntity = ConvertUtils.sourceToTarget(dto, EcCommoditiesEntity.class);
        baseDao.insert(ecCommoditiesEntity);
        Long id = ecCommoditiesEntity.getId();
        MultipartFile[] files = dto.getFiles();
        for (MultipartFile file : files) {
        // 这里的文件上传写了共同方法
            Result uploadDtoResult = imagUtils.imgUpload(file);
            int code = uploadDtoResult.getCode();
            if (code == 0) {
                UploadDto data = uploadDtoResult.getData();
                EcCommoditimageEntity ecCommoditimageEntity = new EcCommoditimageEntity();
                ecCommoditimageEntity.setCommoditesid(id);
                ecCommoditimageEntity.setImageurl(data.getUrl());
                ecCommoditimageEntity.setImgname(data.getFileName());
                ecCommoditimageEntity.setCreater(userId);
                ecCommoditimageService.insert(ecCommoditimageEntity);
            }
        }
} 上面代码解释:将商品信息存入商品表。将图片信息 存入 商品图片表。
dao层 和 xml 省略... ... 本人使用的 是 mybatis-plus-cose 包
上文件上传工具类。
package com.cnassets.utils.fileUtil;
import com.cnassets.commons.tools.constant.Constant;
import com.cnassets.commons.tools.utils.Result;
import com.cnassets.dto.UploadDto;
import org.springframework.beans.factory.annotation.Value;
import org.springframework.core.io.ResourceLoader;
import org.springframework.stereotype.Component;
import org.springframework.web.multipart.MultipartFile;
import java.io.File;
/**
* @Author z
* @Date 2021/11/27 12:35
* @Version 1.0
*/
// @Component 注解不能忽略。需要启动时注入
@Component
public class ImagUtils {
private final ResourceLoader resourceLoader;
// web.profile 配置在 配置在文件中的 上传路径。
@Value("${web.profile}")
private String path;
public ImagUtils(ResourceLoader resourceLoader) {
this.resourceLoader = resourceLoader;
}
/**
* 单图片上传
* @param file
* @return
*/
public Result imgUpload(MultipartFile file) {
if (file.isEmpty()) {
return new Result().error("文件不能为空");
}
try {
//1.定义上传的文件
String localPath = path;
//2.获得文件名字
String fileName = file.getOriginalFilename();
//3.上传
//3.1 生成新的文件路径和文件名
String realPath = FileNameUtils.datePath() + File.separator + FileNameUtils.getFileName(fileName);
// 保存的文件及文件地址
String savePath = localPath + File.separator + realPath;
//3.2 保存文件
File dest = new File(savePath);
//判断文件目目录是否存在,不存在则新建
if (!dest.getParentFile().exists()){
dest.getParentFile().mkdirs();
}
file.transferTo(dest);
//保存路径到数据库
// RESOURCE_PREFIX = "/profile";
String url = Constant.RESOURCE_PREFIX + File.separator + realPath;
UploadDto uploadDto = new UploadDto();
uploadDto.setFileName(fileName);
uploadDto.setUrl(url);
return new Result().ok(uploadDto);
} catch (Exception e) {
e.printStackTrace();
return new Result().error("文件上传失败");
}
}
}

UploadDto 类
package com.cnassets.dto;
import io.swagger.annotations.ApiModel;
import io.swagger.annotations.ApiModelProperty;
import lombok.Data;
/**
* @Author z
* @Date 2021/11/2 11:35
* @Version 1.0
*/
@Data
@ApiModel(value = "上传信息")
public class UploadDto {
@ApiModelProperty(value = "文件URL")
private String url;
@ApiModelProperty(value = "文件名称")
private String fileName;
}至此上传文件已经完成。上传文件的 工具类涉及到其他的工具类。也就是生成路径,和名字的。这里不贴了。贴出来太乱。下篇会专门写一篇文件说说我使用的上传的上传。和一些上传的配置。包括给大家展示,存入数据库后的地址。
下面是简单的展示:

今天就到这里了。如果大家有什么想知道的。可以留言,
感谢有缘人,感谢关注!感谢分享!