Springboot整合并连接虚拟机Linux上的Redis7
目录
概述影响连接因素:
前置条件:
步骤一:
关闭防火墙!关闭防火墙!关闭防火墙!重要的事情说三遍(ps:不要听信网络上说Ubuntu没有防火墙,也是有的!不管开不开放端口,关了再说!)
步骤二:
修改redis.conf文件
详细步骤及解释:
步骤三:
配置Springboot依赖
步骤四:
修改配置文件(建议使用.yml)
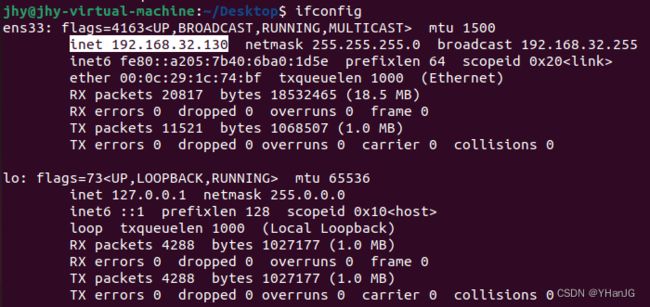
查看redis服务器地址:
编辑
步骤五:
编写RedisConfig配置类
步骤六:
编写RedisTestController进行测试
Springboot文件框架
概述影响连接因素:
- springboot版本,作者亲测
2.3.7.RELEASE可行,其他版本不一定可行,如3.0.6就不行,会报错。
-
Linux防火墙
-
redis.conf配置,特别是密码!!!(作者亲测没有密码不行!且密码最好包含字母和数字,否则作者亲测也不行)
前置条件:
- 在虚拟机上安装好redis(作者为最新版Redis7),且确保虚拟机联网.
- redis.conf文件被复制在了/etc下(一定要复制一份,不然改错了就麻烦了)
- 若ubuntu修改文件操作奇怪比如上下左右键会变成abcd delete键无法正常使用,可以看作者的这篇文章,也是走过的坑实测可用。Ubuntu 编辑文件时上下左右键和Del键和空格回车键失灵_YHanJG的博客-CSDN博客
步骤一:
关闭防火墙!关闭防火墙!关闭防火墙!重要的事情说三遍(ps:不要听信网络上说Ubuntu没有防火墙,也是有的!不管开不开放端口,关了再说!)
以Ubuntu为例,关闭代码为:
sudo ufw disable然后输入以下root用户的密码就可以了(注意下次重新开机还要再关闭哦!)
其他linux系统代码:
sudo systemctl stop firewalld步骤二:
修改redis.conf文件
详细步骤及解释:
sudo vi /etc/redis.conf      //一定要加上sudo用管理员权限去修改
系统要求输入密码:
/daem                        //搜索单词中以daem开头的
输入i进入修改模式
改为
daemonize yes
按esa键退出修改模式
/protected-mode              //搜索单词protected-mode
输入i进入修改模式
改为
protected-mode no
按esa键退出修改模式
/bind 127.0.0.1 -::1
输入i进入修改模式
注释掉
#bind 127.0.0.1 -::1
按esa键退出修改模式
/requirepass                 //搜索单词requirepass
输入i进入修改模式
取消注释 并且在requirepass后面输入自己的密码
requirepass yhanjg123
按esa键退出修改模式
按下:键输入
wq!
保存修改并退出
至此步骤二结束
(若ubuntu修改文件操作奇怪比如上下左右键会变成abcd delete键无法正常使用,可以去前置条件中参考作者的一篇文章两行代码解决)
步骤三:
配置Springboot依赖
简单起见自己创建一个新的Springboot框架之后将pom.xml文件全部删除,将以下代码复制进去即可(如果maven下载过慢建议将默认maven改为阿里云镜像):
    4.0.0
    com.atguigu
    redis
    0.0.1-SNAPSHOT
    redis
    Demo project for Spring Boot


        1.8
        UTF-8
        UTF-8
        2.3.7.RELEASE


            org.springframework.boot
            spring-boot-starter-data-redis


            org.springframework.boot
            spring-boot-starter-test
            test


                    org.junit.vintage
                    junit-vintage-engine


            org.apache.commons
            commons-pool2


            com.fasterxml.jackson.core
            jackson-annotations


            com.fasterxml.jackson.core
            jackson-databind


            org.springframework.boot
            spring-boot-starter-web


                org.springframework.boot
                spring-boot-dependencies
                ${spring-boot.version}
                pom
                import


                org.apache.maven.plugins
                maven-compiler-plugin
                3.8.1

                    1.8
                    1.8
                    UTF-8


                org.springframework.boot
                spring-boot-maven-plugin
                2.3.7.RELEASE

                    com.atguigu.redis.RedisApplication


                        repackage

                            repackage
步骤四:
修改配置文件(建议使用.yml)
在application.properties同级文件夹下new一个File命名为application.yml
在application.yml中写入以下代码:
spring:
  redis:
    # Redis服务器地址,改成自己的,下文有查看操作
    host: 192.168.32.130
    # Redis服务器端口号
    port: 6379
    # 使用的数据库索引,默认是0
    database: 0
    # 连接超时时间
    timeout: 1800000
    # 设置密码,注意是英文单引号,将单引号中间改为自己的密码
    password: 'yhanjg123'
    lettuce:
      pool:
        # 最大阻塞等待时间,负数表示没有限制
        max-wait: -1
        # 连接池中的最大空闲连接
        max-idle: 5
        # 连接池中的最小空闲连接
        min-idle: 0
        # 连接池中最大连接数,负数表示没有限制
        max-active: 20
查看redis服务器地址:
在liunx命令行中输入
ifconfig标白处即为自己的redis服务器地址。
步骤五:
编写RedisConfig配置类
新建RedisConfig类,并将以下代码覆盖上去
package com.example.testttt;

import com.fasterxml.jackson.annotation.JsonAutoDetect;
import com.fasterxml.jackson.annotation.PropertyAccessor;
import com.fasterxml.jackson.databind.ObjectMapper;
import org.springframework.cache.CacheManager;
import org.springframework.cache.annotation.CachingConfigurerSupport;
import org.springframework.cache.annotation.EnableCaching;
import org.springframework.context.annotation.Bean;
import org.springframework.context.annotation.Configuration;
import org.springframework.data.redis.cache.RedisCacheConfiguration;
import org.springframework.data.redis.cache.RedisCacheManager;
import org.springframework.data.redis.connection.RedisConnectionFactory;
import org.springframework.data.redis.core.RedisTemplate;
import org.springframework.data.redis.serializer.Jackson2JsonRedisSerializer;
import org.springframework.data.redis.serializer.RedisSerializationContext;
import org.springframework.data.redis.serializer.RedisSerializer;
import org.springframework.data.redis.serializer.StringRedisSerializer;

import java.time.Duration;

@EnableCaching //开启缓存
@Configuration  //配置类
public class RedisConfig extends CachingConfigurerSupport {

    @Bean
    public RedisTemplate redisTemplate(RedisConnectionFactory factory) {
        RedisTemplate template = new RedisTemplate<>();
        RedisSerializer redisSerializer = new StringRedisSerializer();
        Jackson2JsonRedisSerializer jackson2JsonRedisSerializer = new Jackson2JsonRedisSerializer(Object.class);
        ObjectMapper om = new ObjectMapper();
        om.setVisibility(PropertyAccessor.ALL, JsonAutoDetect.Visibility.ANY);
        om.enableDefaultTyping(ObjectMapper.DefaultTyping.NON_FINAL);
        jackson2JsonRedisSerializer.setObjectMapper(om);
        template.setConnectionFactory(factory);
        //key序列化方式
        template.setKeySerializer(redisSerializer);
        //value序列化
        template.setValueSerializer(jackson2JsonRedisSerializer);
        //value hashmap序列化
        template.setHashValueSerializer(jackson2JsonRedisSerializer);
        return template;
    }

    @Bean
    public CacheManager cacheManager(RedisConnectionFactory factory) {
        RedisSerializer redisSerializer = new StringRedisSerializer();
        Jackson2JsonRedisSerializer jackson2JsonRedisSerializer = new Jackson2JsonRedisSerializer(Object.class);
        //解决查询缓存转换异常的问题
        ObjectMapper om = new ObjectMapper();
        om.setVisibility(PropertyAccessor.ALL, JsonAutoDetect.Visibility.ANY);
        om.enableDefaultTyping(ObjectMapper.DefaultTyping.NON_FINAL);
        jackson2JsonRedisSerializer.setObjectMapper(om);
        // 配置序列化(解决乱码的问题),过期时间600秒
        RedisCacheConfiguration config = RedisCacheConfiguration.defaultCacheConfig()
                .entryTtl(Duration.ofSeconds(600))
                .serializeKeysWith(RedisSerializationContext.SerializationPair.fromSerializer(redisSerializer))
                .serializeValuesWith(RedisSerializationContext.SerializationPair.fromSerializer(jackson2JsonRedisSerializer))
                .disableCachingNullValues();
        RedisCacheManager cacheManager = RedisCacheManager.builder(factory)
                .cacheDefaults(config)
                .build();
        return cacheManager;
    }
}
至此Redis已经连接成功,我们可以再编写一个测试类,来测试我们的连接。
步骤六:
编写RedisTestController进行测试
package com.example.test;

import org.springframework.beans.factory.annotation.Autowired;
import org.springframework.data.redis.core.RedisTemplate;
import org.springframework.web.bind.annotation.GetMapping;
import org.springframework.web.bind.annotation.RestController;
@RestController
public class RedisTestController {

    @Autowired
    private RedisTemplate redisTemplate;

    @GetMapping("/t")
    public String  testRedis(){
        //设置值到redis里面去
        redisTemplate.opsForValue().set("auth","YHanJG");
        //获取值
        String name = (String) redisTemplate.opsForValue().get("auth");
        return name;
    }


}
然后我们启动我们的springboot尝试发送/t请求
springboot启动成功
redis连接成功


