vue-实战记录-前端导出excel文件、pdf文件、word文件
一、excel文件导出
1、引入npm包
npm install --save table-xlsx @pengchen/xlsx
第三方包文档:https://pengchen96.github.io/table-xlsx/docs/tutorial-basics/start
表格支持行/列合并
2、定义导出函数
/**
 * export table
 * @param data 表格数据
 * @param columns 表格表头
 * @param fileName 导出文件名
 */
export function onTableExport(data, columns, fileName) {
  // 过滤无用的操作列
  const tColumns = columns.filter(item => item.dataIndex !== 'action')
  const thead = [
    {
      title: fileName, // 将文件名作为excel表格总标题
      children: tColumns
    }
  ]
  exportFile({
    columns: thead,
    dataSource: data,
    cellStyle: { // 单元格样式
      alignmentHorizontal: 'center',
      borderColorRgb: '000000'
    },
    headerCellStyle: { // 表头样式
      fillFgColorRgb: 'ffffff',
      fontBold: false,
      borderColorRgb: '000000',
      alignmentHorizontal: 'center'
    },
    bodyCellStyle: { // 表格内容单元格样式
      alignmentHorizontal: 'center'
    },
    fileName: `${fileName + new Date().getTime()}.xlsx`
  })
}
4、使用
data() {
	return {
		columns: [
			{
	          title: 'ID',
	          dataIndex: 'id',
	          align: 'center',
	        },
	        {
	          title: '计划名',
	          dataIndex: 'name',
	          align: 'center',
	        },
	        {
	          title: '开始时间',
	          dataIndex: 'createTime',
	          align: 'center',
	          customRender: text => moment(text).format('YYYY-MM-DD HH:MM:SS')
	        },
	        {
	          title: '结束时间',
	          dataIndex: 'endTime',
	          align: 'center',
	          customRender: text => moment(text).format('YYYY-MM-DD HH:MM:SS')
	        },
	        {
	          title: '操作',
	          dataIndex: 'action',
	          align: 'center',
	          fixed: 'right',
	          scopedSlots: { customRender: 'action' }
	        }
		],
		dataSource: []
	}
}
...

	methods: {
		planExport() {
		// this.$toolsFn.是定义全局的工具函数
			let data = this.$toolsFn.deepCopy(this.dataSource) // 深拷贝数据再进行处理
	      	data.map(item => {
	      		// 转换时间格式 - 如2022-09-07 22:09:03
		        item.createTime = moment(item.createTime).format('YYYY-MM-DD HH:MM:SS')
		        item.endTime = moment(item.endTime).format('YYYY-MM-DD HH:MM:SS')
		      })
	      this.$toolsFn.onTableExport(data, this.columns, '生产计划表')
	    },
	}
二、pdf文件导出
通过html2canvas对已经写好的页面生成图片,再通过jspdf把生成好的图片封装成pdf文件(不可编辑)
2、定义导出pdf函数
import html2Canvas from 'html2canvas'
import JsPDF from 'jspdf'
import $ from 'jquery'
export default {
  install(Vue, options) {
    Vue.prototype.getPdf = function(node, title) {
      const A4_WIDTH = 592.28
      const A4_HEIGHT = 841.89
      document.documentElement.scrollTop = 0 // 恢复滚动条
      const imageWrapper = document.querySelector('#' + node) // 获取DOM
      let pageHeight = (imageWrapper.scrollWidth / A4_WIDTH) * A4_HEIGHT
      let pItem = imageWrapper.querySelectorAll('.pdf')
       // 判断当前dom节点是不是处于A4页面底部
      const isSplit = (nodes, index, pageHeight) => {
        if (
          nodes[index].offsetTop + nodes[index].offsetHeight < pageHeight &&
          nodes[index + 1] &&
          nodes[index + 1].offsetTop + nodes[index + 1].offsetHeight > pageHeight
        ) {
          return true
        }
        return false
      }
      // 解决分页字体分割问题
      for (let i = 0; i < pItem.length; i++) {
        let multiple = Math.ceil((pItem[i].offsetTop + pItem[i].offsetHeight) / pageHeight)
        if (isSplit(pItem, i, multiple * pageHeight)) {
          let divParent = pItem[i].parentNode // 获取该div的父节点
          let newNode = document.createElement('div')
          newNode.className = 'emptyDiv'
          newNode.style.background = '#ffffff'
          let _H = multiple * pageHeight - (pItem[i].offsetTop + pItem[i].offsetHeight)
          //留白
          newNode.style.height = _H + 180 + 'px'
          newNode.style.width = '100%'
          let next = pItem[i].nextSibling // 获取div的下一个兄弟节点
          // 判断兄弟节点是否存在
          if (next) {
            // 存在则将新节点插入到div的下一个兄弟节点之前,即div之后
            divParent.insertBefore(newNode, next)
          } else {
            // 不存在则直接添加到最后,appendChild默认添加到divParent的最后
            divParent.appendChild(newNode)
          }
        }
      }

      html2Canvas(imageWrapper, {
        allowTaint: true, // 开启跨域
        scale: 4, // 设置清晰度,数值越高越清晰,生成的图片越大
        useCORS: true,
        backgroundColor: '#FFF'
        // dpi: 350
      }).then(function(canvas) {
        let contentWidth = canvas.width
        let contentHeight = canvas.height
        //一页pdf显示html页面生成的canvas高度;
        let pageHeight = (contentWidth / A4_WIDTH) * A4_HEIGHT
        //生成pdf的html页面高度
        let htmlHeight = contentHeight
        //页面偏移
        let position = 0
        //a4纸的尺寸[A4_WIDTH,A4_HEIGHT],html页面生成的canvas在pdf中图片的宽高
        let imgWidth = A4_WIDTH
        let imgHeight = (A4_WIDTH / contentWidth) * contentHeight
        let pageData = canvas.toDataURL('image/jpeg', 1.0)
        // 2为上面的scale 缩放了2倍
        let PDF = new JsPDF('', 'pt', 'a4')
        //有两个高度需要区分,一个是html页面的实际高度,和生成pdf的页面高度(841.89)
        //当内容未超过pdf一页显示的范围,无需分页
        if (htmlHeight < pageHeight) {
          PDF.addImage(pageData, 'JPEG', 4, 0, imgWidth, imgHeight)
        } else {
          while (htmlHeight > 0) {
            PDF.addImage(pageData, 'JPEG', 4, position, imgWidth, imgHeight)
            htmlHeight -= pageHeight
            position -= 841.89
            if (htmlHeight > 0) {
              //避免添加空白页
              PDF.addPage()
            }
          }
        }
        PDF.save(title + '.pdf')

        // 移除添加的空div - 偷懒用了jquery
        $('.emptyDiv').remove()
      })
    }
  }
}
3、定义页面纯粹的vue-html页面
4、调用
 exportPdf() {
      this.contractVisible = false
      this.$nextTick(() => {
        this.getPdf('pdfDom', '某某合同')
      })
    }
三、word文件导出
1、引入npm包
npm install pizzip --save
npm install docxtemplater --svae
npm install jszip-utils --save
npm install file-saver --save
2、 定义exportDocx.js文件
参考如下代码: (我也是参考下面代码)
import PizZip from 'pizzip'
import docxtemplater from 'docxtemplater'
import JSZipUtils from 'jszip-utils'
import { saveAs } from 'file-saver'
/**
 * 将图片的url路径转为base64路径
 * 可以用await等待Promise的异步返回
 * @param {Object} imgUrl 图片路径
 */
export const getBase64Sync = imgUrl => {
  return new Promise(function(resolve, reject) {
    // 一定要设置为let,不然图片不显示
    let image = new Image()
    // 解决跨域问题
    image.crossOrigin = 'anonymous'
    //图片地址
    image.src = imgUrl
    // image.onload为异步加载
    image.onload = function() {
      let canvas = document.createElement('canvas')
      canvas.width = image.width
      canvas.height = image.height
      let context = canvas.getContext('2d')
      context.drawImage(image, 0, 0, image.width, image.height)
      //图片后缀名
      let ext = image.src.substring(image.src.lastIndexOf('.') + 1).toLowerCase()
      //图片质量
      let quality = 0.8
      //转成base64
      let dataurl = canvas.toDataURL('image/' + ext, quality)
      //返回
      resolve(dataurl)
    }
  })
}
/**
 * 将base64格式的数据转为ArrayBuffer
 * @param {Object} dataURL base64格式的数据
 */
const base64DataURLToArrayBuffer = dataURL => {
  const base64Regex = /^data:image\/(png|jpg|jpeg|svg|svg\+xml);base64,/
  if (!base64Regex.test(dataURL)) {
    return false
  }
  const stringBase64 = dataURL.replace(base64Regex, '')
  let binaryString
  if (typeof window !== 'undefined') {
    binaryString = window.atob(stringBase64)
  } else {
    binaryString = new Buffer(stringBase64, 'base64').toString('binary')
  }
  const len = binaryString.length
  const bytes = new Uint8Array(len)
  for (let i = 0; i < len; i++) {
    const ascii = binaryString.charCodeAt(i)
    bytes[i] = ascii
  }
  return bytes.buffer
}

/**
 * 导出word,支持图片
 * @param {Object} docxPath 模板文件路径
 * @param {Object} wordData 导出数据
 * @param {Object} fileName 导出文件名
 * @param {Object} imgSize 自定义图片尺寸
 */
export const exportWord = (docxPath, wordData, fileName, imgSize) => {
  //这里要引入处理图片的插件
  var ImageModule = require('docxtemplater-image-module-free')
  const expressions = require('angular-expressions')
  // 读取并获得模板文件的二进制内容
  JSZipUtils.getBinaryContent(docxPath, function(error, content) {
    if (error) {
      throw error
    }
    expressions.filters.size = function(input, width, height) {
      return {
        data: input,
        size: [width, height]
      }
    }
    // 图片处理
    let opts = {
      //图像是否居中
      centered: false
    }
    opts.getImage = chartId => {
      //console.log(chartId);//base64数据
      //将base64的数据转为ArrayBuffer
      return base64DataURLToArrayBuffer(chartId)
    }

    opts.getSize = function(img, tagValue, tagName) {
      //自定义指定图像大小
      if (imgSize.hasOwnProperty(tagName)) {
        return imgSize[tagName]
      } else {
        return [600, 350]
      }
    }

    // 创建一个PizZip实例,内容为模板的内容
    let zip = new PizZip(content)
    // 创建并加载docxtemplater实例对象
    let doc = new docxtemplater()
    doc.attachModule(new ImageModule(opts))
    doc.loadZip(zip)

    doc.setData(wordData)

    try {
      // 用模板变量的值替换所有模板变量
      doc.render()
    } catch (error) {
      // 抛出异常
      let e = {
        message: error.message,
        name: error.name,
        stack: error.stack,
        properties: error.properties
      }
      console.log(
        JSON.stringify({
          error: e
        })
      )
      throw error
    }

    // 生成一个代表docxtemplater对象的zip文件(不是一个真实的文件,而是在内存中的表示)
    let out = doc.getZip().generate({
      type: 'blob',
      mimeType: 'application/vnd.openxmlformats-officedocument.wordprocessingml.document'
    })
    // 将目标文件对象保存为目标类型的文件,并命名
    saveAs(out, fileName)
  })
}
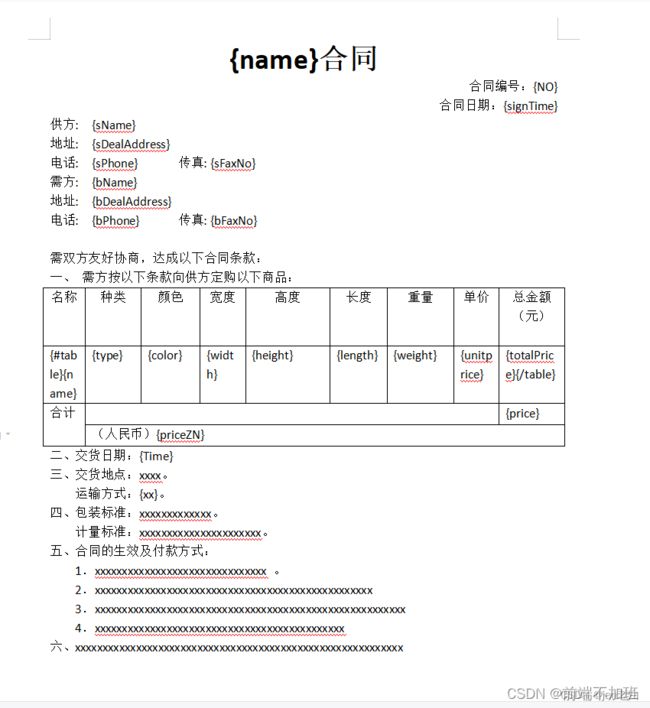
3、创建word文件模板
(1)、利用office或wps穿创建一个word文件并保存至vue项目的public文件夹下
在word模板中变量用中括号定义{变量名},表格需要在头尾分别定义{#table}{/table}
例如:

将word文件存入public文件夹中

5、页面调用
methods: {
...
	 generateWord() {
      	let data  = {
	      	name: '采购',
	        NO: this.sn,
	        signTime: moment(this.signTime).format('YYYY年MM月DD日'),
	        sName: 'xxx公司',
	        sAddress: '深圳市XXXX厂房',
	        sPhone: '0510-85311222',
	        sFaxNo: '0510-85310796',
	        bName: recorData.customName,
	        bDealAddress: recorData.dealAddress,
	        bPhone: recorData.saleCustomer.mobile,
	        bFaxNo: recorData.saleCustomer.fac,
	        table: [...this.dataSurce],
	       ...
      	}
      	exportWord('/contract.docx', data, '购销合同')
    },
...
}