OpenCV-答题卡识别-四点透视变换
目录
- 答题卡识别
-
- 图片读取
- 四点透视变换 划出区域
- 处理选择题区域
- 处理准考证号区域
- 处理科目区域
- 得分导出结果
- 封装成品
答题卡识别
使用opencv技术,实现对答题卡的自动识别,并进行答题结果的统计
技术目的:
- 能够捕获答题卡中的每个填涂选项;
- 将获取的填涂选项与正确选项做对比计算其答题正确率;
技术流程:
- 识别答题区域,对于答题结果进行统计,并且做出打分;
- 识别准考证号,正确读取学生准考证号;
- 识别科目代号,正确读取科目代码;
import cv2
import numpy as np
from imutils.perspective import four_point_transform
from matplotlib import pyplot as plt

import matplotlib
matplotlib.rc("font",family='SimHei')

%matplotlib inline
def judgeX(x,mode):
    if mode=="point":
        if x<600:
            return int(x/100)+1
        elif x>600 and x<1250:
            return int((x-650)/100)+6
        elif x>1250 and x<1900:
            return int((x-1250)/100)+11
        elif x>1900:
            return int((x-1900)/100)+16
    elif mode=="ID":
        return int((x)/50)+1
        # return int((x-110)/260)+1
    elif mode=="subject":
        if x<1500:
            return False

def judgeY(y,mode):
    if mode=="point":
        if y%560>180 and y%560<240:
            return 'A'
        elif y%560>260 and y%560<320:
            return 'B'
        elif y%560>340 and y%560<380:
            return 'C'
        elif y%560>420 and y%560<480:
            return 'D'
        else:
            return False

    elif mode=="ID":
        if y>135:
            return int((y-135)/30) # return int((y-950)/180)
        else:
            return False

    elif mode=="subject":
        print (y, mode)
        if int((y-140)/25)==0:
            return  "政治"
        elif int((y-140)/25)==1:
            return  "语文"
        elif int((y-140)/25)==2:
            return  "数学"
        elif int((y-140)/25)==3:
            return  "物理"
        elif int((y-140)/25)==4:
            return  "化学"
        elif int((y-140)/25)==5:
            return  "英语"
        elif int((y-140)/25)==6:
            return  "历史"
        elif int((y-140)/25)==7:
            return  "地理"
        elif int((y-140)/25)==8:
            return  "生物"
        else:
            return "科目代号填涂有误"
def judge(x,y,mode):
    if judgeY(y,mode)!=False and judgeX(x,mode)!=False:
        if mode=="point":
            return (int(y/560)*20+judgeX(x,mode),judgeY(y,mode))
        elif mode=="ID":
            return (judgeX(x, mode), judgeY(y, mode))
        elif mode=="subject":
            print (y, mode)
            return judgeY(y, mode)
    else:
        return 0

def judge_point(answers, mode):
    IDAnswer = []
    for answer in answers:
        if(judge(answer[0],answer[1],mode)!=0):
            IDAnswer.append(judge(answer[0],answer[1],mode))
        else:
            continue
    IDAnswer.sort()
    return IDAnswer


def judge_ID(IDs, mode):
    student_ID=[]
    for ID in IDs:
        if(judge(ID[0],ID[1], mode)!=False):
            student_ID.append(judge(ID[0], ID[1], mode))
        else:
            continue
    student_ID.sort()
    print ('student_ID:', student_ID)
    return student_ID

def judge_Subject(subject, mode):
    return judge(subject[0][0], subject[0][1], mode)
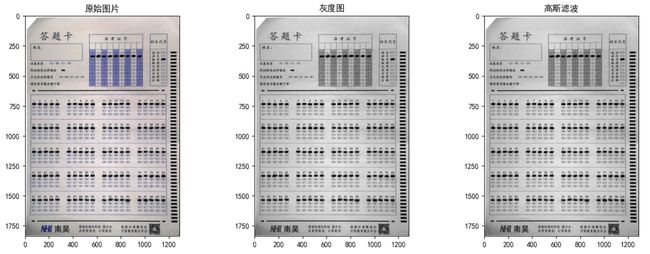
图片读取
因要做后续分割,所以要用到边缘检测,先灰度化再二值化
# 读取图片 RGB \ BGR
img = cv2.imread('./images/5.png')

# 转换为灰度图 COLOR_BGR2GRAY、COLOR_BGR2RGB
gray = cv2.cvtColor(img,cv2.COLOR_BGR2GRAY)

# 高斯滤波 中值滤波
blurred_gauss = cv2.GaussianBlur(gray, (3,3), 0)
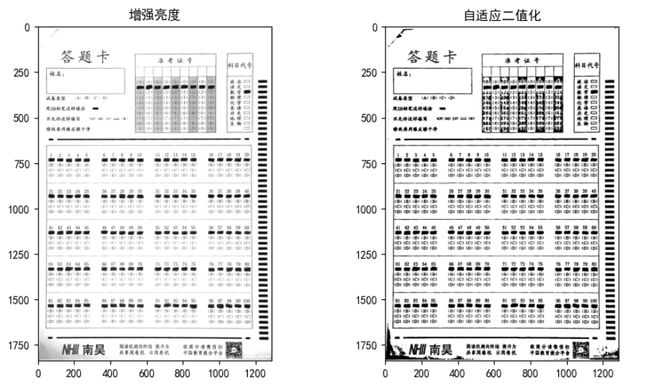
# 增强亮度
def imgBrightness(img1, c, b):
    rows, cols= img1.shape
    blank = np.zeros([rows, cols], img1.dtype)
    # cv2.addWeighted 实现两副相同大小的图像融合相加
    rst = cv2.addWeighted(img1, c, blank, 1-c, b)
    return rst

blurred_bright = imgBrightness(blurred_gauss, 1.5, 3)
自适应二值化函数: cv2.adaptiveThreshold(src, maxValue, adaptiveMethod, thresholdType, blockSize, C, dst=None)
| 参数 | 解释 |
|---|---|
| src | 指原图像,原图像应该是灰度图; |
| maxValue | 指当像素值高于(有时是小于)阈值时应该被赋予的新的像素值; |
| adaptive_method | 自适应阈值算法,CV_ADAPTIVE_THRESH_MEAN_C 或 CV_ADAPTIVE_THRESH_GAUSSIAN_C |
| threshold_type | 取阈值类型, 必须是下者之一 (CV_THRESH_BINARY, CV_THRESH_BINARY_INV) |
| block_size | 计算阈值的象素邻域大小: 3, 5, 7, … |
| C | 常数,每个区域计算出的阈值的基础上在减去这个常数作为这个区域的最终阈值,可以为负数; |
| dst | 输出图像,可以忽略; |
# 自适应二值化

blurred_threshold = cv2.adaptiveThreshold(blurred_bright,
                                          255,
                                          cv2.ADAPTIVE_THRESH_MEAN_C,
                                          cv2.THRESH_BINARY, 51, 2)
# 显示原来的和缩放后的图像  Create a figure
fig = plt.figure(figsize=(16, 12))

# Subplot for original image
a=fig.add_subplot(2,3,1)
imgplot = plt.imshow(img)
a.set_title('原始图片')

a=fig.add_subplot(2,3,2)
imgplot = plt.imshow(gray, cmap='gray')
a.set_title('灰度图')

a=fig.add_subplot(2,3,3)
imgplot = plt.imshow(blurred_gauss, cmap='gray')
a.set_title('高斯滤波')

a=fig.add_subplot(2,3,4)
imgplot = plt.imshow(blurred_bright, cmap='gray')
a.set_title('增强亮度')

a=fig.add_subplot(2,3,5)
imgplot = plt.imshow(blurred_threshold, cmap='gray')
a.set_title('自适应二值化')

plt.show()
# plt.savefig('5张图片.png', bbox_inches='tight')
canny边缘检测
根据轮廓大小,将要处理的几部分分割出来; 如果提取效果不好,可能是拍摄光线原因,导致图片亮度不好,增强一下亮度,二值化后的图片效果会好一点,这样canny边缘检测结果也会好一点
cv2.Canny(image, threshold1, threshold2[, edges[, apertureSize[, L2gradient ]]])
| 参数 | 解释 |
|---|---|
| image | 要检测的图像 |
| threshold1 | 阈值1(最小值) |
| threshold2 | 阈值2(最大值),使用此参数进行明显的边缘检测 |
| edges | 图像边缘信息 |
| apertureSize | sobel算子(卷积核)大小 |
| L2gradient | 布尔值, True:使用更精确的L2范数进行计算(即两个方向的导数的平方和再开方),False:使用L1范数(直接将两个方向导数的绝对值相加) |
# 用来给图片添加边框
blurred_border = cv2.copyMakeBorder(blurred_threshold, 5, 5, 5, 5, cv2.BORDER_CONSTANT, value=(255,255,255))

# canny边缘检测
edged = cv2.Canny(blurred_border, 0, 255)

# 查找检测物体的轮廓信息
cnts, hierarchy = cv2.findContours(edged, cv2.RETR_EXTERNAL, cv2.CHAIN_APPROX_SIMPLE)

docCnt = []
count = 0
# 确保至少有一个轮廓被找到
if len(cnts)>0:
    #将轮廓按照大小排序
    cnts = sorted(cnts, key=cv2.contourArea, reverse=True)

# 对排序后的轮廓进行循环处理
for c in cnts:

    # 获取近似的轮廓
    # 轮廓周长。也称为弧长
    peri = cv2.arcLength(c, True)
    # 一个重新采样的轮廓,所以它仍然会返回一组 (x, y) 点
    approx = cv2.approxPolyDP(c,0.02*peri,True)

    #如果近似轮廓有四个顶点,那么就认为找到了答题卡
    if len(approx) == 4:
        docCnt.append(approx)
        count += 1
        if count==3:
            break
    # break
查找检测物体的轮廓信息
cv2.findContours(image, mode, method, contours=None, hierarchy=None, offset=None)
| 参数 | 解释 |
|---|---|
| image | 源图像,寻找轮廓的图像,注意输入的图片必须为二值图片;若输入的图片为彩色图片,必须先进行灰度化和二值化; |
| mode | 轮廓的检索方式,有4种; |
| method | 轮廓的近似办法,有4种,一般用cv.CHAIN_APPROX_SIMPLE,就表示用尽可能少的像素点表示轮廓; |
| contours | 图像轮廓坐标,是一个链表,使用findContours检测到的轮廓数据,每个轮廓以点向量的形式存储,list中每个元素(轮廓信息)类型为ndarray,point类型的vector |
| hierarchy | [Next, Previous, First Child, Parent], 可选层次结构信息 |
| offset | 可选轮廓偏移参数,用制定偏移量offset=(dx, dy)给出绘制轮廓的偏移量 |
轮廓的检索模式
| mode | 解释 |
|---|---|
| cv2.RETR_EXTERNAL | 只检测外轮廓; |
| cv2.RETR_LIST | 提取所有轮廓,并放置在list中,检测的轮廓不建立等级关系; |
| cv2.RETR_CCOMP | 建立两个等级的轮廓,上面的一层为外边界,里面的一层为内孔的边界信息,如果内孔内还有一个连通物体,这个物体的边界也在顶层; |
| cv2.RETR_TREE | 检测所有轮廓,建立完整的层次结构,建立网状轮廓结构; |
轮廓的近似办法
| method | 解释 |
|---|---|
| cv2.CHAIN_APPROX_NONE | 获取每个轮廓的每个像素,相邻的两个点的像素位置差不超过1; |
| cv2.CHAIN_APPROX_SIMPLE | 压缩水平方向,垂直方向,对角线方向的元素,值保留该方向的重点坐标,如果一个矩形轮廓只需4个点来保存轮廓信息; |
| cv2.CHAIN_APPROX_TC89_L1 | 使用Teh-Chini chain近似算法 |
| cv2.CHAIN_APPROX_TC89_KCOS | 使用Teh-Chini chain近似算法 |
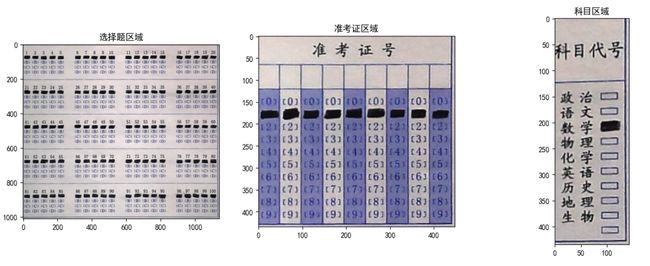
四点透视变换 划出区域
imutils 是在 opencv 基础上的一个封装,达到更为简结的调用 opencv 接口的目的,它可以轻松的实现图像的平移,旋转,缩放,骨架化等一系列的操作;
安装方法: pip install imutils
直接用imutils包中的 four_point_transform 将需要的区域提取出来,灰度图用来处理;因为四个点确定的近似轮廓不一定是矩形,对图像中的ROI执行4点透视变换,并获得ROI的自上而下的“鸟瞰图”;
# 四点变换, 划出选择题区域

paper  = four_point_transform(img,  np.array(docCnt[0]).reshape(4,2))
warped = four_point_transform(gray, np.array(docCnt[0]).reshape(4,2))

# 四点变换, 划出准考证区域

ID_Area        = four_point_transform(img,  np.array(docCnt[1]).reshape(4,2))
ID_Area_warped = four_point_transform(gray, np.array(docCnt[1]).reshape(4,2))

# 四点变换, 划出科目区域

Subject_Area        = four_point_transform(img,  np.array(docCnt[2]).reshape(4,2))
Subject_Area_warped = four_point_transform(gray, np.array(docCnt[2]).reshape(4,2))
# cv2.imwrite('选择题区域.jpg', paper)

# cv2.imwrite('准考证区域.jpg', ID_Area)

# cv2.imwrite('科目区域.jpg', Subject_Area)

#输出一下四点透视变换分割的区域
fig = plt.figure(figsize=(16, 12))

# Subplot for original image

a=fig.add_subplot(2,3,1)
imgplot = plt.imshow(paper)
a.set_title('选择题区域')

a=fig.add_subplot(2,3,2)
imgplot = plt.imshow(ID_Area)
a.set_title('准考证区域')

a=fig.add_subplot(2,3,3)
imgplot = plt.imshow(Subject_Area)
a.set_title('科目区域')
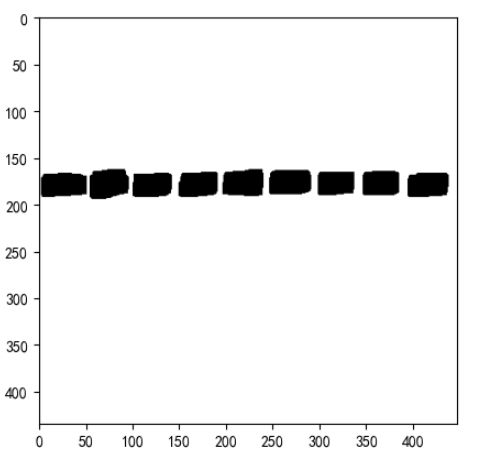
处理选择题区域
1、提取选项轮廓
# 处理选择题区域统计答题结果
thresh = cv2.threshold(warped, 0, 255, cv2.THRESH_BINARY_INV | cv2.THRESH_OTSU)[1]

# fig = plt.figure(figsize=(5, 3))

# # Subplot for original image
# a=fig.add_subplot(1,1,1)
imgplot = plt.imshow(thresh, cmap='gray')
a.set_title('选择题区域-原始图片')

thresh = cv2.resize(thresh, (2400, 2800), cv2.INTER_LANCZOS4)
paper  = cv2.resize(paper,  (2400, 2800), cv2.INTER_LANCZOS4)
warped = cv2.resize(warped, (2400, 2800), cv2.INTER_LANCZOS4)
# canny边缘检测
edged = cv2.Canny(thresh, 0, 255)

# 查找检测物体的轮廓信息
cnts, hierarchy = cv2.findContours(thresh.copy(), cv2.RETR_EXTERNAL, cv2.CHAIN_APPROX_SIMPLE)
questionCnts = []
answers = []

# 对每一个轮廓进行循环处理
for c in cnts:
    # 计算轮廓的边界框,然后利用边界框数据计算宽高比
    (x,y,w,h) = cv2.boundingRect(c)
    ar = w/float(h)

    # 判断轮廓是否是答题框
    if w>=40 and h>=15 and ar>=1 and ar<=1.8:
        M = cv2.moments(c)
        cX = int(M["m10"]/M["m00"])
        cY = int(M["m01"]/M["m00"])
        questionCnts.append(c)
        answers.append((cX, cY))
        cv2.circle(paper, (cX,cY), 7, (255,255,255), -1)
# Create a figure

# fig = plt.figure(figsize=(8, 4))

# # Subplot for original image

# a=fig.add_subplot(1,1,1)

imgplot = plt.imshow(paper)
a.set_title('选择题区域-原始图片-边界框')

plt.show()

ID_Answer = judge_point(answers, mode="point")
paper_drawcontours = cv2.drawContours(paper, questionCnts, -1, (255,0,0), 3)

ID_Answer[0]
![]()
# Create a figure
# fig = plt.figure(figsize=(8, 4))

# # Subplot for original image
# a=fig.add_subplot(1,1,1)
imgplot = plt.imshow(paper)
a.set_title('选择题区域-原始图片-边界框')

plt.show()

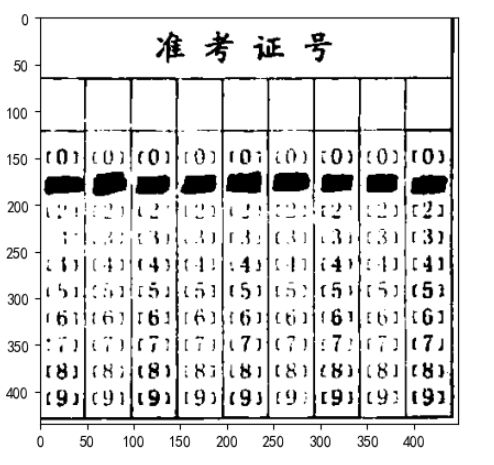
处理准考证号区域
1、提取填涂结果
因为准考证号区域有一部分是红色的,所以二值化之后结果没有答题区域那么理想
ID_Area_warped.shape
![]()
# 处理选择题区域统计答题结果

ID_Area_warped_thresh = cv2.adaptiveThreshold(ID_Area_warped.copy(),255, cv2.ADAPTIVE_THRESH_MEAN_C,cv2.THRESH_BINARY,153,50)

# fig = plt.figure(figsize=(5, 3))

# # Subplot for original image
# a=fig.add_subplot(1,1,1)
imgplot = plt.imshow(ID_Area_warped_thresh, cmap='gray')
a.set_title('准考证号区域-原始图片')
# 腐蚀处理 cv2.erode(),
# (src: 输入图像对象矩阵,为二值化图像;
#  kernel:进行腐蚀操作的核,可以通过函数getStructuringElement()获得;
#  anchor:锚点,默认为(-1,-1);
#  iterations:腐蚀操作的次数,默认为1;
#  borderType: 边界种类,有默认值;
#  borderValue:边界值,有默认值)
kernel=np.ones((3,3),dtype=np.uint8)
img_dilate=cv2.dilate(ID_Area_warped_thresh.copy(),kernel,iterations=3)

kernel=np.ones((5,5),dtype=np.uint8)
img_fushi=cv2.erode(img_dilate.copy(),kernel,iterations=3)

plt.imshow(img_fushi,cmap='gray')
# ID_Area_warped_thresh = cv2.resize(thresh, (2400, 2800), cv2.INTER_LANCZOS4)
# ID_Area  = cv2.resize(ID_Area,  (2400, 2800), cv2.INTER_LANCZOS4)
# ID_Area_warped = cv2.resize(ID_Area_warped, (2400, 2800), cv2.INTER_LANCZOS4)

# canny边缘检测
edged = cv2.Canny(img_fushi, 0, 255)
plt.imshow(edged,cmap='gray')

# 查找检测物体的轮廓信息
cnts, hierarchy = cv2.findContours(edged.copy(), cv2.RETR_EXTERNAL, cv2.CHAIN_APPROX_SIMPLE)
questionCnts = []
answers = []

# 对每一个轮廓进行循环处理
for c in cnts:
    # 计算轮廓的边界框,然后利用边界框数据计算宽高比
    (x,y,w,h) = cv2.boundingRect(c)
    ar = w/float(h)

    # 判断轮廓是否是答题框
    if w>=40 and h>=15 and ar>=1 and ar<=1.9:
        M = cv2.moments(c)
        cX = int(M["m10"]/M["m00"])
        cY = int(M["m01"]/M["m00"])
        questionCnts.append(c)
        answers.append((cX, cY))
        cv2.circle(ID_Area, (cX,cY), 7, (255,255,255), -1)
len(cnts)
#9
answers

student_ID=judge_ID(answers, mode="ID")
![]()
ID_Area_drawcontours = cv2.drawContours(ID_Area, questionCnts, -1, (255,0,0), 3)
# Create a figure
fig = plt.figure(figsize=(8, 4))

# Subplot for original image
a=fig.add_subplot(1,1,1)
imgplot = plt.imshow(ID_Area)
a.set_title('准考证号区域-原始图片-边界框')

plt.show()

处理科目区域
Subject_Area_warped.shape
![]()
Subject_Area_warped_thresh = cv2.adaptiveThreshold(    # src:需要进行二值化的一张灰度图像
    Subject_Area_warped.copy(),
    # maxValue:满足条件的像素点需要设置的灰度值。(将要设置的灰度值)
    255,
    # adaptiveMethod:自适应阈值算法。可选ADAPTIVE_THRESH_MEAN_C 或 ADAPTIVE_THRESH_GAUSSIAN_C
    cv2.ADAPTIVE_THRESH_GAUSSIAN_C,
    # thresholdType:opencv提供的二值化方法,只能THRESH_BINARY或者THRESH_BINARY_INV
    cv2.THRESH_BINARY,
    # blockSize:要分成的区域大小,上面的N值,一般取奇数
    53,
    # C:常数,每个区域计算出的阈值的基础上在减去这个常数作为这个区域的最终阈值,可以为负数
    30)

# fig = plt.figure(figsize=(5, 3))

# # Subplot for original image
# a=fig.add_subplot(1,1,1)
imgplot = plt.imshow(Subject_Area_warped_thresh, cmap='gray')
a.set_title('科目区域-原始图片')

kernel=np.ones((3,3),dtype=np.uint8)
img_dilate=cv2.dilate(Subject_Area_warped_thresh.copy(),kernel,iterations=8)

kernel=np.ones((5,5),dtype=np.uint8)
img_fushi=cv2.erode(img_dilate.copy(),kernel,iterations=3)

plt.imshow(img_fushi,cmap='gray')

# canny边缘检测
edged = cv2.Canny(img_fushi, 0, 255)
plt.imshow(edged,cmap='gray')
# 查找检测物体的轮廓信息
cnts, hierarchy = cv2.findContours(edged.copy(), cv2.RETR_EXTERNAL, cv2.CHAIN_APPROX_SIMPLE)
questionCnts = []
answers = []

# 对每一个轮廓进行循环处理
for c in cnts:
    # 计算轮廓的边界框,然后利用边界框数据计算宽高比
    (x,y,w,h) = cv2.boundingRect(c)
    ar = w/float(h)

    # 判断轮廓是否是答题框
    if w>=30 and h>=10 and ar>=1 and ar<=2.5:
        M = cv2.moments(c)
        cX = int(M["m10"]/M["m00"])
        cY = int(M["m01"]/M["m00"])
        questionCnts.append(c)
        answers.append((cX, cY))
        cv2.circle(Subject_Area, (cX,cY), 7, (255,255,255), -1)
len(cnts)
#1
answers
![]()
questionCnts
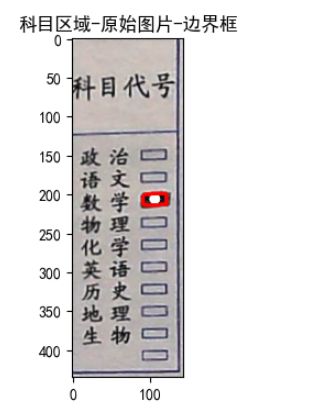
Subject_Area_drawcontours = cv2.drawContours(Subject_Area, questionCnts, -1, (255,0,0), 3)
fig = plt.figure(figsize=(8, 4))

# Subplot for original image
a=fig.add_subplot(1,1,1)
imgplot = plt.imshow(Subject_Area)
a.set_title('科目区域-原始图片-边界框')

plt.show()
student_IDlist = judge_Subject(answers, mode="subject")
![]()
得分导出结果
import pandas as pd
df = pd.read_excel("./答题卡识别-图片/answer.xlsx")
index_list = df[["题号"]].values.tolist()
true_answer_list = df[["答案"]].values.tolist()
index = []
true_answer = []
score = 0

# 去括号
for i in range(len(index_list)):
    index.append(index_list[i][0])
for i in range(len(true_answer_list)):
    true_answer.append(true_answer_list[i][0])

answer_index=[]
answer_option=[]
for answer in ID_Answer:
    answer_index.append(answer[0])
    answer_option.append(answer[1])
for i in range(len(index)):
    if answer_option[i]==true_answer[i]:
        score+=1
    if i+1==len(answer_option):
        break
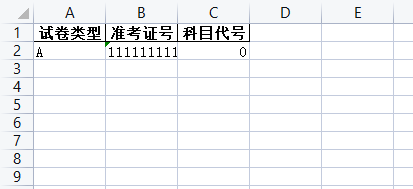
info = {"试卷类型":["A"], "准考证号":[student_ID], "科目代号":[student_IDlist]}
df1 = pd.DataFrame(info)
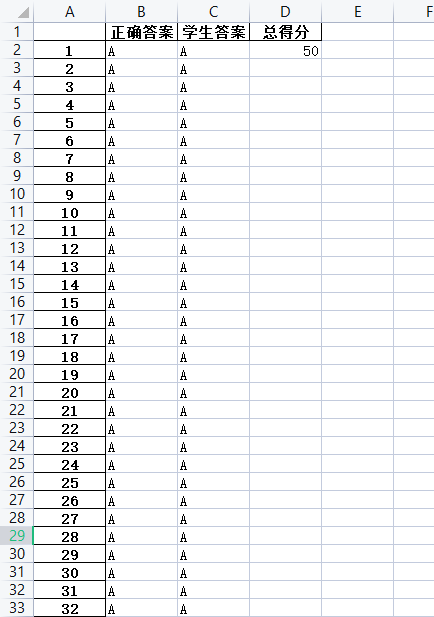
df2 = pd.DataFrame(np.array(true_answer).transpose(), index=index, columns=["正确答案"])
df2["学生答案"] = ''
for i in range(len(answer_option)):
df2["学生答案"] [i+1] = answer_option[i]
df2

df2["总得分"] = ''
df2["总得分"][1] = score
with pd.ExcelWriter("test.xlsx") as writer:
    df1.to_excel(writer, index=False, sheet_name="type")
    df2.to_excel(writer, sheet_name="score")
    writer._save()
    print("导出excel成功!")
封装成品
# 答题卡图像识别

import cv2
import numpy as np
import pandas as pd
from imutils.perspective import four_point_transform
# from matplotlib import pyplot as plt

# import matplotlib
# matplotlib.rc("font",family='AR PL UKai CN')
# 增强亮度
def imgBrightness(img1, c, b):
    rows, cols= img1.shape
    blank = np.zeros([rows, cols], img1.dtype)
    # cv2.addWeighted 实现两副相同大小的图像融合相加
    rst = cv2.addWeighted(img1, c, blank, 1-c, b)
    return rst

def judgeX(x,mode):
    if mode=="point":
        if x<600:
            return int(x/100)+1
        elif x>600 and x<1250:
            return int((x-650)/100)+6
        elif x>1250 and x<1900:
            return int((x-1250)/100)+11
        elif x>1900:
            return int((x-1900)/100)+16
    elif mode=="ID":
        return int((x)/50)+1
        # return int((x-110)/260)+1
    elif mode=="subject":
        if x<1500:
            return False

def judgeY(y,mode):
    if mode=="point":
        if y%560>180 and y%560<240:
            return 'A'
        elif y%560>260 and y%560<320:
            return 'B'
        elif y%560>340 and y%560<380:
            return 'C'
        elif y%560>420 and y%560<480:
            return 'D'
        else:
            return False

    elif mode=="ID":
        if y>135:
            return int((y-135)/30) # return int((y-950)/180)
        else:
            return False

    elif mode=="subject":
        print (y, mode)
        if int((y-140)/25)==0:
            return  "政治"
        elif int((y-140)/25)==1:
            return  "语文"
        elif int((y-140)/25)==2:
            return  "数学"
        elif int((y-140)/25)==3:
            return  "物理"
        elif int((y-140)/25)==4:
            return  "化学"
        elif int((y-140)/25)==5:
            return  "英语"
        elif int((y-140)/25)==6:
            return  "历史"
        elif int((y-140)/25)==7:
            return  "地理"
        elif int((y-140)/25)==8:
            return  "生物"
        else:
            return "科目代号填涂有误"

def judge(x,y,mode):
    if judgeY(y,mode)!=False and judgeX(x,mode)!=False:
        if mode=="point":
            return (int(y/560)*20+judgeX(x,mode),judgeY(y,mode))
        elif mode=="ID":
            return (judgeX(x, mode), judgeY(y, mode))
    elif mode=="subject":
        print (y, mode)
        return judgeY(y, mode)
    else:
        return 0

def judge_point(answers, mode):
    IDAnswer = []
    for answer in answers:
        if(judge(answer[0],answer[1],mode)!=0):
            IDAnswer.append(judge(answer[0],answer[1],mode))
        else:
            continue
    IDAnswer.sort()
    return IDAnswer


def judge_ID(IDs, mode):
    student_ID=[]
    for ID in IDs:
        if(judge(ID[0],ID[1], mode)!=False):
            student_ID.append(judge(ID[0], ID[1], mode))
        else:
            continue
    student_ID.sort()
    print ('student_ID:', student_ID)
    return student_ID

def judge_Subject(subject, mode):
    return judge(subject[0][0], subject[0][1], mode)


# 边缘检测,获取轮廓信息
def get_contours(img_contours):
    '''
        输入:一张二值化的图片,图片
        输出:查找到的轮廓信息,列表list
    '''
    # canny边缘检测
    edged_ = cv2.Canny(img_contours, 0, 255)

    # 查找检测物体的轮廓信息
    cnts_, hierarchy = cv2.findContours(edged_, cv2.RETR_EXTERNAL, cv2.CHAIN_APPROX_SIMPLE)

    # 确保至少有一个轮廓被找到
    if len(cnts_)>0:
        # 将轮廓按照大小排序
        cnts_ = sorted(cnts_, key=cv2.contourArea, reverse=True)
        return cnts_

    print ('获取轮廓信息出错')
    return 'error'


# 获取图像腐蚀、膨胀处理
def get_erode(img_warped, blockSize, c, iterations_dilate, iterations_erode):
    '''
        输入:
        输出:
    '''
    thresh_ = cv2.adaptiveThreshold(img_warped,255,cv2.ADAPTIVE_THRESH_GAUSSIAN_C,cv2.THRESH_BINARY,blockSize,c)

    #膨胀处理 cv2.dilate
    kernel = np.ones((3,3), dtype=np.uint8)
    pengzang_ = cv2.dilate(thresh_.copy(), kernel, iterations=iterations_dilate)

    kernel = np.ones((5,5), np.uint8)
    fushi_ = cv2.erode(pengzang_.copy(), kernel, iterations = iterations_erode)
    return fushi_


# 获取三个主要检测区域
def get_area(img, gray, blurred_border):
    '''
        输入:
        输出:
    '''
    # 查找检测物体的轮廓信息
    cnts = get_contours(blurred_border)
    docCnt = []
    count = 0

    # 对排序后的轮廓进行循环处理
    for c in cnts:

        # 获取近似的轮廓
        # 轮廓周长。也称为弧长
        peri = cv2.arcLength(c, True)
        # 一个重新采s样的轮廓,所以它仍然会返回一组 (x, y) 点
        approx = cv2.approxPolyDP(c,0.02*peri,True)

        #如果近似轮廓有四个顶点,那么就认为找到了答题卡
        if len(approx) == 4:
            docCnt.append(approx)
            count += 1
            if count==3:
                break

    # 四点变换, 划出选择题区域
    paper  = four_point_transform(img,  np.array(docCnt[0]).reshape(4,2))
    warped = four_point_transform(gray, np.array(docCnt[0]).reshape(4,2))

    # 四点变换, 划出准考证区域
    ID_Area        = four_point_transform(img,  np.array(docCnt[1]).reshape(4,2))
    ID_Area_warped = four_point_transform(gray, np.array(docCnt[1]).reshape(4,2))

    # 四点变换, 划出科目区域
    Subject_Area        = four_point_transform(img,  np.array(docCnt[2]).reshape(4,2))
    Subject_Area_warped = four_point_transform(gray, np.array(docCnt[2]).reshape(4,2))

    # 图像存储
    cv2.imwrite('选择题区域.png', paper)
    cv2.imwrite('准考证区域.png', ID_Area)
    cv2.imwrite('科目区域.png', Subject_Area)

    return paper, warped, ID_Area, ID_Area_warped, Subject_Area, Subject_Area_warped

# 处理选择题区域
def get_area_1(paper, warped):
    '''
    '''
    # 处理选择题区域统计答题结果
    thresh = cv2.threshold(warped, 0, 255, cv2.THRESH_BINARY_INV | cv2.THRESH_OTSU)[1]

    # 图像放大
    thresh = cv2.resize(thresh, (2400, 2800), cv2.INTER_LANCZOS4)
    paper  = cv2.resize(paper,  (2400, 2800), cv2.INTER_LANCZOS4)
    warped = cv2.resize(warped, (2400, 2800), cv2.INTER_LANCZOS4)

    # 查找检测物体的轮廓信息
    cnts, hierarchy = cv2.findContours(thresh.copy(), cv2.RETR_EXTERNAL, cv2.CHAIN_APPROX_SIMPLE)
    questionCnts = []
    answers = []

    # 对每一个轮廓进行循环处理
    for c in cnts:
        # 计算轮廓的边界框,然后利用边界框数据计算宽高比
        (x,y,w,h) = cv2.boundingRect(c)
        ar = w/float(h)

        # 判断轮廓是否是答题框
        if w>=40 and h>=15 and ar>=1 and ar<=1.8:
            M = cv2.moments(c)
            cX = int(M["m10"]/M["m00"])
            cY = int(M["m01"]/M["m00"])
            questionCnts.append(c)
            answers.append((cX, cY))
            cv2.circle(paper, (cX,cY), 7, (255,255,255), -1)
    print ('检测到的选择题目信息长度:', len(answers))

    # 根据像素坐标获取选择题答案
    ID_Answer = judge_point(answers, mode="point")
    # 将像素坐标位置画到原图上
    paper_drawcontours = cv2.drawContours(paper, questionCnts, -1, (255,0,0), 3)
    cv2.imwrite('选择题区域识别结果.jpg', paper)

    return ID_Answer

# 处理准考证号区域
def get_area_2(ID_Area, ID_Area_warped, blockSize, c, iterations_dilate, iterations_erode):
    fushi = get_erode(ID_Area_warped, blockSize, c, iterations_dilate, iterations_erode)
    cnts, hierarchy = cv2.findContours(fushi.copy(), cv2.RETR_LIST, cv2.CHAIN_APPROX_SIMPLE)

    ID_Cnts=[]
    IDs=[]
    # 对每一个轮廓进行循环处理
    for c in cnts:
        # 计算轮廓的边界框,然后利用边界框数据计算宽高比
        (x,y,w,h) = cv2.boundingRect(c)
        ar = w/float(h)
        # print (w, h, ar, y, x)

        # 判断轮廓是否是答题框
        if w>=15 and w<300 and h>=5 and ar>=1 and ar<=3.0 and y>100:
            M = cv2.moments(c)
            cX = int(M["m10"]/M["m00"])
            cY = int(M["m01"]/M["m00"])
            if cY<265:
                ID_Cnts.append(c)
                IDs.append((cX, cY))
                cv2.circle(ID_Area, (cX,cY), 7, (255,255,255), -1)


    # 从像素坐标转换成学生的准考证号
    student_IDlist = judge_ID(IDs, mode="ID")
    # 判断准考证号是否有误
    ID_index = 1
    student_ID=""
    for tuple_ in student_IDlist:
        if tuple_[0] == ID_index:
            student_ID += str(tuple_[1])
            ID_index += 1
        else:
            student_ID = "准考证号填涂有误"
            break
    # 像素坐标信息画到原图上
    ID_Area_drawContours = cv2.drawContours(ID_Area, ID_Cnts, -1, (255,0,0), 3)

    cv2.imwrite('准考证区域识别结果.jpg', ID_Area)
    return student_ID

# 科目代码区域
def get_area_3(Subject_Area, Subject_Area_warped, blockSize, c, iterations_dilate, iterations_erode):
    '''
        输入:
        输出:
    '''
    Subject_thresh_fushi = get_erode(Subject_Area_warped, blockSize, c, iterations_dilate, iterations_erode)
    cnts, hierarchy = cv2.findContours(Subject_thresh_fushi.copy(), cv2.RETR_LIST, cv2.CHAIN_APPROX_SIMPLE)

    ID_Cnts=[]
    IDs=[]
    # 对每一个轮廓进行循环处理
    for c in cnts:
        # 计算轮廓的边界框,然后利用边界框数据计算宽高比
        (x,y,w,h) = cv2.boundingRect(c)
        ar = w/float(h)

        # 判断轮廓是否是答题框
        if w>=15 and w<150 and h>=5 and ar>=1 and ar<=3.0 and x>50:
            M = cv2.moments(c)
            cX = int(M["m10"]/M["m00"])
            cY = int(M["m01"]/M["m00"])
            if cY<2650:
                ID_Cnts.append(c)
                IDs.append((cX, cY))
                cv2.circle(Subject_Area, (cX,cY), 7, (255,255,255), -1)

    student_IDlist = judge_Subject(IDs, mode="subject")
    cv2.imwrite('科目代码区域识别结果.jpg', Subject_Area)
    return student_IDlist

# 存储 表格
def save_csv(answer_path, save_path, ID_Answer, student_ID, student_IDlist):
    df = pd.read_excel(answer_path)
    index_list = df[["题号"]].values.tolist()
    true_answer_list = df[["答案"]].values.tolist()
    index = []
    true_answer = []
    score = 0

    # 去括号
    for i in range(len(index_list)):
        index.append(index_list[i][0])
    for i in range(len(true_answer_list)):
        true_answer.append(true_answer_list[i][0])

    answer_index=[]
    answer_option=[]
    for answer in ID_Answer:
        answer_index.append(answer[0])
        answer_option.append(answer[1])
    for i in range(len(index)):
        if answer_option[i]==true_answer[i]:
            score+=1
        if i+1==len(answer_option):
            break

    # 写入表格
    info = {"试卷类型":["A"], "准考证号":[student_ID], "科目代号":[student_IDlist]}
    df1 = pd.DataFrame(info)
    df2 = pd.DataFrame(np.array(true_answer).transpose(), index=index, columns=["正确答案"])
    df2["学生答案"] = ''

    for i in range(len(answer_option)):
        df2["学生答案"] [i+1] = answer_option[i]

    df2["总得分"] = ''
    df2["总得分"][1] = score
    with pd.ExcelWriter(save_path) as writer:
        df1.to_excel(writer, index=False, sheet_name="type")
        df2.to_excel(writer, sheet_name="score")
        writer.save()
        print("导出excel成功!")

    return


# 答题卡图片处理主要步骤
def img_1(image_path, answer_path, save_path):
    # 读取图片 RGB \ BGR
    img = cv2.imread(image_path)

    # 转换为灰度图 COLOR_BGR2GRAY、COLOR_BGR2RGB
    gray = cv2.cvtColor(img,cv2.COLOR_BGR2GRAY)

    # 高斯滤波 中值滤波
    blurred_gauss = cv2.GaussianBlur(gray, (3,3), 0)

    # 增强亮度
    blurred_bright = imgBrightness(blurred_gauss, 1.5, 3)

    # 自适应二值化
    blurred_threshold = cv2.adaptiveThreshold(blurred_bright, 255, cv2.ADAPTIVE_THRESH_MEAN_C, cv2.THRESH_BINARY, 51, 2)

    # 用来给图片添加边框
    blurred_border = cv2.copyMakeBorder(blurred_threshold, 5, 5, 5, 5, cv2.BORDER_CONSTANT, value=(255,255,255))

    # 获取主要区域
    paper, warped, ID_Area, ID_Area_warped, Subject_Area, Subject_Area_warped = get_area(img, gray, blurred_border)

    # 处理选择题区域
    ID_Answer = get_area_1(paper, warped)

    # 处理准考证号区域
    student_ID = get_area_2(ID_Area, ID_Area_warped, 53, 30, 3, 3)

    # 科目代码区域
    student_IDlist = get_area_3(Subject_Area, Subject_Area_warped, 53, 30, 4, 3)

    # 存储表格
    save_csv(answer_path, save_path, ID_Answer, student_ID, student_IDlist)

    return

if __name__ == '__main__':
    image_path = 'images/5.png'
    answer_path = "answer.xlsx"
    save_path = "test.xlsx"

    img_1(image_path, answer_path, save_path)
    print('预测结束')