ffmpeg安装过程记录
编译前准备
安装编译依赖
sudo apt-get update && sudo apt-get -y install \
  autoconf \
  automake \
  build-essential \
  cmake \
  git-core \
  libass-dev \
  libfreetype6-dev \
  libgnutls28-dev \
  libmp3lame-dev \
  libsdl2-dev \
  libtool \
  libva-dev \
  libvdpau-dev \
  libvorbis-dev \
  libxcb1-dev \
  libxcb-shm0-dev \
  libxcb-xfixes0-dev \
  meson \
  ninja-build \
  pkg-config \
  texinfo \
  wget \
  yasm \
  zlib1g-dev \
  libunistring-dev \
  libopus-dev
fdk-aac单独安装:
如果缺失fdk-aac
git clone https://github.com/mstorsjo/fdk-aac.git
cd fdk-aac
autoreconf -i
./configure –enable-shared
make install -j8
如果报错:
/usr/bin/ld: /usr/local/lib/libvpx.a(vpx_codec.c.o): relocation R_X86_64_32 against `.rodata.str1.1’ can not be used when making a shared object; recompile with -fPIC
configure添加参数:–enable-shared还是解决不了的话,建议用cmake安装吧,不要在这上面浪费时间。
安装libvpx
tar xf libvpx-1.8.2.tar.gz
cd libvpx-1.8.2
./configure \
    --disable-examples \
    --enable-vp8 --enable-pic \
    --enable-shared --as=yasm

make -j8

make install -j8
安装x265:
(1)安装依赖,使得支持hg命令下载libx265
sudo apt-get install mercurial
hg clone http://hg.videolan.org/x265
(2)进入./x265_2.9/build/linux目录
./make-Makefiles.bash
sudo make -j8 && sudo make install -j8
安装x264:
git clone git://git.videolan.org/x264.git
链接:https://pan.baidu.com/s/1nZamB6wsNJRQE1NWTJXmKg
提取码:1vkw
Linux下最简单编译步骤:
./configure --enable-shared --enable-static --disable-asm
make -j8
make install -j8
编译ffmpeg
下载源码:
git clone https://git.ffmpeg.org/ffmpeg.git ffmpeg
进入源码目录
cd ffmpeg
配置编译选项
参考:如何将libavcodec也静态编译并可链接到.so中
sudo ./configure   \
--extra-libs="-lpthread -lm" \
--enable-shared \
--disable-static \
--enable-pic \
--prefix=/usr/local/ffmpeg \
--ld="g++" \
--enable-gpl \
--enable-gnutls \
--enable-libass \
--enable-libfdk-aac \
--enable-libfreetype \
--enable-libmp3lame \
--enable-libopus \
--enable-libvorbis \
--enable-libvpx \
--enable-libx264 \
--enable-libx265 \
--enable-libxml2 \
--enable-nonfree
–enable-shared,–disable-static,–enable-pic,以上三项最好带上,避免其他以ffmpeg作为依赖的软件安装时发生这类报错:libavcodec.a(vc1dsp_mmx.o):针对符号`ff_pw_9‘的重定位R_X86_64_PC32。
如果之前安装过ffmpeg,要将其卸载干净,避免安装其他软件时总是链接到以前安装的库,导致反复安装几次依然找不到问题根源。特别注意/usr/lib/, /usr/local/lib/,安装软件寻找已安装的依赖库时默认这几个位置的优先级要更高,其中/usr/lib/> /usr/local/lib/,到这些位置把之前安装的库删掉。
精简版configure:
./configure --enable-shared --prefix=/usr/local/ffmpeg # --prefix选项指出ffmpeg的安装路径
编译
make -j12
安装
sudo make install -j12
配置环境
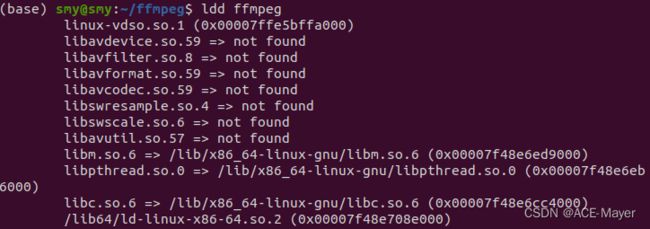
1. 用以下命令查看软件所有的依赖库信息,可以看到有些依赖库已安装而有些依赖库找不到:
ldd ffmpeg
2. 用以下命令查找这些依赖库的位置:
find /usr -name 'libavdevice.so.59'
输出:/usr/local/ffmpeg/lib/libavdevice.so.59
再找一个:find /usr -name ‘libavfilter.so.8’
output: usr/local/ffmpeg/lib/libavfilter.so.8
可以看出这两个缺失的都在usr/local/ffmpeg/lib/中,说明安装的时候已经把相关库安装到系统了,但是启动软件后没有找到,接下来通过配置环境来解决这个问题。
3. 配置软件环境
sudo vim ~/.bashrc
添加以下内容:
export PATH="/usr/local/ffmpeg/bin:${PATH}"
export LD_LIBRARY_PATH="/usr/local/ffmpeg/lib:{LD_LIBRARY_PATH}"
source ~/.bashrc
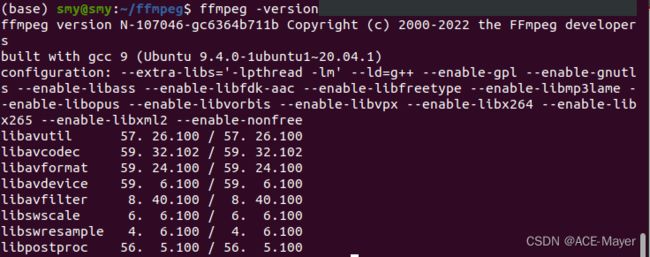
检查是否安装完成
ffmpeg -version

