空转旋转 seurat spatial rotate 图片 翻转 数据结构 对象 seurat的空转数据存储
1seurat 取子集操作
3. 对象操作
① 通过结构图上的@,$符号依次取
② 两个中括号操作,pbmc[[ ]]。
教程中,pbmc[['percent.MT']]向meta.data添加 percent.MT 这一列。
pbmc[[]],中括号取的是上面结构图中的二级数据名称
以上两种方法的区别是?
如果取的一级结构Assays的下属内容:
无差别
> class(pbmc[['RNA']])
[1] "Assay"
attr(,"package")
[1] "Seurat"
> class(pbmc@assays$RNA)
[1] "Assay"
attr(,"package")
[1] "Seurat"
如果是一级结构meta.data里的下属内容:
返回的数据类型不同
> class(pbmc[['nCount_RNA']])
[1] "data.frame"
> class([email protected]$nCount_RNA)
[1] "numeric"
pbmc[['nCount_RNA']] 取出来,是所有细胞的nCount_RNA,包含细胞信息,数据框
image.png
而[email protected]$nCount_RNA取出来的是单独nCount_RNA一列,是向量
image.png
如果取的一级结构里reductions的下属内容:
无差别
> class(pbmc[['pca']])
[1] "DimReduc"
attr(,"package")
[1] "Seurat"
> class(pbmc@reductions$pca)
[1] "DimReduc"
attr(,"package")
[1] "Seurat"
作者:森尼啊
链接:https://www.jianshu.com/p/0c4bc6a932b2
来源:简书
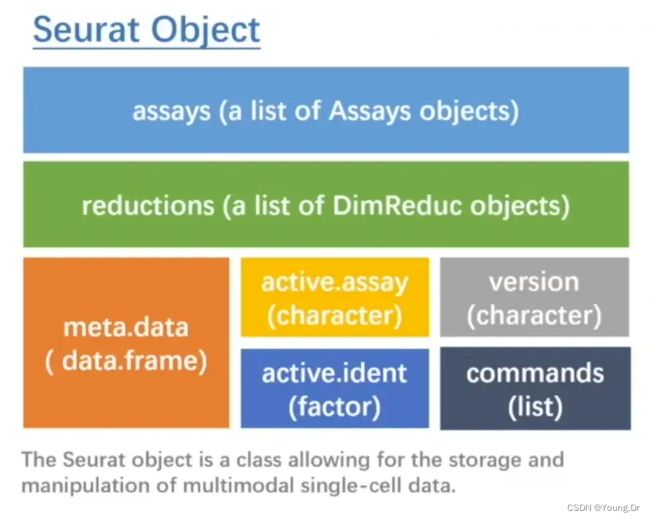
著作权归作者所有。商业转载请联系作者获得授权,非商业转载请注明出处。1.4 Seurat 流程第一步就是创建 Seurat 对象,首先要明白 Seurat 对象的构成。Seurat 对象进一步细分为: Assay Object 对象 和 DimReduc Object 对象。
Assay Object 对象存放的多组学的表达数据, DimReduc Object 对象存放的是对 Assay Object 对象进行降维分析后的结果。
Seurat对象数据结构 - 简书

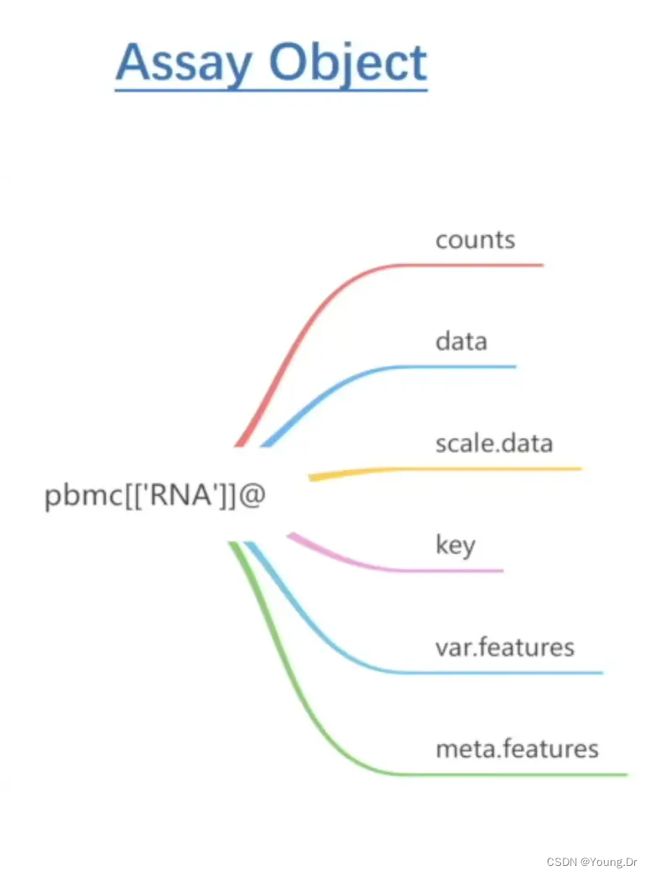
5.2 assay
一个Seurat对象可以包括多个assay对象,但是在某个时刻,只有一个assay对象是默认激活的。可以通过函数 active.assay 查询当前默认激活的是哪个assay对象。也可以用 DefaultAssay 来设置默认的 assay。
5.3 ident Seurat对象数据结构 - 简书1、标准流程里面的过滤三步骤,也可以用 SCTransform 代替 Seurat基本教程[Seurat%E5%9F%BA%E6%9C%AC%E6%95%99%E7%A8%8... https://www.jianshu.com/p/238976158dcc
可以理解为细胞的类型,在Seurat对象中,细胞可能有好几种不同方法注释的类型,但是在某一时刻,只有一种细胞类型是默认激活的。可以用active.ident来查询当前默认的细胞类型是什么。

5.4 reduction
和assay一样,reduction返回的也是一个列表。里面包含的是一个或多个 DimReduc object 对象。 每个DimReduc object 对象对应的是 assay 对象进行某种降维分析后得到的结果。降维也就是PCA 、tsen 、umap 三种。 下面这个例子里面的列表中,有两个DimReduc object 对象,分别是PCA 和umap

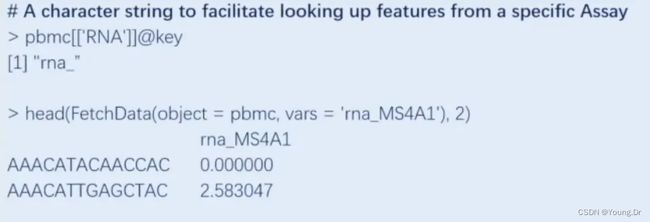
1.5 key : 每个active对象都有一个key值,可以用fetch函数来获取
2 anndata数据结构
anndata

单细胞转录组的核心就是一个cell X gene的二维表,但是分群后要存储cell的分群结果,特征选择是要记录gene的信息,降维后要存储降维后的结果。所以,这张表.X的对象cell相关的信息记录在.obs中,属性gene的信息记录在.var中,其他的信息在.uns中。
记得初中时学习立体几何老师要求我们要有空间想象力,把思维提高到一个新的维度。在单细胞数据分析的过中,我们也要挑起我们的想象力,比如在RNA速率的分析中,anndata存储的内容是这样的:
adata

AnnData object with n_obs × n_vars = 7292 × 1999
    obs: 'initial_size_unspliced', 'initial_size_spliced', 'initial_size', 'n_counts', 'velocity_self_transition', 'leiden', 'velocity_clusters'
    var: 'Accession', 'Chromosome', 'End', 'Start', 'Strand', 'means', 'dispersions', 'dispersions_norm', 'velocity_gamma', 'velocity_r2', 'velocity_genes', 'velocity_score', 'fit_alpha', 'fit_beta', 'fit_gamma', 'fit_t_', 'fit_scaling', 'fit_std_u', 'fit_std_s', 'fit_likelihood', 'fit_u0', 'fit_s0', 'fit_pval_steady', 'fit_steady_u', 'fit_steady_s', 'fit_alignment_scaling', 'fit_r2'
    uns: 'pca', 'neighbors', 'connectivities_key', 'distances_key', 'velocity_settings', 'velocity_graph', 'velocity_graph_neg', 'leiden', 'umap', 'leiden_colors', 'rank_velocity_genes', 'recover_dynamics'
    obsm: 'X_pca', 'X_umap', 'velocity_umap'
    varm: 'PCs', 'loss'
    layers: 'matrix', 'ambiguous', 'spliced', 'unspliced', 'Ms', 'Mu', 'velocity', 'variance_velocity', 'fit_t', 'fit_tau', 'fit_tau_', 'velocity_u'
    obsp: 'distances', 'connectivities'
我们不仅要知道每一部分存储的内容,还要知道各部分之间的关系。
链接:https://www.jianshu.com/p/13142bf51e81
3
3 空转数据翻转 seurat的空转数据存储
#自建函数 翻转----------
#https://github.com/satijalab/seurat/issues/2702
{

  # flip_angle %in% c(180, "R90", "L90", "Hf", "Vf")

  rotimat=function(foo,rotation){
    if(!is.matrix(foo)){
      cat("Input is not a matrix")
      return(foo)
    }
    if(!(rotation %in% c("180","Hf","Vf", "R90", "L90"))){
      cat("Rotation should be either L90, R90, 180, Hf or Vf\n")
      return(foo)
    }
    if(rotation == "180"){
      foo <- foo %>%
        .[, dim(.)[2]:1] %>%
        .[dim(.)[1]:1, ]
    }
    if(rotation == "Hf"){
      foo <- foo %>%
        .[, dim(.)[2]:1]
    }

    if(rotation == "Vf"){
      foo <- foo %>%
        .[dim(.)[1]:1, ]
    }
    if(rotation == "L90"){
      foo = t(foo)
      foo <- foo %>%
        .[dim(.)[1]:1, ]
    }
    if(rotation == "R90"){
      foo = t(foo)
      foo <- foo %>%
        .[, dim(.)[2]:1]
    }
    return(foo)
  }

  rotateSeuratImage = function(seuratVisumObject, slide = "slice1", rotation="Vf"){
    if(!(rotation %in% c("180","Hf","Vf", "L90", "R90"))){
      cat("Rotation should be either 180, L90, R90, Hf or Vf\n")
      return(NULL)
    }else{
      seurat.visium = seuratVisumObject
      ori.array = (seurat.visium@images)[[slide]]@image
      img.dim = dim(ori.array)[1:2]/(seurat.visium@images)[[slide]]@scale.factors$lowres
      new.mx <- c()
      # transform the image array
      for (rgb_idx in 1:3){
        each.mx <- ori.array[,,rgb_idx]
        each.mx.trans <- rotimat(each.mx, rotation)
        new.mx <- c(new.mx, list(each.mx.trans))
      }

      # construct new rgb image array
      new.X.dim <- dim(each.mx.trans)[1]
      new.Y.dim <- dim(each.mx.trans)[2]
      new.array <- array(c(new.mx[[1]],
                           new.mx[[2]],
                           new.mx[[3]]),
                         dim = c(new.X.dim, new.Y.dim, 3))

      #swap old image with new image
      seurat.visium@images[[slide]]@image <- new.array

      ## step4: change the tissue pixel-spot index
      img.index <- (seurat.visium@images)[[slide]]@coordinates

      #swap index
      if(rotation == "Hf"){
        seurat.visium@images[[slide]]@coordinates$imagecol <- img.dim[2]-img.index$imagecol
      }

      if(rotation == "Vf"){
        seurat.visium@images[[slide]]@coordinates$imagerow <- img.dim[1]-img.index$imagerow
      }

      if(rotation == "180"){
        seurat.visium@images[[slide]]@coordinates$imagerow <- img.dim[1]-img.index$imagerow
        seurat.visium@images[[slide]]@coordinates$imagecol <- img.dim[2]-img.index$imagecol
      }

      if(rotation == "L90"){
        seurat.visium@images[[slide]]@coordinates$imagerow <- img.dim[2]-img.index$imagecol
        seurat.visium@images[[slide]]@coordinates$imagecol <- img.index$imagerow
      }

      if(rotation == "R90"){
        seurat.visium@images[[slide]]@coordinates$imagerow <- img.index$imagecol
        seurat.visium@images[[slide]]@coordinates$imagecol <- img.dim[1]-img.index$imagerow
      }

      return(seurat.visium)
    }
  }


}
{
  d.all=rotateSeuratImage(d.all,rotation = "L90", slide = "SiO2_56")
  SpatialDimPlot(d.all, images = "SiO2_56",pt.size.factor = 1,label = TRUE)

  d.all=rotateSeuratImage(d.all,rotation = "L90", slide = "NS_7")
  SpatialDimPlot(d.all, images = "NS_7",pt.size.factor = 1,label = TRUE)


  d.all=rotateSeuratImage(d.all,rotation = "L90", slide = "SiO2_7")
  SpatialDimPlot(d.all, images = "SiO2_7",pt.size.factor = 1,label = TRUE,repel = TRUE)


  SpatialDimPlot(d.all,  repel = TRUE,
                 ncol = 2,images = c("NS_7" ,"SiO2_7","NS_56","SiO2_56"),
                 pt.size.factor = 1,label = TRUE,
                 label.size = 2)

  SpatialDimPlot(d.all, # repel = TRUE,
                 ncol = 2,images = c("NS_7" ,"SiO2_7","NS_56","SiO2_56"),
                 pt.size.factor = 1,label = TRUE,
                 label.size = 2)

}