【Flutter学习】AppBar 和 PopupMenu
App Bar 可以视为页面的标题栏,在 Flutter 中用AppBar组件实现;Popup Menu 是弹出菜单,用PopupMenuButton实现。下面结合这两个组件说明其用法。
1. 代码实现
一个简单的AppBar实现代码如下:
import 'package:flutter/material.dart';
void main() {
runApp(const AppBarTest());
}
class AppBarTest extends StatelessWidget {
const AppBarTest({Key? key}) : super(key: key);
Widget build(BuildContext context) {
return MaterialApp(
debugShowCheckedModeBanner: false,
home: Scaffold(
appBar: AppBar(
title: const Text('这是 AppBar'),
actions: [
IconButton(
icon: const Icon(Icons.search),
tooltip: '搜索',
onPressed: () {
print('点击了搜索按钮');
},
),
PopupMenuButton<String>(
itemBuilder: (context) => <PopupMenuItem<String>>[
const PopupMenuItem(value: '1',child: Text('T恤')),
const PopupMenuItem(value: '2',child: Text('外套')),
const PopupMenuItem(value: '3',child: Text('夹克')),
const PopupMenuItem(value: '4',child: Text('卫衣')),
],
onSelected: (String item) {
print('选择了$item');
},
elevation: 5,
),
],
),
body: const Center(
child: Text('页面内容'),
),
),
);
}
}
Chrome Web 展示效果如下:

为展示AppBar的功能,我们在通过actions属性添加了两个组件,一个是搜索按钮(IconButton),另一个是弹出菜单(PopupMenuButton)。点击弹出菜单会弹出一个选择项列表:
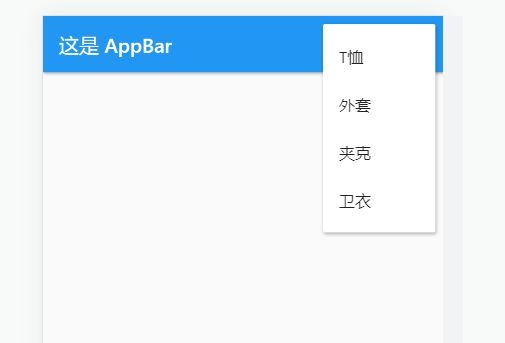
PopupMenuButton的onSelected方法可以获取选中的菜单值,即PopupMenuItem的value属性值:

2. onSelected 方法
PopupMenuButton.onSelected方法在选择了菜单项后调用,其参数为PopupMenuItem.value属性的类型,也即PopupMenuButton的泛型类型。

因其定义为泛型,故我们可以将任意类型的数据填充为value值。假设我们需要在点击菜单项时获取服装类型的编码(code)和名称(name),我们可以将其定义为对应的类:
class ClothesItem {
  ClothesItem(this.code, this.name);

  String code;
  String name;
}
将服装类型数据定义为ClothesItem的数组:
final clothesItems = [
  ClothesItem('1', 'T恤'),
  ClothesItem('2', '外套'),
  ClothesItem('3', '夹克'),
  ClothesItem('4', '卫衣'),
];
则在可以将 clothesItems 转为 List:
List<PopupMenuItem<ClothesItem>> popupMenuItems = clothesItems
  .map((e) => PopupMenuItem<ClothesItem>(
		value: e,
		child: Text(e.name),
	  ))
  .toList();
这样我们就可以将onSelected的参数类型声明为ClothesItem,从而在方法中获取其 code 和 name 值:
onSelected: (ClothesItem item) {
  print('选择了${item.code}:${item.name}');
}
完整代码如下:
import 'package:flutter/material.dart';
void main() {
runApp(AppBarTest());
}
class ClothesItem {
ClothesItem(this.code, this.name);
String code;
String name;
}
class AppBarTest extends StatelessWidget {
AppBarTest({Key? key}) : super(key: key);
final clothesItems = [
ClothesItem('1', 'T恤'),
ClothesItem('2', '外套'),
ClothesItem('3', '夹克'),
ClothesItem('4', '卫衣'),
];
Widget build(BuildContext context) {
return MaterialApp(
debugShowCheckedModeBanner: false,
home: Scaffold(
appBar: AppBar(
title: const Text('这是 AppBar'),
actions: [
IconButton(
icon: const Icon(Icons.search),
tooltip: '搜索',
onPressed: () {
print('点击了搜索按钮');
},
),
PopupMenuButton<ClothesItem>(
itemBuilder: (_) => clothesItems
.map((e) => PopupMenuItem<ClothesItem>(
value: e,
child: Text(e.name),
))
.toList(),
onSelected: (ClothesItem item) {
print('选择了${item.code}:${item.name}');
},
elevation: 5,
),
],
),
body: const Center(
child: Text('页面内容'),
),
),
);
}
}
参考
Flutter 官方示例 gallery