Java进击框架:Spring(一)
Java进击框架:Spring(一)
- 前言
-
- 创建Spring项目
- Spring IoC容器和Beans介绍
-
- Bean的概述
- Spring IoC
- 配置元数据
- 实例化Bean
- 依赖注入
-
- 循环依赖
- 详细配置
- 生命周期回调
- Bean定义继承
- 基于注解的容器配置
- @Component和进一步的原型注解
- 自动检测类和注册Bean定义
- 使用JSR 330标准注释
- ApplicationContext的附加功能
前言
Spring 诞生于 2003 年,轻量级的 Java 开源框架,是对早期 J2EE 规范复杂性的回应。虽然有些人认为Java EE和Spring是竞争,但Spring实际上是Java EE的补充。
从整体上看Spring可以分为五个部分(从上到下、从左到右):Data Access/Integration、Web、AOP、Core Container、Test。
- Data Access/Integration:数据访问与集成,包括 JDBC、ORM、OXM、JMS 和 Transactions 模块,主要提供数据库底层操作和事务控制等支持。
- Web:提供了基本web集成特性,比如:多文件上传功能、资源请求,数据绑定、通讯等支持。
- AOP:面向切面编程。比如:日志记录、权限控制、性能统计等通用功能和业务逻辑分离的技术。
- Core Container:核心容器。提供控制反转(IOC)和依赖注入(DI),上下文配置,表达式语言等支持。
- Test:测试模块。使用Junit和TestNG对Spring组件进行测试。
除了Spring Framework之外,还有其他项目,例如Spring Boot,Spring Security,Spring Data,Spring Cloud,Spring Batch等。
创建Spring项目
(1)以idea为例,先创建Maven项目。 (2)然后再main文件下创建resouces文件。
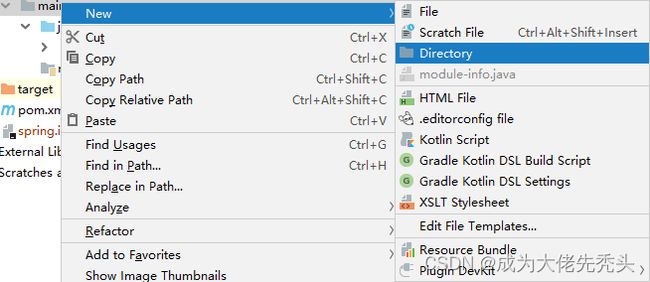
(3)找到idea最右侧,标记为Resource文件。
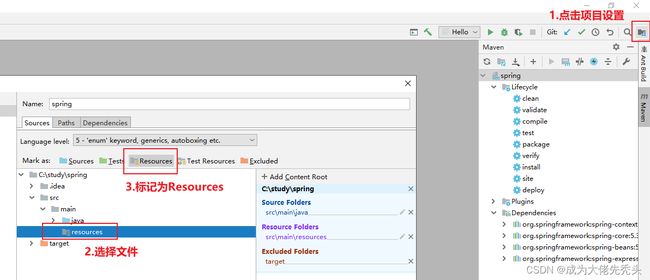
(4)然后引入依赖(spring5.3.23为例)。
    <dependencies>

        <dependency>
            <groupId>org.springframeworkgroupId>
            <artifactId>spring-contextartifactId>
            <version>5.3.23version>
        dependency>

        <dependency>
            <groupId>org.springframeworkgroupId>
            <artifactId>spring-coreartifactId>
            <version>5.3.23version>
        dependency>

        <dependency>
            <groupId>org.springframeworkgroupId>
            <artifactId>spring-beansartifactId>
            <version>5.3.23version>
        dependency>

        <dependency>
            <groupId>org.springframeworkgroupId>
            <artifactId>spring-expressionartifactId>
            <version>5.3.23version>
        dependency>
    dependencies>
(5)再resources文件下创建xml文件,文件名自定义。

(6)写入基本配置结构
<beans xmlns="http://www.springframework.org/schema/beans"
       xmlns:xsi="http://www.w3.org/2001/XMLSchema-instance"
       xsi:schemaLocation="http://www.springframework.org/schema/beans
        https://www.springframework.org/schema/beans/spring-beans.xsd">

beans>
这样就创建完成spring项目,后续通过此结构进行讲解。
Spring IoC容器和Beans介绍
在 Spring 中,构成应用程序主干并由 Spring IoC 容器管理的对象称为 Bean。 Bean 是由 Spring IoC 容器实例化,组装和以其他方式管理的对象。Bean 及其之间的依赖关系反映在容器使用的配置元数据中。配置元数据用XML、Java注释或Java代码表示。它让您能够表达组成应用程序的对象以及这些对象之间丰富的相互依赖关系。
Bean的概述
Spring IoC容器管理一个或多个beans。这些beans是用您提供给容器的配置元数据创建的(例如,以XML的形式
在容器本身中,这些bean定义表示为BeanDefinition对象,这些对象包含以下元数据(以及其他信息):
-
包限定类名:通常是正在定义的bean的实际实现类。
-
Bean行为配置元素,声明bean在容器中的行为方式(范围、生命周期回调等)。
-
对bean完成其工作所需的其他bean的引用。这些引用也称为协作者或依赖者。
-
要在新创建的对象中设置的其他配置设置,例如,池的大小限制或在管理连接池的bean中使用的连接数。
这些元数据转化为一组组成每个bean定义的属性。下表描述了这些属性:
| 属性 | 介绍 |
|---|---|
| Class | 实例化bean |
| Name | 命名bean |
| Scope | bean范围 |
| Constructor arguments | 构造器参数 |
| Dependency Injection | 依赖注入 |
| Autowiring mode | 自动装配模式 |
| Lazy initialization mode | 延迟初始化的bean |
| Initialization method | 初始化方法 |
| Destruction method | 销毁方法 |
Spring IoC
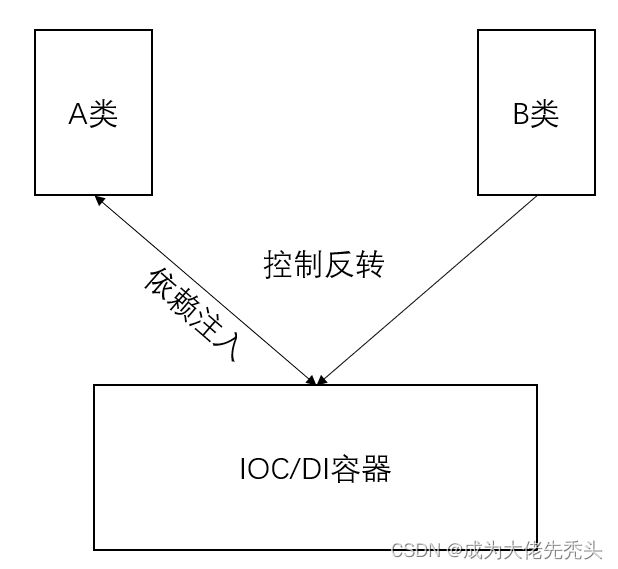
IoC(Inversion of Control)控制反转,也称为依赖注入(DI)。
我们可以先来重温一下,初学Java时,当某个类需要调用其它类的方法,直接new这个类,再调用方法,如代码所示:
public class B {
    public void b(){}
}
public class A {
    public static void main(String[] args) {
        B b = new B();
        b.b();
    }
}
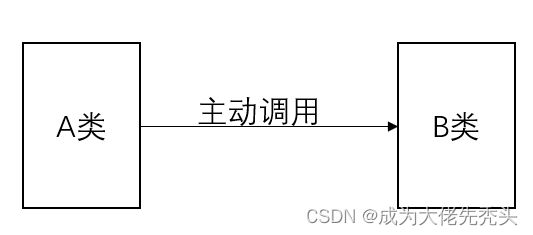
这样就很容易导致,耦合度太高,有了IOC容器后将主动权交给了第三方进行管理。
定义一个容器配置元数据:
<beans xmlns="http://www.springframework.org/schema/beans"
       xmlns:xsi="http://www.w3.org/2001/XMLSchema-instance"
       xsi:schemaLocation="http://www.springframework.org/schema/beans
        https://www.springframework.org/schema/beans/spring-beans.xsd">
    <bean id="a" class="com.example.A">
        <constructor-arg ref="b">constructor-arg>
    bean>
    <bean id="b" class="com.example.B">bean>
beans>
定义构造类,进行注入:
public class B {
    public void b(){}
}
public class A {
    private B b;

    public A(B b) { this.b = b; }

    public void getb(){ b.b(); }

    public static void main(String[] args) {
        ApplicationContext applicationContext = new ClassPathXmlApplicationContext("applicationContext.xml");
        A a = applicationContext.getBean("a", A.class);
        a.getb();
    }
}
org.springframework.beans和org.springframework.context包是Spring Framework的IoC容器的基础。
org.springframework.context.ApplicationContext接口代表Spring IoC容器。
你可以创建ClassPathXmlApplicationContext或者FileSystemXmlApplicationContext来启动对元数据的支持。
通过使用IoC,这里通过构造器注入(还有其它方法)使类与类之间耦合性减小,所以IoC不是一种技术,更多的是一种思想,它能指导我们如何设计出松耦合、更优良的程序。
通俗点说:IOC容器改变了依赖对象的创建方式,反向的向类注入所需要的其它对象 。
配置元数据
Spring IoC容器管理一个或多个beans。这些beans是用您提供给容器的配置元数据创建的(例如,以XML的形式
<beans>
    <bean id="a" name="a,a1;a3" class="com.example.A" scope="singleton">bean>
    <alias name="a" alias="as-a">alias>
beans>
id属性:标识单个bean定义,唯一标识。
    public static void main(String[] args) {
        ApplicationContext applicationContext = new ClassPathXmlApplicationContext("applicationContext.xml");
        A a = applicationContext.getBean("a", A.class);
    }
name属性:标识单个bean定义,唯一标识,可以与id相同,指定多个名称可以使用逗号或者分号隔开。
    public static void main(String[] args) {
        ApplicationContext applicationContext = new ClassPathXmlApplicationContext("applicationContext.xml");
        A a = applicationContext.getBean("a1", A.class);
    }
alias属性:有时需要为在别处定义的bean引入别名,在基于XML的配置元数据中,可以使用元素来实现这一点。
    public static void main(String[] args) {
        ApplicationContext applicationContext = new ClassPathXmlApplicationContext("applicationContext.xml");
        A a = applicationContext.getBean("as-a", A.class);
    }
class属性:定义bean的类型,并使用完全限定的类名。如果id和name都没有想要获取bean可以通过完全限定的类名。
    public static void main(String[] args) {
        ApplicationContext applicationContext = new ClassPathXmlApplicationContext("applicationContext.xml");
        A a = applicationContext.getBean("com.example.A", A.class);
    }
scope属性:指定对象的作用范围。最初只有两种:singleton和prototype,随着版本的不断更新,新增类型:request、session、application、websocket。Bean的生命周期有三种:创建、运行、销毁。
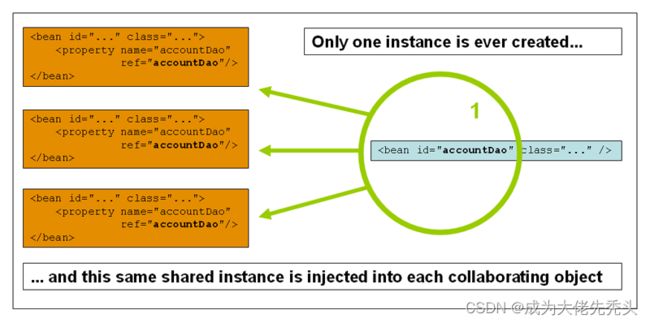
(1)singleton:默认值。Spring容器中只有一个实例。
创建:容器创建时,对象创建。
运行:容器存在,一直存活。
销毁:容器销毁,对象销毁。
示例代码:
<beans>
    <bean id="a" class="com.example.A" scope="singleton">bean>
beans>
public class A {
    public static void main(String[] args) {
        ApplicationContext applicationContext = new ClassPathXmlApplicationContext("applicationContext.xml");
        A a = applicationContext.getBean("a", A.class);
        System.out.println(a);
        a = applicationContext.getBean("a", A.class);
        System.out.println(a);
        /** Output:
         * com.example.A@ff5b51f
         * com.example.A@ff5b51f
         */
    }
}
运行后我们发现,当范围为singleton时,打印输出的内存地址相同,容器只创建了一个实例。
(2)prototype:每次请求Spring容器都会创建一个新的实例。
创建:使用时,对象创建。
运行:对象使用时,一直存活。
销毁:对象长时间不用,且没有别的对象引用时,由Java的垃圾回收机制回收。
示例代码:
<beans>
    <bean id="a" class="com.example.A" scope="prototype">bean>
beans>
public class A {
    public static void main(String[] args) {
        ApplicationContext applicationContext = new ClassPathXmlApplicationContext("applicationContext.xml");
        A a = applicationContext.getBean("a", A.class);
        System.out.println(a);
        a = applicationContext.getBean("a", A.class);
        System.out.println(a);
        /** Output:
         * com.example.A@6e1567f1
         * com.example.A@5cb9f472
         */
    }
}
运行后我们发现,当范围为prototype时,打印输出的内存地址不相同,容器只创建了两个实例。
(3)request:每个HTTP请求都有自己的bean实例,仅在web有效。
(4)session:将单个bean定义作用于HTTP Session的生命周期,仅在web有效。
(5)application:将单个bean定义作用于ServletContext的生命周期,仅在web有效。
(6)websocket:将单个bean定义作用于WebSocket的生命周期,仅在web有效。
(7)自定义范围:bean作用域机制是可扩展的。您可以定义自己的作用域,甚至重新定义现有的作用域,尽管后者被认为是不好的做法,您需要实现org.springframework.beans.factory.config.Scope接口。
public class NewScope implements Scope {

    public Object get(String s, ObjectFactory<?> objectFactory) { return null; }

    public Object remove(String s) { return null; }

    public void registerDestructionCallback(String s, Runnable runnable) { }

    public Object resolveContextualObject(String s) { return null; }

    public String getConversationId() { return null; }
}
实例化Bean
bean定义本质上是创建一个或多个对象的方法。当被访问时,容器查看命名bean的配方,并使用由该bean定义封装的配置元数据来创建(或获取)实际对象。
实例化 Bean 有四种方式:构造函数实例化、静态工厂方法实例化、实例工厂方法进行实例化、接口实例化。
- 构造函数实例化
当您通过构造器方法创建一个bean时,所有普通的类都可以被Spring使用并与之兼容。Spring IoC容器实际上可以管理您希望它管理的任何类。您还可以在容器中包含更多奇特的非bean样式的类。
使用基于XML的配置元数据,您可以按如下方式指定bean类::
<beans>
    <bean id="a" class="com.example.A">bean>
beans>
示例代码如下:
public class A {
    public A() {
        System.out.println("构造方法实例化");
    }

    public static void main(String[] args) {
        ApplicationContext applicationContext = new ClassPathXmlApplicationContext("applicationContext.xml");
        A a = applicationContext.getBean("a", A.class);
        System.out.println(a);
        /** Output:
         *  构造方法实例化
         *  com.example.A@462d5aee
         */
    }
}
- 静态工厂方法实例化
通过factory-method属性指定工厂方法,用静态工厂方法创建的bean。在此示例中getInstance()方法必须是static方法。以下示例显示了如何指定工厂方法:
<beans>
    <bean id="a" class="com.example.A" factory-method="getInstance">bean>
beans>
示例代码如下:
public class A {

    public static A getInstance(){
        System.out.println("静态工厂实例");
        return new A();
    }

    public static void main(String[] args) {
        ApplicationContext applicationContext = new ClassPathXmlApplicationContext("applicationContext.xml");
        A a = applicationContext.getBean("a", A.class);
        System.out.println(a);
        /** Output:
         * 静态工厂实例
         * com.example.A@148080bb
         */
    }
}
- 实例工厂方法进行实例化
实例工厂方法是通过现有非静态方法bean创建新的bean。要使用这种机制,将class属性为空,并且在factory-bean属性,指定当前(或父或祖先)容器中bean的名称,该容器包含创建对象时要调用的实例方法。属性设置工厂方法本身的名称factory-method属性。以下示例显示了如何配置这样的bean:
<beans>
    <bean id="a" class="com.example.A">bean>
    <bean id="a2" factory-bean="a" factory-method="getInstance">bean>
beans>
示例代码如下:
public class A {

    public A getInstance(){
        System.out.println("实例化工厂方法");
        return new A();
    }

    public static void main(String[] args) {
        ApplicationContext applicationContext = new ClassPathXmlApplicationContext("applicationContext.xml");
        A a = applicationContext.getBean("a2", A.class);
        System.out.println(a);
        /** Output:
         * 实例化工厂方法
         * com.example.A@6e1ec318
         */
    }
}
- 接口实例化
BeanFactory接口提供了能够管理任何类型对象的高级配置机制。ApplicationContext是BeanFactory的子接口。
BeanFactory定义了IOC容器的最基本形式,并提供了IOC容器应遵守的的最基本的接口,也就是Spring IOC所遵守的最底层和最基本的编程规范。
public interface BeanFactory {
    String FACTORY_BEAN_PREFIX = "&";
	//省略部分代码... ...
    Object getBean(String var1) throws BeansException;
    <T> ObjectProvider<T> getBeanProvider(Class<T> var1);
    boolean containsBean(String var1);
    boolean isSingleton(String var1) throws NoSuchBeanDefinitionException;
    boolean isPrototype(String var1) throws NoSuchBeanDefinitionException;
    boolean isTypeMatch(String var1, Class<?> var2) throws NoSuchBeanDefinitionException;
    @Nullable
    Class<?> getType(String var1) throws NoSuchBeanDefinitionException;
    String[] getAliases(String var1);
}
如果按照传统的方式,则需要在中提供大量的配置信息。Spring提供了一个FactoryBean的工厂类接口,FactoryBean是个Bean,用户可以通过实现该接口定制实例化Bean的逻辑。
<beans>
    <bean id="a" class="com.example.A">bean>
beans>
public class A implements FactoryBean<A> {

    public A getObject() throws Exception {
        System.out.println("FactoryBean a");
        return new A();
    }

    public Class<?> getObjectType() {
        return A.class;
    }

    public static void main(String[] args) {
        ApplicationContext applicationContext = new ClassPathXmlApplicationContext("applicationContext.xml");
        A a = applicationContext.getBean("a", A.class);
        System.out.println(a);
        /** Output:
         * FactoryBean a
         * com.example.A@29ca901e
         */
    }

}
依赖注入
依赖注入(DI)是一个过程,通过构造函数参数、工厂方法的参数等方式,在对象实例上设置的属性来定义它们的依赖关系(即,它们使用的其他对象)。然后,容器在创建bean时注入这些依赖项。这个过程基本上是bean本身的逆过程(因此得名,控制反转)。
依赖注入(DI)有三种主要形式:基于构造函数的依赖注入和基于Setter的依赖注入、自动注入。
- 基于构造函数的依赖注入
基于构造函数的依赖注入(DI)是通过容器调用一个带有多个参数的构造函数来实现的,每个参数代表一个依赖项。
通过ref 属性引用了另一个bean定义的名称。id属性和ref属性之间的链接表示协作对象之间的依赖关系:
<beans>
    <bean id="a" class="com.example.A">
        <constructor-arg ref="c">constructor-arg>
        <constructor-arg ref="b">constructor-arg>
    bean>
    <bean id="b" class="com.example.B">bean>
    <bean id="c" class="com.example.C">bean>
beans>
示例代码如下:
public class B {
    public void b(){
        System.out.println("b");
    }
}
public class C {
    public void c(){
        System.out.println("c");
    }
}
public class A {
    private B b;
    private C c;
    public A(B b,C c) {
        this.b = b;
        this.c = c;
    }
    public static void main(String[] args) {
        ApplicationContext applicationContext = new ClassPathXmlApplicationContext("applicationContext.xml");
        A a = applicationContext.getBean("a", A.class);
        a.b.b();
        a.c.c();
        /** Output:
         *  b
         *  c
         */
    }
}
再Bean中定义的顺序,就是实例化bean时提供给相应构造函数的顺序。
如果构造参数为基本类型的有参构造时,可以通过type属性指定构造函数参数的类型,value属性指定参数值:
<beans>
    <bean id="a" class="com.example.A">
        <constructor-arg type="Integer" value="123">constructor-arg>
        <constructor-arg type="String" value="c">constructor-arg>
    bean>
beans>
示例代码如下:
public class A {
    private Integer b;
    private String c;
    public A(Integer b,String c) {
        this.b = b;
        this.c = c;
    }

    public static void main(String[] args) {
        ApplicationContext applicationContext = new ClassPathXmlApplicationContext("applicationContext.xml");
        A a = applicationContext.getBean("a", A.class);
        System.out.println(a.b);
        System.out.println(a.c);
        /** Output:
         *  123
         *  c
         */
    }

}
您也可以使用index属性显式指定构造函数参数的索引,如下例所示:
<beans>
    <bean id="a" class="com.example.A">
        <constructor-arg index="0" value="123">constructor-arg>
        <constructor-arg index="1" value="c">constructor-arg>
    bean>
beans>
- 基于Setter的依赖注入(属性注入)
基于setter的依赖注入(DI)是由容器在调用无参数构造函数或无参数构造函数后调用bean上的setter方法来完成的。
下面的示例,通过
<beans>
    <bean id="a" class="com.example.A">
        <property name="b" ref="b">property>
    bean>
    <bean id="b" class="com.example.B">bean>
beans>
示例代码如下:
public class A {
    private B b;

    public void setB(B b) {
        System.out.println("setter注入");
        this.b = b;
    }

    public static void main(String[] args) {
        ApplicationContext applicationContext = new ClassPathXmlApplicationContext("applicationContext.xml");
        A a = applicationContext.getBean("a", A.class);
        System.out.println(a.b);
        /** Output:
         *  setter注入
         *  com.example.B@1990a65e
         */
    }
}
- 自动注入
你可以使用autowire属性来达到自动装配。autowire属性提供5中策略:
<beans>

    <bean id="a" class="com.example.A" autowire="no">bean>
    <bean id="a" class="com.example.A" autowire="default">bean>

    <bean id="a" class="com.example.A" autowire="byType">bean>

    <bean id="a" class="com.example.A" autowire="byName">bean>

    <bean id="a" class="com.example.A" autowire="constructor">bean>
beans>
byType和byName都是通过setter()方法注入,constructor通过构造函数属性的类型注入。
<beans>
    <bean id="a" class="com.example.A" autowire="byType">bean>
    <bean id="b" class="com.example.B">bean>
beans>
示例代码如下:
public class B{}
public class A{
    private B b;

    public void setB(B b) { this.b = b; }

    public static void main(String[] args) {
        ApplicationContext applicationContext = new ClassPathXmlApplicationContext("applicationContext.xml");
        A a = applicationContext.getBean("a", A.class);
        System.out.println(a.b);
        /** Output:
         *  com.example.B@4c762604
         */
    }
}
如果未能匹配到类型或者名称,则注入失败:
public class A{
    private C c;

    public void setC(C c) { this.c = c; }

    public static void main(String[] args) {
        ApplicationContext applicationContext = new ClassPathXmlApplicationContext("applicationContext.xml");
        A a = applicationContext.getBean("a", A.class);
        System.out.println(a.c);
        /** Output:
         *  null
         */
    }
}
你可以使用@Autowired注解减少指定属性或构造函数参数的需要。
示例代码如下:
@Component
public class B {}
@Component
public class A{
    @Autowired
    private B b;

    public static void main(String[] args) {
        ApplicationContext applicationContext = new AnnotationConfigApplicationContext("com.example");
        A a = applicationContext.getBean("a", A.class);
        System.out.println(a.b);
        /** Output:
         *  com.example.B@3c419631
         */
    }
}
- 使用方法注入
Spring的方法注入可分为两种:查找方法注入和任意方法替换。
(1)查找方法注入
查找方法会导致IoC容器覆盖给定的方法并返回bean属性中给出的名称。这是方法注入的一种形式。
在
<beans>
        <bean id="a" class="com.example.A">
            <lookup-method name="getB" bean="b">lookup-method>
        bean>
        <bean id="b" class="com.example.B">bean>
beans>
name属性指定方法名,bean为返回的类型
示例代码如下:
public class B {
    public void b(){ System.out.println("b"); }
}
public class A{
    private B b;

    public B getB() { return b; }

    public static void main(String[] args) {
        ApplicationContext applicationContext = new ClassPathXmlApplicationContext("applicationContext.xml");
        A a = applicationContext.getBean("a", A.class);
        System.out.println(a.getB());
        /** Output:
         *  com.example.B@58c1c010
         */
    }

}
当然你也可以使用注解@Lookup,示例代码如下:
@Component
public class A{
    private B b;

//    @Lookup("getB")查找指定bean方法
    @Lookup
    public B getB() {
        return b;
    }

    public static void main(String[] args) {
        ApplicationContext applicationContext = new AnnotationConfigApplicationContext("com.example");
        A a = applicationContext.getBean(A.class);
        System.out.println(a.getB());
        /** Output:
         *  com.example.B@58c1c010
         */
    }
}
@Autowired注解会将所有bean范围改为单例,@Lookup可以保证被引入的组件保持prototype模式。
(2)任意方法替换
与查找方法注入相比,方法注入的一个不太有用的形式是用另一个方法实现替换受管bean中的任意方法的能力。
对于基于XML的配置元数据,您可以使用replaced-method元素将现有的方法实现替换为另一个方法实现。
<beans>
        <bean id="a" class="com.example.A">
            <replaced-method name="method" replacer="AReplace">

                <arg-type>Stringarg-type>
            replaced-method>
        bean>
        <bean id="AReplace" class="com.example.AReplace">bean>
beans>
你可以通过
示例代码如下:
public class AReplace implements MethodReplacer {
    public Object reimplement(Object o, Method method, Object[] objects) throws Throwable {
        System.out.println("替换了:"+objects[0].toString());
        return null;
    }
}
public class A{

    public void method(String p){}

    public static void main(String[] args) {
        ApplicationContext applicationContext = new ClassPathXmlApplicationContext("applicationContext.xml");
        A a = applicationContext.getBean(A.class);
        a.method("123");
        /** Output:
         *  替换了:123
         */
    }
}
大多数Spring用户并不直接使用这些类(即以编程方式),而是使用XMLbean定义、带注释的组件。然后,这些源在内部被转换为BeanDefinition并用于加载整个Spring IoC容器实例。
循环依赖
如果您主要使用构造函数注入,就有可能创建一个无法解析的循环依赖场景。
比如:A类通过构造函数注入需要B类的一个实例,B类通过构造函数注入需要A类的一个实例。如果将类A和B的beans配置为相互注入,Spring IoC容器会在运行时检测到这种循环引用,并抛出一个BeanCurrentlyInCreationException。
<beans>
    <bean id="a" class="com.example.A">
        <constructor-arg name="b" ref="b">constructor-arg>
    bean>
    <bean id="b" class="com.example.B">
        <constructor-arg name="a" ref="a">constructor-arg>
    bean>
beans>
示例代码如下:
public class B {
    private A a;

    public B(A a) {
        this.a = a;
    }
}
public class A {
    private B b;

    public A(B b) {
        this.b = b;
    }

    public static void main(String[] args) {
        ApplicationContext applicationContext = new ClassPathXmlApplicationContext("applicationContext.xml");
        A a = applicationContext.getBean("a", A.class);
        System.out.println(a);
        /** Output:
         * Caused by: org.springframework.beans.factory.BeanCurrentlyInCreationException: Error creating bean with name 'a': Requested bean is currently in creation: Is there an unresolvable circular reference?
         * 	... 29 more
         */
    }
}
您可以使用setter注入配置循环依赖项。
<beans>
    <bean id="a" class="com.example.A">
        <property name="b" ref="b">property>
    bean>
    <bean id="b" class="com.example.B">
        <constructor-arg name="a" ref="a">constructor-arg>
    bean>
beans>
示例代码如下:
public class B {
    private A a;

    public B(A a) { this.a = a; }
}
public class A {
    private B b;

    public void setB(B b) { this.b = b; }

    public static void main(String[] args) {
        ApplicationContext applicationContext = new ClassPathXmlApplicationContext("applicationContext.xml");
        A a = applicationContext.getBean("a", A.class);
        System.out.println(a);
        /** Output:
         * com.example.A@2fd66ad3
         */
    }
}
Spring容器在创建容器时验证每个bean的配置。它在容器加载时检测配置问题,例如,bean由于缺少或无效的属性而抛出一个异常。
详细配置
下面介绍其它的配置标签、属性等。
p命名空间
使用p名称空间可以简洁的XML配置,我们先看看原来的配置文件:
<beans>
    <bean id="a" class="com.example.A">
        <property name="id" value="123456">property>
        <property name="userName" value="张三">property>
        <property name="b" ref="b">property>
    bean>
    <bean id="b" class="com.example.B">bean>
beans>
使用p名称空间,首先再
xmlns:p=“http://www.springframework.org/schema/p”
然后我们就可以使用p命名空间来配置XML:
<beans xmlns="http://www.springframework.org/schema/beans"
       xmlns:xsi="http://www.w3.org/2001/XMLSchema-instance"
       xmlns:p="http://www.springframework.org/schema/p"
       xsi:schemaLocation="http://www.springframework.org/schema/beans
        https://www.springframework.org/schema/beans/spring-beans.xsd">
    <bean id="a" class="com.example.A"
          p:id="123456"
          p:userName="张三"
          p:b-ref="b">
    bean>
    <bean id="b" class="com.example.B">bean>
beans>
p:*-ref表示这不是一个直接的值,而是对另一个bean的引用。
示例代码如下:
public class A {
    private int id;
    private String userName;
    private B b;

    public void setId(int id) { this.id = id; }

    public void setUserName(String userName) { this.userName = userName; }

    public void setB(B b) { this.b = b; }

    public static void main(String[] args) {
        ApplicationContext applicationContext = new ClassPathXmlApplicationContext("applicationContext.xml");
        A a = applicationContext.getBean("a", A.class);
        System.out.println(a.id+","+a.userName+","+a.b);
        /** Output:
         *  123456,张三,com.example.B@52525845
         */
    }
}
c命名空间
我们先来看看原始的构造函数注入方式:
<beans>
    <beans>
        <bean id="a" class="com.example.A">
            <constructor-arg ref="b">constructor-arg>
            <constructor-arg name="name" value="张三">constructor-arg>
        bean>
        <bean id="b" class="com.example.B">bean>
    beans>
beans>
像p命名空间一样,可以使用c命名空间来简化配置构造函数参数,首先再
xmlns:c=“http://www.springframework.org/schema/c”
然后我们就可以使用c命名空间来配置XML:
<beans xmlns="http://www.springframework.org/schema/beans"
       xmlns:xsi="http://www.w3.org/2001/XMLSchema-instance"
       xmlns:c="http://www.springframework.org/schema/c"
       xsi:schemaLocation="http://www.springframework.org/schema/beans
        https://www.springframework.org/schema/beans/spring-beans.xsd">
    <beans>
        <bean id="a" class="com.example.A"
              c:b-ref="b"
              c:name="张三">
        bean>
        <bean id="b" class="com.example.B">bean>
    beans>
beans>
c:*-ref表示对于另一个bean引用。
示例代码如下:
public class A {
    private B b;
    private String name;

    public A(B b, String name) {
        this.b = b;
        this.name = name;
    }

    public static void main(String[] args) {
        ApplicationContext applicationContext = new ClassPathXmlApplicationContext("applicationContext.xml");
        A a = applicationContext.getBean("a", A.class);
        a.b.b();
        System.out.println(a.name);
        /** Output:
         *  b
         *  张三
         */
    }
}
idref标签
idref标签只是传递id(一个字符串值,不是引用),配置文件如下:
<beans>
    <bean id="a" class="com.example.A">
        <property name="content">
            <idref bean="b">idref>
        property>
    bean>
    <bean id="b" class="com.example.B">bean>
beans>
示例代码如下:
public class B {}
public class A {
    private String content;

    public String getContent() {
        return content;
    }

    public void setContent(String content) {
        this.content = content;
    }

    public static void main(String[] args) {
        ApplicationContext applicationContext = new ClassPathXmlApplicationContext("applicationContext.xml");
        A a = applicationContext.getBean("a", A.class);
        System.out.println(a.getContent());
        /** Output:
         *  b
         */
    }
}
前面的bean定义片段完全等同于(在运行时)下面的片段:
<beans>
	<bean id="a" class="com.example.A">
	    <property name="content" value="b"/>
	bean>
	<bean id="b" class="com.example.B">bean>
beans>
idref标签让容器在部署时验证被引用的命名bean是否确实存在。
ref属性(标签)
前面简单介绍了ref属性(标签),ref属性(标签)是
<beans>
    <bean id="a" class="com.example.A">

        <property name="b">
            <ref bean="b">ref>
        property>
    bean>
    <bean id="b" class="com.example.B">bean>
beans>
- Collections
依赖注入可以注入集合:,以及
(1)list
介绍两种用法:字符串集合、对象集合
<beans>
    <bean id="a" class="com.example.A">

        <property name="list">
            <list>
                <value>qwevalue>
                <value>asdvalue>
            list>
        property>

        <property name="listObject">
            <list>

                <ref bean="b">ref>
                <bean class="com.example.B">
                    <property name="name" value="a"/>
                    <property name="age" value="01"/>
                bean>
            list>
        property>
    bean>
    <bean id="b" class="com.example.B">
        <property name="name" value="b"/>
        <property name="age" value="00"/>
    bean>
beans>
示例代码如下:
public class B {
    private String name;
    private Integer age;

    public String getName() { return name; }

    public void setName(String name) { this.name = name; }

    public Integer getAge() { return age; }

    public void setAge(Integer age) { this.age = age; }
}
public class A {
    private List<String> list;
    private List<B> listObject;

    public void setList(List<String> list) { this.list = list; }

    public void setListObject(List<B> listObject) { this.listObject = listObject; }

    public static void main(String[] args) {
        ApplicationContext applicationContext = new ClassPathXmlApplicationContext("applicationContext.xml");
        A a = applicationContext.getBean("a", A.class);
        System.out.println(JSONObject.toJSONString(a.list));
        System.out.println(JSONObject.toJSONString(a.listObject));
        /** Output:
         *  ["qwe","asd"]
         *  [{"age":0,"name":"b"},{"age":1,"name":"a"}]
         */
    }
}
(2)set
set也有两种用法:字符串set、对象set
<beans>
    <bean id="a" class="com.example.A">

        <property name="set">
            <set>
                <value>qwevalue>
                <value>asdvalue>
            set>
        property>

        <property name="setObject">
            <set>

                <ref bean="b">ref>
                <bean name="b" class="com.example.B">
                    <property name="name" value="a"/>
                    <property name="age" value="01"/>
                bean>
            set>
        property>
    bean>
    <bean id="b" class="com.example.B">
        <property name="name" value="b"/>
        <property name="age" value="00"/>
    bean>
beans>
示例代码如下:
public class A {
    private Set<String> set;
    private Set<B> setObject;

    public void setSet(Set<String> set) { this.set = set; }

    public void setSetObject(Set<B> setObject) { this.setObject = setObject; }

    public static void main(String[] args) {
        ApplicationContext applicationContext = new ClassPathXmlApplicationContext("applicationContext.xml");
        A a = applicationContext.getBean("a", A.class);
        System.out.println(JSONObject.toJSONString(a.set));
        System.out.println(JSONObject.toJSONString(a.setObject));
        /** Output:
         *  ["qwe","asd"]
         *  [{"age":0,"name":"b"},{"age":1,"name":"a"}]
         */
    }
}
(3)map
<beans>
    <bean id="a" class="com.example.A">
        <property name="map">
            <map>
                <entry key="name" value="a">entry>
                <entry key="age" value="01">entry>
            map>
        property>
    bean>
beans>
示例代码如下:
public class A {
    private Map<String,String> map;

    public void setMap(Map<String, String> map) { this.map = map; }

    public static void main(String[] args) {
        ApplicationContext applicationContext = new ClassPathXmlApplicationContext("applicationContext.xml");
        A a = applicationContext.getBean("a", A.class);
        System.out.println(JSONObject.toJSONString(a.map));
        /** Output:
         *  {"name":"a","age":"01"}
         */
    }
}
(4)props
本质上是hashtable。
<beans>
    <bean id="a" class="com.example.A">
        <property name="props">
            <props>
                <prop key="name">aprop>
                <prop key="age">01prop>
            props>
        property>
    bean>
beans>
示例代码如下:
public class A {
    private Properties props;

    public void setProps(Properties props) { this.props = props; }

    public static void main(String[] args) {
        ApplicationContext applicationContext = new ClassPathXmlApplicationContext("applicationContext.xml");
        A a = applicationContext.getBean("a", A.class);
        System.out.println(JSONObject.toJSONString(a.props));
        /** Output:
         *  {"age":"01","name":"a"}
         */
    }
}
映射键或值或设置值的值也可以是以下任何元素:
bean | ref | idref | list | set | map | props | value | null
- Null和空字符串值
如果将值设为null或者空字符串可以这样:
<beans>
    <bean id="b" class="com.example.B">
        <property name="name" value=""/>
        <property name="age">
            <null>null>
        property>
    bean>
beans>
示例代码如下:
public class B {
    private String name;
    private Integer age;

    public void setName(String name) { this.name = name; }

    public void setAge(Integer age) { this.age = age; }

    public static void main(String[] args) {
        ApplicationContext applicationContext = new ClassPathXmlApplicationContext("applicationContext.xml");
        B b = applicationContext.getBean("b", B.class);
        System.out.println(b.age+","+b.name);
        /** Output:
         *  null,
         */
    }
}
- 使用
depends-on
如果一个bean是另一个bean的依赖项,这通常意味着一个bean被设置为另一个bean的属性。通常,您可以使用元素在基于XML的配置元数据中。depends-on属性表示bean之间的依赖关系,bean被初始化之前指定强制一个或多个bean被初始化。
<beans>
        <bean id="a" class="com.example.A" depends-on="b,c">bean>
        <bean id="b" class="com.example.B">bean>
        <bean id="c" class="com.example.C">bean>
beans>
示例代码如下:
public class B {
    public void b(){ System.out.println("b"); }
}
public class C {
    public void c(){ System.out.println("c"); }
}
public class A {

    public static void main(String[] args) {
        ApplicationContext applicationContext = new ClassPathXmlApplicationContext("applicationContext.xml");
        A a = applicationContext.getBean("a", A.class);
        /** Output:
         *  ... ...Creating shared instance of singleton bean 'b'
         *  ... ...Creating shared instance of singleton bean 'c'
         *  ... ...Creating shared instance of singleton bean 'a'
         */
    }
}
你也可以使用@DependsOn注解,进行bean的依赖关系初始化。
@Configuration
public class Config {
    @Bean("a")
	@DependsOn({"b"})
    public A getA(){
        return new A();
    }
    @Bean("b")
    public B getB(){
        return new B();
    }
}
当然也可以再类上面使用注解
@Component
@DependsOn("b")
public class A{ }
@Component
public class B { }
- 惰性初始化的Beans
一般情况下,启动项目时会初始化所有的bean,当不希望出现这种行为时,可以通过将bean定义标记为惰性初始化来防止单例bean的预实例化。惰性初始化的bean告诉IoC容器在第一次被请求时创建一个bean实例,而不是在启动时。
在lazy-init=true属性:
<beans>
        <bean id="a" class="com.example.A" lazy-init="true">bean>
        <bean id="b" class="com.example.B">bean>
        <bean id="c" class="com.example.C">bean>
beans>
当项目启动时,bean不会被急切地预实例化,示例代码如下:
public class A {

    public static void main(String[] args) {
        ApplicationContext applicationContext = new ClassPathXmlApplicationContext("applicationContext.xml");
        //使用时被创建
//        A a = applicationContext.getBean("a", A.class);
        /** Output:
         *  ... ...Creating shared instance of singleton bean 'b'
         *  ... ...Creating shared instance of singleton bean 'c'
         */
    }
}
你也可以使用@Lazy注解惰性初始化。
@Component
public class C extends Base{ }
@Component
public class B extends Base{ }
@Lazy
public class A{
    public static void main(String[] args) {
        ApplicationContext applicationContext = new AnnotationConfigApplicationContext("com.example");
        /** Output:
         *  Creating shared instance of singleton bean 'b'
         *  Creating shared instance of singleton bean 'c'
         */
    }
}
- 设置主Bean
当注入的Bean有多个候选项时,应该给Bean设置一个主bean,否则注入时会NoUniqueBeanDefinitionException错误
<beans>
    <bean id="a" class="com.example.A" autowire="byType">bean>
    <bean id="b" class="com.example.B">bean>
    <bean id="c" class="com.example.C">bean>
beans>
public interface Base {}
public class B implements Base {}
public class C implements Base {}
public class A{
    private Base base;

    public void setBase(Base base) { this.base = base; }

    public static void main(String[] args) {
        ApplicationContext applicationContext = new ClassPathXmlApplicationContext("applicationContext.xml");
    }
}
我们可以使用primary属性,指定为主bean。
<beans>
    <bean id="a" class="com.example.A" autowire="byType">bean>
    <bean id="b" class="com.example.B" primary="true">bean>
    <bean id="c" class="com.example.C">bean>
beans>
示例代码如下:
public class A{
    private Base base;

    public void setBase(Base base) { this.base = base; }

    public static void main(String[] args) {
        ApplicationContext applicationContext = new ClassPathXmlApplicationContext("applicationContext.xml");
        A bean = applicationContext.getBean(A.class);
        System.out.println(bean.base);
        /** Output:
         *  com.example.B@16f7c8c1
         */
    }
}
也可以使用autowire-candidate属性标记当前bean是否会被注入候选项,默认true,false表示排除候选项。
<beans>
    <bean id="a" class="com.example.A" autowire="byType">bean>
    <bean id="b" class="com.example.B" autowire-candidate="false">bean>
    <bean id="c" class="com.example.C">bean>
beans>
你还可以使用@Primary注解确定一个主要候选对象。
public interface Base {}
@Primary
@Component
public class B implements Base {}
@Component
public class C implements Base {}
@Component
public class A{
    @Autowired
    private Base base;

    public static void main(String[] args) {
        ApplicationContext applicationContext = new AnnotationConfigApplicationContext("com.example");
        A bean = applicationContext.getBean(A.class);
        System.out.println(bean.base);
        /** Output:
         *  com.example.B@72a7c7e0
         */
    }
}
通过在基于XML的Spring配置中包含
ConfigurationClassPostProcessor
AutowiredAnnotationBeanPostProcessor
CommonAnnotationBeanPostProcessor
PersistenceAnnotationBeanPostProcessor
EventListenerMethodProcessor
<beans xmlns="http://www.springframework.org/schema/beans"
    xmlns:xsi="http://www.w3.org/2001/XMLSchema-instance"
    xmlns:context="http://www.springframework.org/schema/context"
    xsi:schemaLocation="http://www.springframework.org/schema/beans
        https://www.springframework.org/schema/beans/spring-beans.xsd
        http://www.springframework.org/schema/context
        https://www.springframework.org/schema/context/spring-context.xsd">

    <context:annotation-config/>

beans>
- 限定符
您可以将限定符值与特定的参数相关联,缩小类型匹配的范围,以便为每个参数选择特定的bean。
<beans>

    <context:annotation-config/>
    <bean id="a" class="com.example.A" autowire="byType">

    bean>
    <bean id="b" class="com.example.B">
        <qualifier value="b">qualifier>
    bean>
    <bean id="c" class="com.example.C">
        <qualifier value="c">qualifier>
    bean>
beans>
@Qualifier注解使用, 示例代码如下:
public interface Base {}
public class B implements Base {}
public class C implements Base {}
public class A{

    private Base base;

    public void setBase(@Qualifier("b")Base base) { this.base = base; }

    public static void main(String[] args) {
        ApplicationContext applicationContext = new ClassPathXmlApplicationContext("applicationContext.xml");
        A bean = applicationContext.getBean(A.class);
        System.out.println(bean.base);
        /** Output:
         *  com.example.B@7920ba90
         */
    }
}
你也可以使用@Autowired注解搭配@Qualifier注解使用,示例代码如下:
public interface Base {}
@Component
public class B implements Base {}
@Component
public class C implements Base {}
@Component
public class A{

    @Autowired
    @Qualifier("b")
    private Base base;

    public static void main(String[] args) {
        ApplicationContext applicationContext = new AnnotationConfigApplicationContext("com.example");
        A bean = applicationContext.getBean(A.class);
        System.out.println(bean.base);
        /** Output:
         *  com.example.B@70e8f8e
         */
    }
}
还有一种更简单的方式,使用JSR-250@Resource注解,它在语义上被定义为通过其惟一的名称来标识特定的目标组件,声明的类型与匹配过程无关。
public interface Base {}
@Component
public class B implements Base {}
@Component
public class C implements Base {}
@Component
public class A{
    @Resource(name = "b")
    private Base base;

    public static void main(String[] args) {
        ApplicationContext applicationContext = new AnnotationConfigApplicationContext("com.example");
        A bean = applicationContext.getBean(A.class);
        System.out.println(bean.base);
        /** Output:
         *  com.example.B@769f71a9
         */
    }
}
生命周期回调
为了与容器对bean生命周期的管理进行交互,您可以实现Spring的InitializingBean和DisposableBean接口,让bean在初始化和销毁bean时执行某些操作。
- 初始化回调
(1)使用XML进行初始化
对于基于XML的配置元数据,可以使用init-method属性指定具有void无参数签名的方法的名称。
<beans>
        <bean id="a" class="com.example.A" init-method="init">bean>
beans>
实例代码如下:
public class A{

    public void init(){
        System.out.println("初始化bean");
    }

    public static void main(String[] args) {
        ApplicationContext applicationContext = new ClassPathXmlApplicationContext("applicationContext.xml");
        A bean = applicationContext.getBean(A.class);
        System.out.println(bean);
        /** Output:
         *  初始化bean
         *  com.example.A@b7dd107
         */
    }
}
(2)InitializingBean接口
通过实现org.springframework.beans.factory.InitializingBean接口重写afterPropertiesSet()方法执行初始化工作。
<beans>
        <bean id="a" class="com.example.A">bean>
beans>
示例代码如下:
public class A implements InitializingBean{

    public void afterPropertiesSet() throws Exception {
        System.out.println("初始化");
    }
    public static void main(String[] args) {
        ApplicationContext applicationContext = new ClassPathXmlApplicationContext("applicationContext.xml");
        A bean = applicationContext.getBean(A.class);
        System.out.println(bean);
        /** Output:
         *  初始化bean
         *  com.example.A@b7dd107
         */
    }
}
(3)@PostConstruct注解
@Component
public class A {
    @PostConstruct
    public void init(){
        System.out.println("初始化");
    }

    public static void main(String[] args) {
        ApplicationContext applicationContext = new AnnotationConfigApplicationContext("com.example");
        A bean = applicationContext.getBean(A.class);
        System.out.println(bean);
        /** Output:
         *  初始化bean
         *  com.example.A@b7dd107
         */
    }
}
(4)使用@Bean的initMethod属性
@Configuration
public class Config {
    @Bean(initMethod = "init")
    public A a(){
        return new A();
    }
}
@Component
public class A {
    public void init(){
        System.out.println("初始化bean");
    }

    public static void main(String[] args) {
        ApplicationContext applicationContext = new AnnotationConfigApplicationContext("com.example");
        A bean = applicationContext.getBean(A.class);
        System.out.println(bean);
        /** Output:
         *  初始化bean
         *  com.example.A@b7dd107
         */
    }
}
- 销毁回调
销毁回调和初始化回调的方式基本一致。你可以调用ApplicationContext类的registerShutdownHook()方法和close()方法进行容器销毁。
(1)使用XML进行销毁
使用destroy-method属性指定无参方法名。
<beans>
        <bean id="a" class="com.example.A" destroy-method="destroy">bean>
beans>
示例代码如下:
public class A {
    public void destroy(){
        System.out.println("销毁bean");
    }

    public static void main(String[] args) {
        ApplicationContext applicationContext = new ClassPathXmlApplicationContext("applicationContext.xml");
        A bean = applicationContext.getBean(A.class);
//        ((ClassPathXmlApplicationContext) applicationContext).registerShutdownHook();
        ((ClassPathXmlApplicationContext) applicationContext).close();
        /** Output:
         *  销毁bean
         */
    }
}
(2)DisposableBean接口
通过实现org.springframework.beans.factory.DisposableBean接口重写destroy()方法执行销毁工作。
<beans>
        <bean id="a" class="com.example.A">bean>
beans>
示例代码如下:
public class A implements DisposableBean {

    public static void main(String[] args) {
        ApplicationContext applicationContext = new ClassPathXmlApplicationContext("applicationContext.xml");
        A bean = applicationContext.getBean(A.class);
//        ((ClassPathXmlApplicationContext) applicationContext).registerShutdownHook();
        ((ClassPathXmlApplicationContext) applicationContext).close();
        /** Output:
         *  销毁bean
         */
    }

    public void destroy() throws Exception {
        System.out.println("销毁bean");
    }
}
(3)@PreDestroy注解
@Component
public class A {

    @PreDestroy
    public void destroy() {
        System.out.println("销毁bean");
    }

    public static void main(String[] args) {
        ApplicationContext applicationContext = new AnnotationConfigApplicationContext("com.example");
        A bean = applicationContext.getBean(A.class);
//        ((AnnotationConfigApplicationContext) applicationContext).registerShutdownHook();
        ((AnnotationConfigApplicationContext) applicationContext).close();
        /** Output:
         *  销毁bean
         */
    }
}
(4)使用@Bean的destroyMethod属性
@Configuration
public class Config {
    @Bean(destroyMethod = "destroy")
    public A a(){
        return new A();
    }
}
@Component
public class A {

    public void destroy() {
        System.out.println("销毁bean");
    }

    public static void main(String[] args) {
        ApplicationContext applicationContext = new AnnotationConfigApplicationContext("com.example");
        A bean = applicationContext.getBean(A.class);
//        ((AnnotationConfigApplicationContext) applicationContext).registerShutdownHook();
        ((AnnotationConfigApplicationContext) applicationContext).close();
        /** Output:
         *  销毁bean
         */
    }
}
- 默认初始化和销毁方法
你可以在顶层元素default-init-method属性和default-destroy-method属性,当创建和组装bean时,如果bean类有这样的方法,它将在适当的时候被调用。
<beans default-init-method="init" default-destroy-method="destroy">
        <bean id="a" class="com.example.A">bean>
        <bean id="b" class="com.example.B">bean>
beans>
示例代码如下:
public class B { }
public class A {

    public void init(){ System.out.println("初始化bean"); }

    public void destroy() { System.out.println("销毁bean"); }

    public static void main(String[] args) {
        ApplicationContext applicationContext = new ClassPathXmlApplicationContext("applicationContext.xml");
        A bean = applicationContext.getBean(A.class);
//        ((ClassPathXmlApplicationContext) applicationContext).registerShutdownHook();
        ((ClassPathXmlApplicationContext) applicationContext).close();
        /** Output:
         *  初始化bean
         *  销毁bean
         */
    }
}
Bean定义继承
子bean定义从父定义继承配置数据。子定义可以根据需要覆盖一些值或添加其他值。使用父bean和子bean定义可以节省大量的输入。实际上,这是一种模板形式。
<beans>
    <bean id="a" class="com.example.A" parent="b">
        <property name="name" value="child">property>
    bean>
    <bean id="b" class="com.example.B" abstract="true">
        <property name="name" value="parent">property>
        <property name="age" value="28">property>
    bean>
beans>
子类通过parent属性与父类建立关系,且可以覆盖相应的父设置。
示例代码如下:
public class B {
    private String name;
    private Integer age;

    public void setName(String name) { this.name = name; }

    public void setAge(Integer age) { this.age = age; }
}
public class A{
    private String name;
    private Integer age;

    public String getName() { return name; }

    public void setName(String name) { this.name = name; }

    public Integer getAge() { return age; }

    public void setAge(Integer age) { this.age = age; }

    public static void main(String[] args) {
        ApplicationContext applicationContext = new ClassPathXmlApplicationContext("applicationContext.xml");
        A bean = applicationContext.getBean(A.class);
        System.out.println(JSONObject.toJSONString(bean));
        /** Output:
         *  {"age":28,"name":"child"}
         */
    }
}
如果父定义没有指定类,则将父bean定义显式标记为abstract是必需的,如下例所示:
<beans>
    <bean id="a" class="com.example.A" parent="b">
        <property name="name" value="child">property>
    bean>
    <bean id="b" abstract="true">
        <property name="name" value="parent">property>
        <property name="age" value="28">property>
    bean>
beans>

当父类显式标记为abstract,父bean不能自行实例化,因为它是不完整的,只能用作纯模板bean定义。
基于注解的容器配置
开发人员不使用XML来描述bean连接,而是通过使用相关类、方法或字段声明上的注释将配置移入组件类本身。
对于配置Spring,注释比XML更好吗?
简短的回答是“视情况而定”最长的答案是每种方法都有其优点和缺点,通常,由开发人员决定哪种策略更适合他们。无论选择什么,Spring都可以容纳两种风格,甚至可以将它们混合在一起。
Spring的Java配置支持中的核心构件是@Configuration注解的类和@Bean注解的方法。@Configuration是一个类级别的注释,表示一个对象是bean定义的来源;@Bean注解用于指示一个方法实例化、配置和初始化一个由Spring IoC容器管理的新对象。
@Configuration
public class Config {
    @Bean
    public A getA(){
        return new A();
    }
}
代码相当于下面的XML:
<beans>
    <bean id="getA" class="com.example.A">bean>
beans>
我们可以使用@Scope注解定义一个范围,默认范围是singleton:
@Configuration
public class Config {
    @Bean
    @Scope("prototype")
    public A getA(){
        return new A();
    }
}
默认情况下,配置类使用@Bean方法的名称作为结果bean的名称。但是,可以指定name:
@Configuration
public class Config {
    @Bean("a")
    public A getA(){
        return new A();
    }
}
有时,为bean提供更详细的文本描述会很有帮助,您可以使用@Description注释。
@Configuration
public class Config {
    @Bean("a")
    @Description("this is a test")
    public A getA(){
        return new A();
    }
}
在前面的章节内容中多次使用AnnotationConfigApplicationContext类启用注解操作:
public class A{
    public static void main(String[] args) {
        ApplicationContext applicationContext = new AnnotationConfigApplicationContext("com.example");
    }
}
对于XML可以使用ClassPathXmlApplicationContext类:
public class A{
    public static void main(String[] args) {
        ApplicationContext applicationContext = new ClassPathXmlApplicationContext("applicationContext.xml");
    }
}
spring的@Configuration类支持的目标不是100%完全替代Spring XML。一些工具,比如Spring XML名称空间,仍然是配置容器的理想方式。
- 定义bean的优先级
如果希望数组或列表中的项按特定顺序排序,也可以使用@Order或@Priority注解。
public abstract class Base {  }

@Component
@Order(2)
//@Priority(2)
public class B extends Base{ }

@Component
@Order(1)
//@Priority(1)
public class C extends Base{ }

public class A{
    @Autowired
    private List<Base> baseList;

    public static void main(String[] args) {
        ApplicationContext applicationContext = new AnnotationConfigApplicationContext("com.example");
        A bean = applicationContext.getBean(A.class);
        System.out.println(bean.baseList);
        /** Output:
         *  没有注解之前:[com.example.B@76508ed1, com.example.C@41e36e46]
         *  加了注解后:[com.example.C@15eb5ee5, com.example.B@4f209819]
         */
    }
}
@Order是Spring提供的注解,@Priority是JSR 250标准,都是值越小优先级越高。
要注意它们不会影响bean的启动顺序,这是由依赖关系和
@DependsOn声明。
@Resource注解
Spring还通过使用JSR-250支持注入@Resource注释(jakarta.annotation.Resource)或bean属性setter方法。这是Jakarta EE中的常见模式。对于Spring管理的对象,Spring也支持这种模式。
@Resource接受名称属性。默认情况下,Spring将该值解释为要注入的bean名称。换句话说,它遵循按名称语义,如以下示例所示:
public interface Base {}
@Component
public class B implements Base {}
@Component
public class A{
    @Resource(name = "b")
    private Base base;

    @Resource
    private B b;

    public static void main(String[] args) {
        ApplicationContext applicationContext = new AnnotationConfigApplicationContext("com.example");
        A bean = applicationContext.getBean(A.class);
        System.out.println(bean.base);
        /** Output:
         *  com.example.B@769f71a9
         */
    }
}
如果没有显式指定名称,则默认名称是从字段名或setter方法派生的。
- 使用
@Value
@Value通常用于注入外部化的属性
application.properties文件内容:
spring.application.name=study
配置属性源:
@Configuration
@PropertySource("classpath:application.properties")
public class Config {}
示例代码如下:
@Component
public class A{
    @Value("${spring.application.name}")
    private String name;

    public static void main(String[] args) {
        ApplicationContext applicationContext = new AnnotationConfigApplicationContext("com.example");
        A bean = applicationContext.getBean(A.class);
        System.out.println(bean.name);
        /** Output:
         *  study
         */
    }
}
如果找不到属性值,可以通过属性名:默认值定义一个默认值。
@Component
public class A{
    @Value("${spring.aaa:123}")
    private String name;

    public static void main(String[] args) {
        ApplicationContext applicationContext = new AnnotationConfigApplicationContext("com.example");
        A bean = applicationContext.getBean(A.class);
        System.out.println(bean.name);
        /** Output:
         *  123
         */
    }
}
spring提供了占位符配置器,你可以通过setPlaceholderPrefix()方法和 setPlaceholderSuffix()方法自定义占位符。
@Configuration
@PropertySource("classpath:application.properties")
public class Config {
    @Bean
    public static PropertySourcesPlaceholderConfigurer propertyPlaceholderConfigurer(){
        PropertySourcesPlaceholderConfigurer property = new PropertySourcesPlaceholderConfigurer();
        property.setPlaceholderPrefix("**");
        property.setPlaceholderSuffix("**");
        return property;
    }
}
Spring提供的内置转换器支持允许简单的类型转换(到Integer或者int例如)被自动处理。
@Component和进一步的原型注解
@Repository注解是任何实现存储库角色或原型的类的标记(也称为数据访问对象或DAO)。Spring提供了进一步的原型注释:@Component, @Service,以及@Controller。@Component是任何Spring管理的组件的通用原型。@Repository, @Service,以及@Controller是专业化的@Component对于更具体的用例(分别在持久层、服务层和表示层)。

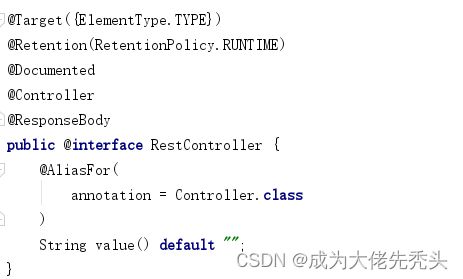
您还可以组合元注解来创建“组合注解”。例如,在@RestController,Spring MVC的注释由以下部分组成@Controller和@ResponseBody。
自动检测类和注册Bean定义
要自动检测这些类并注册相应的bean,您需要将@ComponentScan添加到@Configuration类,其中basePackages属性是这两个类的公共父包。
@Configuration@RestController
@ComponentScan(basePackages = "com.example")
public class Config {
}
XML使用方式
<beans xmlns="http://www.springframework.org/schema/beans"
       xmlns:xsi="http://www.w3.org/2001/XMLSchema-instance"
       xmlns:context="http://www.springframework.org/schema/context"
       xsi:schemaLocation="http://www.springframework.org/schema/beans
        https://www.springframework.org/schema/beans/spring-beans.xsd
        http://www.springframework.org/schema/context
        https://www.springframework.org/schema/context/spring-context.xsd">
    <context:component-scan base-package="com.example"/>
beans>
使用
隐式地启用了的功能。通常不需要包含元素。
您可以通过应用自定义过滤器来自定义扫描,@ComponentScan注解添加includeFilters(包含过滤器) 或者 excludeFilters(忽略过滤器) 的属性(XML在
FilterType(过滤器类型):ANNOTATION(注解)、ASSIGNABLE_TYPE(指定类型)、ASPECTJ(切面)、REGEX(正则表达式)、CUSTOM(自定义)。
public class B {}
//自定义过滤
public class DemoFilter implements TypeFilter {
    public boolean match(MetadataReader metadataReader, MetadataReaderFactory metadataReaderFactory) throws IOException {
        AnnotationMetadata annotationMetadata = metadataReader.getAnnotationMetadata();
        System.out.println(annotationMetadata.getClassName());
        return false;
    }
}
@Controller
public class A{
    public static void main(String[] args) {
        ApplicationContext applicationContext = new AnnotationConfigApplicationContext(Config.class);
        /** Output:
         *  com.example.B
         *  com.example.DemoFilter
         */
    }
}
@Configuration
@ComponentScan(basePackages = "com.example",
        includeFilters = {@ComponentScan.Filter(type = FilterType.CUSTOM, classes = DemoFilter.class),
                @ComponentScan.Filter(type = FilterType.ASSIGNABLE_TYPE, classes = B.class)},
        excludeFilters = @ComponentScan.Filter(type = FilterType.ANNOTATION, classes = Component.class))
public class Config {
}
XML格式如下:
<beans>
    <context:component-scan base-package="com.example">
        <context:include-filter type="custom" expression="com.example.DemoFilter">context:include-filter>
        <context:include-filter type="assignable" expression="com.example.B">context:include-filter>
        <context:exclude-filter type="annotation" expression="org.springframework.stereotype.Component">context:exclude-filter>
    context:component-scan>
beans>
您也可以通过注解设置useDefaultFilters=false
@ComponentScan(basePackages = "com.example",useDefaultFilters = false)
或use-default-filters="false"属性禁用默认过滤器。
<beans>
    <context:component-scan base-package="com.example" use-default-filters="false"/>
beans>
这实际上禁用了@Component, @Repository, @Service, @Controller,@RestController,@Configuration。
当在扫描过程中自动检测到一个组件时,它的bean名称由BeanNameGenerator扫描器已知策略。默认情况下,任何Spring原型注释(@Component, @Repository, @Service,以及@Controller)包含一个名称value从而将该名称提供给相应的bean定义。如果未设置value值,默认bean名称生成器返回未大写的非限定类名。
@Controller(value = "a")
public class A{}
自动检测的组件的默认且最常见的作用域是singleton,但是,有时您需要一个不同的范围,该范围可以由@Scope注解。
@Service
@Scope("prototype")
public class A{}
使用JSR 330标准注释
Spring支持JSR-330标准注释(依赖注入)。先引入Maven依赖。
        <dependency>
            <groupId>jakarta.injectgroupId>
            <artifactId>jakarta.inject-apiartifactId>
            <version>1.0version>
        dependency>
使用@Named注解代替@Component注解,@Inject注解代替@Autowired注解,示例代码如下:
@Named("b")
public class B{}
@Named
public class A{

    @Inject
    private B b;

    public static void main(String[] args) {
        ApplicationContext applicationContext = new AnnotationConfigApplicationContext("com.example");
        A bean = applicationContext.getBean(A.class);
        System.out.println(bean.b);
        /** Output:
         *  com.example.B@67a20f67
         */
    }
}
还有其他的注解替换,比如:@ManagedBean注解等价于@Component注解,@Scope("singleton")注解等价于@Singleton注解。
ApplicationContext的附加功能
- 使用MessageSource进行国际化
ApplicationContext接口扩展了一个名为MessageSource的接口,因此提供了国际化(“i18n”)功能,用于支持信息的国际化和包含参数的信息的替换。
Spring的各种MessageSource实现遵循与标准JDK ResourceBundle相同的语言环境解析和回退规则。
定义两个配置文件,语言类别简称结尾。
messages_en.properties:
spring.msg=hello,{0}
messages_zh.properties:
spring.msg=你好,{0}
通过调用MessageSource.getMessage()方法解析,示例代码如下:
@Configuration
public class Config {
    @Bean
    public ResourceBundleMessageSource messageSource(){
        ResourceBundleMessageSource resourceBundleMessageSource = new ResourceBundleMessageSource();
        //指定beanname
        resourceBundleMessageSource.setBasenames("i18n/messages");
        //设置字符编码
        resourceBundleMessageSource.setDefaultEncoding("utf-8");
        return resourceBundleMessageSource;
    }
}
@Component
public class A{

    @Autowired
    private MessageSource messageSource;

    public void test(){
        String message = messageSource.getMessage("spring.msg", new Object[]{"world"},"default", Locale.ENGLISH);
        System.out.println(message);
        message = messageSource.getMessage("spring.msg", new Object[]{"world"},"default", Locale.CHINESE);
        System.out.println(message);
    }

    public static void main(String[] args) {
        ApplicationContext applicationContext = new AnnotationConfigApplicationContext("com.example");
        A bean = applicationContext.getBean(A.class);
        bean.test();
        /** Output:
         *  hello,world
         *  你好,world
         */
    }
}
以xml方式创建bean
<beans>
    <bean id="messageSource"
            class="org.springframework.context.support.ResourceBundleMessageSource">
        <property name="basenames">
            <list>
                <value>messages_envalue>
                <value>messages_zhvalue>
            list>
        property>
    bean>
beans>
Spring提供了三个MessageSource实现方式:ResourceBundleMessageSource、ReloadableResourceBundleMessageSourc和StaticMessageSource。
- 标准和自定义事件
ApplicationContext中的事件处理是通过ApplicationEvent类和ApplicationListener接口提供的。如果将实现ApplicationListener接口的bean部署到上下文中,那么每当ApplicationEvent发布到ApplicationContext时,就会通知该bean。本质上,这是标准的观察者设计模式。
Spring提供的标准事件:ContextRefreshedEvent、ContextStartedEvent、ContextStoppedEvent、ContextClosedEvent、RequestHandledEvent、ServletRequestHandledEvent,您还可以创建和发布自己的自定义事件。
假设创建一个发送通知的功能,首先创建事件类,继承ApplicationEvent抽象类:
public class MyEvent extends ApplicationEvent {
    public String message;

    public MyEvent(Object source, String message) {
        super(source);
        this.message = message;
        System.out.println("创建MyEvent");
    }
}
创建一个发布事件类,实现ApplicationEventPublisherAware 接口:
public class NotifyService implements ApplicationEventPublisherAware {
    private ApplicationEventPublisher publisher;
    public void setApplicationEventPublisher(ApplicationEventPublisher applicationEventPublisher) {
        publisher = applicationEventPublisher;
    }
    public void sendMessage(String message){
        publisher.publishEvent(new MyEvent(this,message));
    }
}
容器自动调用setApplicationEventPublisher()。实际上,传入的参数是Spring容器本身。
注册bean:
<beans>
	<bean id="notifyService" class="com.example.NotifyService">bean>
beans>
创建监听类,接收自定义ApplicationEvent类,可以实现ApplicationListener接口,为了更直观观测,创建两个监听类:
public class Zhangsan implements ApplicationListener<MyEvent> {

    public void onApplicationEvent(MyEvent event) {
        System.out.println("zhangsan收到消息:"+event.message);
    }
}
public class Lisi implements ApplicationListener<MyEvent> {
    public void onApplicationEvent(MyEvent event) {
        System.out.println("lisi收到消息:"+event.message);
    }
}
注册bean:
<beans>
    <bean id="zhangsan" class="com.example.Zhangsan">bean>
    <bean id="lisi" class="com.example.Lisi">bean>
beans>
ApplicationListener指定事件类型,onApplicationEvent()方法可以保持类型安全,避免任何向下转换的需要。您可以注册任意数量的事件监听器,但是请注意,默认情况下,事件侦听器同步接收事件。
执行结果如下所示:
public class Test{

    public static void main(String[] args) {
        ApplicationContext applicationContext = new ClassPathXmlApplicationContext("applicationContext.xml");
        NotifyService bean = applicationContext.getBean(NotifyService.class);
        bean.sendMessage("hello world");
        /** Output:
         *  创建MyEvent
         *  zhangsan收到消息:hello world
         *  lisi收到消息:hello world
         */
    }
}
你也可以使用@EventListener注解,在bean的任意方法上注册事件侦听器:
@Component
public class NotifyService {
    @Autowired
    private ApplicationEventPublisher publisher;
    public void sendMessage(String message){
        publisher.publishEvent(new MyEvent(this,message));
    }
}
@Component
public class Lisi {
    @EventListener
    public void onApplicationEvent(MyEvent event) {
        System.out.println("lisi收到消息:"+event.message);
    }
}
@Component
public class Zhangsan {
    @EventListener
    public void onApplicationEvent(MyEvent event) {
        System.out.println("zhangsan收到消息:"+event.message);
    }
}
@EventListener注解也可以监听多个事件:
@Component
public class Lisi {
    @EventListener({MyEvent.class, MyEvent2.class})
    public void onApplicationEvent(Object event) {
        System.out.println(event);
    }
}
- 异步侦听器
假设:方法B调用方法A,你希望方法B不需要等待方法A执行完成而是继续往下执行,可以使用@Async注解。
创建任务执行器(防止报异常),@EnableAsync启用异步注解:
@Configuration
@EnableAsync
public class Config {
    @Bean
    public AsyncTaskExecutor asyncTaskExecutor(){
        ThreadPoolTaskExecutor asyncTaskExecutor = new ThreadPoolTaskExecutor();
        asyncTaskExecutor.setCorePoolSize(10);
        asyncTaskExecutor.setMaxPoolSize(10);
        asyncTaskExecutor.initialize();
        return asyncTaskExecutor;
    }
}
指定异步注解方法
@Component
public class A{
    @Async
    public void a(){
        System.out.println("thread:"+Thread.currentThread().getName());
        try {
            Thread.sleep(20000);
        } catch (InterruptedException e) {
            e.printStackTrace();
        }
    }
}
需要注意@Async注解,对同一个类中的方法和static方法无效,不能通过返回值来进行后续操作。如果引发Exception,不会传播到调用方。
测试注解是否生效
@Component
public class B {
    @Autowired
    A a;

    public void test() {
        System.out.println("before");
        this.a.a();
        System.out.println("after");
    }

    public static void main(String[] args) {
        ApplicationContext applicationContext = new AnnotationConfigApplicationContext("com.example");
        B bean = applicationContext.getBean(B.class);
        bean.test();
        /** Output:
         *  before
         *  after
         *  thread:asyncTaskExecutor-1
         */
    }
}
本章内容主要介绍了Spring IoC 容器与Bean之间的关系及基本使用。

