springboot+vue实现七牛云上传图片功能
1、需求描述
用户发布帖子,需要用到上传图片功能,并进行图片回显。

2、环境
前端:uniapp + uview1.8
后端:springboot 2.5.13
3、具体流程
用户在前端上传图片后,交由后端处理,上传至七牛云,并返回相关数据。
3、1先前准备
1、前往七牛云,注册,学生认证后可免费领取12个月的【成长计划专属资源包】。

注册完毕之后,建立自己的空间,点击控制台,进入控制台页面。


这里可是使用公开,公开便于后端进行操作,可以免去对Bucket(你所建立的存储空间)相关认证。
2、后端配置
2、1在application.yml中配置七牛云
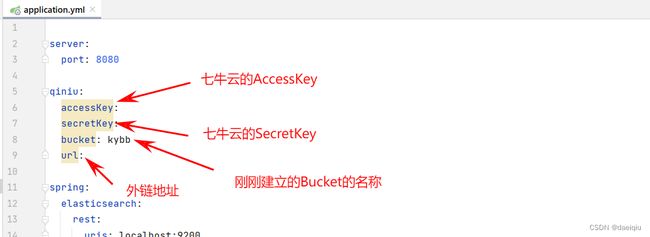
其中accessKey与secretKey在七牛云的个人中心/密钥管理处获取

url在刚刚建立的Bucket的空间概览中有一个免费的域名,如果自己有域名可自行设置。

2、2建立ImageUtils
注:uploadImageQiniu方法的返回值进行了封装,便于后续删除、处理相关业务操作。
package com.example.esdemo.utils;

import com.example.esdemo.pojo.QiNiuImage;
import com.qiniu.common.QiniuException;
import com.qiniu.storage.BucketManager;
import com.qiniu.storage.Configuration;
import com.qiniu.storage.Region;
import com.qiniu.storage.UploadManager;
import com.qiniu.util.Auth;
import org.springframework.beans.factory.annotation.Value;
import org.springframework.stereotype.Component;
import org.springframework.web.multipart.MultipartFile;

import javax.annotation.PostConstruct;
import java.io.IOException;
import java.text.SimpleDateFormat;
import java.util.*;

/**
 * @author eiqiu
 * @date 2023/1/9
 * 七牛云图片上传
 */
@Component
public class ImageUtils {

    @Value("${qiniu.accessKey}")
    private String accessKey;

    @Value("${qiniu.secretKey}")
    private String secretKey;

    @Value("${qiniu.bucket}")
    private String bucket;

    @Value("${qiniu.url}")
    private String url;

    /** 七牛文件上传管理器 */
    private UploadManager uploadManager;

    /** 七牛文件管理器 */
    private BucketManager bucketManager;

    /** 七牛云认证工具 */
    private Auth auth;

    /** 七牛云上传的token */
    private String token;

    @PostConstruct
    private void init() {
        uploadManager = new UploadManager(new Configuration(Region.huabei()));
        auth = Auth.create(accessKey, secretKey);
        bucketManager = new BucketManager(auth, new Configuration(Region.huabei()));
        token = auth.uploadToken(bucket);
    }

    /**
     * 多文件上传至七牛云
     * @param multipartFiles 文件集合
     * @return 文件外链映射集合
     */
    public Map> uploadImages(MultipartFile[] multipartFiles){
        Map> map = new HashMap<>();
        List imageUrls = new ArrayList<>();
        for(MultipartFile file : multipartFiles){
            QiNiuImage qiNiuImage = uploadImageQiniu(file);
            imageUrls.add(qiNiuImage.getPath());
        }
        map.put("imageUrl",imageUrls);
        return map;
    }

    /**
     * 上传文件至七牛云
     * @param multipartFile 文件
     * @return 文件外链地址
     */
    public QiNiuImage uploadImageQiniu(MultipartFile multipartFile){
        try {
            //1、获取文件上传的流
            byte[] fileBytes = multipartFile.getBytes();

            /**
             * 此处可以根据不同的业务类型,创立相应的文件夹,方便管理
             * 为了方便,此处仅使用日期来创立文件夹
             *  */

            //2、创建日期目录分隔
            SimpleDateFormat dateFormat = new SimpleDateFormat("yyyy/MM/dd");
            String datePath = dateFormat.format(new Date());

            //3、获取文件名
            String originalFilename = multipartFile.getOriginalFilename();
            assert originalFilename != null;
            // 文件类型
            String suffix = originalFilename.substring(originalFilename.lastIndexOf("."));
            // 生成新的文件名
            String fileKey = UUID.randomUUID().toString().replace("-", "");
            String bucket = this.bucket;
            // 文件在bucket下的存储目录
            String path = datePath+"/"+ fileKey + suffix;

            //4.上传图片至七牛云
            uploadManager.put(fileBytes,path,token);

            // 这里进行了自定义封装,
            /**
             * {bucket: "文件所在bucket“,
             * fileKey: "文件的新名称,全局唯一,方便存入数据库”,
             * path: "外链地址,用于前端展示"
             * fileName: "文件在bucket下的存储目录,便于删除"}
             */
            return new QiNiuImage(bucket, fileKey, url+"/"+path, path);

        } catch (IOException e) {
            e.printStackTrace();
        }
        return null;
    }

    /**
     *
     * @param bucketName 空间名称
     * @param fileName 文件存储位置:如 /2023/1/9/sadihfuehjdshdcjbhuasd.png
     * @return 是否删除
     */
    public boolean removeImageQiniu(String bucketName, String fileName) {
        try {
            bucketManager.delete(bucketName, fileName);
        } catch (QiniuException e) {
            e.printStackTrace();
        }
        return true;
    }

}
2、3服务接口
注:service层没写什么业务逻辑,仅仅是调用了util,省略。
package com.example.esdemo.controller;

import com.example.esdemo.pojo.QiNiuImage;
import com.example.esdemo.pojo.Result;
import com.example.esdemo.serivice.QiNiuService;
import lombok.extern.slf4j.Slf4j;
import org.springframework.beans.factory.annotation.Autowired;
import org.springframework.web.bind.annotation.*;
import org.springframework.web.multipart.MultipartFile;

/**
 * @author eiqiu
 * @date 2023/1/9
 */
@Slf4j
@RestController
@RequestMapping("/user")
public class UploadController {

    @Autowired
    private QiNiuService qiNiuService;

    @RequestMapping(value = "/upload", method = RequestMethod.POST)
    public Result upLoadImage(@RequestPart("file") MultipartFile file) {
        log.info("执行了=>上传图片方法");
        QiNiuImage path = qiNiuService.uploadImage(file);
        if (path != null) {
            log.info("七牛云返回路径");
            return Result.success(200,"图片上传成功",path);
        } else {
            return Result.failure(401,"图片为空");
        }
    }

    @RequestMapping(value = "/remove", method = RequestMethod.POST)
    public Result removeImage(@RequestBody QiNiuImage qiNiuImage) {
        System.out.println(qiNiuImage);
        boolean result = qiNiuService.removeImage(qiNiuImage.getBucket(), qiNiuImage.getFileName());
        System.out.println(result);
        return Result.success();
    }

}
3、前端代码
主要参数说明:
:action="action" ,其中action为自己的后端接口地址,此处http://localhost:8080/user/upload
:auto-uload="true",上传图片自动上传开启
@on-success="successUpload",文件上传至后端后,回调函数
@on-remove="removeImage",删除图片函数
:max-count="2",最大上传图片数量
其他相关参数请见官网uvuew1.x版本
图片上传成功回调函数逻辑:
上传图片至后端成功后,将后端处理好的图片数据(id,外链地址,存储空间Bucket名称,存储目录)传入表单。
图片删除操作逻辑:
index代表用户选择的图片索引,先获取该图片的相关数据(主要起作用的是存储空间Bucket、存储目录),传入后端处理,进行删除七牛云下的该文件,然后将表单中的该图片数据删除。
            // 图片上传成功回调函数
			successUpload(data, index, lists, name) {
				this.form.appealImages.push(data.data);
			},
			// 删除请求操作
			async removeImage(index) {
				try{
					const res = await removeImageQiniu(this.form.appealImages[index]);
					this.form.appealImages.splice(index,1);
				}catch(e){
					//TODO handle the exception
				}
			},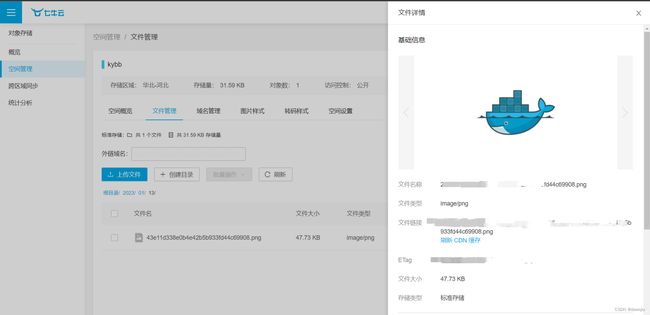
上传成功后,七牛云的该空间下便创建了我们上传的图片。删除操作也是如此。
注:如何上传文件至私有空间并获取文件链路地址?
如果要上传至私有空间,需要每次进行鉴权,并且设置图片外链地址失效时间,具体代码如下。(仅小小演示)
/**
     * 获取私有空间文件
     * @param path 文件地址 url + fileName
     * @return
     */
    public String getPrivateFile(String path) {
        // 外链过期时间1小时,可以自定义链接过期时间
        long expireInSeconds = 3600;
        return auth.privateDownloadUrl(path, expireInSeconds);
    }
以上便是整个的操作。