Linux 安装mysql
一、rpm包安装方式(推荐)
1)下载5.7.37版本
官方地址:https://downloads.mysql.com/archives/community/
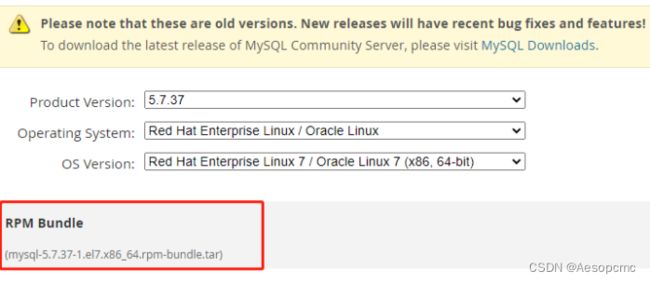
或者打开镜像地址:https://mirrors.huaweicloud.com/mysql/Downloads/MySQL-5.7/
搜索mysql-5.7.37-1.el7.x86_64.rpm-bundle.tar 下载
安装
-
解压
tar -zxvf mysql-5.7.37-1.el7.x86_64.rpm-bundle.tar
进入解压目录后,执行以下命令 -
安装前置类库
yum install -y libaio;yum -y install numactl -
安装mysql核心,按顺序执行一下命令
rpm -ivh mysql-community-common-5.7.38-1.el7.x86_64.rpm
rpm -ivh mysql-community-libs-5.7.38-1.el7.x86_64.rpm
rpm -ivh mysql-community-client-5.7.38-1.el7.x86_64.rpm
rpm -ivh mysql-community-devel-5.7.38-1.el7.x86_64.rpm
rpm -ivh mysql-community-server-5.7.38-1.el7.x86_64.rpm -
systemctl start mysqld 启动mysql
-
数据库安装好后,设置新密码、和启用远程连接等初始化操作脚本init.sh
#!/bin/bash
#
# 脚本功能说明:修改数据库新密码、加入自定义配置文件
#

# 定义新密码(8位数,必须包含大小写字母、数字、特殊符号)
Newpassword="Master_2022"
# 获取初始密码
password=$(grep "A temporary password is generated for root@localhost:" /var/log/mysqld.log | awk -F 'root@localhost: ' '{print $2}')


# 启动,设置为开机自启
systemctl start mysqld;systemctl enable mysqld

echo "root初始密码为:${password}"

# 修改初始密码
mysql --connect-expired-password -uroot -p"${password}" <<EOF
alter USER 'root'@'localhost' IDENTIFIED BY '${Newpassword}';
quit
EOF

echo "已变更root密码为:${Newpassword}"

# 其它操作,允许远程连接
mysql -uroot -p"${Newpassword}" <<EOF
use mysql;
update user set host = '%' where user ='root';
flush privileges;
quit
EOF

echo "写入扩展配置到/etc/my.cnf ..."
# 加入自定义配置
cat << EOF >> /etc/my.cnf

# 扩展配置
port = 13306
bind-address = 0.0.0.0
back_log = 300
sql-mode = "STRICT_TRANS_TABLES,NO_AUTO_CREATE_USER,NO_ENGINE_SUBSTITUTION"
lower_case_table_names= 1 # 设置不区分大小写,0区分大小写,1不区分大小写
validate_password_policy = 0 # 密码策略, 0(LOW),1(MEDIUM),2(STRONG)
validate_password_length = 6 # 密码长度

log_timestamps = SYSTEM
init-connect = 'SET NAMES utf8'
character-set-server = utf8

max_connections = 5347
max_connect_errors = 6000
open_files_limit = 65535
table_open_cache = 1024
max_allowed_packet = 500M
binlog_cache_size = 1M
max_heap_table_size = 8M
tmp_table_size = 128M

read_buffer_size = 2M
read_rnd_buffer_size = 8M
sort_buffer_size = 8M
join_buffer_size = 8M
key_buffer_size = 256M

#thread_concurrency = 6 # 线程并发数,应设为CPU核数的2倍 (注意,改参数在GNU/Linux系统上没有用的。)
thread_cache_size = 600 # 线程缓存变量,减少连接创建,一般设置规则

query_cache_type = 1 # 0时表示关闭查询缓存,1时表示打开查询缓存
query_cache_size = 64M # 查询缓存,设置不宜过大,主要是因为缓存越大,设置失效时间越长。如果高并发写,可以禁用该功能
query_cache_limit = 2M # 指定单个查询能够使用的缓冲区大小,默认为1M
query_cache_min_res_unit = 4k #大数据查询4k,小数据查询2k,目的是提高缓存命中率

ft_min_word_len = 4

default_storage_engine = InnoDB
innodb_file_per_table = 1
innodb_open_files = 500
innodb_buffer_pool_size = 128M # 类似于myisam的key_pool_size 适当增加可提高命中率,专用服务器可设置为70-80%
innodb_write_io_threads = 12 # write IO线程,根据cpu核心线程数量设置
innodb_read_io_threads = 12 # read IO线程,根据cpu核心线程数量设置
innodb_thread_concurrency = 6 #服务器有几个CPU就设置为几,建议用默认设置,一般为8
innodb_purge_threads = 1
innodb_flush_log_at_trx_commit = 2 # 默认值1 每次提交日志记录磁盘 2 日志写入系统缓存 0 不提交也记录,不安全,不推荐
innodb_log_buffer_size = 4M # 日志文件所用的内存大小,以M为单位。缓冲区更大能提高性能,但意外的故障将会丢失数据(开发人员推荐1-8M---不知道为什么)
innodb_log_file_size = 1G # 数据日志文件大小,较大可提升性能
innodb_log_files_in_group = 3 # 以循环方式将日志文件写到多个文件,默认2
innodb_max_dirty_pages_pct = 90
innodb_lock_wait_timeout = 120 # 事务获取锁的最长等待时间,超时请求失败

EOF

echo "mysql重启中..."
systemctl restart mysqld

# 【创建数据库和用户】(可选)
# dbname="testdb"
# dbuser="testuser"
# dbpassword="testpwd"
# echo "创建数据库:${dbname}"
# echo "创建用户:${dbuser},密码:${dbpassword},并授予所有权"
# mysql -uroot -p"${Newpassword}" <
# CREATE DATABASE IF NOT EXISTS ${dbname} CHARACTER SET utf8mb4 COLLATE utf8mb4_bin;
# CREATE USER '${dbuser}'@'%' IDENTIFIED BY '${dbpassword}';
# GRANT ALL PRIVILEGES ON *.* TO '${dbuser}'@'%';
# flush privileges;
# quit
# EOF

echo "初始化完成."
二、yum存储库方式安装
官方教程:
Installing MySQL on Linux Using the MySQL Yum Repository
1)下载mysql80-community-release-el7-6.noarch.rpm
官方地址:https://dev.mysql.com/downloads/repo/yum/
2)安装rpm
sudo yum localinstall mysql80-community-release-el7-6.noarch.rpm
3)列出即将安装的mysql数据库信息
yum repolist enabled | grep "mysql.*-community.*"
4)选择安装的mysql版本。默认是安装8.0,因为要安装5.7版本,所以要修改描述文件
vim /etc/yum.repos.d/mysql-community.repo
修改5.7版本的enabled=1,gpgcheck=0
修改5.8版本的enabled=0

5)再次查看版本是否选择正确
yum repolist enabled | grep "mysql.*-community.*"
可以看到,只有57版本了,选择正确了

6)基于 EL8 的系统(例如 RHEL8 和 Oracle Linux 8)包含一个默认启用的 MySQL 模块,在安装前需要禁用它
sudo yum module disable mysql
7)开始安装
安装前先配置数据库文件
编辑或创建文件/etc/my.cnf:
datadir=/var/lib/mysql # 默认位置
socket=/var/lib/mysql/mysql.sock #默认位置

log-error=/var/log/mysqld.log #默认位置
pid-file=/var/run/mysqld/mysqld.pid #默认位置

# 添加自定义配置
lower_case_table_names=1
执行安装指令
sudo yum -y install mysql-community-server
8)管理mysql指令
systemctl start mysqld # 启动mysql
systemctl status mysqld # 查看状态
systemctl stop mysqld # 停止
systemctl restart mysqld # 重启
systemctl enable mysqld #开机自启
9)查看初始密码
grep password /var/log/mysqld.log
10)登录mysql
mysql -uroot -p
11)修改密码
alter user 'root'@'localhost' identified by 'Master_2022';
12)新建一个超级账号,赋予所有权,并允许远程连接;
# all代表全部权限(增删改查),*.* 代表全部的数据库的全部表,后面的@'%'是在任何 IP 都可以拥有这些权限
#grant all privileges on *.* to 'yj_gongdian'@'%';
mysql> CREATE USER 'root'@'%' IDENTIFIED BY '123456';
mysql> GRANT ALL PRIVILEGES ON *.* TO 'root'@'%' WITH GRANT OPTION;
mysql> flush privileges;
//更多请阅读:https://www.yiibai.com/mysql/grant.html
三、解压版安装教程
mysql安装教程官方地址:
https://dev.mysql.com/doc/refman/5.7/en/binary-installation.html
打开官网下载地址,选择对应的linux版本以及mysql版本进行下载:
https://downloads.mysql.com/archives/community/
如下图所示:
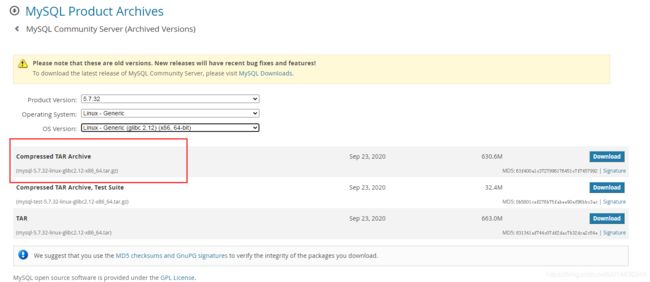
点击Dowload后复制下载链接 https://cdn.mysql.com//Downloads/MySQL-5.7/mysql-5.7.33-linux-glibc2.12-x86_64.tar.gz
(5)安装过程:
安装前,检查是否已经安装过mysql:https://www.jianshu.com/p/276d59cbc529

#下载压缩包
shell>wget https://cdn.mysql.com/archives/mysql-5.7/mysql-5.7.32-linux-glibc2.12-x86_64.tar.gz
shell> cd /home/tar/
shell> wget https://cdn.mysql.com//Downloads/MySQL-5.7/mysql-5.7.33-linux-glibc2.12-x86_64.tar.gz

安装依赖库
shell> yum search libaio  # search for info
shell> yum install libaio # install library

创建安装目录
shell> mkdir /usr/local/mysql

复制到安装目录
shell> cp -a mysql-5.7.32-linux-glibc2.12-x86_64.tar.gz /usr/local/mysql/

解压
shell> cd /usr/local/mysql
shell> tar -zxvf mysql-5.7.32-linux-glibc2.12-x86_64.tar.gz
shell> cd mysql-5.7.32-linux-glibc2.12-x86_64/
shell> mv * ../
shell> cd ../
shell> rm -rf mysql-5.7.32-linux-glibc2.12-x86_64*
shell> ls #目录结构如下
drwxr-xr-x  2 root root    4096 Feb  4 20:37 bin             # mysqld server, client and utility programs
drwxr-x---  6 mysql mysql   4096 Feb  4 21:20 data           # 数据库数据,该目录将再下面的初始化指令执行后生成
drwxr-xr-x  2 root root    4096 Feb  4 20:38 docs            # MySQL manual in Info format
drwxr-xr-x  3 root root    4096 Feb  4 20:37 include         # Include (header) files
drwxr-xr-x  5 root root    4096 Feb  4 20:38 lib             # Libraries
-rw-r--r--  1 7161 31415 250129 Dec 10 11:01 LICENSE
drwxr-xr-x  4 root root    4096 Feb  4 20:37 man             # Unix manual pages
drwxr-x---  2 mysql mysql   4096 Feb  4 20:46 mysql-files    # ,该目录将再下面的初始化指令执行后生成
-rw-r--r--  1 7161 31415    566 Dec 10 11:01 README
drwxr-xr-x 28 root root    4096 Feb  4 20:38 share           # Error messages, dictionary, and SQL for database installation
drwxr-xr-x  2 root root    4096 Feb  4 20:38 support-files   # Miscellaneous support files

shell> vim /etc/my.cnf #文件:
[mysql]
#客户端默认字符集
default-character-set=utf8
[mysqld]
#设置3306端口
port = 3306
# 允许最大连接数
max_connections=200
# 服务端使用的字符集默认为8比特编码的latin1字符集
character-set-server=utf8
# 创建新表时将使用的默认存储引擎
default-storage-engine=INNODB
#skip-grant-tables
sql_mode=STRICT_TRANS_TABLES,NO_ZERO_IN_DATE,NO_ZERO_DATE,ERROR_FOR_DIVISION_BY_ZERO,NO_AUTO_CREATE_USER,NO_ENGINE_SUBSTITUTION
bind-address=0.0.0.0

添加用户和组
shell> groupadd mysql
shell> useradd -r -g mysql -s /bin/false mysql
shell> mkdir mysql-files
shell> chown mysql:mysql mysql-files
shell> chmod 750 mysql-files
shell> bin/mysqld --initialize --user=mysql  #注意保存生成的初始密码: jme=mipiq5hD
shell> bin/mysql_ssl_rsa_setup
shell> bin/mysqld_safe --user=mysql &


# 把服务注册到常用位置
shell> cp support-files/mysql.server /etc/init.d/mysql.server

# 启动服务器
shell> /etc/init.d/mysql.server start


初次登录mysql,设置root账户密码,打开远程连接
shell>cd /usr/local/mysql/bin
shell>./mysql -uroot -p
#刚才初始化时生成的密码
mysql> set password=password('123456'); #登入成功后,修改初始密码
mysql>use mysql;
mysql>SELECT user, host, authentication_string FROM user; #查看所有账号列表
mysql>GRANT ALL PRIVILEGES ON *.* TO 'root'@'%' IDENTIFIED BY '123456' WITH GRANT OPTION;   #添加超级用户,授予所有权限,并且允许远程连接
mysql>FLUSH PRIVILEGES;

完成.

后面要修改root密码操作如下,注意两个身份都要修改,一个远程% ,一个本地localhost:
mysql>use mysql;
mysql>SELECT user, host, authentication_string FROM user; #查看所有账号列表
mysql>SET PASSWORD FOR 'root'@'localhost' = PASSWORD('新密码');
mysql>SET PASSWORD FOR 'root'@'%' = PASSWORD('新密码');
mysql>flush privileges;

完成.

mysql服务启动关闭状态查看常用指令:
shell>/etc/init.d/mysql.server status
shell>/etc/init.d/mysql.server stop
shell>/etc/init.d/mysql.server start
shell>/etc/init.d/mysql.server reload
shell>/etc/init.d/mysql.server restart

(6)注册为开机启动
vim /etc/rc.local (需确保有执行权限chmod +x /etc/rc.d/rc.local)
末尾写入:/etc/init.d/mysql.server start
四、配置文件参考
-》常用配置及优化
需要给与mysql目录权限
chown -R mysql:mysql /usr/local/mysql
[client]
port = 3306
socket = /tmp/mysql.sock
default-character-set = utf8

[mysql]
prompt="MySQL [\d]> "
no-auto-rehash

[mysqld]
port = 3306

socket = /tmp/mysql.sock

basedir = /usr/local/mysql
datadir = /usr/local/mysql/data
#pid-file = /usr/local/mysql/mysql.pid
user = mysql
bind-address = 0.0.0.0
server-id = 201

log_timestamps = SYSTEM
init-connect = 'SET NAMES utf8'
character-set-server = utf8

skip-name-resolve
#skip-networking
back_log = 300

max_connections = 5347
max_connect_errors = 6000
open_files_limit = 65535
table_open_cache = 1024
max_allowed_packet = 500M
binlog_cache_size = 1M
max_heap_table_size = 8M
tmp_table_size = 128M

read_buffer_size = 2M
read_rnd_buffer_size = 8M
sort_buffer_size = 8M
join_buffer_size = 8M
key_buffer_size = 256M

thread_cache_size = 64

query_cache_type = 1
query_cache_size = 64M
query_cache_limit = 2M

ft_min_word_len = 4

log_bin = mysql-bin
binlog_format = row
expire_logs_days = 15

log_error = /usr/local/mysql/mysql-error.log
slow_query_log = 1
long_query_time = 2
slow_query_log_file = /usr/local/mysql/mysql-slow.log

performance_schema = 0
explicit_defaults_for_timestamp

lower_case_table_names = 1

skip-external-locking

default_storage_engine = InnoDB
#default-storage-engine = MyISAM
innodb_file_per_table = 1
innodb_open_files = 500
innodb_buffer_pool_size = 128M
innodb_write_io_threads = 4
innodb_read_io_threads = 4
innodb_thread_concurrency = 0
innodb_purge_threads = 1
innodb_flush_log_at_trx_commit = 2
innodb_log_buffer_size = 2M
innodb_log_file_size = 32M
innodb_log_files_in_group = 3
innodb_max_dirty_pages_pct = 90
innodb_lock_wait_timeout = 120

bulk_insert_buffer_size = 8M
#myisam_sort_buffer_size = 64M
#myisam_max_sort_file_size = 10G
#myisam_repair_threads = 1

interactive_timeout = 28800
wait_timeout = 28800
sql_mode=NO_AUTO_CREATE_USER,NO_ENGINE_SUBSTITUTION,STRICT_TRANS_TABLES,NO_ZERO_IN_DATE,NO_ZERO_DATE,ERROR_FOR_DIVISION_BY_ZERO
[mysqldump]
quick
max_allowed_packet = 500M

[myisamchk]
key_buffer_size = 256M
sort_buffer_size = 8M
read_buffer = 4M
write_buffer = 4M