使用Yolov5+Pytorch训练自定义目标检测模型
一、简介
使用Pytorch、Yolov5和OpenCV,完成目标检测模型的训练和部署。
项目的两个功能:
(1)Yolov5离线文件夹:主要是为了照顾国内的网络环境。文件夹不仅包含了https://github.com/ultralytics/yolov5 https://github.com/ultralytics/yolov5的完整文件,还提前下载了yolov5.pt文件。
(2)工作区:分为两个部分,第一个部分由三个文件夹组成,第二个部分由三个Python程序组成。
①dataset文件夹:自定义数据集的最终存放位置
②voc_dataset文件夹:pascal voc数据集存放位置
③yolo_dataset文件夹:yolo数据集临时存放位置
④preprocess.py:图片预处理程序
⑤voc_to_yolo.py:将pascal voc格式数据集转换为yolo格式数据集
⑥data_split.py:将存放在yolo_dataset文件夹的数据集切分为train、val和test数据集。
三个Python程序有非常详细的英文注释。
二、准备工作
1、安装Visual Studio Community 2022
安装软件,并勾选安装“使用C/C++桌面开发”选项。
2、安装Anaconda
安装完成后,运行Anaconda Prompt,依次运行以下代码。
conda create -n pytorch python>3.8
activate pytorch
pip install pytorch
pip install labelImg
pip install opencv-python
pip install pillow
pip install shutil
pip install xml
pip install yaml
pip install json
pip install glob
三、使用方法
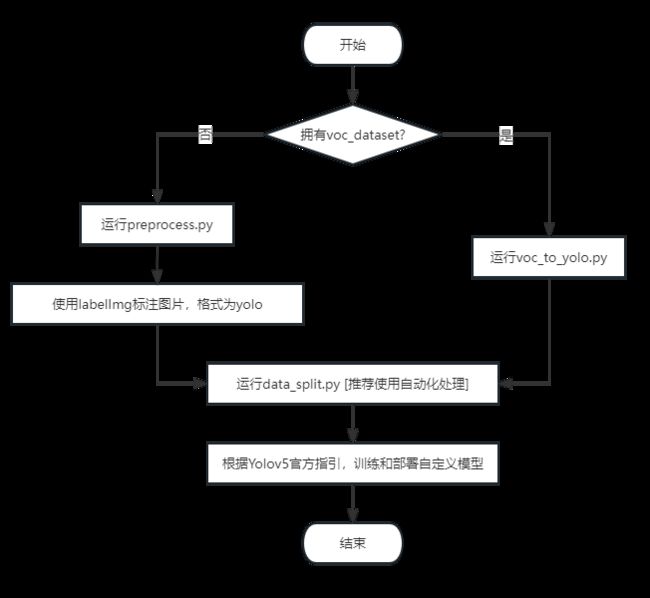
1、【可选项】测试Yolov5运行环境,运行“test_installation.py”。
2、【可选项】把图片放到“voc_dataset”文件夹中,子文件夹需要命名为“类名字”。
3、运行“preprocess.py”程序,重命名图片、调整图片尺寸。
4、运行labelImg,具体的使用方法见GitHub - heartexlabs/labelImg: LabelImg is now part of the Label Studio community. The popular image annotation tool created by Tzutalin is no longer actively being developed, but you can check out Label Studio, the open source data labeling tool for images, text, hypertext, audio, video and time-series data.LabelImg is now part of the Label Studio community. The popular image annotation tool created by Tzutalin is no longer actively being developed, but you can check out Label Studio, the open source data labeling tool for images, text, hypertext, audio, video and time-series data. - GitHub - heartexlabs/labelImg: LabelImg is now part of the Label Studio community. The popular image annotation tool created by Tzutalin is no longer actively being developed, but you can check out Label Studio, the open source data labeling tool for images, text, hypertext, audio, video and time-series data.https://github.com/heartexlabs/labelImg或自行搜索。
5、【可选项】运行“voc_to_yolo.py”,将数据集从pascal voc格式转换为yolo格式。
6、运行“data_split.py”程序,将yolo_dataset划分为训练(train)、验证(val)和测试(test)。此外,你可以通过输入“Y/N”来确认是否要自动生成最终的数据集并移动到指定位置。
7、根据Yolov5官方指引,训练和部署自定义模型。
四、流程图
五、文件【百度网盘分享】
见本人博客文章末尾,使用Yolov5+Pytorch训练自定义目标检测模型 – 科创研学社
六、GitHub
https://github.com/icexiaoyou/Yolov5-Object-Detectionhttps://github.com/icexiaoyou/Yolov5-Object-Detection