LibTorch部署PyTorch模型简单流程
笔者的PyTorch模型为*.pth格式,将其转换为*.pt格式,并通过LibTorch调用。
一、配置LibTorch
1.1 下载
下载地址:https://pytorch.org/
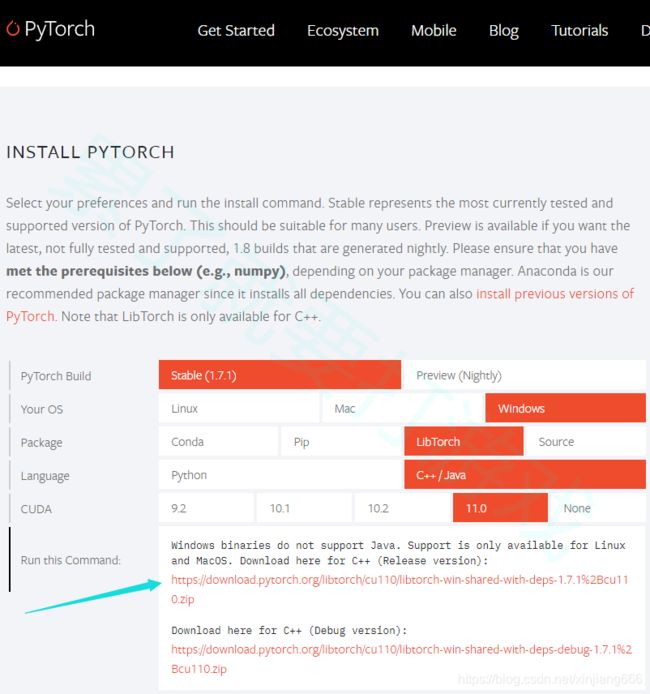
下图分别是GPU和CPU的下载地址,GPU版本需要根据CUDA的版本确定。箭头指向为Release版,下方是Debug版。
下载完成后,将…\libtorchCPU\lib 添加至环境变量。
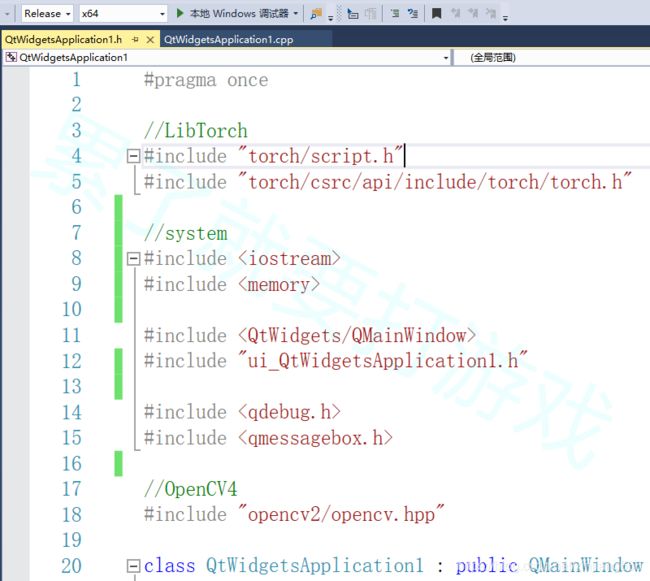
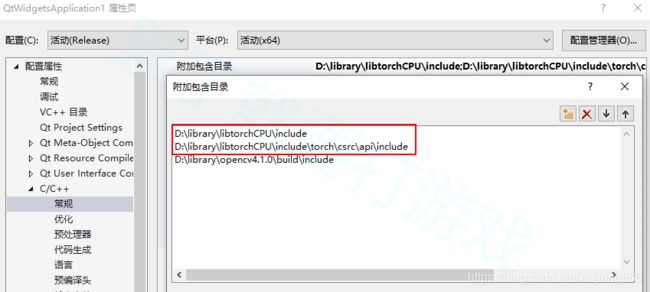
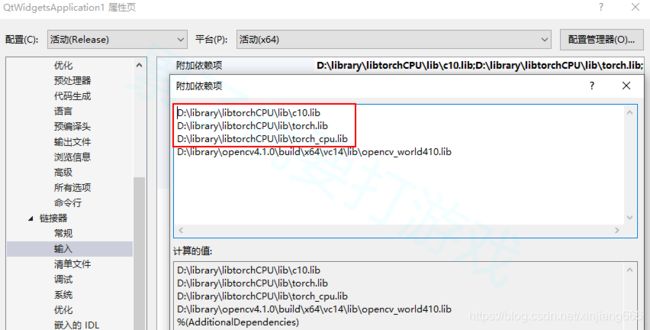
1.2 配置方法1:VS直接配置
注意:LibTorch的头文件要放在前/上面,否则报错
1.3 配置方法2:CMakeLists配置
分享给有需要的人,代码质量勿喷。
1.3.1 CmakeLists.txt与测试代码
(1)CmakeLists.txt
cmake_minimum_required(VERSION 3.0 FATAL_ERROR)
project(xjTestLibTorch)

find_package(Torch REQUIRED)
set(CMAKE_CXX_FLAGS "${CMAKE_CXX_FLAGS} ${TORCH_CXX_FLAGS}")

add_executable(xjTestLibTorch xjTestLibTorch.cpp)
target_link_libraries(xjTestLibTorch "${TORCH_LIBRARIES}")
set_property(TARGET xjTestLibTorch PROPERTY CXX_STANDARD 14)

if (MSVC)
  file(GLOB TORCH_DLLS "${TORCH_INSTALL_PREFIX}/lib/*.dll")
  add_custom_command(TARGET xjTestLibTorch
                     POST_BUILD
                     COMMAND ${CMAKE_COMMAND} -E copy_if_different
                     ${TORCH_DLLS}
                     $)
endif (MSVC)
(2)xjTestLibTorch.cpp
#include
#include

int main() {
  torch::Tensor tensor = torch::rand({2, 3});
  std::cout << tensor << std::endl;
}
1.3.2 编译生成
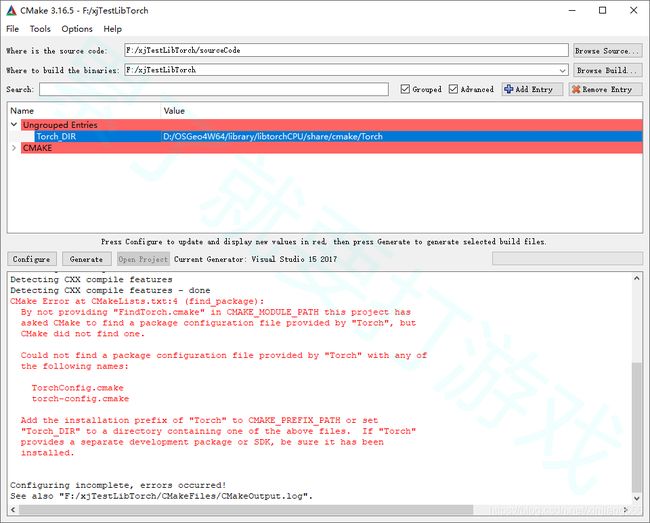
(1)使用CMake设置源码与编译路径;选择VS版本与设置x64。单击Configure后会报错。
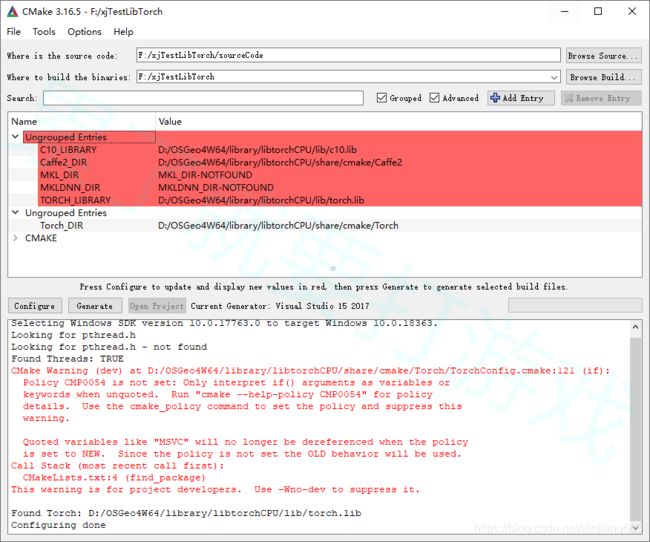
(2)设置Torch_DIR(.../libtorchCPU /share/cmake/Torch)后单击Configure即可。Configure done。
(3)单击Generate。Generate done。
(4)VS2017编译
生成一个2*3的张量即为成功。
二、模型转换
这篇文章写的挺好:https://pytorch.apachecn.org/docs/1.0/cpp_export.html
import torch
import torchvision.models as models
from PIL import Image
import numpy as np

device = torch.device('cpu')
model = torch.load("test.pth", map_location=device)

model.eval()
# print(model)

example = torch.rand(1, 1, 224, 224)

traced_script_module = torch.jit.trace(model, example)

output = traced_script_module(torch.ones(1, 1, 224, 224))
print(output)

# ----------------------------------
traced_script_module.save("test.pt")
三、模型应用
此案例为路面图像中灌缝的语义分割,生成灌缝二值图。
3.1 CmakeLists.txt与模型调用代码
(1)CMakeLists.txt添加了OpenCV
cmake_minimum_required(VERSION 3.0.0 FATAL_ERROR)
project(SS_pouring)

find_package(Torch REQUIRED)
find_package (OpenCV 4 REQUIRED)
set(CMAKE_CXX_FLAGS "${CMAKE_CXX_FLAGS} ${TORCH_CXX_FLAGS}")

message(STATUS "Pytorch status:")
message(STATUS "    libraries: ${TORCH_LIBRARIES}")

add_executable(SS_pouring SS_pouring.cpp)
target_link_libraries(SS_pouring "${TORCH_LIBRARIES}")
target_link_libraries(SS_pouring ${OpenCV_LIBS})
set_property(TARGET SS_pouring PROPERTY CXX_STANDARD 14)

include_directories (${OpenCV_INCLUDE_DIRS})
link_directories    (${OpenCV_LIBRARY_DIRS})

if (MSVC)
  file(GLOB TORCH_DLLS "${TORCH_INSTALL_PREFIX}/lib/*.dll")
  add_custom_command(TARGET SS_pouring
                     POST_BUILD
                     COMMAND ${CMAKE_COMMAND} -E copy_if_different
                     ${TORCH_DLLS}
                     $)
endif (MSVC)
(2)模型调用代码 SS_pouring.cpp
核心点包括:模型调用、图像转Tensor、网络前向计算等。
//LibTorch库放在最上面
#include "torch/script.h"
#include "torch/csrc/api/include/torch/torch.h"

#include
#include


#include "opencv2/opencv.hpp"

using namespace std;


int main(int argc, const char* argv[])
{
	//1 core 加载模型
	torch::jit::script::Module xjModule = torch::jit::load("F:/SS_pouring/sourceCode/test.pt");
	//xjModule.to(at::kCUDA);//XXX-GPU版本添加
	std::cout << "1 load pt\n";

	//2 图像预处理
	auto imageO = cv::imread("F:/testImage.jpg", cv::ImreadModes::IMREAD_COLOR);
	int cols = imageO.cols;
	int rows = imageO.rows;
	cv::Mat imageT;
	cv::resize(imageO, imageT, cv::Size(1024, 512));
	std::cout << "2 image\n";

	//3 core 图像转换为Tensor
	torch::Tensor tensorImage = torch::from_blob(imageT.data, { imageT.rows, imageT.cols,1 }, torch::kByte);
	tensorImage = tensorImage.permute({ 2,0,1 });
	tensorImage = tensorImage.toType(torch::kFloat);
	tensor_image = tensor_image.unsqueeze(0).to(at::kCUDA);//XXX-GPU 使用 .to(at::kCUDA)
	std::cout << "3 tensor\n" << std::endl;

	//4 core 网络前向计算
	at::Tensor output0 = xjModule.forward({ tensorImage }).toTensor();
	std::cout << "4 forward\n";

	//5 处理
	torch::Tensor tensorRes = output0.squeeze();
	tensorRes = tensorRes.to(torch::kCPU).detach();
	tensorRes = tensorRes.mul(255).clamp(0, 255).to(torch::kU8);
	std::cout << "5 process\n";

	//6 保存
	cv::Mat resultImg = cv::Mat(512, 1024, 0);
	//将ten_wrp数据存为resultImage格式
	std::memcpy((void *)resultImg.data, tensorRes.data_ptr(), sizeof(torch::kU8) * tensorRes.numel());
	cv::Mat resultImage = cv::Mat(rows, cols, 0);
	cv::resize(resultImg, resultImage, cv::Size(cols, rows));
	//保存为result.jpg
	cv::imwrite("F:/testResult.png", resultImage);
	std::cout << "test OK\n";
}
3.2 CM编译-VS运行-结果
 原图
原图
 二值图
二值图
