proteus仿真大赛-----pyqt5制作上位机安防页面
本项目是基于pyqt5进行上位机的开发,主要是向下位机发送控制指令以及向服务器发送信息
主页面如图所示:

1.主页面是继承QMainWindow,使用QPushButton设置四个按钮,分别使用信号与槽机制连接不同的方法,然后使用setStyleSheet对按钮进行美化,分了两种类型,鼠标点击和鼠标划过
text_btn = QPushButton("注册", self)
        text_btn.setGeometry(100, 30, 200, 100)
        text_btn.clicked.connect(self.register_dialog)
        text_btn.setStyleSheet('''
                             QPushButton
                             {text-align : center;        #文本框内容居中显示
                             background-color : white;    #背景颜色:白色
                             font: bold;                  #将字体加粗
                             border-color: red;           #设置按钮边框颜色:红色
                             border-width: 2px;           #边框宽度设置为2像素。
                             border-radius: 20px;         #按钮的圆角半径设置为20像素,使其变成圆形或椭圆形
                             padding: 6px;                #按钮的内部填充设置为6像素,以增加按钮与其内容之间的间距
                             height : 14px;               #按钮的高度设置为14像素
                             border-style: outset;
                             font : 25px;}
                             QPushButton:pressed
                             {text-align : center;
                             background-color : light gray;
                             font: bold;
                             border-color: gray;
                             border-width: 2px;
                             border-radius: 10px;
                             padding: 6px;
                             height : 14px;
                             border-style: outset;
                             font : 25px;}
                             ''')

        self.switch_btn1 = QPushButton("关闭安防", self)
        self.switch_btn1.setFont(QFont('Arial', 15))
        self.switch_btn1.setGeometry(450, 200, 200, 100)
        # switch_btn1.clicked.connect(self.switch1)
        self.switch_btn1.setStyleSheet('''
                             QPushButton
                             {text-align : center;
                             background-color : white;
                             font: bold;
                             border-color: red;
                             border-width: 2px;
                             border-radius: 20px;
                             padding: 6px;
                             height : 14px;
                             border-style: outset;
                             font : 25px;}
                             QPushButton:pressed
                             {text-align : center;
                             background-color : light gray;
                             font: bold;
                             border-color: gray;
                             border-width: 2px;
                             border-radius: 10px;
                             padding: 6px;
                             height : 14px;
                             border-style: outset;
                             font : 25px;}
                             ''')

        self.switch_btn2 = QPushButton("打开安防", self)
        self.switch_btn2.setFont(QFont('Arial', 15))
        self.switch_btn2.setGeometry(450, 30, 200, 100)
        # switch_btn2.clicked.connect(self.switch2)
        self.switch_btn2.setStyleSheet('''
                             QPushButton
                             {text-align : center;
                             background-color : white;
                             font: bold;
                             border-color: red;
                             border-width: 2px;
                             border-radius: 20px;
                             padding: 6px;
                             height : 14px;
                             border-style: outset;
                             font : 25px;}
                             QPushButton:pressed
                             {text-align : center;
                             background-color : light gray;
                             font: bold;
                             border-color: gray;
                             border-width: 2px;
                             border-radius: 10px;
                             padding: 6px;
                             height : 14px;
                             border-style: outset;
                             font : 25px;}
                             ''')

        self.switch_btn3 = QPushButton("房屋数据", self)
        self.switch_btn3.setFont(QFont('Arial', 15))
        self.switch_btn3.setGeometry(100, 200, 200, 100)
        # switch_btn3.clicked.connect(self.tempurate_dialog)
        self.switch_btn3.setStyleSheet('''
                             QPushButton
                             {text-align : center;
                             background-color : white;
                             font: bold;
                             border-color: red;
                             border-width: 2px;
                             border-radius: 20px;
                             padding: 6px;
                             height : 14px;
                             border-style: outset;
                             font : 25px;}
                             QPushButton:pressed
                             {text-align : center;
                             background-color : light gray;
                             font: bold;
                             border-color: gray;
                             border-width: 2px;
                             border-radius: 10px;
                             padding: 6px;
                             height : 14px;
                             border-style: outset;
                             font : 25px;}
                             ''')
2.注册页面主要打开一个继承QDialog,使用标签和文本框,进行有效信息的输入,然后点击确定按钮,进入到槽函数,槽函数中分别读取三个文本框的内容,然后转换为统一格式发送给下位机,同时将信息发送给服务器
#注册窗口代码
 self.setWindowTitle("注册页面")
        self.resize(500, 400)
        self.setWindowModality(Qt.ApplicationModal)
        self.formlayout = QFormLayout()
        font = QFont()
        font.setPointSize(12)
        self.label1 = QLabel("设备ID:")
        self.lineEdit1 = QLineEdit()
        self.label2 = QLabel("用户姓名:")
        self.lineEdit2 = QLineEdit()
        self.label3 = QLabel("手机号:")
        self.lineEdit3 = QLineEdit()
        self.label1.setFont(font)
        self.label2.setFont(font)
        self.label3.setFont(font)
        self.label1.setFixedSize(100, 50)
        self.label2.setFixedSize(100, 50)
        self.label3.setFixedSize(100, 50)
        self.lineEdit1.setFixedSize(400, 50)
        self.lineEdit2.setFixedSize(400, 50)
        self.lineEdit3.setFixedSize(400, 50)
        self.lineEdit1.setFont(font)
        self.lineEdit2.setFont(font)
        self.lineEdit3.setFont(font)
        self.lineEdit1.setStyleSheet("""
                    QLineEdit {
                        border: 2px solid blue;
                        border-radius: 5px;
                        padding: 5px;
                        background-color: #ffffff;
                        color: #333333;
                    }

                    QLineEdit:focus {
                        border-color: #00aaff;
                        outline: none;
                    }
        """)
        self.lineEdit2.setStyleSheet("""
                    QLineEdit {
                        border: 2px solid green;
                        border-radius: 5px;
                        padding: 5px;
                        background-color: #ffffff;
                        color: #333333;
                    }

                    QLineEdit:focus {
                        border-color: #00aaff;
                        outline: none;
                    }
                """)
        self.lineEdit3.setStyleSheet("""
                    QLineEdit {
                        border: 2px solid Purple;
                        border-radius: 5px;
                        padding: 5px;
                        background-color: #ffffff;
                        color: #333333;
                    }

                    QLineEdit:focus {
                        border-color: #00aaff;
                        outline: none;
                    }
                """)
        self.formlayout.addRow(self.label1, self.lineEdit1)
        self.formlayout.addRow(self.label2, self.lineEdit2)
        self.formlayout.addRow(self.label3, self.lineEdit3)
        self.setLayout(self.formlayout)
        self.signIn = QPushButton('确认')
        self.signIn.setStyleSheet('''
                                     QPushButton
                                     {text-align : center;
                                     background-color : white;
                                     font: bold;
                                     border-color: green;
                                     border-width: 2px;
                                     border-radius: 20px;
                                     padding: 6px;
                                     height : 14px;
                                     border-style: outset;
                                     font : 25px;}
                                     QPushButton:pressed
                                     {text-align : center;
                                     background-color : light gray;
                                     font: bold;
                                     border-color: gray;
                                     border-width: 2px;
                                     border-radius: 10px;
                                     padding: 6px;
                                     height : 14px;
                                     border-style: outset;
                                     font : 25px;}
                                     ''')
        self.signIn.setFixedSize(500,50)
        self.signIn.setFont(font)
        self.formlayout.addRow(self.signIn)
        self.signIn.clicked.connect(self.sendRegisterRequest)
        self.exec_()
再打开一个子线程用于串口信息的发送【在之前也尝试过在槽函数中直接进行发送信息,但程序会直接卡死】,同时我在注册页面还加入了一个信号,必须是完成注册后于,其他三个功能才可以使用
#槽函数代码
        self.signal.emit("yes")                  #发送信息给主窗口,点击了确认按钮
        user_id = self.lineEdit1.text()
        user_name = self.lineEdit2.text()
        user_number = self.lineEdit3.text()
        user_final_number = '+86' + user_number
        data = {'ID': user_id, "name": str(user_name), 'phone': user_final_number}
        message = json.dumps(data) + '\r\n'
        requests.post('http://47.109.149.102:5050/register', data=data)
        # 创建子线程
        self.serial_thread = SerialThread(message)
        self.serial_thread.data_signal.connect(self.handle_data)
        # 启动子线程
self.serial_thread.start() 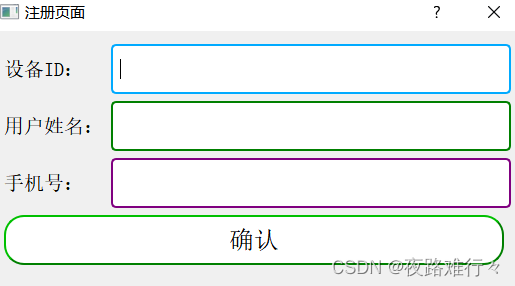
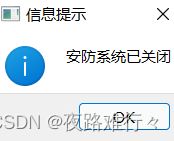
3.然后就是打开安防和关闭安防,两者作用就是给串口发送标志信息,让下位机进行对应的处理,关闭安防,可以设置关闭来设置安防的时间

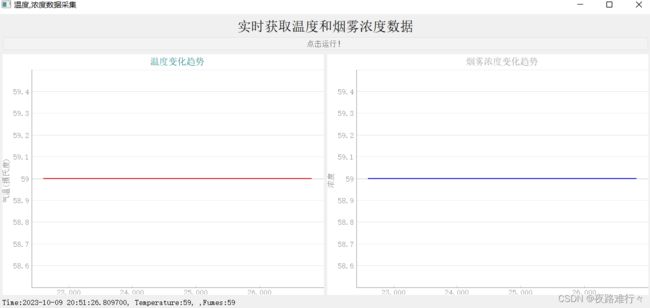
4.房屋数据:主要使用来实时显示当前房屋内温度和烟雾浓度的实时信息,进行实时更迭,设定一个类,继承QMainWindow,大致的流程就是,在类内设定两个方法分别去处理从串口读取的温度和烟雾浓度的数据,然后进行绘图,因为读取串口的信息类似于键值对的形式,所以需要进行处理
 data = data.strip().replace(' ', '').replace('\r', '').split('\n')
                print(data)
                self.data_label.setText('Time:' + str(datetime.datetime.now()) + ', ' +
                                        data[0] + ', ' + data[1])
                self.t.append(time.time())
                self.temp.append(float(data[0].split(':')[1].strip()))
                self.pot.append(float(data[1].split(':')[1].strip()))
然后将数据放入到signal中,通过信号传递给主线程【房屋数据窗口】
            signal = (self.t, (self.temp, self.pot))
            self.newdata.emit(signal)
图片: