MQTT通信在PyQt5中的应用
0 目的
- 网上质量差的水贴太多,对初学者很不友好。
- 系统性分享MQTT通信在PyQt5中的应用的博文很少。
- 作者非计算机类专业(电力系统专业),于2020年4月初学PyQt5以应对项目界面需求,历时1月已能系统性制作中大型界面。鉴于从网上的相关博文收获了一些知识,在此以回馈社会,与君共勉,今后在博士学业之余也会陆续更新博文。
1 功能概述
- 主界面以mqtt进行通信,实现收、发数据功能
- 主界面能实时更新并显示最新的数据
2 主界面可视化设计
在Qt Creator中进行主界面可视化设计,如下图所示:
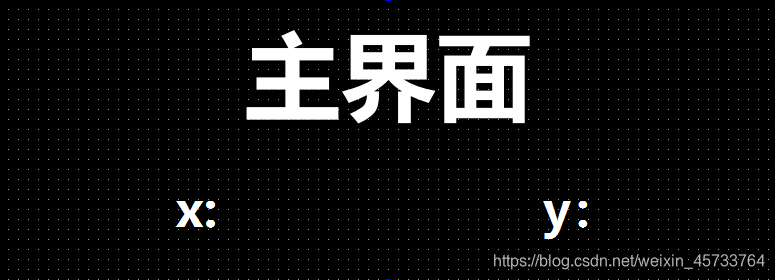 其中共包含3个label,主界面应将接收的x和y值实时显示于相应区域,x和y区域的变量名分别为:xLabel和yLabel。
3 程序设计
主界面的py程序如下所示:
import sys
import time
import json
import paho.mqtt.client as mqtt
from PyQt5.QtWidgets import QWidget, QApplication
from PyQt5.QtCore import QTime, QTimer

from ui_mainApplication import Ui_Widget

x, y = 0, 0                                    # 初始化
mqttClient = mqtt.Client(protocol=3)           # 定义mqtt对象


# noinspection PyUnusedLocal
def on_connect(client, userdata, flags, rc):
    print("连接成功" + "Connected with result code " + str(rc))


# noinspection PyUnusedLocal
def on_message(client, userdata, msg):         # 接收非图片数据
    global x, y
    inputData = json.loads(msg.payload)        # 解压json格式的数据
    x = inputData['x']
    y = inputData['y']


# noinspection PyUnusedLocal
def on_subscribe(client, userdata, mid, granted_qos):
    print("消息订阅成功")


class MyApplication(QWidget):
    def __init__(self, _IP, _port, parent=None):
        super().__init__(parent)
        self.ui = Ui_Widget()
        self.ui.setupUi(self)
        # 创建定时器
        self.timer = QTimer()                                       # 创建定时器
        self.timer.stop()                                           # 定时器停止
        self.timer.setInterval(20)                                  # 设置2刷新界面的周期为20毫秒
        self.counter = QTime()                                      # 创建计时器
        # mqtt配置初始化
        mqttClient.username_pw_set("admin", "password")
        mqttClient.on_connect = on_connect                          # 连接递归
        mqttClient.on_subscribe = on_subscribe                      # 订阅递归
        mqttClient.on_message = on_message                          # 消息递归
        mqttClient.connect(host=_IP, port=_port, keepalive=60)      # 订阅频道
        time.sleep(0.02)
        # 发布消息
        outputData = {'topic': "refresh", 'value': 1}
        mqttClient.publish(topic="eig/simple_01_", payload=json.dumps(outputData), qos=0)       # 以json格式发布数据

        self.setIni()                                           # 初始化界面

    def setIni(self):
        self.timer.start()                                      # 开始定时
        self.counter.start()                                    # 开始计时
        self.timer.timeout.connect(self.do_timer_timeout)       # 联接相应的回调函数
        # 订阅消息
        mqttClient.subscribe(topic="eig/simple_01", qos=0)
        mqttClient.loop_start()

    def do_timer_timeout(self):  # 计时器递归调用函数
        self.ui.xLabel.setText("x:"+str(x))                     # 设置主界面IP标签
        self.ui.yLabel.setText("y:"+str(y))                     # 设置主界面端口标签


if __name__ == "__main__":
    IP = "127.0.0.1"                                # IP
    port = 61613                                    # 端口

    application = QApplication(sys.argv)
    myApplication = MyApplication(IP, port)
    myApplication.showMaximized()                   # 最大化显示
    sys.exit(application.exec_())
其中:在GUI类前定义mqtt对象及其附属函数,在类中进行mqtt初始化;程序逻辑为界面启动时发布消息,一直订阅消息;实时更新并显示数据是通过设置定时器来实现定时刷新界面。
4 结果
建立收信和发信的py文件模拟mqtt通信。
1)收信py程序如下所示:
import time
import paho.mqtt.client as mqtt


def on_connect(client, userdata, flags, rc):
    print("Connected with result code " + str(rc))


def on_message(client, userdata, msg):
    print(msg.topic + " " + str(msg.payload))


client = mqtt.Client(protocol=3)
client.username_pw_set("admin", "password")                     # 用户名和密码设置
client.on_connect = on_connect                                  # 连接递归
client.on_message = on_message                                  # 消息递归
client.connect(host="127.0.0.1", port=61613, keepalive=60)      # 连接
time.sleep(1)
client.subscribe(topic="eig/simple_01_", qos=0)                 # 订阅主题
client.loop_forever()
发信py程序如下所示:(定时发布不同的x和y值)
import paho.mqtt.client as mqtt
import time
import sys
import json


def on_connect(client, userdata, flags, rc):
    print("Connected with result code " + str(rc))


client = mqtt.Client(protocol=3)
client.username_pw_set("admin", "password")
client.on_connect = on_connect
client.connect(host="127.0.0.1", port=61613, keepalive=60)  # 订阅频道
time.sleep(0.02)

i = 0
while True:
    try:
        outputData = {'x': i, 'y': i}               # 发布MQTT信息
        client.publish(topic="eig/simple_01", payload=json.dumps(outputData), qos=0)
        i += 1
        time.sleep(0.02)
    except KeyboardInterrupt:
        client.disconnect()
        sys.exit(0)
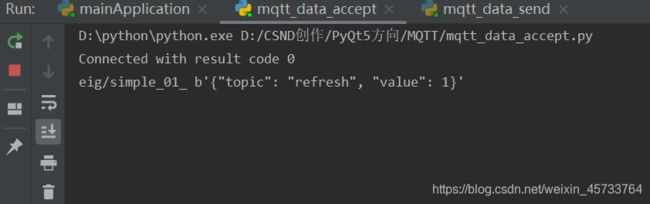
同时运行主界面、收信和发信的py程序,可实现前述需求,具体效果如下所示。
1)主界面发信效果:
 2)主界面收信效果:
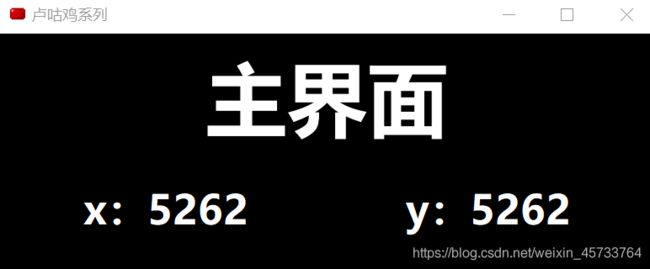 注:主界面一直在刷新x和y的值。
5 需特别注意的点
- mqtt配置时,需在连接后补充time.sleep(0.02),时间可自设定,以便mqtt连接上,否则通信失效。
- mqtt订阅时应用mqttClient.loop_start(),而不是mqttClient.loop_forever()。
- 因界面设计及其程序较为简单,未专设QSS文件,已在Qt Creator对各组件进行了QSS设置。
- 此系列代码和文件免费向有兴趣读者开放,可见https://download.csdn.net/download/weixin_45733764/12442384