TensorFlow是做什么的?
Tensorflow是Google开源的第二代用于数字计算的软件库。起初,它是Google大脑团队为了研究机器学习和神经网络而开发的,但是后来发现这个系统足够通用, 能够支持更加广泛的应用,就将其开源贡献了出来。
tensorflow可以理解为一个深度学习框架,里面有完整的数据流向与处理机制,同时还封装了大量高效可用的算法与神经网络搭建方面的函数, 可以在此基础之上进行深度学习的开发和研究。
TensorFlow的特点
1.灵活
TensorFlow与CNTK、MXNET、Theano同属于符号计算框架,允许用户不需要使用其他的低级语言(如Caffe中)实现的情况下,开发出新的复杂层模型。基于图运算是其基本特点,通过图上的节点变量可以控制训练中的各个环节变量,尤其在需要对底层操作时,TensorFlow要比其他的框架更容易。当然也有缺点,灵活的操作会真加使用复杂度,从而增加一定的学习成本。
2便携和通用
作为主流的框架, TensorFlow生成是模型, 更加具有便捷和通用的特点, 可以更加满足使用者的需求, TensorFlow 可以在Mac、Linux、Windows系统上进行开发。
3.成熟
由于TensorFlow被使用的情况最多,所以其框架的成熟度绝对是第一。在Google的白皮书上写道,Google内部的大量的产品几乎都运用了TensorFlow,如搜索排序、语言识别、谷歌相册和自然语言处理等。
4.超强的运算能力
虽然TensorFlow在大型计算机集群的并行处理中, 运算性能仅略低于CNTK, 但是在个人机器使用的情况下,会根据机器的配置自动选择CPU 或者是GPU运算, 在这方面更加的友好和智能化。
TensorFlow基本开发步骤-也逻辑回归拟合二维数组
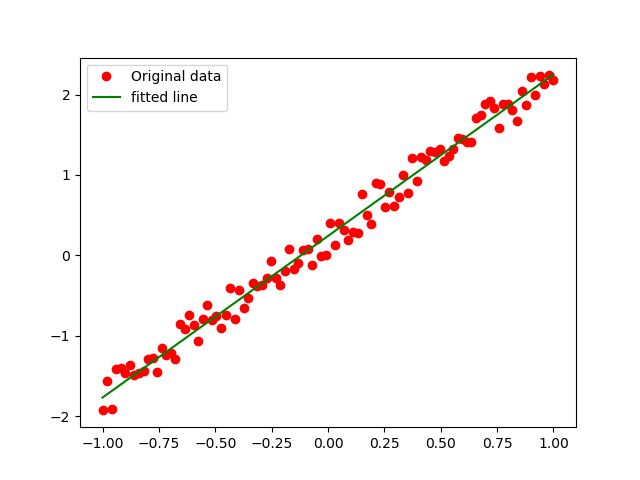
也一组混乱的数据中找出y=2x的规律
深度学习大概的4个步骤如下
(1)准备数据
(2)搭建模型
(3)迭代训练
(4)使用模型
1、准备数据
import tensorflow as tf
import numpy as np
import matplotlib.pyplot as plt

# 准备数据

train_x = np.linspace(-1, 1, 100)  # 在(-1, 1)之间产生100个数据

train_y = 2 * train_x + np.random.rand(*train_x.shape) * 0.5  # 加入一些噪声
plt.plot(train_x, train_y,"ro", label="Original data")
plt.savefig("Original.png")   # 保存图像
plt.legend()
plt.show()
2、搭建模型
# 搭建模型
X = tf.placeholder("float")
Y = tf.placeholder("float")   # 定义站位符
# 模型参数
w = tf.Variable(tf.random_normal([1]), name="weight")  # 定义变量 命名为weight
b = tf.Variable(tf.zeros([1]), name="baise")       # 变量 b
# 前向结构
z = tf.multiply(X, w) + b   # 模拟 z = X * w + b
# 反向优化
cost = tf.reduce_mean(tf.square(Y-z))  # 生成值与真实值的平方差
learning_rate = 0.01  # 学习率
optimizer = tf.train.GradientDescentOptimizer(learning_rate=learning_rate).minimize(cost) # 梯度下降法
3、迭代训练模型
1:训练模型
# 初始化所以的变量
initializer = tf.global_variables_initializer()
# 定义参数
train_epochs = 20  # 迭代次数
display_step = 2
# 启动会话(Session)
with tf.Session() as sess:
    sess.run(initializer)  # 初始化所有的变量
    plotdata = {"batchsize": [], "loss": []}  # 存放批次值和损失值
    # 向模型输入数据
    for epoch in range(train_epochs):
        for (x, y) in zip(train_x,train_y):
            sess.run(optimizer, feed_dict={X: x, Y: y})  # 向模型喂数据
        if epoch % display_step == 0:
            loss = sess.run(cost, feed_dict={X: train_x, Y: train_y})
            print("Epoch:", epoch + 1, "Cost:", loss, "W", sess.run(w), "b", sess.run(b))
            if not (loss == 'NA'):
                plotdata["batchsize"].append(epoch)
                plotdata["loss"].append(loss)

    print("Finished!")
print("cost:", sess.run(cost, feed_dict={X: train_x, Y: train_y}), "w:", sess.run(w), "b:", sess.run(b))运行结果如下所示:![]()
2:模型的可视化操作
def moving_average(a, w=10):
    if len(a) < w:
        return a[:]
    else:
        return [val if idx < w else sum(a[(idx-w):idx])/w for idx, val in enumerate(a)]


    plt.plot(train_x, train_y, "ro", label="Original data")
    plt.plot(train_x, sess.run(w) * train_x + sess.run(b), label="fitted line", color='g')
    plt.legend()
    plt.savefig("new_data.png")
    plt.show()
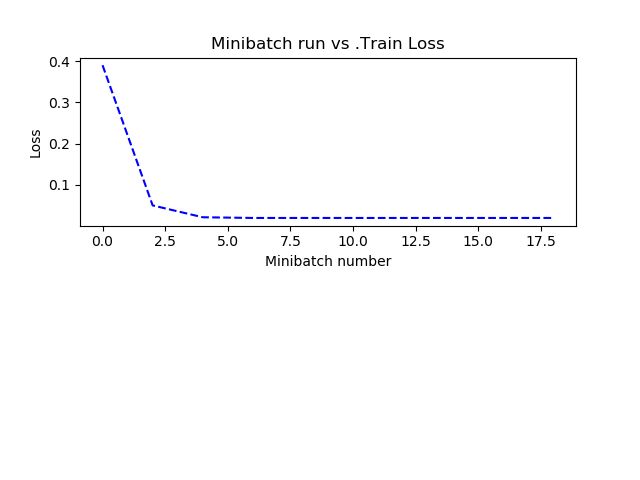
    plotdata["avgloss"] = moving_average(plotdata["loss"])
    plt.figure(1)
    plt.subplot(211)
    plt.plot(plotdata["batchsize"], plotdata["avgloss"], "b--")
    plt.ylabel("Loss")
    plt.xlabel("Minibatch number")
    plt.title("Minibatch run vs .Train Loss")
    plt.savefig("Minbatch number.png")
    plt.show()
可视化结果如下:
4、使用模型
使用sess.run来运行模型的z节点。
print("x=0.2, z=", sess.run(z, feed_dict={X: 0.2}))![]()
程序完整代码如下:
import tensorflow as tf
import numpy as np
import matplotlib.pyplot as plt

# 准备数据

train_x = np.linspace(-1, 1, 100)  # 在(-1, 1)之间产生100个数据

train_y = 2 * train_x + np.random.rand(*train_x.shape) * 0.5  # 加入一些噪声
plt.plot(train_x, train_y,"ro", label="Original data")
plt.savefig("Original.png")   # 保存图像
plt.legend()
plt.show()

# 搭建模型
X = tf.placeholder("float")
Y = tf.placeholder("float")   # 定义站位符
# 模型参数
w = tf.Variable(tf.random_normal([1]), name="weight")  # 定义变量 命名为weight
b = tf.Variable(tf.zeros([1]), name="baise")       # 变量 b
# 前向结构
z = tf.multiply(X, w) + b   # 模拟 z = X * w + b
# 反向优化
cost = tf.reduce_mean(tf.square(Y-z))  # 生成值与真实值的平方差
learning_rate = 0.01  # 学习率
optimizer = tf.train.GradientDescentOptimizer(learning_rate=learning_rate).minimize(cost) # 梯度下降法


def moving_average(a, w=10):
    if len(a) < w:
        return a[:]
    else:
        return [val if idx < w else sum(a[(idx-w):idx])/w for idx, val in enumerate(a)]
# 初始化所以的变量
initializer = tf.global_variables_initializer()
# 定义参数
train_epochs = 20  # 迭代次数
display_step = 2
# 启动会话(Session)
with tf.Session() as sess:
    sess.run(initializer)  # 初始化所有的变量
    plotdata = {"batchsize": [], "loss": []}  # 存放批次值和损失值
    # 向模型输入数据
    for epoch in range(train_epochs):
        for (x, y) in zip(train_x,train_y):
            sess.run(optimizer, feed_dict={X: x, Y: y})  # 向模型喂数据
        if epoch % display_step == 0:
            loss = sess.run(cost, feed_dict={X: train_x, Y: train_y})
            print("Epoch:", epoch + 1, "Cost:", loss, "W", sess.run(w), "b", sess.run(b))
            if not (loss == 'NA'):
                plotdata["batchsize"].append(epoch)
            plotdata["loss"].append(loss)

    plt.plot(train_x, train_y, "ro", label="Original data")
    plt.plot(train_x, sess.run(w) * train_x + sess.run(b), label="fitted line", color='g')
    plt.legend()
    plt.savefig("new_data.png")
    plt.show()
    plotdata["avgloss"] = moving_average(plotdata["loss"])
    plt.figure(1)
    plt.subplot(211)
    plt.plot(plotdata["batchsize"], plotdata["avgloss"], "b--")
    plt.ylabel("Loss")
    plt.xlabel("Minibatch number")
    plt.title("Minibatch run vs .Train Loss")
    plt.savefig("Minbatch number.png")
    plt.show()
    print("Finished!")
    print("cost:", sess.run(cost, feed_dict={X: train_x, Y: train_y}), "w:", sess.run(w), "b:", sess.run(b))
TensorFlow开发的基本步骤
(1)定义TensorFlow输入节点。
(2)定义"学习参数"的变量.
(3)定义"运算"
(4)优化函数,优化目标
(5)初始化所有的变量。
(6)迭代更新参数到最优解。
(7)测试模型。
(8)使用模型。
1:定义输入节点的方法。
TensorFlow中有也下定义输入节点的方法。
- 通过占位符定义:一般使用这种方式。
- 通过字典类型定义:一般用于输入比较多的情况。
- 直接定义:一般很少使用。
通过占位符定义:
具体使用tf.placeholder 函数创建。
x = tf.placeholder("float")
y = tf.placeholder("float")
通过字典创建
例如:
input_dict={
"x":tf.placeholder("float"),
"y":tf.placeholder("float")
}
直接定义
直接定义就是将定义好的的pyhton变量直接放在OP节点中参与输入运算, 将数据的变量直接放在模型中进行训练。
也下面的代码为例:
import tensorflow as tf
import matplotlib.pyplot as plt
import numpy as np

train_x = np.linspace(-1, 1, 100)
train_y = 2 * train_x + np.random.rand(*train_x.shape) * 0.2
# display
plt.plot(train_x, train_y, "ro", label="Original data")
plt.legend()
plt.show()

# 模型参数
w = tf.Variable(tf.random_normal([1]), name="weight")
b = tf.Variable(tf.zeros([1]), name="baise")
# 向前结构
z = tf.multiply(train_x, w) + b   # 变量直接在OP中参加运算
2、 定义"学习参数"的变量
学习参数定义和输入参数的定义很像,包括了直接定义和字典定义两部分。这两种都是常见的使用方式,只不过在深度神经网络中由于参数过多,普遍会使用第二种情况。
1:直接定义
通常用tf.Variable对参数进行定义
模型参数定义
W= tf.Variable(tf.random_normal([1]),name="weight")
b = tf.Variable(tf.zeros([1]), name="baise")
2:字典定义
# 模型参数定义
paradict ={

    "w": tf.Variable(tf.random_normal([1]), name="weight"),
    "b": tf.Variable(tf.zeros([1]), name="baise")
}
3、定义运算
定义运算的过程是建立模型的核心过程,直接决定了模型的拟合效果。
1.定义正向传播模型
他们都是由不同的神经元也不同的组合方式组成的网络结构。
2.定义损失函数
损失函数主要计算“输出值”与“目标值”之间的误差,是配合反向传播使用的,为了在反向传播中可以找到最小值,要求函数必须是可导的。
4、优化函数,优化目标
有了正向结构和损失函数后, 就是通过优化函数来优化学习参数,也是在反向传播中完成。
反向传播过程,就是沿着正向传播的结构向相反方向将误差传递过去。
5、初始化所以的变量
初始化通过下面的代码实现
init = tf.global_variables_initializer()
with tf.Session() as sess:
    sess.run(init)
6、迭代更新参数到最优解
在迭代训练的环节中,都需要建立一个session来完成,常用的用with语法,可以在session结束后自动关闭。
用session.run()来训练OP,在优化操作中,只不过是训练的是优化的OP,同时会在外层加上循环次数。
也下面示意代码为参考
with tf.Session() as sess:  # 使用with语法
    sess.run(init)
    for epoch in range(train_epochs):  # train_epochs:迭代次数
        for (x, y) in zip(train_x, train_y):
            sess.run(optimizer,feed_dict={X:x, Y:y})
7、测试模型
测试模型已经不是神经网络的核心环节了,同归对评估节点的输出,得到模型准确率(或误差率)从而得到模型的好坏。也下面的代码说明:
print("cost:", sess.run(cost, feed_dict={X: train_x, Y: train_y}), "w:", sess.run(w), "b:", sess.run(b))
也可以写成:
print("cost:",cost.eval({X:train_x, Y:train_y}))
8、使用模型
使用模型与测试模型相似,只不过是将损失值的节点换成输出的节点即可。
一般会把生成 的模型进行保存起来,在通过载入也有的模型进行实际的使用。
TensorFlow的编程基础
TensorFlow的运行机制属于“定义”与“运行”相分离。从操作层面可以分为模型构建和模型运行。
模型构建的概念
- tensor(张量):数据,即某一类的多维数组。
- Variable(变量):定义模型的参数,通过不断训练得到值。
- placeholder(占位符):输入变量的载体。也可以理解成定义函数时的参数。
- opration,op(图中的节点操作):即一个op获取0个或多个tensor,执行计算,输出额外多的0个或者多个的tensor.
演示Session的使用
import tensorflow as tf
string = tf.constant("hello world")

with tf.Session() as sess:  # with
    print(sess.run(string))

# 或者
sess = tf.Session()
print(sess.run(string))
sess.close()
注入机制
定义占位符, 使用feed机制将数据传入,实现+,-, *,/
a = tf.placeholder(tf.float32)
b = tf.placeholder(tf.float32)
add = tf.add(a, b)  # a+b
sub = tf.subtract(a, b)  # a-b
mul = tf.multiply(a, b)  # a*b
div = tf.divide(a, b)  # a/b

with tf.Session() as sess:
    print("Add:", sess.run(add, feed_dict={a: 3.0, b: 4.0}))
    print("Sub:", sess.run(sub, feed_dict={a: 3.0, b: 4.0}))
    print("Mul:", sess.run(mul, feed_dict={a: 3.0, b: 4.0}))
    print("Div:", sess.run(div, feed_dict={a: 3.0, b: 4.0}))


answer:
Add: 7.0
Sub: -1.0
Mul: 12.0
Div: 0.75
保存和载入模型
1.保存模型
1.创建saver
2.在session中通过saver.save 保存模型
示意代码如下所示:

saver = tf.train.Saver()
with tf.Session() as sess:
    sess.run(tf.global_variables_initializer())
    saver.save(sess, "save_path/file_name")  # file_name 不存在就会自动创建
2.载入模型
示意代码如下所示:

saver = tf.train.Saver()
with tf.Session() as sess:
    sess.run(tf.global_variables_initializer())
    saver.restore(sess, "save_path/file_name")  # 会将已经保存的变量值resotre到变量中
TensorBoard可视化
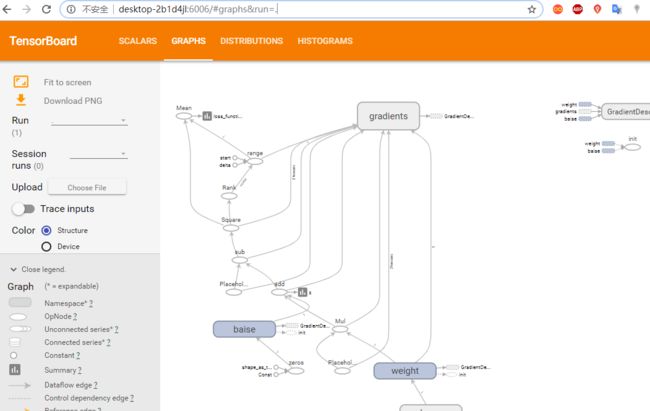
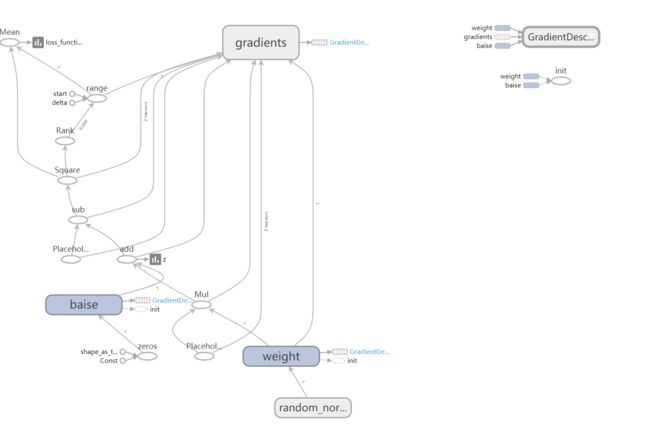
TensorFlow提供了一个可视化的工具TensorBoard.它可以将训练过程中的各种数据展示出来,包括标量(Scalars)、图片(Image)、音频(Audio)、计算图(Graph)、数据分布、直方图(Histograms)和嵌入式向量。可以通过网页来观察模型的结构和训练过程的各个参数之间的 变化。
模型操作相关的函数
tf.summary.scalar(tags, values, collections=None, name=None)#标量的数据汇总。
tf.summary.histogram(tags,values, collections=None, name=None) # 记录变量var的直方图,输出带直方图的汇总的protobuf。
tf.summary.image(tag, values, max_image=3, collections=None, name=None)# 图像数据汇总,输出protobuf。
tf.summary.merge(inputs, collections=None, name=None) # 合并所以的汇总日志。
tf.summary.FileWriter # 创建一个summaryWriter。
class summary_write: # 将protibuf写成文件的类。
add_summary()
add sessionlog(),
add_event()
or add_graph()
也上面的线性回归进行可视化操作
关键的代码如下:
# 前向结构
z = tf.multiply(X, w) + b   # 模拟 z = X * w + b
tf.summary.histogram("z", z) # 将预测值也直方图的形式显示
# 反向优化
cost = tf.reduce_mean(tf.square(Y-z))  # 生成值与真实值的平方差
tf.summary.scalar("loss_functions", cost)   # 也损失函数为标量的形式显示
with tf.Session() as sess:
    sess.run(initializer)  # 初始化所有的变量
    merged_summary_op = tf.summary.merge_all()  # 合并所以的summary
    plotdata = {"batchsize": [], "loss": []}  # 存放批次值和损失值
    # 创建summary_write, 用于写文件的操作
    summary_write = tf.summary.FileWriter("F:/code_data/log/mnist_with_summaries", sess.graph)

    # 向模型输入数据
    for epoch in range(train_epochs):
        for (x, y) in zip(train_x, train_y):
            sess.run(optimizer, feed_dict={X: x, Y: y})  # 向模型喂数据
            summary_str = sess.run(merged_summary_op, feed_dict={X: x, Y: y}) # 生成summary
            summary_write.add_summary(summary_str, epoch)  # 将summary写入文件
找到你的summary日志文件夹 复制路径:F:\code_data\log\mnist_with_summaries
在电脑上运行cmd,启动命令行窗口
输入:tensorboard --logdir F:\code_data\log\mnist_with_summaries
get_Variable和Variable的不同
import tensorflow as tf

var1 = tf.Variable(1.0, name="firstval")
print("var1:",  var1.name)
var1 = tf.Variable(2.0, name="firstval")
print("var1:", var1.name)
var2 = tf.Variable(3.0)
print("var2:",var2.name)
var2 = tf.Variable(3.0)
print("var1:", var2.name)
with tf.Session() as sess:
    sess.run(tf.global_variables_initializer())
    print("var1:", var1.eval())
    print("var2:", var2.eval())
'''
answer:

var1 firstval:0
var1 firstval_1:0
var2 Variable:0
var1 Variable_1:0
var1: 2.0
var2: 3.0
定义两次的var1,内存生成了两个var1, 名字不同
而对于图来说 后面一个有效

'''
get_Variable
get_variable = tf.get_variable("firstvar", [1], initializer=tf.constant_initializer(0.3))
print(get_variable.name)
get_variable = tf.get_variable("firstvar", [1], initializer=tf.constant_initializer(0.4))
会产生 Traceback (most recent call last):
使用get_variable只能定义一次指定名称。
get_variable = tf.get_variable("firstvar", [1], initializer=tf.constant_initializer(0.3))
print(get_variable.name)
get_variable = tf.get_variable("firstvar1", [1], initializer=tf.constant_initializer(0.4))
print(get_variable.name)

with tf.Session() as sess:
    sess.run(tf.global_variables_initializer())
    print("values:", get_variable.eval())  # 0.4
将名字改成firstval1程序正常的输出。
在特定的作用域下获取变量
使用get_variable以及variable_scope
import tensorflow as tf
# var1 = tf.get_variable("firstvar", shape=[2], dtype=tf.float32)
# var2 = tf.get_variable("firstvar", shape=[2], dtype=tf.float32) # 这样创建var1和var2 ERROR

with tf.variable_scope("test1", ):  # 表示定义一个作用域

    var1 = tf.get_variable("firstvar", shape=[2], dtype=tf.float32)
    print("var1", var1.name)
with tf.variable_scope("test2", ):
    var2 = tf.get_variable("firstvar", shape=[2], dtype=tf.float32)
    print("var2:", var2.name)

"""
var1 test1/firstvar:0
var2: test2/firstvar:0
"""
# scope的嵌套


with tf.variable_scope("test1",):
    var1 = tf.get_variable("firstvar", shape=[2], dtype=tf.float32)
    print("Var1:", var1.name)
    with tf.variable_scope("test2", ):
        var2 = tf.get_variable("firstvar", shape=[2], dtype=tf.float32)

        print("Var2:", var2.name)


"""
Var1: test1/firstvar:0
Var2: test1/test2/firstvar:0

"""
识别图中的模糊手写数字
代码的相关步骤:
(1)导入MNIST数据集。
(2)分析MNIST样本的特点定义变量。
(3)构建模型。
(4)训练模型并输出中间变量的参数。
(5)测试模型。
(6)保留模型。
(7)读取模型。
示意代码如下:
import tensorflow as tf
from tensorflow.examples.tutorials.mnist import input_data
mnist = input_data.read_data_sets("MNIST_data/", one_hot=True) # 下载MNIST数据 保存在同级目录下的MNIST_data文件夹
print("data", mnist.train.images)
print("data", mnist.train.images.shape)  # 55000, 784

# 定义变量

x = tf.placeholder(tf.float32, [None, 784])  # 28 * 28
y = tf.placeholder(tf.float32,  [None, 10])  # 10个分类

# 定义学习参数

w = tf.Variable(tf.random_normal([784, 10]))
b = tf.Variable(tf.zeros([10]))

# 定义输出节点

pred = tf.nn.softmax(tf.matmul(x, w) + b)
cost = tf.reduce_mean(-tf.reduce_sum(y*tf.log(pred), reduction_indices=1))  # 损失函数
learing_rate = 0.1  # 学习率
optimizer = tf.train.GradientDescentOptimizer(learning_rate=learing_rate).minimize(cost)  # 梯度下降优化器
train_ecops = 20  # 迭代次数
batch_size = 100  # 批次大小
display_step = 1
with tf.Session() as sess:
    sess.run(tf.global_variables_initializer())  # 变量初始化

    for epoch in range(train_ecops):
        avg_cost = 0
        total_batch = int(mnist.train.num_examples / batch_size)
        for i in range(total_batch):
            batch_xs, batch_ys = mnist.train.next_batch(batch_size)
            _, c = sess.run([optimizer, cost], feed_dict={x: batch_xs, y: batch_ys})  # 优化器启动
            avg_cost += (c/total_batch)  # 计算平均的loss

        if (epoch+1) % display_step == 0: # 显示训练中的详细信息
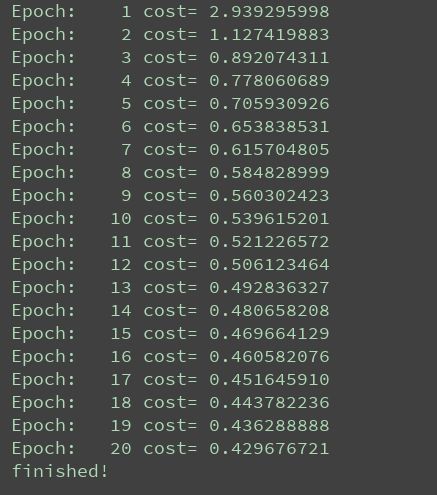
            print("Epoch:", "%4d" % (epoch + 1), "cost=", "{:.9f}".format(avg_cost))

print("finished!")# 测试模式
correct_prediction = tf.equal(tf.argmax(pred, 1), tf.argmax(y, 1))
# 计算准确率
accuracy = tf.reduce_mean(tf.cast(correct_prediction, tf.float32))
print("accuracy:", accuracy.eval({x: mnist.test.images, y: mnist.test.labels}))
print("finished!")# 保存模型
saver = tf.train.Saver()
model_path = "F:\code_data\log\model.ckpt"
save_path = saver.save(sess, model_path)
print("model saveed in file %s"% save_path)部分代码:
import pylab
with tf.Session() as sess:
sess.run(tf.global_variables_initializer())
saver.restore(sess, save_path=model_path)
# 测试模型
correct_prediction = tf.equal(tf.argmax(pred, 1), tf.argmax(y, 1))
accuracy = tf.reduce_mean(tf.cast(correct_prediction, tf.float32))
print("accuracy:", accuracy.eval({x: mnist.test.images, y: mnist.test.labels}))
output = tf.argmax(pred, 1)
batch_xs, batch_ys = mnist.train.next_batch(2)
output_val, predv = sess.run([output, pred], feed_dict={x:batch_xs, y:batch_ys})
print(output_val, predv, batch_ys)
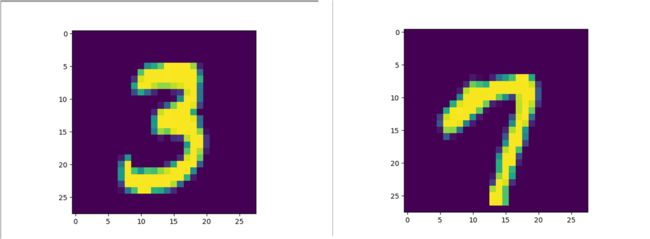
im = batch_xs[0]
im = im.reshape(-1, 28)
pylab.imshow(im)
pylab.show()
im = batch_xs[1]
im = im.reshape(-1, 28)
pylab.imshow(im)单个神经元
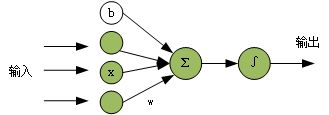
一个神经元是有下面几部分组成:
- 激活函数
- 损失函数
- 梯度下降
正向传播
数据从输入流到输出的流向传递过来的, 当然,它是假设没有一个合适的w和b的基础上,才可以实现对现实环境的正常的拟合,但是在实际过程中, 我们不知道具体的w,b是多少才算正常。
于是加入了一个反向误差传递的方法,通过反向误差的方法来让模自动的进行修正,最终达到一个合适的权重。
反向传播
反向传播就很明确-告诉需要将w,b调整到多少, 刚开始没有得到合适的权重时,正向传播和实际的标签是存在误差,反向传播就是将这个误差传递给权重,让权重适当调整一下,来达到一个合适的输出。
### 激活函数 ###
再神经网络的中,常用的激活函数有Sigmoid,Tanh,relu和swith函数。
softmax-处理分类问题
上述讲的激活函数的输出值为两种(0、1,-1、 1或者0、x)等类型, 而在实际的情况下,需要对某个问题进行多种分类,例如前面的MNIST中, 就是多分类问题, 也是运用了softmax算法。
一般的激活函数只能分类两类, 可以说softmax是sigmoid类函数的扩展, 表达式如下:
softmax = exp(logits)/reduce_Sum(exp(logits), dim)
把所有值的e的x次方算出来, 后求出每一个值的占比, 保证和为1, 一般就可以理解softmax得到的就是概率。
损失函数-真实值与预测值的距离来指导模型的收敛方式
损失函数
描述模型预测值与真实值的差距大小。两种常见的算法
- 均值平方差M(MSE)
- 交叉熵
tensorflow上面的API
1.均值平方差
MSE = tf.reduce_mean(tf.pow(tf.sub(logits, outputs), 2.0))
MSE = tf.reduce_mean(tf.square(tf.sub(logits, outputs)))
MSE = tf.reduce_mean(tf.square(logits - outputs))
Rmse = tf.sqrt(tf.reduce_mean(tf.pow(tf.sub(logits, outputs))))
mad = tf.reduce_mean(tf.complex_abs((tf.sub(logits, outputs))))
logits:表示标签值 outputs:表示预测值
2.交叉熵
交叉熵函数有下面的几种。
(1)sigmoid交叉熵
(2)softmax交叉熵
(3)sqarse交叉熵
(4)加权sigmoid交叉熵
Tensorflow中的损失函数
tf.nn.sigmoid_cross_entropy_with_logits(logits, targets, name=None) # 计算logits, targets之间的交叉熵。
tf.nn.softmax_cross_entropy_with_logits(logits, labels, name=None) # 计算logits和 targets的softmax之间的交叉熵 logits和target之间的维度必须相等和相同的数据类型。
tf.nn.sparse_softmax_cross_entropy_with_logits(logits, labels, name=None) # 计算logits和 labls的softmax之间的交叉熵 样本的真实值与预测值不需要进行one_hot编码。
tf.nn.weighted_cross_entropy_with_logits(logits, targets, pos_weight, name=None) # 在交叉熵的基础上给第一项城上一个系数(加权),是增加或减少正样本在计算交叉熵时的损失值。
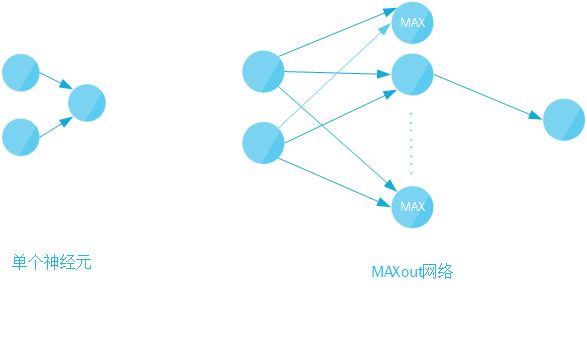
单个神经元的扩展-maxout 网络
示意代码如下:

z = tf.matmul(x, w) + b
maxout = tf.reduce_mean(z, axis=1, keep_dims=True)
w2 = tf.Variable(tf.truncated_normal([1, 10], stddev=0.1))
b = tf.Variable(tf.zeros([1]))
pred = tf.nn.softmax(tf.matmul(maxout, w2) + b)
cost = tf.reduce_mean(-tf.reduce_sum(y*tf.log(pred), reduction_indices=1))
optimizer = tf.train.GradientDescentOptimizer(learning_rate=0.01).minimize(cost)
多层神经网络
- 线性问题
- 非线性问题
1.线性问题
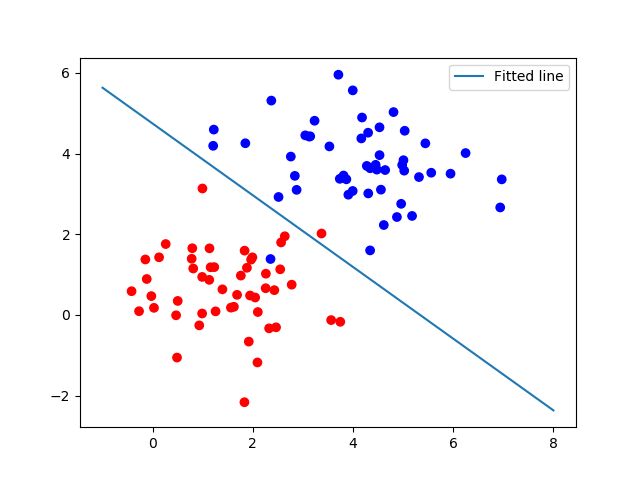
分析肿瘤是恶性还是良性
生成样本数据
import tensorflow as tf
import numpy as np
from sklearn.utils import shuffle
import matplotlib.pyplot as plt


def generate(sample_size, mean, cov, diff, regression):  # 生成样本数据函数
    num_classes = 2  # len(diff)
    samples_per_class = int(sample_size / 2)

    X0 = np.random.multivariate_normal(mean, cov, samples_per_class)
    Y0 = np.zeros(samples_per_class)

    for ci, d in enumerate(diff):
        X1 = np.random.multivariate_normal(mean + d, cov, samples_per_class)
        Y1 = (ci + 1) * np.ones(samples_per_class)
        X0 = np.concatenate((X0, X1))
        Y0 = np.concatenate((Y0, Y1))

    if regression == False:  # one-hot  0 into the vector "1 0
        class_ind = [Y == class_number for class_number in range(num_classes)]
        Y = np.asarray(np.hstack(class_ind), dtype=np.float32)

    X, Y = shuffle(X0, Y0)

    return X, Y


np.random.seed()  # 生成随机种子
num_class= 2
mean = np.random.randn(num_class)
cov = np.eye(num_class)
x, y = generate(1000, mean, cov, [3.0], True)
colors = ['r' if l == 0 else 'b' for l in y[:]]
plt.scatter(x[:, 0], x[:, 1], c=colors)
plt.xlabel("Scaled age in(yrs)")
plt.ylabel("Tumor size in(cm)")
plt.savefig("saled.png")
plt.show()完整的代码如下所示:
import tensorflow as tf
import matplotlib.pyplot as plt
import numpy as np
from sklearn.utils import shuffle


# 模拟数据点
def generate(sample_size, mean, cov, diff, regression):
    num_classes = 2  # len(diff)
    samples_per_class = int(sample_size / 2)

    X0 = np.random.multivariate_normal(mean, cov, samples_per_class)
    Y0 = np.zeros(samples_per_class)

    for ci, d in enumerate(diff):
        X1 = np.random.multivariate_normal(mean + d, cov, samples_per_class)
        Y1 = (ci + 1) * np.ones(samples_per_class)

        X0 = np.concatenate((X0, X1))
        Y0 = np.concatenate((Y0, Y1))

    if regression == False:  # one-hot  0 into the vector "1 0
        class_ind = [Y == class_number for class_number in range(num_classes)]
        Y = np.asarray(np.hstack(class_ind), dtype=np.float32)
    X, Y = shuffle(X0, Y0)

    return X, Y


input_dim = 2
np.random.seed(10)
num_classes = 2
mean = np.random.randn(num_classes)
cov = np.eye(num_classes)
X, Y = generate(1000, mean, cov, [3.0], True)
colors = ['r' if l == 0 else 'b' for l in Y[:]]
plt.scatter(X[:, 0], X[:, 1], c=colors)
plt.xlabel("Scaled age (in yrs)")
plt.ylabel("Tumor size (in cm)")
plt.show()
lab_dim = 1
# tf Graph Input
input_features = tf.placeholder(tf.float32, [None, input_dim])
input_labels = tf.placeholder(tf.float32, [None, lab_dim])
# Set model weights
W = tf.Variable(tf.random_normal([input_dim, lab_dim]), name="weight")
b = tf.Variable(tf.zeros([lab_dim]), name="bias")

output = tf.nn.sigmoid(tf.matmul(input_features, W) + b)
cross_entropy = -(input_labels * tf.log(output) + (1 - input_labels) * tf.log(1 - output))
ser = tf.square(input_labels - output)
loss = tf.reduce_mean(cross_entropy)
err = tf.reduce_mean(ser)
optimizer = tf.train.AdamOptimizer(0.04)  # 尽量用这个--收敛快,会动态调节梯度
train = optimizer.minimize(loss)  # let the optimizer train

maxEpochs = 50
minibatchSize = 25

# 启动session
with tf.Session() as sess:
    sess.run(tf.global_variables_initializer())

    for epoch in range(maxEpochs):
        sumerr = 0
        for i in range(np.int32(len(Y) / minibatchSize)):
            x1 = X[i * minibatchSize:(i + 1) * minibatchSize, :]
            y1 = np.reshape(Y[i * minibatchSize:(i + 1) * minibatchSize], [-1, 1])
            tf.reshape(y1, [-1, 1])
            _, lossval, outputval, errval = sess.run([train, loss, output, err],
                                                     feed_dict={input_features: x1, input_labels: y1})
            sumerr = sumerr + errval

        print("Epoch:", '%04d' % (epoch + 1), "cost=", "{:.9f}".format(lossval), "err=",
              sumerr / np.int32(len(Y) / minibatchSize))

    # 图形显示
    train_X, train_Y = generate(100, mean, cov, [3.0], True)
    colors = ['r' if l == 0 else 'b' for l in train_Y[:]]
    plt.scatter(train_X[:, 0], train_X[:, 1], c=colors)
    # plt.scatter(train_X[:, 0], train_X[:, 1], c=train_Y)
    # plt.colorbar()

    #    x1w1+x2*w2+b=0
    #    x2=-x1* w1/w2-b/w2
    x = np.linspace(-1, 8, 200)
    y = -x * (sess.run(W)[0] / sess.run(W)[1]) - sess.run(b) / sess.run(W)[1]
    plt.plot(x, y, label='Fitted line')
    plt.legend()
    plt.savefig('line.png')
    plt.show()
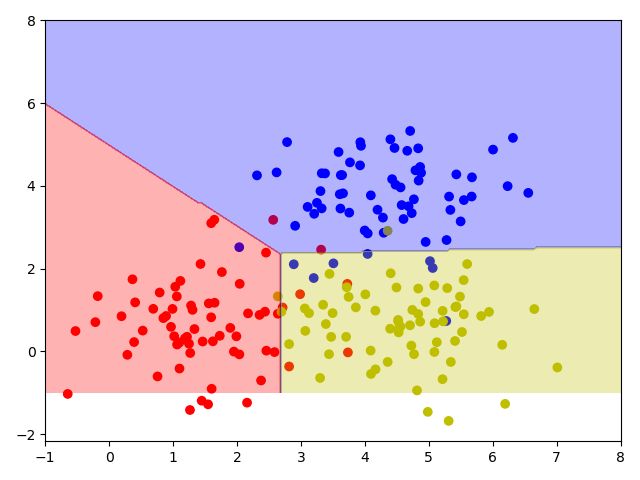
线性逻辑回归多分类问题
import tensorflow as tf
import numpy as np
import matplotlib.pyplot as plt
from sklearn.utils import shuffle
from matplotlib.colors import colorConverter, ListedColormap

# 对于上面的fit可以这么扩展变成动态的
from sklearn.preprocessing import OneHotEncoder
def onehot(y,start,end):
    ohe = OneHotEncoder()
    a = np.linspace(start,end-1,end-start)
    b =np.reshape(a,[-1,1]).astype(np.int32)
    ohe.fit(b)
    c=ohe.transform(y).toarray()
    return c
#

def generate(sample_size, num_classes, diff,regression=False):
    np.random.seed(10)
    mean = np.random.randn(2)
    cov = np.eye(2)

    #len(diff)
    samples_per_class = int(sample_size/num_classes)

    X0 = np.random.multivariate_normal(mean, cov, samples_per_class)
    Y0 = np.zeros(samples_per_class)

    for ci, d in enumerate(diff):
        X1 = np.random.multivariate_normal(mean+d, cov, samples_per_class)
        Y1 = (ci+1)*np.ones(samples_per_class)

        X0 = np.concatenate((X0,X1))
        Y0 = np.concatenate((Y0,Y1))
        #print(X0, Y0)


    if regression==False: #one-hot  0 into the vector "1 0
        Y0 = np.reshape(Y0,[-1,1])
        #print(Y0.astype(np.int32))
        Y0 = onehot(Y0.astype(np.int32),0,num_classes)
        #print(Y0)
    X, Y = shuffle(X0, Y0)
    #print(X, Y)
    return X,Y


# Ensure we always get the same amount of randomness
np.random.seed(10)

input_dim = 2
num_classes =3
X, Y = generate(2000,num_classes,  [[3.0],[3.0,0]],False)
aa = [np.argmax(l) for l in Y]
colors =['r' if l == 0 else 'b' if l==1 else 'y' for l in aa[:]]

plt.scatter(X[:,0], X[:,1], c=colors)
plt.xlabel("Scaled age (in yrs)")
plt.ylabel("Tumor size (in cm)")
plt.show()

lab_dim = num_classes
# tf Graph Input
input_features = tf.placeholder(tf.float32, [None, input_dim])
input_lables = tf.placeholder(tf.float32, [None, lab_dim])
# Set model weights
W = tf.Variable(tf.random_normal([input_dim,lab_dim]), name="weight")
b = tf.Variable(tf.zeros([lab_dim]), name="bias")
output = tf.matmul(input_features, W) + b

z = tf.nn.softmax( output )

a1 = tf.argmax(tf.nn.softmax( output ), axis=1)#按行找出最大索引,生成数组
b1 = tf.argmax(input_lables, axis=1)
err = tf.count_nonzero(a1-b1) # 两个数组相减,不为0的就是错误个数

cross_entropy = tf.nn.softmax_cross_entropy_with_logits( labels=input_lables,logits=output)
loss = tf.reduce_mean(cross_entropy)# 对交叉熵取均值很有必要


optimizer = tf.train.AdamOptimizer(0.04) #尽量用这个--收敛快,会动态调节梯度
train = optimizer.minimize(loss)  # let the optimizer train

maxEpochs = 50
minibatchSize = 25

# 启动session
with tf.Session() as sess:
    sess.run(tf.global_variables_initializer())

    for epoch in range(maxEpochs):
        sumerr=0
        for i in range(np.int32(len(Y)/minibatchSize)):
            x1 = X[i*minibatchSize:(i+1)*minibatchSize,:]
            y1 = Y[i*minibatchSize:(i+1)*minibatchSize,:]

            _,lossval, outputval,errval = sess.run([train,loss,output,err], feed_dict={input_features: x1, input_lables:y1})
            sumerr =sumerr+(errval/minibatchSize)

        print ("Epoch:", '%04d' % (epoch+1), "cost=","{:.9f}".format(lossval),"err=",sumerr/(np.int32(len(Y)/minibatchSize)))

    train_X, train_Y = generate(200,num_classes,  [[3.0],[3.0,0]],False)
    aa = [np.argmax(l) for l in train_Y]
    colors =['r' if l == 0 else 'b' if l==1 else 'y' for l in aa[:]]
    plt.scatter(train_X[:,0], train_X[:,1], c=colors)

    x = np.linspace(-1,8,200)

    y=-x*(sess.run(W)[0][0]/sess.run(W)[1][0])-sess.run(b)[0]/sess.run(W)[1][0]
    plt.plot(x,y, label='first line',lw=3)

    y=-x*(sess.run(W)[0][1]/sess.run(W)[1][1])-sess.run(b)[1]/sess.run(W)[1][1]
    plt.plot(x,y, label='second line',lw=2)

    y=-x*(sess.run(W)[0][2]/sess.run(W)[1][2])-sess.run(b)[2]/sess.run(W)[1][2]
    plt.plot(x,y, label='third line',lw=1)

    plt.legend()
    plt.show()
    print(sess.run(W),sess.run(b))


    train_X, train_Y = generate(200,num_classes,  [[3.0],[3.0,0]],False)
    aa = [np.argmax(l) for l in train_Y]
    colors =['r' if l == 0 else 'b' if l==1 else 'y' for l in aa[:]]
    plt.scatter(train_X[:,0], train_X[:,1], c=colors)

    nb_of_xs = 200
    xs1 = np.linspace(-1, 8, num=nb_of_xs)
    xs2 = np.linspace(-1, 8, num=nb_of_xs)
    xx, yy = np.meshgrid(xs1, xs2) # create the grid
    # Initialize and fill the classification plane
    classification_plane = np.zeros((nb_of_xs, nb_of_xs))
    for i in range(nb_of_xs):
        for j in range(nb_of_xs):
            #classification_plane[i,j] = nn_predict(xx[i,j], yy[i,j])
            classification_plane[i,j] = sess.run(a1, feed_dict={input_features: [[ xx[i,j], yy[i,j] ]]} )


    # Create a color map to show the classification colors of each grid point
    cmap = ListedColormap([
            colorConverter.to_rgba('r', alpha=0.30),
            colorConverter.to_rgba('b', alpha=0.30),
            colorConverter.to_rgba('y', alpha=0.30)])
    # Plot the classification plane with decision boundary and input samples
    plt.contourf(xx, yy, classification_plane, cmap=cmap)
    plt.show()
利用全连接网络进行分类
是输入输出层之间使用两个隐藏层
示意代码如下所示:
import tensorflow as tf
from tensorflow.examples.tutorials.mnist import input_data
mnist = input_data.read_data_sets("MNIST_data/", one_hot=True)
print("data", mnist.train.images)
print("data", mnist.train.images.shape)  # 55000, 7

learning_rate = 0.01  # 学习率
train_epoches = 25
display_step = 1
batch_size = 100

# 设计两层隐藏层

n_hidden_1 = 256  # 第一个隐藏层的节点个数
n_hidden_2 = 256  # 第二个隐藏层的节点个数
n_output = 10   # 10个分类
n_input = 784  # MNIST 28 * 28


x = tf.placeholder(tf.float32, [None, n_input])
y = tf.placeholder(tf.float32, [None, n_output])

# 参数


weight ={

    "w1": tf.Variable(tf.random_normal([n_input, n_hidden_1])),
    "w2": tf.Variable(tf.random_normal([n_hidden_1, n_hidden_2])),
    "w3": tf.Variable(tf.random_normal([n_hidden_2, n_output]))
}


baise = {

    "b1": tf.Variable(tf.zeros([n_hidden_1])),
    "b2": tf.Variable(tf.zeros(n_hidden_1)),
    "b3": tf.Variable(tf.zeros(n_output))
}


# 定义运函数

def multilayer_perceptron(x, weight, baise):

    # 第一层
    layer_1 = tf.add(tf.matmul(x, weight["w1"]), baise["b1"])
    layer_1 = tf.nn.relu(layer_1)
    # 第二层
    layer_2 = tf.nn.tanh(tf.add(tf.matmul(layer_1, weight["w2"]), baise["b2"]))
    # 输出层
    out_layer = tf.matmul(layer_2, weight["w3"]) + baise["b3"]

    return out_layer


# 输出值
pred = multilayer_perceptron(x, weight=weight, baise=baise)
loss = tf.reduce_mean(tf.square(y-pred))

train = tf.train.AdamOptimizer(learning_rate=learning_rate).minimize(loss)

# 会话session

with tf.Session() as sess:
    sess.run(tf.global_variables_initializer())

    for epoch in range(train_epoches):
        total_batch = int(mnist.train.num_examples / batch_size)
        avg_cost = 0
        for i in range(total_batch):
            train_xs, train_ys = mnist.train.next_batch(batch_size)
            _, c = sess.run([train, loss], feed_dict={x: train_xs, y: train_ys})
            avg_cost+= (c/total_batch)
        if epoch % display_step == 0:
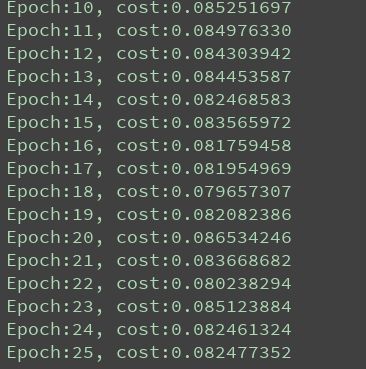
print("Epoch:{:2}, cost:{:.9f}".format(epoch+1, avg_cost))卷积神经网络 -解决参数过多问题
卷积神经网络包括了:
- 输入层:将每个像素代表的特征节点输入进去
- 卷积操作部分:又多个滤波器组合的卷积层
- 池化层:多生成的feature map取全局平均值。
- 输出层:需要分成几类,相应的就是几个输出节点。每个输出节点都代表了当前的样本属于该类型的概率。
卷积的完整结构:
卷积操作
1.步长
步长的卷积操作的核心。通过部长的变化,可以得到不同类型的卷积操作,也窄卷积为例。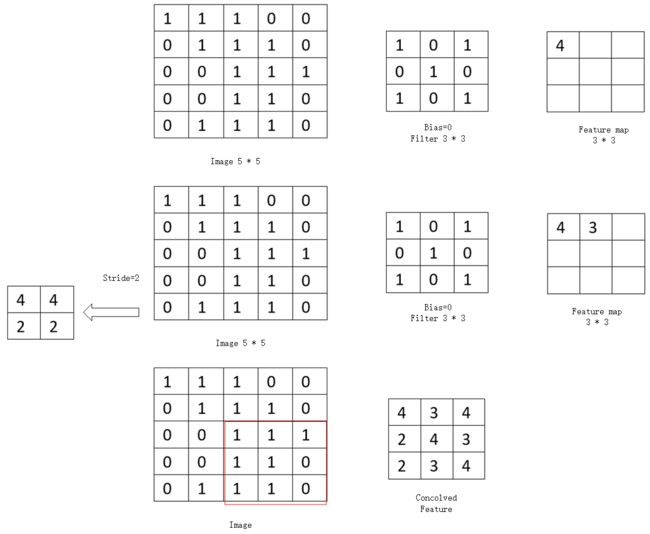
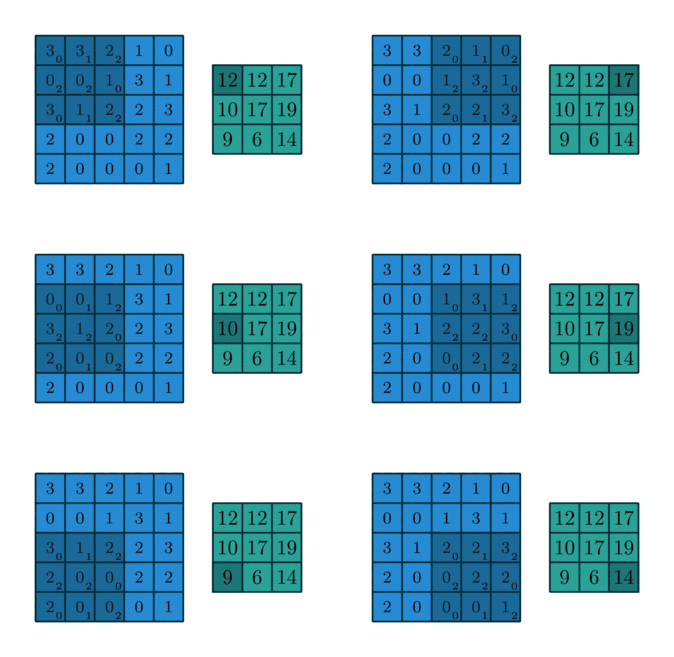
根据图中, 可以看出大小为5x5大小的矩阵代表图片,每个图片的右侧3x3矩阵代表了卷积核, 最右侧的3x3矩阵代代表了计算完的结果 feature map。
卷积操作依然是将卷积核(filter)和对应的图片(image)中的矩阵数据一一相乘, 在相加,第一行feature map中的第一个元素,是有image块中前3行和前3列中的元素与filter中的元素对应相乘后相加得到(4=1x1 + 1x0+ 1x1 +1x0 +1x0 +1x1 +0x0 +1x1 +1x0 +0x1)
步长(stride)表示卷积核在图片是上的移动的格数。
- 当步长为1时, 第二行右侧的feature map块里面第二元素3, 是有卷积核计算完成第一个元素4, 右移一格计算出来的, 相当于图片中的前3行和第1到第4围成的3x3矩阵各元素进行相乘相加的结果(3 = 1x1 +1x0+0x1 +1x0 +1x1 +1x0 +0x1 +1x0 +1x1)
- 当步长为2情况下, 就代表移动两格, 最终得到第二行左边的2x2矩阵块的结果。
2.窄卷积
窄卷积(valid卷积), 从字面上可以很容易理解, 即生成feature map比原图像小, 它的步长是可变的, 假设滑动步长为S, 原始图片的大小的维度是N1xN1, 那么卷积核的大小为N2xN2, 卷积后的图像为(N1-N2)/S +1x(N1-N2)/S+1
3.同卷积
同卷积(same卷积)表示卷积后的图像尺寸和原始图片的大小一样大, 同卷积的步长是固定的, 滑动步长为1. 一般操作都需要使用padding技术(外部补一圈0, 也确保生成的尺寸不变)
4.全卷积
全卷积(full卷积)也叫反卷积, 就是把原始图像里的每个像素点都用卷积操作展开。
全卷积的步长也是固定的,滑动步长为1, 假设原始图像的维度是N1xN1,卷积核的维度是N2xN2, 卷积后图像的大小为:N1-N2-1 x N1+N2-1
5反向传播
反向传播的核心步骤:
- 反向将误差传向前面一层。
- 根据当前的误差对应的学习表达式,计算出其他更新的差值。
6.多通道卷积
通道(channel),是指图片中像素有几个数表示的,这几个数一指的就是色彩,比如灰度图的通道就是1,而彩色图通道就是3(RGB).
在卷积神经网络里,通道又分为输入通道和输出通道。
输入通道:就是图像通道,如彩色图片, 起始输入的通道就是3, 如果有中间层的卷积,输入通道就是上一层的输出通道个数,计算方法,每个输入通道的图片都使用同一个卷积核进行卷积操作,生成与输出通道匹配的feature map(比如彩色通道就是3个), 然后把这几张feature map相同的位置上的值进行相加起来, 生成一张feature map.
输出通道:想要几个feature map , 就放几个卷积核,就输出几个通道。
池化层
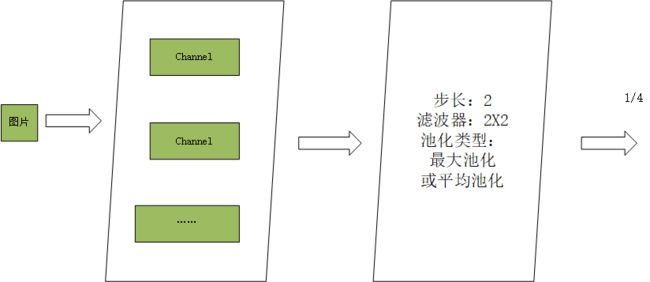
池化的主要的目的就是降维, 即在保持原有的特征的基础上最大限度的将数租的维度变小。
池化的操作外表跟卷积很像,只是算法不同。
- 卷积是将对应像素上的点相乘,然后在相加。
- 池化只关心滤波器的尺寸,不考虑内部的值。算法是,滤波器映射区域内的像素点取取平均值或者最大值。
1.均值池化
就是将图片上的对应滤波器的大小区域,对里面的所以不为0的像素点取均值,特征数据会对背景信息敏感。注意的不为0的像素点,加上0的,会让分母增,从而使整体数据降低。
2.最大池化
最大池化就是在图片上对应出滤波器大小的区域,将里面的像素点取最大值,这种方式得到的特征数据会对纹理特征的信息更加敏感。
3.反向传播
对于最大池化,直接将误差还原到对应的位置,将它用0填入,对于均值池化,则将其全部误差填入该像素对应的池化区域。
卷积函数的API
tf.nn.conv2d(input, filter, strides, padding, use_cudnn_on_gpu=True, data_format="NHWC", dilations=[1, 1, 1, 1], name=None)
input:需要做卷积的输入图像(Tensor)
filter:卷积核 (Tensor)
strides:卷积时图像每一维移动的步长。
padding定义元素边框的与元素内容之间的空间。只要"SAME“和"VALID", 决定不同卷积的方式,padding为:"SAME"表示填充到滤波器可以达到的图像边缘,"VALID":表示:边缘不填充。
return tensor
卷积提取图片的轮廓
import matplotlib.pyplot as plt  # plt 用于显示图片
import matplotlib.image as mpimg  # mpimg 用于读取图片
import numpy as np
import tensorflow as tf


myimg = mpimg.imread('F:\code_data\image\image2.jpg')
plt.imshow(myimg)  # 显示图片
plt.axis('off')  # 不显示坐标轴
plt.show()
print(myimg.shape)

full = np.reshape(myimg, [1, 640, 1024, 3])
inputfull = tf.Variable(tf.constant(1.0, shape=[1, 640, 1024, 3]))

filter = tf.Variable(tf.constant([[-1.0, -1.0, -1.0], [0, 0, 0], [1.0, 1.0, 1.0],
                                  [-2.0, -2.0, -2.0], [0, 0, 0], [2.0, 2.0, 2.0],
                                  [-1.0, -1.0, -1.0], [0, 0, 0], [1.0, 1.0, 1.0]], shape=[3, 3, 3, 1]))

op = tf.nn.conv2d(inputfull, filter, strides=[1, 1, 1, 1], padding='SAME')  # 3个通道输入,生成1个feature ma
o = tf.cast(((op - tf.reduce_min(op)) / (tf.reduce_max(op) - tf.reduce_min(op))) * 255, tf.uint8)

with tf.Session() as sess:
    sess.run(tf.global_variables_initializer())

    t, f = sess.run([o, filter], feed_dict={inputfull: full})
    # print(f)
    t = np.reshape(t, [640, 1024])

    plt.imshow(t, cmap='Greys_r')  # 显示图片
    plt.axis('off')  # 不显示坐标轴

    plt.savefig("gray.png")
    plt.show()
测试结果如下:
CIFAR-10数据集
CIFAR-10数据集包含10个类的60000张32x32的彩色图像,每个类有6000张图像.有50000张训练图像和10000张测试图像.CIFAR-10数据集
10个分类明细及对应的部分图片: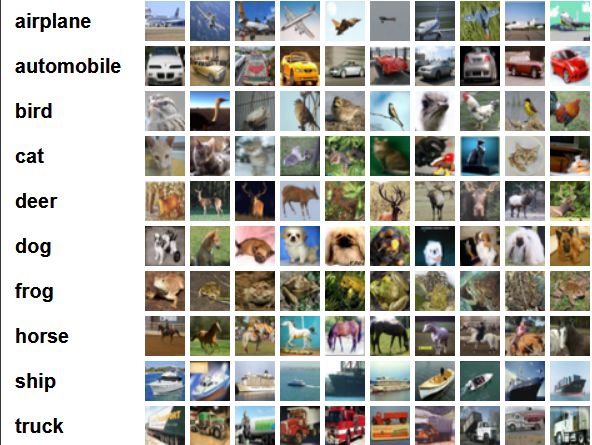
示意代码如下:
import tensorflow as tf
import cifar10_input
import numpy as np

# 训练的尺寸


# 导入模块和数据(data)
batch_size = 128

data_dir = 'F:\\tmp\cifar10_data\cifar-10-batches-bin'

image_train, label_train = cifar10_input.inputs(eval_data=False, data_dir=data_dir, batch_size= batch_size)

# 定义网络结构


# 定义权值weight

def weight_variable(shape):
    init = tf.truncated_normal(shape, stddev=0.1)
    return tf.Variable(init)

# 定义baise


def baise_variable(shape):
    init = tf.constant(0.1, shape=shape)
    return tf.Variable(init)


# 定义卷积层

def conv2d(x, w):
    return tf.nn.conv2d(x, w, strides=[1, 1, 1, 1], padding="SAME")

#  定义池化层 2*2的池化层


def max_pool_2x2(x):
    return tf.nn.max_pool(x, ksize=[1, 2, 2, 1], padding="SAME", strides=[1, 2, 2, 1])


# 定义平均池化层6x6


def avg_pool_6x6(x):
    return tf.nn.avg_pool(x, strides=[1, 6, 6, 1], ksize=[1, 6, 6, 1], padding="SAME", )


# 定义站位符

x = tf.placeholder(tf.float32, [None, 24, 24, 3])
y = tf.placeholder(tf.float32, [None, 10])

x_image = tf.reshape(x, [-1, 24, 24, 3])


w_conv1 = weight_variable([5, 5, 3, 64])
b_conv1 = baise_variable([64])


h_conv1 = tf.nn.relu(conv2d(x_image, w_conv1) + b_conv1)
h_pool1 = max_pool_2x2(h_conv1)

w_conv2 = weight_variable([5, 5, 64, 64])
b_conv2 = baise_variable([64])


h_conv2 = tf.nn.relu(conv2d(h_pool1, w_conv2)) + b_conv2
h_pool2 = max_pool_2x2(h_conv2)

w_conv3 =weight_variable([5, 5, 64, 10])
b_conv3 = baise_variable([10])
h_conv3 = tf.nn.relu(conv2d(h_pool2, w_conv3) + b_conv3)


nt_hpool3 =avg_pool_6x6(h_conv3)
nt_hpool3_flat = tf.reshape(nt_hpool3, [-1, 10])
y_conv = tf.nn.softmax(nt_hpool3_flat)

cross_entropy = -tf.reduce_sum(y**tf.log(y_conv))  # 损失函数

train_step = tf.train.AdamOptimizer(1e-4).minimize(cross_entropy) # 梯度下降法
correct_prediction = tf.equal(tf.argmax(y_conv, 1), tf.argmax(y, 1))
accuracy = tf.reduce_mean(tf.cast(correct_prediction, 'float'))

# 运行session进行train

sess = tf.Session()
sess.run(tf.global_variables_initializer())
tf.train.start_queue_runners(sess=sess)
for i in range(15000):
    image_batch, label_batch = sess.run([image_train, label_train])
    label_b = np.eye(10, dtype=float)[label_batch]
    train_step.run(feed_dict={x: image_batch, y:label_b}, session=sess)
    if i % 500 == 0:
        train_accuracy = accuracy.eval(feed_dict={x: image_batch, y: label_b},session = sess)

        print("Stop: %d, train accuracy: %g" % (i, train_accuracy))
反卷积神经网络
反卷积是指, 通过测量输出和已知的输入进行重构未知输入过程。
也下的图片是参考:
https://www.jianshu.com/p/f0674e48894c
tensorflow反卷积操作
import tensorflow as tf
import numpy as np

img = tf.Variable(tf.constant(1.0, shape=[1, 4, 4, 1]))

filter = tf.Variable(tf.constant([1.0, 0, -1, -2], shape=[2, 2, 1, 1]))

conv = tf.nn.conv2d(img, filter=filter, strides=[1, 2, 2, 1], padding="SAME")
conv1 = tf.nn.conv2d(img, filter=filter, strides=[1, 2, 2, 1], padding="VALID")

print(conv.shape)

print(conv1.shape)


# 进行反卷积

contv = tf.nn.conv2d_transpose(conv, filter, [1, 4, 4, 1], [1, 2, 2, 1], padding="SAME")
contv1 = tf.nn.conv2d_transpose(conv, filter, [1, 4, 4, 1], [1, 2, 2, 1], padding="VALID")

with tf.Session() as sess:
    sess.run(tf.global_variables_initializer())

    print("conv:\n", sess.run(conv))
    print("filter:\n", sess.run(filter))
    print("contv:\n", sess.run(contv))
    print("contv1:\n", sess.run(contv1))
循环神经网络-具有记忆的功能
1.了解人的记忆原理
2-3岁的小孩,刚开始说话的时候,把“我要”说成“要我”, 一看见喜欢的小零食,就会对你说“要我,要我.....”
大脑受到刺激时对后续的字有预测的功能。从神经网络的角度理解,大脑在语音模型在某一场景下一定对这两个字进行了先后顺序的区分, 比如,第一个字的"我",后面跟着我“要”,就会觉得正常,而使用“要我” 来匹配“我要”的意思, 生活中很少遇到,就觉得奇怪。
当获得“我们找你玩游”信息后,大脑的语言模型会之东预测后一个字为“戏”,而不是“乐”,“泳”等字。![]()
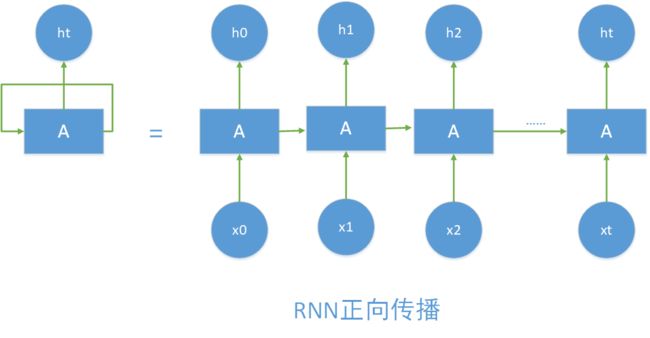
在上图中,每个字分开载开,在语言模型中就形成一个循环的神经网络。
每一个预测的结果都会放在下一个输入里面进行运算,与下一次生成的输入一起来生成下一次的结果。
即如下所示:
正向传播过程
模拟退位减法的操作
示意代码如下所示:
import copy, numpy as np
np.random.seed(0)  # 随机数生成器的种子,可以每次得到一样的值


# compute sigmoid nonlinearity
def sigmoid(x):  # 激活函数
    output = 1 / (1 + np.exp(-x))
    return output


# convert output of sigmoid function to its derivative
def sigmoid_output_to_derivative(output):  # 激活函数的导数
    return output * (1 - output)


int2binary = {}  # 整数到其二进制表示的映射
binary_dim = 8  # 暂时制作256以内的减法
## 计算0-256的二进制表示
largest_number = pow(2, binary_dim)
binary = np.unpackbits(
    np.array([range(largest_number)], dtype=np.uint8).T, axis=1)
for i in range(largest_number):
    int2binary[i] = binary[i]

# input variables
alpha = 0.9  # 学习速率
input_dim = 2  # 输入的维度是2
hidden_dim = 16
output_dim = 1  # 输出维度为1

# initialize neural network weights
synapse_0 = (2 * np.random.random((input_dim, hidden_dim)) - 1) * 0.05  # 维度为2*16, 2是输入维度,16是隐藏层维度
synapse_1 = (2 * np.random.random((hidden_dim, output_dim)) - 1) * 0.05
synapse_h = (2 * np.random.random((hidden_dim, hidden_dim)) - 1) * 0.05
# => [-0.05, 0.05),

# 用于存放反向传播的权重更新值
synapse_0_update = np.zeros_like(synapse_0)
synapse_1_update = np.zeros_like(synapse_1)
synapse_h_update = np.zeros_like(synapse_h)

# training
for j in range(10000):

    # 生成一个数字a
    a_int = np.random.randint(largest_number)
    # 生成一个数字b,b的最大值取的是largest_number/2,作为被减数,让它小一点。
    b_int = np.random.randint(largest_number / 2)
    # 如果生成的b大了,那么交换一下
    if a_int < b_int:
        tt = b_int
        b_int = a_int
        a_int = tt

    a = int2binary[a_int]  # binary encoding
    b = int2binary[b_int]  # binary encoding
    # true answer
    c_int = a_int - b_int
    c = int2binary[c_int]

    # 存储神经网络的预测值
    d = np.zeros_like(c)
    overallError = 0  # 每次把总误差清零

    layer_2_deltas = list()  # 存储每个时间点输出层的误差
    layer_1_values = list()  # 存储每个时间点隐藏层的值

    layer_1_values.append(np.ones(hidden_dim) * 0.1)  # 一开始没有隐藏层,所以初始化一下原始值为0.1

    # moving along the positions in the binary encoding
    for position in range(binary_dim):  # 循环遍历每一个二进制位

        # generate input and output
        X = np.array([[a[binary_dim - position - 1], b[binary_dim - position - 1]]])  # 从右到左,每次去两个输入数字的一个bit位
        y = np.array([[c[binary_dim - position - 1]]]).T  # 正确答案
        # hidden layer (input ~+ prev_hidden)
        layer_1 = sigmoid(np.dot(X, synapse_0) + np.dot(layer_1_values[-1],
                                                        synapse_h))  # (输入层 + 之前的隐藏层) -> 新的隐藏层,这是体现循环神经网络的最核心的地方!!!
        # output layer (new binary representation)
        layer_2 = sigmoid(np.dot(layer_1, synapse_1))  # 隐藏层 * 隐藏层到输出层的转化矩阵synapse_1 -> 输出层

        layer_2_error = y - layer_2  # 预测误差
        layer_2_deltas.append((layer_2_error) * sigmoid_output_to_derivative(layer_2))  # 把每一个时间点的误差导数都记录下来
        overallError += np.abs(layer_2_error[0])  # 总误差

        d[binary_dim - position - 1] = np.round(layer_2[0][0])  # 记录下每一个预测bit位

        # store hidden layer so we can use it in the next timestep
        layer_1_values.append(copy.deepcopy(layer_1))  # 记录下隐藏层的值,在下一个时间点用

    future_layer_1_delta = np.zeros(hidden_dim)

    # 反向传播,从最后一个时间点到第一个时间点
    for position in range(binary_dim):
        X = np.array([[a[position], b[position]]])  # 最后一次的两个输入
        layer_1 = layer_1_values[-position - 1]  # 当前时间点的隐藏层
        prev_layer_1 = layer_1_values[-position - 2]  # 前一个时间点的隐藏层

        # error at output layer
        layer_2_delta = layer_2_deltas[-position - 1]  # 当前时间点输出层导数
        # error at hidden layer
        # 通过后一个时间点(因为是反向传播)的隐藏层误差和当前时间点的输出层误差,计算当前时间点的隐藏层误差
        layer_1_delta = (future_layer_1_delta.dot(synapse_h.T) + layer_2_delta.dot(
            synapse_1.T)) * sigmoid_output_to_derivative(layer_1)

        # 等到完成了所有反向传播误差计算, 才会更新权重矩阵,先暂时把更新矩阵存起来。
        synapse_1_update += np.atleast_2d(layer_1).T.dot(layer_2_delta)
        synapse_h_update += np.atleast_2d(prev_layer_1).T.dot(layer_1_delta)
        synapse_0_update += X.T.dot(layer_1_delta)

        future_layer_1_delta = layer_1_delta

    # 完成所有反向传播之后,更新权重矩阵。并把矩阵变量清零
    synapse_0 += synapse_0_update * alpha
    synapse_1 += synapse_1_update * alpha
    synapse_h += synapse_h_update * alpha
    synapse_0_update *= 0
    synapse_1_update *= 0
    synapse_h_update *= 0

    # print out progress
    if (j % 800 == 0):
        # print(synapse_0,synapse_h,synapse_1)
        print("总误差:" + str(overallError))
        print("Pred:" + str(d))
        print("True:" + str(c))
        out = 0
        for index, x in enumerate(reversed(d)):
            out += x * pow(2, index)
        print(str(a_int) + " - " + str(b_int) + " = " + str(out))
        print("------------")
测试部分结果如下所示:
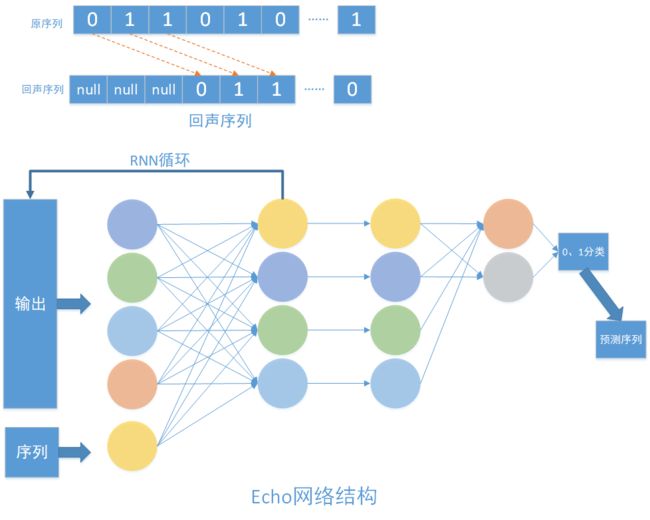
使用RNN网络拟合回声信号序列
code:
import numpy as np
import tensorflow as tf
import matplotlib.pyplot as plt

num_epochs = 5  # 初始输入
total_series_length = 50000 # 样本数据
truncated_backprop_length = 15  # 截取长度
state_size = 4
num_classes = 2
echo_step = 3  # 回声序列步长
batch_size = 5  # 批次大小
num_batches = total_series_length // batch_size // truncated_backprop_length


def generateData():  # 生成数据函数
    x = np.array(np.random.choice(2, total_series_length, p=[0.5, 0.5]))  # 在0 和1 中选择total_series_length个数
    y = np.roll(x, echo_step)  # 向右循环移位【1111000】---【0001111】
    y[0:echo_step] = 0

    x = x.reshape((batch_size, -1))  # 5,10000
    y = y.reshape((batch_size, -1))

    return (x, y)


batchX_placeholder = tf.placeholder(tf.float32, [batch_size, truncated_backprop_length])
batchY_placeholder = tf.placeholder(tf.int32, [batch_size, truncated_backprop_length])
init_state = tf.placeholder(tf.float32, [batch_size, state_size])

# Unpack columns
inputs_series = tf.unstack(batchX_placeholder, axis=1)  # truncated_backprop_length个序列
labels_series = tf.unstack(batchY_placeholder, axis=1)

current_state = init_state
predictions_series = []
losses = []
for current_input, labels in zip(inputs_series, labels_series):
    # for current_input in inputs_series:
    current_input = tf.reshape(current_input, [batch_size, 1])
    input_and_state_concatenated = tf.concat([current_input, current_state], 1)  # current_state 4  +1 # 沿着某一个轴连接tensor

    next_state = tf.contrib.layers.fully_connected(input_and_state_concatenated, state_size
                                                   , activation_fn=tf.tanh)
    # t f.contrib.layers.fully_connection(F,num_output,activation_fn) 函数就是全链接成层,F是输入,num_output是下一层单元的个数,activation_fn是激活函数

    current_state = next_state
    logits = tf.contrib.layers.fully_connected(next_state, num_classes, activation_fn=None)
    loss = tf.nn.sparse_softmax_cross_entropy_with_logits(labels=labels, logits=logits)
    losses.append(loss)
    predictions = tf.nn.softmax(logits)
    predictions_series.append(predictions)

total_loss = tf.reduce_mean(losses)
train_step = tf.train.AdagradOptimizer(0.3).minimize(total_loss)


def plot(loss_list, predictions_series, batchX, batchY):
    plt.subplot(2, 3, 1)
    # cla()   # Clear axis即清除当前图形中的当前活动轴。其他轴不受影响。
    # clf()   # Clear figure清除所有轴,但是窗口打开,这样它可以被重复使用。
    # close() # Close a figure window
    plt.cla()
    plt.plot(loss_list)

    for batch_series_idx in range(batch_size):
        one_hot_output_series = np.array(predictions_series)[:, batch_series_idx, :]
        single_output_series = np.array([(1 if out[0] < 0.5 else 0) for out in one_hot_output_series])

        plt.subplot(2, 3, batch_series_idx + 2)
        plt.cla()
        plt.axis([0, truncated_backprop_length, 0, 2])
        left_offset = range(truncated_backprop_length)
        left_offset2 = range(echo_step, truncated_backprop_length + echo_step)

        label1 = "past values"
        label2 = "True echo values"
        label3 = "Predictions"
        plt.plot(left_offset2, batchX[batch_series_idx, :] * 0.2 + 1.5, "o--b", label=label1)
        plt.plot(left_offset, batchY[batch_series_idx, :] * 0.2 + 0.8, "x--b", label=label2)
        plt.plot(left_offset, single_output_series * 0.2 + 0.1, "o--y", label=label3)

    plt.legend(loc='best')
    plt.draw()
    plt.pause(0.0001)


with tf.Session() as sess:
    sess.run(tf.global_variables_initializer())
    plt.ion() # 打开交互模式
    plt.figure()
    plt.show()
    loss_list = []

    for epoch_idx in range(num_epochs):
        x, y = generateData()
        _current_state = np.zeros((batch_size, state_size))

        print("New data, epoch", epoch_idx)

        for batch_idx in range(num_batches):  # 50000/ 5 /15=分成多少段
            start_idx = batch_idx * truncated_backprop_length
            end_idx = start_idx + truncated_backprop_length

            batchX = x[:, start_idx:end_idx]
            batchY = y[:, start_idx:end_idx]

            _total_loss, _train_step, _current_state, _predictions_series = sess.run(
                [total_loss, train_step, current_state, predictions_series],
                feed_dict={
                    batchX_placeholder: batchX,
                    batchY_placeholder: batchY,
                    init_state: _current_state
                })

            loss_list.append(_total_loss)

            if batch_idx % 100 == 0:
                print("Step", batch_idx, "Loss", _total_loss)
                plot(loss_list, _predictions_series, batchX, batchY)

plt.ioff()
plt.show()
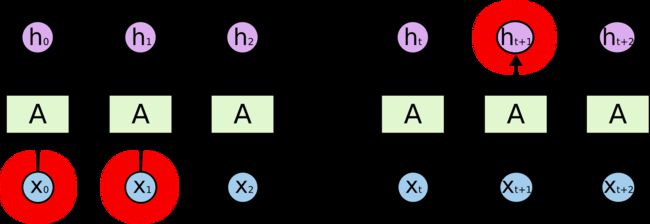
当间隔不断增大时,RNN 会丧失学习到连接如此远的信息的能力
在理论上,RNN 绝对可以处理这样的 长期依赖 问题。人们可以仔细挑选参数来解决这类问题中的最初级形式,但在实践中,RNN 肯定不能够成功学习到这些知识。而LSTM并没有这个问题!
LSTM 网络
Long Short Term 网络—— 一般就叫做 LSTM ——是一种 RNN 特殊的类型,可以学习长期依赖信息。LSTM 由Hochreiter & Schmidhuber (1997)提出,并在近期被Alex Graves进行了改良和推广。在很多问题,LSTM 都取得相当巨大的成功,并得到了广泛的使用。
LSTM 通过刻意的设计来避免长期依赖问题。记住长期的信息在实践中是 LSTM 的默认行为,而非需要付出很大代价才能获得的能力!
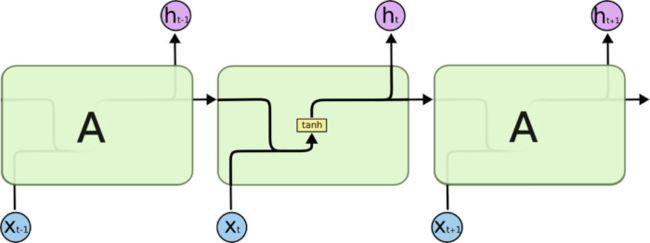
所有 RNN 都具有一种重复神经网络模块的链式的形式。在标准的 RNN 中,这个重复的模块只有一个非常简单的结构,例如一个 tanh 层
LSTM也有这样的结构
LSTM 拥有三个门,来保护和控制细胞状态
- 忘记门:决定什么时候需要把以前的状态忘记。
- 输入门:决定什么时候加入新的状态。
- 输出门:决定什么时候需要把状态和输入放在一起输出。
忘记门
该门会读取ht−1 和xt,输出一个在0~1之间的数值给每个在细胞状态ct-1中的数字。1表示“完全保留”, 而0表示“完全舍弃”。
输入门
输出门的功能有两部分:一部分是找到那些需要更新的细胞状态, 另外部分是把需要更新的信息更新在细胞状态里。
其中, tanh层就是创建一个新的细胞状态值向量-Ct, 会被加入到状态中。
忘记门找到需要忘记的ft后, 在于旧状态相乘,丢弃掉需要丢弃的信息, 在将结果加上it x Ct 使细胞状态获取到新的信息,这样就完成了细胞的更新。
输出门
首先,我们运行一个 sigmoid 层来确定细胞状态的哪个部分将输出出去。接着,我们把细胞状态通过 tanh 进行处理(得到一个在 -1 到 1 之间的值)并将它和 sigmoid 门的输出相乘,最终输出我们想输出的那部分。
窥视孔连接(Peephole)
一种流行的LSTM变种,由Gers和Schmidhuber (2000)提出,加入了“窥视孔连接”(peephole connections)。这意味着门限层也将单元状态作为输入。
GRU网络
GRU是与LSTM几乎一样的另一个常用的网络结构,它将忘记门和输入门和在一个单独的更新门中, 同样还混合了细胞状态和隐藏状态及其他的一些改动,最终的模型比LSTM模型简单。
自编码网络
提取图像的特征, 并用特征还原图像
code:
import tensorflow as tf
import numpy as np
import matplotlib.pyplot as plt

from tensorflow.examples.tutorials.mnist import input_data
mnist = input_data.read_data_sets("MNIST_data/", one_hot=True)
learning_rate = 0.01
n_hiddle1 = 256
n_hiddle2 = 128
n_input = 784
x = tf.placeholder("float", [None, n_input])
y = x

weights ={
    "encoder_h1": tf.Variable(tf.random_normal([n_input, n_hiddle1])),
    "encoder_h2": tf.Variable(tf.random_normal([n_hiddle1, n_hiddle2])),
    "decoder_h1": tf.Variable(tf.random_normal([n_hiddle2, n_hiddle1])),
    "decoder_h2": tf.Variable(tf.random_normal([n_hiddle1, n_input])),

}

baises = {
    "encoder_b1": tf.Variable(tf.zeros([n_hiddle1])),
    "encoder_b2": tf.Variable(tf.zeros([n_hiddle2])),
    "decoder_b1": tf.Variable(tf.zeros([n_hiddle1])),
    "decoder_b2": tf.Variable(tf.zeros([n_input])),

}


def encoder(x):
    layer1 = tf.nn.sigmoid(tf.add(tf.matmul(x, weights["encoder_h1"]), baises["encoder_b1"]))
    layer2 = tf.nn.sigmoid(tf.add(tf.matmul(layer1, weights["encoder_h2"]), baises["encoder_b2"]))

    return layer2


def decoder(x):
    layer1 = tf.nn.sigmoid(tf.add(tf.matmul(x, weights["decoder_h1"]), baises["decoder_b1"]))
    layer2 = tf.nn.sigmoid(tf.add(tf.matmul(layer1, weights["decoder_h2"]), baises["decoder_b2"]))
    return layer2


encode_out = encoder(x)


pred = decoder(encode_out)
print(pred.shape)


cost = tf.reduce_mean(tf.pow(y-pred, 2))
optimizer = tf.train.RMSPropOptimizer(learning_rate=learning_rate).minimize(cost)

train_epochs = 20
batch_size = 256
display_step = 5


with tf.Session() as sess:
    sess.run(tf.global_variables_initializer())
    total_batch = int(mnist.train.num_examples/batch_size)
    for epoch in range(train_epochs):
        for i in range(total_batch):
            batch_xs, batch_ys = mnist.train.next_batch(batch_size)
            _, c = sess.run([optimizer, cost], feed_dict={x: batch_xs})

        if epoch % display_step == 0:  # 现实日志信息
            print("Epoch:", '%04d' % (epoch + 1), "cost=", "{:.9f}".format(c))
        show_num = 10
        reconstruction = sess.run(pred, feed_dict={x: mnist.test.images[:show_num]})
        f, a = plt.subplots(2, 10, figsize=(10, 2))
        for i in range(show_num):

            a[0][i].imshow(np.reshape(mnist.test.images[i], (28, 28)))
            a[1][i].imshow(np.reshape(reconstruction[i], (28, 28)))
        plt.draw()
    plt.show()
