three.js项目--在线选车
需求
知识点:在上一个项目基础上,在学习光源、材质、gsap、精灵与css2D、坐标
需求:
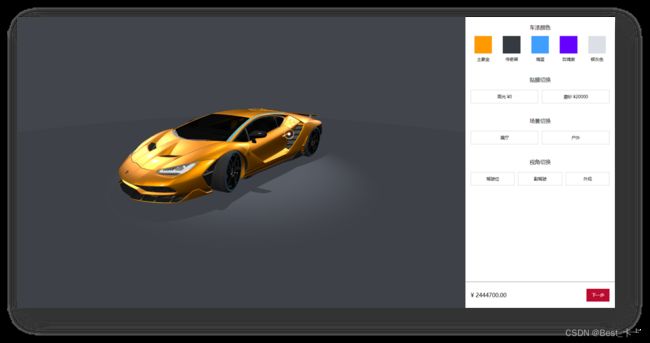
1、车身颜色修改
2、磨砂、高光切换、同时价格切换
3、室内室外切换
4、驾驶位、副驾驶、外观多角度观察
5、车门的开启、关闭
编码:
面向对象编程思想
单例模式
订阅发布模式
ps:方便代码迁移复用(技术vite+js)
1697008817819086
git项目地址
https://github.com/geyixia/OnlineCarSelection.git
git clone后
npm install
npm run dev
然后以下代码为整个项目实现思路可以辅助启动的项目进行理解
01.项目准备-初始化项目并且对three.js进行简单封装
html
doctype html>
<html lang="en">

<head>
  <meta charset="UTF-8" />
  <meta name="viewport" content="width=device-width, initial-scale=1.0" />
  <title>汽车展厅title>
  <link rel="stylesheet" href="/style.css">
head>

<body>
  <div class="wrap">
    <div class="app">div>
    <div class="tool">
      <div class="group_list">
        <div class="group">
          <p class="title">车漆颜色p>
          <div class="item_wrap col_group">
            <div data-col="#ff9900">
              <div class="col" style="background-color: #ff9900;">div>
              <p>土豪金p>
            div>
            <div data-col="#343a40">
              <div class="col" style="background-color: #343a40;">div>
              <p>传奇黑p>
            div>
            <div data-col="#409EFF">
              <div class="col" style="background-color: #409EFF;">div>
              <p>海蓝p>
            div>
            <div data-col="#6600ff">
              <div class="col" style="background-color: #6600ff;">div>
              <p>玫瑰紫p>
            div>
            <div data-col="#DCDFE6">
              <div class="col" style="background-color: #DCDFE6;">div>
              <p>银灰色p>
            div>
          div>
        div>
        <div class="group">
          <p class="title">贴膜切换p>
          <div class="item_wrap coat_group">
            <div data-co="高光">
              <div>div>
              <p class="info_btn">高光 ¥0p>
            div>
            <div data-co="磨砂">
              <div>div>
              <p class="info_btn">磨砂 ¥20000p>
            div>
          div>
        div>
        <div class="group">
          <p class="title">场景切换p>
          <div class="item_wrap scene_group">
            <div data-poi="展厅">
              <div>div>
              <p class="info_btn">展厅p>
            div>
            <div data-poi="户外">
              <div>div>
              <p class="info_btn">户外p>
            div>
          div>
        div>
        <div class="group">
          <p class="title">视角切换p>
          <div class="item_wrap look_group">
            <div data-po="main">
              <div>div>
              <p class="info_btn">驾驶位p>
            div>
            <div data-po="copilot">
              <div>div>
              <p class="info_btn">副驾驶p>
            div>
            <div data-po="outside">
              <div>div>
              <p class="info_btn">外观p>
            div>
          div>
        div>
      div>
      <div class="price">
        <span>¥ 2444700.00 span>
        <div class="next_btn">
          下一步
        div>
      div>
    div>
  div>
  <script type="module" src="/main.js">script>
body>

html>
package.json
{
  "name": "car-project",
  "private": true,
  "version": "0.0.0",
  "type": "module",
  "scripts": {
    "dev": "vite",
    "build": "vite build",
    "preview": "vite preview"
  },
  "devDependencies": {
    "vite": "^4.4.5"
  },
  "dependencies": {
    "dat.gui": "^0.7.9",
    "gsap": "^3.12.2",
    "three": "^0.154.0"
  }
}
style.css
*{
  box-sizing: border-box;
}
body {
  margin: 0
}
html, body{
  width: 100%;
  height: 100%;
}
/* 容器 */
.wrap{
  width: 100%;
  height: 100%;
  display: flex;
}
.app{
  flex: 3;
}
.tool{
  flex: 1;
  /* 预留底部总价标签位置 */
  padding-bottom: 60px;
  position: relative;
  width: 100%;
  display: flex;
  flex-direction: column;
}

/* 右侧工具-公共 */
.group{
  padding: 10px 10px;
  text-align: center;
}
.group .title{
  font-size: 15px;
}
.item_wrap{
  display: flex;
  text-align: center;
}
.group_list{
  overflow-y: scroll;
}
.group_list::-webkit-scrollbar{
  display: none;
}

/* 右侧工具-颜色 */

.item_wrap>div{
  flex: 1;
  font-size: 12px;
}
.item_wrap .col{
  width: 50px;
  height: 50px;
  display: inline-block;
}
.item_wrap p{
  margin: 5px;
}

.info_btn{
  padding: 10px 0;
  border: 1px solid lightgray;
}

/* 底部价格 */
.price{
  box-sizing: border-box;
  padding: 20px 15px;
  display: flex;
  justify-content: space-between;
  position: absolute;
  bottom: 0;
  border-top: 1px solid gray;
  align-items: center;
  width: 100%;
  background-color: white;
}

.price .next_btn{
  background-color: #bb0a30;
  box-sizing: border-box;
  font-size: 12px;
  color: white;
  padding: 10px 15px;
}
src/entry/index.js
// 初始化 three.js 基础环境
import * as THREE from 'three'
import { OrbitControls } from 'three/addons/controls/OrbitControls.js'

let scene, camera, renderer, controls
// 这次 app 标签作为 three.js 的画布容器
const app = document.querySelector('.app')

function init() {
  scene = new THREE.Scene()
  camera = new THREE.PerspectiveCamera(75, app.clientWidth / app.clientHeight, 0.1, 1000)
  camera.position.set(3, 1.5, 3)
  renderer = new THREE.WebGLRenderer({ antialias: true })
  renderer.shadowMap.enabled = true
  renderer.setSize(app.clientWidth, app.clientHeight)
  document.querySelector('.app').appendChild(renderer.domElement)


}

function createControls() {
  controls = new OrbitControls(camera, renderer.domElement)
}

function createHelper() {
  const axesHelper = new THREE.AxesHelper(5)
  scene.add(axesHelper)
}

function resizeRender() {
  window.addEventListener('resize', () => {
    renderer.setSize(app.clientWidth, app.clientHeight)
    camera.aspect = app.clientWidth / app.clientHeight
    camera.updateProjectionMatrix()
  })
}

function renderLoop() {
  renderer.render(scene, camera)
  controls.update()
  requestAnimationFrame(renderLoop)
}

function start() {
  init()
  createControls()
  createHelper()
  resizeRender()
  renderLoop()
}

start()
1、项目开始-汽车模型加载
目标
把建模师准备好的汽车模型文件,通过 three.js 提供的 API 加载到网页里显示
封装加载模型函数,并定义汽车类,加载模型到页面上

新建loadManager.js封装专门加载模型的函数,用于加载模型

/**
 * 专门加载模型文件的
 * @param {*} path 模型文件路径
 * @param {*} successFn 接收模型对象的成功函数
 */
import { GLTFLoader } from 'three/addons/loaders/GLTFLoader.js';
export function loadManager(path, successFn) {
  const gltfLoader = new GLTFLoader()
  gltfLoader.load(path, gltf => successFn(gltf.scene), process => {
    // console.log(process)
  }, error => {
    throw new Error(error)
  })
}
function init() {
  scene = new THREE.Scene()
  camera = new THREE.PerspectiveCamera(75, app.clientWidth / app.clientHeight, 0.1, 1000)
  camera.position.set(3, 1.5, 3)
  renderer = new THREE.WebGLRenderer({ antialias: true })
  renderer.shadowMap.enabled = true
  renderer.setSize(app.clientWidth, app.clientHeight)
  app.appendChild(renderer.domElement)

  // 加载汽车模型
  loadManager('glb/Lamborghini.glb', (model) => {
    new Car(model, scene, camera, controls)
    new MyLight(scene)
    new Sky(scene)
  })
}
2.项目-灯光添加
基于 three.js 提供的灯光构造函数,给场景加入灯光,照亮汽车模型
讲解
封装灯光类,并创建场景需要的环境光


灯光类:
this.dirPosList 灯光位置
// 灯光类
import * as THREE from 'three'
export class MyLight {
  constructor(scene) {
    this.scene = scene

    // 平行光的坐标位置
    this.dirPosList = [
      [0, 5, 10],
      [-10, 5, 0],
      [0, 5, -10],
      [10, 5, 0]
    ]
    this.createCarDL()
  }
  // 创建照亮汽车的平行光
  createCarDL() {
    this.dirPosList.forEach(positionArr => {
      const directionalLight = new THREE.DirectionalLight(0xffffff, 0.5)
      directionalLight.position.set(...positionArr)
      this.scene.add(directionalLight)
    })
  }
}
3.项目-汽车皮肤修改
目标
修改汽车类,重新设置汽车皮肤材质
讲解

思想:准备数据结构,通过名字找到并保存小模型对象,做后续处理
用数据结构保存汽车皮肤小模型对象,后续方便使用和修改材质等
this.carModel = {
  'body': {
    'main': { // 车身
      name: 'Object_103',
      model: {} // 小物体对象
    },
    'roof': { // 车顶
      name: 'Object_110',
      model: {}
    },
    'leftDoor': { // 左车门
      name: 'Object_64',
      model: {},
    },
    'rightDoor': { // 右车门
      name: 'Object_77',
      model: {},
    }
  }
}
在 src/model/Car.js 中对汽车模型的几个小物体查找并保存
// 初始化汽车
init() {
	this.scene.add(this.model)

	// 通过数据结构名字 => 小物体对象保存在数据结构中
	Object.values(this.carModel.body).forEach(obj => {
		// 通过名字找到小物体
		obj.model = this.model.getObjectByName(obj.name)
	})

}
4.项目-添加背景
目标
为场景添加一个灰色背景和地面效果
讲解
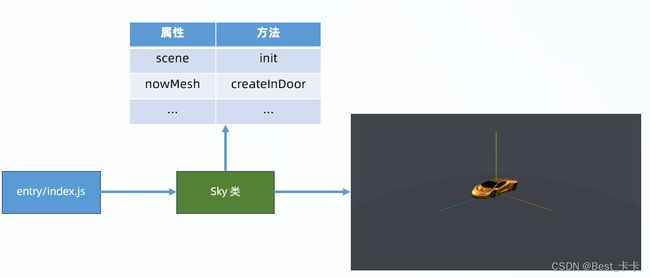
封装背景类,设置场景球体和地板球面

// 天空和地面管理类
import * as THREE from 'three'
export class Sky {
  constructor(scene) {
    this.scene = scene

    this.init()
  }
  // 初始化天空
  init() {
    // 默认-先创建室内展厅的背景环境
    this.createInDoor()
  }
  // 室内
  createInDoor() {
    // 球体
    const sphereGeo = new THREE.SphereGeometry(10, 32, 16)
    const material = new THREE.MeshBasicMaterial({ color: 0x42454c, side: THREE.DoubleSide })
    const sphere = new THREE.Mesh(sphereGeo, material)
    this.scene.add(sphere)
    this.nowMesh.push(sphere)

    // 地面
    const planeGeo = new THREE.CircleGeometry(10, 32)
    const standardMaterial = new THREE.MeshStandardMaterial({ color: 0x42454c, side: THREE.DoubleSide })
    const plane = new THREE.Mesh(planeGeo, standardMaterial)
    plane.rotation.set(- Math.PI / 2, 0, 0)
    plane.receiveShadow = true
    this.scene.add(plane)
    this.nowMesh.push(plane)
  }
}
5.项目-车门热点标记
目标:封装精灵类,生成车门热点标记
注意:目标物体跟着父级物体一起变换,需要添加到父级物体上
思路:1. 准备精灵类 2. 准备数据 3. 遍历数据创建精灵物体 4. 添加到车门上
model/MySprite.js
// 专门产生精灵物体类
import * as THREE from 'three'
export class MySprite {
  constructor({ name, url, position, scale }) {
    const texture = (new THREE.TextureLoader()).load(url)
    const spriteMaterial = new THREE.SpriteMaterial({ map: texture })
    const sprite = new THREE.Sprite(spriteMaterial)
    sprite.position.set(...position)
    sprite.scale.set(...scale)
    sprite.name = name

    // 直接返回精灵物体对象(而非 new 创建的空白对象)
    return sprite
  }
}
model/Car.js
this.carModel = {
    'body': {
        // ...
        'leftDoor': { // 左车门
          name: 'Object_64',
          model: {},
          mark: [
            {
              name: 'sprite',
              url: 'image/sprite.png',
              scale: [0.2, 0.2],
              position: [1.07, 1.94, -0.23] // 参考车门的原点相对位移
            }
          ]
        },
        'rightDoor': { // 右车门
          name: 'Object_77',
          model: {},
          mark: [
            {
              name: 'sprite',
              url: 'image/sprite.png',
              scale: [0.2, 0.2],
              position: [-1.05, 0.78, -0.23]
            }
          ]
        }
    }
}
定义创建精灵物体函数并在 constructor 里调度使用
// 创建车门上精灵物体
  createDoorSprite() {
    // 自定义合成数组(只有创建精灵物体对象)
    const markList = [this.carModel.body.leftDoor, this.carModel.body.rightDoor]
    // 遍历创建精灵物体
    markList.forEach(obj => {
      // 给车门所有热点标记遍历一个个生成附加的物体
      obj.mark.forEach(smallObj => {
        if (smallObj.name === 'sprite') {
          // 为数据对象生成精灵物体,并添加到小物体模型上
          const sprite = new MySprite(smallObj)
          obj.model.add(sprite)


        }
      })
    })
  }
6.项目-车门开关效果
目标:封装单击处理程序类,管理 three.js 光线投射交互
单例模式:保证类的实例化对象只有一个,避免事件重复创建
思路:1. 封装 ClickHandler 类 2. 在 Car 类中注册需要点击交互物体和构造函数
新增 utils/ClickHandler.js 类
// 整个 three.js 项目-单击事件管理类
import * as THREE from 'three'
export class ClickHandler {
  // 单例模式(静态/类方法): 这个类被调用 n 次也只会产生同一个实例对象
  // 类方法只能由类调用,例如:ClickHandler.getInstance()
  static getInstance() {
    if (!this.instance) {
      // 只有运行时:第一次才会进入
      this.instance = new ClickHandler() // 实例化对象
    }

    return this.instance
  }
  init(camera) {
    this.camera = camera
    this.list = [] // 光线投射交互计算的物体
    this.map = new Map() // key 可以是 three.js 物体(与点击要执行的回调函数产生一对一关系)

    // 光线投射
    const rayCaster = new THREE.Raycaster()
    const pointer = new THREE.Vector2()
    const app = document.querySelector('.app')
    window.addEventListener('click', e => {
      pointer.x = (e.clientX / app.clientWidth) * 2 - 1
      pointer.y = -(e.clientY / app.clientHeight) * 2 + 1

      rayCaster.setFromCamera(pointer, this.camera)
      const list = rayCaster.intersectObjects(this.list)

      // 通过交互物体本身,去 map 中找到对应要执行的回调函数调用
      // obj 是射线收集到的数据对象,obj.object 才是 three.js 物体对象
      list.forEach(obj => {
        const fn = this.map.get(obj.object)
        // 回调绑定点击事件函数体,并回传当前触发的这个 three.js 物体
        fn(obj.object)
      })
    })
  }
  // 传入要点击物体和函数体
  addMesh(mesh, fn) {
    this.list.push(mesh)
    this.map.set(mesh, fn)
  }
}
在 main.js 注册
ClickHandler.getInstance().init(camera)
修改 Car.js / createDoorSprite 函数,新增如下代码
// 为精灵物体进行射线交互的绑定
      ClickHandler.getInstance().addMesh(sprite, (clickThreeObj) => {
        // clickThreeObj: 精灵物体
        // clickThreeObj.parent: Object_77 车门物体 (坐标轴原点在世界坐标系中心,旋转车门有问题)
        // clickThreeObj.parent.parent.parent (才是整个车门的最大物体对象,坐标系在车门框点固定住-旋转)
        const targetDoor = clickThreeObj.parent.parent.parent
        if (!targetDoor.userData.isOpen) {
          // 没开门 => 开门
          this.setDoorAnimation(targetDoor, { x: Math.PI / 3 })
          targetDoor.userData.isOpen = true
        } else {
          // 已开门 => 关门
          this.setDoorAnimation(targetDoor, { x: 0 })
          targetDoor.userData.isOpen = false
        }
      })
新增车门动画方法
// 车门动画
  setDoorAnimation(mesh, obj) {
    gsap.to(mesh.rotation, {
      x: obj.x,
      duration: 1,
      ease: 'power1.in'
    })
  }
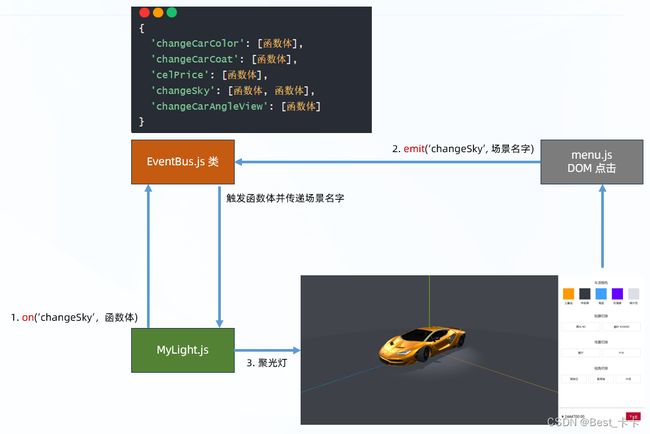
7.项目-事件总线
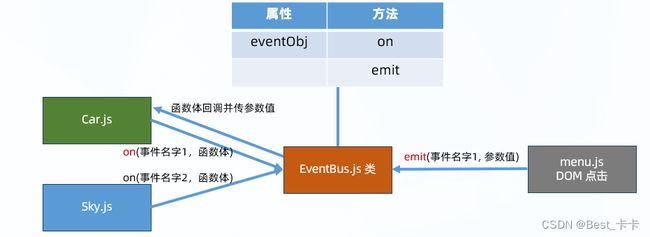
概念:集中式事件处理机制,是订阅与发布模式的一种实现
目标:封装事件总线类,管理跨模块通信
语法:
绑定事件监听: EventBus.getInstance().on(‘事件名字’, 函数体)
触发事件: EventBus.getInstance().emit(‘事件名字’, 参数值)
新增 utils/EventBus.js
// 集中式事件总线类(订阅与发布的自定义事件)
export class EventBus {
  constructor() {
    this.eventObj = {} // 保存事件名和要触发的函数体们
  }
  static getInstance() {
    if (!this.instance) {
      this.instance = new EventBus()
    }
    return this.instance
  }
  // 订阅事件
  on(eventName, fn) {
    if (!this.eventObj[eventName]) {
      // 如果这个事件名字没有注册过,那就先声明此属性(事件名),赋予一个装入回调函数的数组
      this.eventObj[eventName] = []
    }
    this.eventObj[eventName].push(fn)
  }
  // 触发事件并传参
  emit(eventName, ...arg) {
    // arg 此变量是一个数组(值就是按照先后顺序传入的实参)
    this.eventObj[eventName].forEach(fn => {
      fn(...arg) // 展开参数数组,按顺序一个个传递给回调函数
    })
  }
}
8.项目-车颜色修改
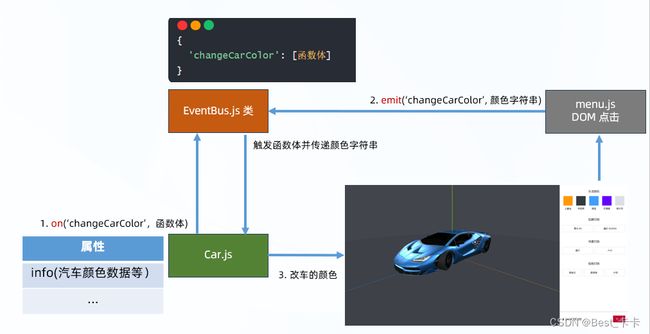
目标:切换汽车的车身颜色

使用:

1.注册 changeCarColor 事件并传入函数体

2.新建 DOM 绑定并触发事件传参

3.实现修改汽车颜色逻辑

4.同步选中颜色到 info 对象
数据结构
// 车数值相关(记录用于发给后台-保存用户要购车相关信息)
    this.info = {
      color: [
        {
          name: '土豪金',
          color: '#ff9900',
          isSelected: true
        },
        {
          name: '传奇黑',
          color: '#343a40',
          isSelected: false
        },
        {
          name: '海蓝',
          color: '#409EFF',
          isSelected: false
        },
        {
          name: '玫瑰紫',
          color: '#6600ff',
          isSelected: false
        },
        {
          name: '银灰色',
          color: '#DCDFE6',
          isSelected: false
        }
      ]
    }
新增 model/Car.js 中 订阅事件等待被修改车颜色
// 订阅汽车修改颜色的事件和函数体
    EventBus.getInstance().on('changeCarColor', (colorStr) => {
      Object.values(this.carModel.body).forEach(obj => {
        obj.model.material.color = new THREE.Color(colorStr)
      })

      // 保存用户选择的车颜色
      this.info.color.forEach(obj => {
        obj.isSelected = false
        if (obj.color === colorStr) {
          obj.isSelected = true
        }
      })
      // console.log(this.info.color)
    })
9.项目-贴膜切换

目标:切换汽车的贴膜类型
使用:
1.注册 changeCarCoat 事件并传入函数体
2.新建 DOM 绑定并触发事件传参
3.实现修改汽车贴膜材质逻辑
4.同步选中贴膜材质到 info 对象
数据结构
// 车数值相关(记录用于发给后台-保存用户要购车相关信息)
    this.info = {
      allPrice: 2444700, // 车整体默认总价
      color: [
        {
          name: '土豪金',
          color: '#ff9900',
          isSelected: true
        },
        {
          name: '传奇黑',
          color: '#343a40',
          isSelected: false
        },
        {
          name: '海蓝',
          color: '#409EFF',
          isSelected: false
        },
        {
          name: '玫瑰紫',
          color: '#6600ff',
          isSelected: false
        },
        {
          name: '银灰色',
          color: '#DCDFE6',
          isSelected: false
        }
      ],
      // 贴膜
      film: [
        {
          name: '高光',
          price: 0,
          isSelected: true
        },
        {
          name: '磨砂',
          price: 20000,
          isSelected: false
        }
      ]
    }
在 model/Car.js 中新增订阅事件
// 订阅汽车贴膜修改的事件和函数体
    EventBus.getInstance().on('changeCarCoat', coatName => {
      if (coatName === '高光') {
        Object.values(this.carModel.body).forEach(obj => {
          obj.model.material.roughness = 0.5
          obj.model.material.metalness = 1
          obj.model.material.clearcoat = 1
        })
      } else if (coatName === '磨砂') {
        Object.values(this.carModel.body).forEach(obj => {
          obj.model.material.roughness = 1
          obj.model.material.metalness = 0.5 // 如果为 0 显得很假
          obj.model.material.clearcoat = 0
        })
      }

      // 保存用户选择的贴膜类型
      Object.values(this.info.film).forEach(obj => {
        obj.isSelected = false
        if (obj.name === coatName) obj.isSelected = true
        // 为后面计算总价做准备
      })
    })
10.项目-价格计算

目标:在用户选择信息后,更新总价

使用:

1.注册 celPrice 事件并传入函数体

2.触发 celPrice 事件

3.统计汽车总价并赋予到页面
在 model/Car.js 订阅事件等待价格计算
// 订阅计算总价事件
EventBus.getInstance().on('celPrice', () => {
  const filmTarget = this.info.film.find(obj => obj.isSelected)

  // 动态总价
  const celPrice = this.info.allPrice + filmTarget.price
  document.querySelector('.price>span').innerHTML = `¥ ${celPrice.toFixed(2)}`
})
11.项目-场景切换
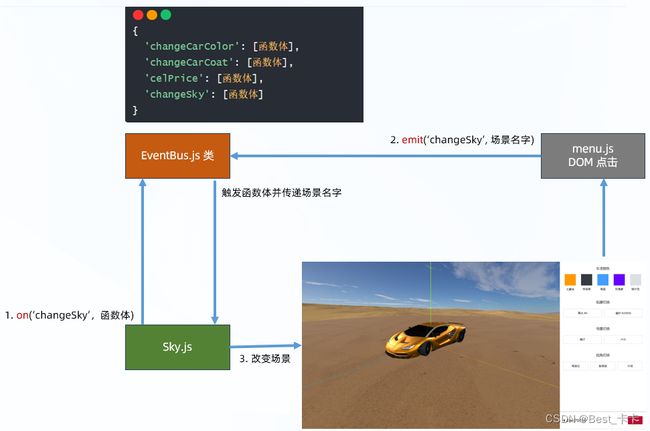
-
在 effect/Sky.js 类,init 方法中订阅天空切换事件
// 订阅切换场景事件 EventBus.getInstance().on('changeSky', skyName => { if (skyName === this.nowSkyName) return // 防止用户反复点击同一个场景创建无用的东西 this.clear() // 清除当前物体 if (skyName === '展厅') { this.createInDoor() this.nowSkyName = '展厅' } else if (skyName === '户外') { this.createOutDoor() this.nowSkyName = '户外' } }) -
新增 2 个属性
this.nowMesh = [] // 当前背景的物体对象列表 this.nowSkyName = '展厅' // 默认当前场景的名字 -
准备创建户外场景函数(注意球体半径大小变化)
// 户外 createOutDoor() { // 让球体大一些 // 球体 const sphereGeo = new THREE.SphereGeometry(40, 32, 16) const sphereTexture = (new THREE.TextureLoader()).load('image/desert.jpg') // 户外 720 度全景图片-得到纹理对象 sphereTexture.colorSpace = THREE.SRGBColorSpace const material = new THREE.MeshBasicMaterial({ map: sphereTexture, side: THREE.DoubleSide }) const sphere = new THREE.Mesh(sphereGeo, material) this.scene.add(sphere) this.nowMesh.push(sphere) // 地面 const planeGeo = new THREE.CircleGeometry(20, 32) const planeTexture = (new THREE.TextureLoader()).load('image/sand.jpg') // 地面纹理对象 const standardMaterial = new THREE.MeshStandardMaterial({ map: planeTexture, color: 0xa0825a, side: THREE.DoubleSide }) // 颜色和颜色贴图可以混合计算 const plane = new THREE.Mesh(planeGeo, standardMaterial) plane.rotation.set(- Math.PI / 2, 0, 0) this.scene.add(plane) this.nowMesh.push(plane) } -
定义 clear 方法,用于清除当下背景
 // 清除球体和地面
  clear() {
    this.nowMesh.forEach(obj => {
      obj.geometry.dispose()
      obj.material.dispose()
      obj.material.map && obj.material.map.dispose() // 纹理对象释放内存

      obj.parent.remove(obj)
    })

    this.nowMesh.splice(0, this.nowMesh.length) // 清空数组
  }
14.项目-视角切换

目标:切换汽车视角
使用:
1.注册 changeCarAngleView 事件
2.新建 DOM 绑定并触发事件传参
3.封装切换摄像机和轨道控制器动画函数
4.使用函数传入位置数据,切换视角
在 model/Car.js 准备每个位置,摄像机位置和轨道控制器观察点坐标数据
// 汽车各种视角坐标对象
    this.positionObj = {
      // 主驾驶
      main: {
        camera: {
          x: 0.36,
          y: 0.96,
          z: -0.16
        },
        controls: {
          x: 0.36,
          y: 0.87,
          z: 0.03
        }
      },
      // 副驾驶位
      copilot: {
        camera: {
          x: -0.39,
          y: 0.87,
          z: 0.07
        },
        controls: {
          x: -0.39,
          y: 0.85,
          z: 0.13
        }
      },
      // 外面观察
      outside: {
        camera: {
          x: 3,
          y: 1.5,
          z: 3
        },
        controls: {
          x: 0,
          y: 0,
          z: 0
        }
      }
    }
在 model/Car.js 添加摄像机和轨道控制器切换动画
 // 摄像机和轨道控制器动画
  setCameraAnimation(dataObj) {
    gsap.to(this.camera.position, {
      ...dataObj.camera,
      duration: 1,
      ease: 'power1.in'
    })
    gsap.to(this.controls.target, {
      ...dataObj.controls,
      duration: 1,
      ease: 'power1.in'
    })
  }
在 model/Car.js 订阅场景切换事件
// 订阅视角切换事件
EventBus.getInstance().on('changeCarAngleView', viewName => {
  this.setCameraAnimation(this.positionObj[viewName])
})
15.项目-玻璃透视效果
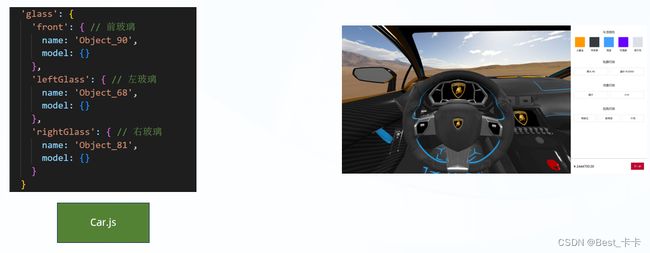
问题1:棚顶默认是单面渲染,需要改成双面渲染
问题2:玻璃默认是双面渲染,需要改成单面渲染
目的:找到小物体对象,并修改物体的材质 side 属性的值
在 model/Car.js 新增数据结构,保存几个关键小物体
// 车小模型对象
    this.carModel = {
      'body': {
        // ...
      },
      'glass': { // 玻璃
        'front': { // 前玻璃
          name: 'Object_90',
          model: {}
        },
        'leftGlass': { // 左玻璃
          name: 'Object_68',
          model: {}
        },
        'rightGlass': { // 右玻璃
          name: 'Object_81',
          model: {}
        }
      }
    }
在 model/Car.js 的 init 方法,找到小物体保存
// 玻璃相关
Object.values(this.carModel.glass).forEach(obj => {
  // 通过名字找到小物体
  obj.model = this.model.getObjectByName(obj.name)
})
在 modifyCarDefault 方法中,修改材质
// 改变玻璃渲染面
Object.values(this.carModel.glass).forEach(obj => {
  obj.model.material.side = THREE.FrontSide // 前面渲染
})
// 车顶部两面渲染
this.carModel.body.roof.model.material.side = THREE.DoubleSide
14.项目-聚光灯阴影效果

目标:使用聚光灯,并产生光斑+阴影效果
使用:
1.创建聚光灯函数
2.调整散射角度和平滑程度
3.根据 4 步让车产生阴影(注意:需设置车模型中每个小物体 castShadow = true)
在 effect/MyLight.js 新增属性
this.nowSpotLight = {} // 聚光灯光源对象
this.nowSceneName = '展厅'
this.createSportL()
新增创建聚光灯方法
// 创建聚光灯
createSportL() {
this.nowSpotLight = new THREE.SpotLight(0xffffff, 1)
// 设置聚光灯光源角度(0 - Math.PI / 2)
this.nowSpotLight.angle = 0.16 * Math.PI
// 光的衰减程度(0 - 1)
this.nowSpotLight.penumbra = 0.8
// 开启阴影支持
this.nowSpotLight.castShadow = true
this.nowSpotLight.shadow.mapSize.set(4096, 4096) // 阴影贴图大小宽高
this.nowSpotLight.position.set(0, 5, 0)
this.scene.add(this.nowSpotLight)
}
15.项目-聚光灯切换
目标:实现聚光灯切换,在室外环境移除
使用:
1.实现删除聚光灯函数
2.订阅 changeSky 事件
3.接收场景名字,用于切换聚光灯
在 effect/MyLight.js 创建删除聚光灯函数
// 删除聚光灯
  removeSportL() {
    this.nowSpotLight.parent.remove(this.nowSpotLight)
    this.nowSpotLight = {}
  }
constructor 中,订阅切换场景事件,同时修改灯光
EventBus.getInstance().on('changeSky', sceneName => {
  if (this.nowSceneName === sceneName) return
  if (sceneName === '展厅') {
    this.createSportL()
  } else if (sceneName === '户外') {
    this.removeSportL()
  }

  this.nowSceneName = sceneName // 把当前点击的场景名字保存一下
})
鸣谢-广告
学程序上黑马,黑马程序员成就IT黑马,感谢黑马讲师的视频课程