Python Matplotlib add_subplot 和 subplots_adjust详解及代码详细说明 配图片说明
Table of Contents
Matplotlib
add_subplot(self, *args, **kwargs)添加子图
说明、参数、返回值
参数
返回值
代码实例
效果图:
subplots_adjust
说明、参数
对比效果图:
在子图坐标轴ax4中画出sin(x)的曲线
完整代码
Matplotlib
Matplotlib是一个Python库,用于通过使用Python脚本创建二维图形和图表。
它有一个名为pyplot的模块,通过提供控制线条样式,字体属性,格式化轴等功能,使得绘图变得容易。
支持各种各样的图形和图形 - 即直方图,条形图,功率谱,误差图等
与NumPy一起使用,为MatLab提供了一个有效的开源替代方案。
也可以用于像PyQt和wxPython这样的图形工具包。
以上介绍选自https://www.yiibai.com/python_data_science/python_matplotlib.html
通常,通过添加以下语句将包导入到Python脚本中
import matplotlib.pyplot as pltadd_subplot(self, *args, **kwargs)添加子图
说明、参数、返回值
Add an Axes to the figure as part of a subplot arrangement.
作为子图布置的一部分,将坐标轴添加到图中。
Call signatures:如何调用:
add_subplot(nrows, ncols, index, **kwargs)
add_subplot(pos, **kwargs)
add_subplot(ax)
方法说明位于:
C:\anaconda3\Lib\site-packages\matplotlib\figure.py模块下figure类方法 add_subplot(self, *args, **kwargs)
参数
Parameters
----------
*args
Either a 3-digit integer or three separate integers
describing the position of the subplot. If the three
integers are *nrows*, *ncols*, and *index* in order, the
subplot will take the *index* position on a grid with *nrows*
rows and *ncols* columns. *index* starts at 1 in the upper left
corner and increases to the right.
*pos* is a three digit integer, where the first digit is the
number of rows, the second the number of columns, and the third
the index of the subplot. i.e. fig.add_subplot(235) is the same as
fig.add_subplot(2, 3, 5). Note that all integers must be less than
10 for this form to work.
笔者翻译:
参数
----------
* ARGS
3位整数或3个单独的整数来描述子图的位置。 如果三个
整数是* nrows *,* ncols *和* index *的顺序,
子图将采用 nrows * ncols 的网格上的* index *位置。
* index *从左上角的1开始,并向右增加。
* pos *是一个三位整数,其中第一个数字是
行数,第二个数字是列数和第三个数字是
子图的索引。 即fig.add_subplot(235)与fig.add_subplot(2,3,5)相同。
请注意,希望这个格式正确工作,所有整数必须小于10。
举个栗子,如果nrows = 3,ncols = 2,那么这个网格(grid)大小为3*2,即总共有6个格子。
Index从左上角的1开始(不是零),依次向右增加。可以参考如下表格:
表格中的数字代表index,以下两句代码是等效的
add_subplot(3, 2, 1) # 推荐此种写法
add_subplot(321)
| (3,2,1) |
(3,2,2) |
| (3,2,3) |
(3,2,4) |
| (3,2,5) |
(3,2,6) |
projection默认为rectilinear(矩形图)
返回值
Returns
-------
axes : an `.axes.SubplotBase` subclass of `~.axes.Axes` (or a subclass of `~.axes.Axes`)
The axes of the subplot. The returned axes base class depends on
the projection used. It is `~.axes.Axes` if rectilinear projection
are used and `.projections.polar.PolarAxes` if polar projection
are used. The returned axes is then a subplot subclass of the
base class.
返回值
-------
axes:`~.axes.Axes`的子类`.axes.SubplotBase`(或`~.axes.Axes`的子类)
子图的坐标轴。 返回的轴基类取决于
使用的投影。 如果是直线投影,它是`~.axes.Axes`;
如果投影为polar则返回`.projections.polar.PolarAxes` 。
然后返回的轴是基类的子图子类。
代码实例
以下代码出自add_subplot的说明,我改了个row的参数,加了点东西,方便大家看效果
#! /usr/bin/env python
# -*- coding: utf-8 -*-

import matplotlib.pyplot as plt

fig=plt.figure('subplot demo')  # 图像标题为'subplot demo',否则默认为'Figure 1'

# 接下来是在一个3行*2列的网格里添加子图
# row = 3, col = 2,该网格可以摆放六张子图index total为6
# fig.add_subplot(221)          # row = 3, col = 2, index = 1
# equivalent but more general【与上面一行等价,但是这种更普遍】
ax1=fig.add_subplot(3, 2, 1)    # row = 3, col = 2, index = 1

# add a subplot with no frame
ax2=fig.add_subplot(322, frameon=False) # row = 3, col = 2, index = 2

# add a polar subplot
fig.add_subplot(323, projection='polar')    # row = 3, col = 2, index = 3

# add a red subplot that share the x-axis with ax1
fig.add_subplot(324, sharex=ax1, facecolor='red')   # row = 3, col = 2, index = 4

# add a polar subplot
fig.add_subplot(325, projection='lambert')    # row = 3, col = 2, index = 5

# add a red subplot, mollweide 即是椭圆ellipse
fig.add_subplot(326, projection='mollweide')   # row = 3, col = 2, index = 6

#delete ax2 from the figure
fig.delaxes(ax2)

#add ax2 to the figure again
fig.add_subplot(ax2)

plt.show()  # 显示图像
效果图:
带括号的紫色文字是我后期加上去的,为了说明各个坐标轴的index位置
更多信息请参考
https://matplotlib.org/api/_as_gen/matplotlib.figure.Figure.html?highlight=add_subplot#matplotlib.figure.Figure.add_subplot
subplots_adjust
说明、参数
Adjusting the spacing of margins and subplots调整边距和子图的间距
subplots_adjust(self, left=None, bottom=None, right=None, top=None,
wspace=None, hspace=None)
Tune the subplot layout.调整子图布局。
The parameter meanings (and suggested defaults) are:参数含义(和建议的默认值)是:
left = 0.125 # the left side of the subplots of the figure图片中子图的左侧
right = 0.9 # the right side of the subplots of the figure图片中子图的右侧
bottom = 0.1 # the bottom of the subplots of the figure图片中子图的底部
top = 0.9 # the top of the subplots of the figure图片中子图的顶部
wspace = 0.2 # the amount of width reserved for space between subplots,
# expressed as a fraction of the average axis width
#为子图之间的空间保留的宽度,平均轴宽的一部分
hspace = 0.2 # the amount of height reserved for space between subplots,
# expressed as a fraction of the average axis height
#为子图之间的空间保留的高度,平均轴高度的一部分
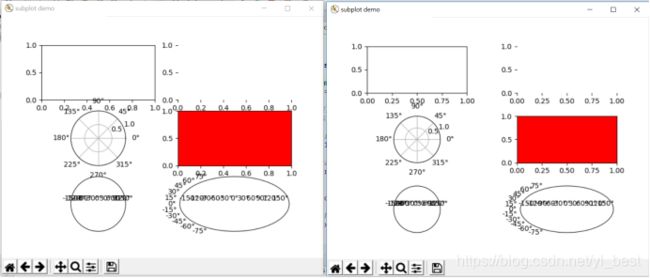
加了这个语句,子图会稍变小,因为空间也占用坐标轴的一部分
fig.subplots_adjust(wspace=0.5,hspace=0.5)
对比效果图:
右图是加加了subplots_adjust的
更多细节及代码实例可参考:
https://matplotlib.org/api/_as_gen/matplotlib.pyplot.subplots_adjust.html
在子图坐标轴ax4中画出sin(x)的曲线
添加以下代码
# add a red subplot that share the x-axis with ax1
ax4 = fig.add_subplot(324, sharex=ax1, facecolor='red')   # row = 3, col = 2, index = 4
# 在坐标轴ax4中添加画曲线图y = sin(x)
# Compute the x and y coordinates for points on a sine curve
x = np.arange(0, 3 * np.pi, 0.1)    # 创建一个一维数组,[0, 3*pi),步长为0.1
y = np.sin(x)
# Plot the points using matplotlib - y = sin(x)
ax4.plot(x, y)
plt.title("sin wave form")  # 为该曲线取名为"sin wave form"
完整代码
效果图如上图
#! /usr/bin/env python
# -*- coding: utf-8 -*-

import matplotlib.pyplot as plt
import numpy as np

fig=plt.figure('subplot demo')  # 图像标题为'subplot demo',否则默认为'Figure 1'
fig.subplots_adjust(wspace=0.5,hspace=0.5)  # 调整边距和子图的间距

# 接下来是在一个3行*2列的网格里添加子图
# row = 3, col = 2,该网格可以摆放六张子图index total为6
# fig.add_subplot(221)          # row = 3, col = 2, index = 1
# equivalent but more general【与上面一行等价,但是这种更普遍】
ax1 = fig.add_subplot(3, 2, 1)    # row = 3, col = 2, index = 1

# add a subplot with no frame
ax2 = fig.add_subplot(322, frameon=False) # row = 3, col = 2, index = 2

# add a polar subplot
ax3 = fig.add_subplot(323, projection='polar')    # row = 3, col = 2, index = 3

# add a red subplot that share the x-axis with ax1
ax4 = fig.add_subplot(324, sharex=ax1, facecolor='red')   # row = 3, col = 2, index = 4
# 在坐标轴ax4中添加画曲线图y = sin(x)
# Compute the x and y coordinates for points on a sine curve
x = np.arange(0, 3 * np.pi, 0.1)    # 创建一个一维数组,[0, 3*pi),步长为0.1
y = np.sin(x)
# Plot the points using matplotlib - y = sin(x)
ax4.plot(x, y)
plt.title("sin wave form")  # 为该曲线取名为"sin wave form"

# add a polar subplot
ax5 = fig.add_subplot(325, projection='lambert')    # row = 3, col = 2, index = 5

# add a red subplot, mollweide 即是椭圆ellipse
ax6 = fig.add_subplot(326, projection='mollweide')   # row = 3, col = 2, index = 6

#delete ax2 from the figure
fig.delaxes(ax2)

#add ax2 to the figure again
fig.add_subplot(ax2)

plt.show()  # 显示图像

