mongodb的安装和使用
文章目录
- 一、mongodb 介绍
-
- 1.1 结构
- 1.2 MongoDB技术优势
- 1.3 MongoDB的应用场景
- 二、安装MongoDB
-
- 2.1windows安装MongoDB
- 2.2 Linux安装MongoDB
- 2.3 拓展
-
- 2.3.1 配置环境变量+配置文件 启动mongodb
- 2.3.2 关闭mongodb
- 三、Mongo shell使用
- 四、mongodb的安全认证
-
- 4.1 创建管理员账号
- 4.2 权限认证方式启动mongodb
- 五、mongodb的文档操作
-
- 5.1 插入文档
-
- 5.1.2 新增单个文档
- 5.1.3 批量(多个)新增文档
- 5.2 查询文档
-
- 5.2.1 条件查询
- 5.2.2 排序&分页
- 5.3 更新文档
-
- 5.3.1 更新单个文档
- 5.3.2 更新多个文档
- 5.3.3 使用upsert命令
- 5.3.4 实现replace语义
- 5.3.5 findAndModify命令
- 5.4 删除文档
-
- 5.4.1 使用 remove 删除文档
- 5.4.2 使用 delete 删除文档
- 5.4.3 返回被删除文档
- 5.5 聚合操作
-
- 5.5.1 单一作用聚合
- 5.5.2 聚合管道
-
- 5.5.2.1 什么是 MongoDB 聚合框架
- 5.5.2.2 管道(Pipeline)和阶段(Stage)
- 5.5.2.3 常用的管道聚合阶段
- 5.5.2.4 数据准备
-
- 举例
- 5.5.2.1 案例
- 5.5.3 MapReduce
- 5.6视图
-
- 5.6.1创建视图
-
- 5.6.1.1 单个集合创建视图
- 5.6.1.2 多个集合创建视图
- 5.6.2 修改视图
- 5.6.3 删除视图
- 5.7 索引
-
- 5.7.1 索引介绍
- 5.7.2 索引操作
-
- 5.7.2.1 创建索引
- 5.7.2.2 查看索引
- 5.7.2.3 删除索引
- 5.7.3 索引类型
-
- 5.7.3.1 单键索引(Single Field Indexes)
- 5.7.3.2 复合索引(Compound Index)
- 5.7.3.3 多键索引(Multikey Index)
- 5.7.3.4 地理空间索引(Geospatial Index)
- 5.7.3.5 全文索引(Text Indexes)
- 5.7.3.6 Hash索引(Hashed Indexes)
- 5.7.3.7 通配符索引(Wildcard Indexes)
- 5.7.4 索引属性
-
- 5.7.4.1 唯一索引(Unique Indexes)
- 5.7.4.2 部分索引(Partial Indexes)
- 5.7.4.3 稀疏索引(Sparse Indexes)
- 5.7.4.4 TTL索引(TTL Indexes)
- 5.7.4.5 隐藏索引(Hidden Indexes)
- 5.7.5 索引使用建议
- 六、springboot整合MongoDB
-
- 6.1 集合操作
- 6.2文档操作
-
- 6.2.1 添加文档
- 6.2.2 查询文档
- 6.2.3 更新文档
- 6.2.4 删除文档
- 6.3 聚合操作
-
- 6.3.1示例:以聚合管道示例2为例
- 七、 explain执行计划详解
一、mongodb 介绍
- mongodb是一个文档数据库(以json为数据模型),是一个介于关系型和非关系型数据库之间的产品,是非关系型数据库当中功能最丰富的。
- 它支持的数据结构非常松散,数据格式是BSON(类似于json的二进制形式的存储格式),和json一样支持内嵌的文档对象和数组对象,因此可以存储比较复杂的数据类型
- Mongodb最大的特点是支持的语言非常强大,基本支持所有的关系型数据库单表查询的大部分功能,而且支持数据建立索引。
- 原则上oracle和mysql能做的事情,mongdb都能做(包括ACID事务)
1.1 结构
| SQL概念 | Mongodb概念 |
|---|---|
| 数据库database | 数据库database |
| 表table | 集合collection |
| 行 row | 文档document |
| 列 column | 字段 field |
| 索引 index | 索引index |
| 主键 primarykey | _id 字段 |
| 视图 view | 视图 view |
| 表连接 table joins | 聚合操作 $lookop |
1.2 MongoDB技术优势
- mongodb基于灵活的json文档模型,适用于敏捷快速开发;
- 与生俱来的高可用(备份,容灾)、高水平扩展能力(命令执行)方便能处理高并发和大数据量;
- 可以把关系型数据库中多张表的数据放入在一个集合中,方便数据库的设计
1.3 MongoDB的应用场景

那如何选择是否使用MongoDB呢?
下面的只要满足一条就可以考虑使用了。

二、安装MongoDB
centos7 + MongoDB社区版本
下载位置:https://www.mongodb.com/try/download/community
自学的话,还是使用windows版本的,方便点!
2.1windows安装MongoDB
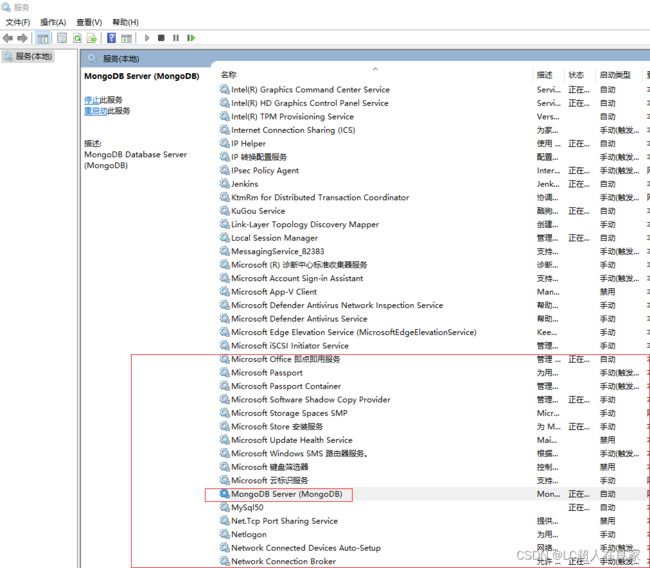
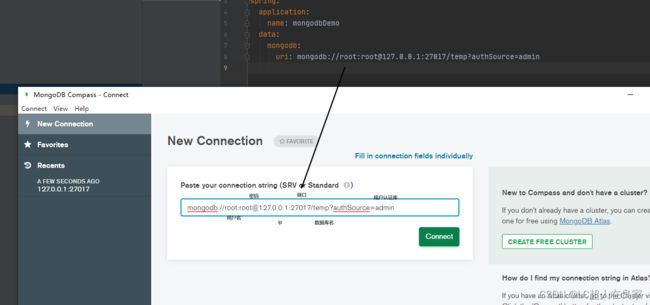
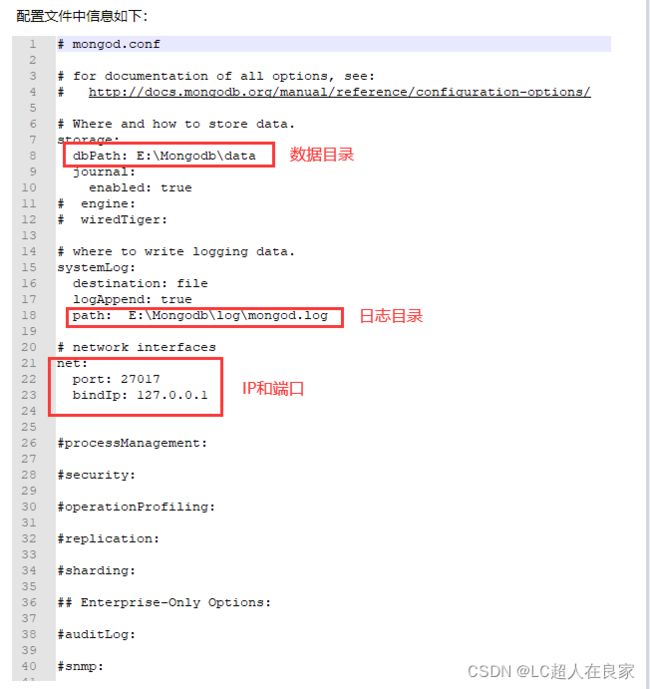
如果按照上面流程所有步骤都成功了,说明mongodb已经启动成功了,那么这一步就非必须操作项,如果需要修改mongodb的IP端口、数据目录、日志目录等信息,可以继续往下看。
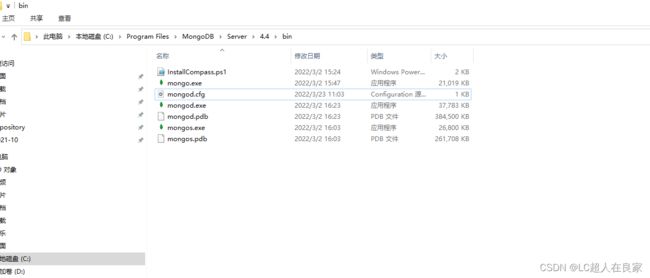
mongodb默认安装目录:C:\Program Files\MongoDB\Server\5.0\bin,可以从服务中查看到,配置文件为:mongod.cfg。

至此,windows下安装启动mongodb就完成了!
2.2 Linux安装MongoDB
1.解压:tar -zxvf mongodb-linux-x86_64-rhel70-4.4.13.tgz
可以吧文件夹名字改成mongodb,简化名称
2.创建数据存储目录dbpath和日志存储目录logpath
# 创建数据存储目录dbpath和日志存储目录logpath
mkdir -p /mongodb/data  /mongodb/log

# 进入mongodb目录,启动mongodb服务
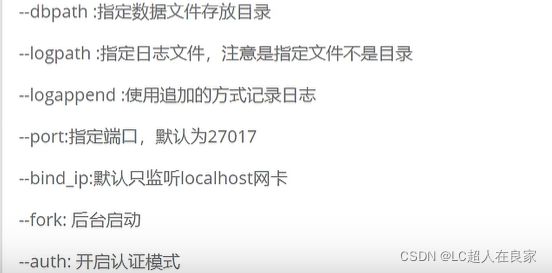
bin/mongod --port=27017 --dbpath=/mongodb/data --logpath=/mongodb/log/mongodb.log \ --bind_ip=0.0.0.0 --fork
注意:如果进入mongodb文件夹,那就不需要-p 来创建多级目录

此时可能报错:libcrypto.so.10: cannot open shared object file: No such file or directory

输入命令查看缺少什么数据源
# 路径是自己的mongodb安装路径
ldd /usr/local/mongodb/bin/mongod
此时可以手动安装这两个
yum install libcrypto.so.10
yum install libssl.so.10
但是此时报下面的错误:
CentOS Linux 8 - AppStream 错误:为仓库 ‘appstream‘ 下载元数据失败 : Cannot prepare internal mirrorlist: No URLs
可以查看这一篇博客https://blog.csdn.net/wykqh/article/details/123004620
- 进入mongodb数据库
bin/mogo
- 关闭mongodb
方式一:
mongod --port=27017 --dbpath=/mongodb/data --shutdown
方式二:
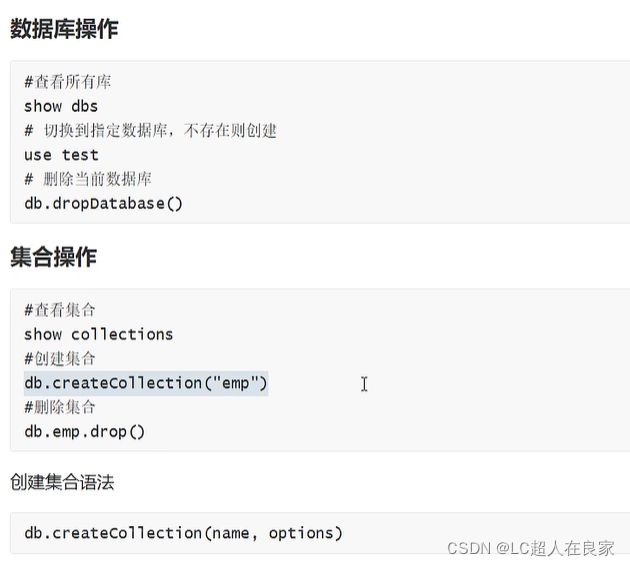
进入mongo shell(sql命令栏)
先切库到admin,在关闭
use admin
db.shutdownServer()
exit
2.3 拓展
2.3.1 配置环境变量+配置文件 启动mongodb
1.添加环境变量
修改etc/profile,添加环境变量,方便执行mongodb命令
export MONGODB_HOME=/usr/local/mongodb
PATH=$PATH:$MONGODB_HOME/bin
export MONGODB_HOME 填写mongodb的安装路径
2.编辑/mongodb/conf/mongo.conf文件,内容如下(yaml格式):
vim /mongodb/conf/mongo.conf

i+复制下面的内容
esc ctrl+shift+; 输入wq
保存退出
( /mongodb/conf/mongo.conf知道是mongodb的配置文件路径)
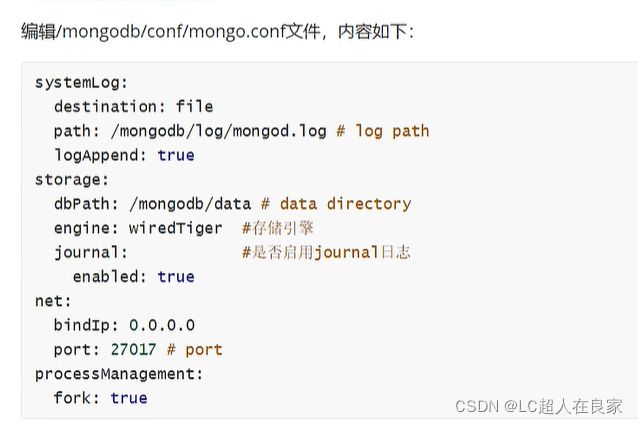
启动mongod
mongod -f /mongodb/conf/mongo.conf
2.3.2 关闭mongodb
按照上面的方法配置了配置文件的话,此时就可以用下面命令操作关闭( /mongodb/conf/mongo.conf知道是mongodb的配置文件路径)
mongod -f /mongodb/conf/mongo.conf --shutdown
三、Mongo shell使用
mongo是mongodb的交互式javascript shell界面,它为系统管理员提供了强大的界面,并为开发人员能提供了直接测试数据库查询和操作的方法。
linux上面的连接数据库命令
mongo --port=27017
指定端口是27017,host连接的主机地址默认是127.0.0.1

windows上面打开shell界面
双击点mongo.exe
注意:mongo.exe 是用来启动MongoDB客户端。
四、mongodb的安全认证
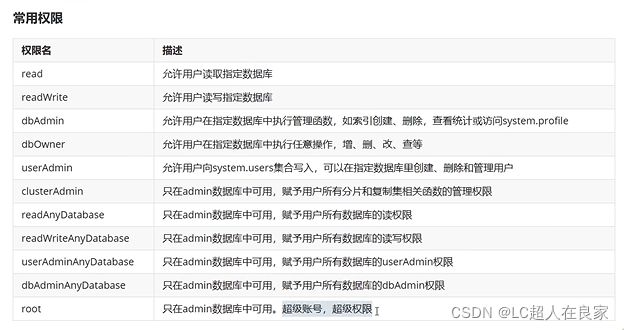
4.1 创建管理员账号
#设置管理员用户名密码需要 切换到admin库
use admin
#创建管理员
db.createUser({user:"root",pwd:"root",roles:["root"]})
#查看所有用户信息
show users
#删除用户
db.dropUser("root")
查看一下结果:
先启动mongodb

创建用户

可以看出来成功了,但是有一个问题,此时是可以直接输入mongo进去到shell页面的,如何解决了,那就是让mongodb按照权限认证的方式启动
4.2 权限认证方式启动mongodb
输入下面命令( /mongodb/conf/mongo.conf知道是mongodb的配置文件路径)
mongod -f /mongodb/conf/mongo.conf --auth
必须按照下面的方式登录
mongo -ufox -pfox --authenticationDatabase=admin
authenticationDatabase后面跟的是想要连接的数据库名

五、mongodb的文档操作
5.1 插入文档
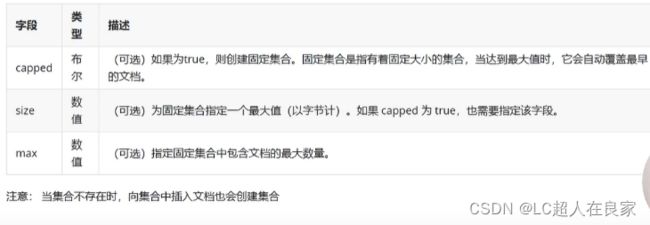
3.2版本之后新增了db.collection.insertOne()和db.collection.insertMany()。
5.1.2 新增单个文档
- insertOne:支持writeConcern(与事务有关)
db.collection.insertOne(
	,
	{
		writeConcern:
	}

)
writeConcern决定一个写操作落到多少个节点上才算成功,writeConcern的取值包括:
0:发起写操作,不关心是否成功
1:集群最大数据节点数,写操作需要被复制到指定节点数才算成功
majority:写操作需要被复制到大多数节点上才算成功
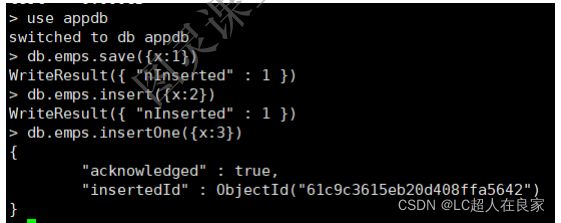
- insert:若插入的数据主键已经存在,则会跑DuplicateKeyException异常,提示主键重复,不保存当前数据
- save:如果_id主键存在则更新数据,如果不存在才插入数据(不建议使用了)
5.1.3 批量(多个)新增文档
- insertMany:向指定集合中插入多条文档数据
db.collection.insertMany(
	[ <document 1> , <document 2>, ... ],
	{
		writeConcern: <document>,
		ordered: <boolean>
	}
)
writeConcern:写入策略,默认为1,既既要求确认写操作; 0 是不要求;
ordered:指定是否按顺序写入,默认true,按顺序写入;
- insert和save也可以实现批量插入
5.2 查询文档
find查询集合中的若干文档,语法格式如下:
db.collection.find(query, projection)
- query:可选,使用查询操作符指定查询条件
- projection: 可选,使用投影操作符指定返回的键。查询时返回文档中所有的键值,只需省略该参数即可(默认省略)。投影时,id为1的时候,其他字段必须是1;id是0的时候,其他字段可以是0;如果没有_id字段约束,多个其他字段必须同为0或同为1.
如果查询返回的条目数量较多,mongo shell则会自动实现分批显示。默认情况下每次只显示20条,可
以输入it命令读取下一批。
- findOne查询集合中的第一个文档
语法格式如下:db.集合名.findOne(query, projection)
5.2.1 条件查询
- 指定条件查询
#查询带有nosql标签的book文档:
db.books.find({tag:"nosql"})
#按照id查询单个book文档:
db.books.find({_id:ObjectId("61caa09ee0782536660494d9")})
#查询分类为“travel”、收藏数超过60个的book文档:
db.books.find({type:"travel",favCount:{$gt:60}})
-
查询条件对照表
|SQL |MQL |
|–|--|
|a=1 |{a: 1} |
|a<>1 |{a: {KaTeX parse error: Expected 'EOF', got '}' at position 6: ne: 1}̲} | |a>1 | {a…gt: 1}} |
|a>=1 |{a: {KaTeX parse error: Expected 'EOF', got '}' at position 7: gte: 1}̲} | |a<1 | {a…lt: 1}} |
|a<=1 |{a: {$lte: 1}} | -
查询逻辑对照表
|SQL |MQL |
|–|--|
| a = 1 AND b = 1 | {a: 1, b: 1}或{KaTeX parse error: Expected 'EOF', got '}' at position 22: …{a: 1}, {b: 1}]}̲ | | a = 1 OR b…or: [{a: 1}, {b: 1}]} |
| a IS NULL | {a: {KaTeX parse error: Expected 'EOF', got '}' at position 14: exists: false}̲} | | a IN (1, …in: [1, 2, 3]}} | -
查询逻辑运算符
- $lt: 存在并小于
- $lte: 存在并小于等于
- $gt: 存在并大于
- $gte: 存在并大于等于
- $ne: 不存在或存在但不等于
- $in: 存在并在指定数组中
- $nin: 不存在或不在指定数组中
- $or: 匹配两个或多个条件中的一个
- $and: 匹配全部条件
5.2.2 排序&分页
- 指定排序
在 MongoDB 中使用 sort() 方法对数据进行排序
#指定按收藏数(favCount)降序返回
db.books.find({type:"travel"}).sort({favCount:-1})
- 分页查询
skip用于指定跳过记录数,limit则用于限定返回结果数量。可以在执行find命令的同时指定skip、limit
参数,以此实现分页的功能。比如,假定每页大小为8条,查询第3页的book文档:
db.books.find().skip(8).limit(4)
- 正则表达式匹配查询
MongoDB 使用 $regex 操作符来设置匹配字符串的正则表达式。
//使用正则表达式查找type包含 so 字符串的book
db.books.find({type:{$regex:"so"}})
//或者
db.books.find({type:/so/})
5.3 更新文档
可以用update命令对指定的数据进行更新,命令的格式如下:
db.collection.update(query,update,options)
query:描述更新的查询条件;
update:描述更新的动作及新的内容;
options:描述更新的选项
- upsert: 可选,如果不存在update的记录,是否插入新的记录。默认false,不插入
- multi: 可选,是否按条件查询出的多条记录全部更新。 默认false,只更新找到的第一条记录
- writeConcern :可选,决定一个写操作落到多少个节点上才算成功。
更新操作符:
5.3.1 更新单个文档
某个book文档被收藏了,则需要将该文档的favCount字段自增
db.books.update({_id:ObjectId("61caa09ee0782536660494d9")},{$inc:{favCount:1}})
5.3.2 更新多个文档
默认情况下,update命令只在更新第一个文档之后返回,如果需要更新多个文档,则可以使用multi选
项。
将分类为“novel”的文档的增加发布时间(publishedDate)
db.books.update({type:"novel"},{$set:{publishedDate:new Date()}},{"multi":true})
multi : 可选,mongodb 默认是false,只更新找到的第一条记录,如果这个参数为true,就把按条件
查出来多条记录全部更新
update命令的选项配置较多,为了简化使用还可以使用一些快捷命令:
- updateOne:更新单个文档。
- updateMany:更新多个文档。
- replaceOne:替换单个文档。
5.3.3 使用upsert命令
upsert是一种特殊的更新,其表现为如果目标文档不存在,则执行插入命令。
db.books.update(
	{title:"my book"},
	{$set:{tags:["nosql","mongodb"],type:"none",author:"fox"}},
	{upsert:true}
)
nMatched、nModified都为0,表示没有文档被匹配及更新,nUpserted=1提示执行了upsert动作

5.3.4 实现replace语义
update命令中的更新描述(update)通常由操作符描述,如果更新描述中不包含任何操作符,那么
MongoDB会实现文档的replace语义
db.books.update(
	{title:"my book"},
	{justTitle:"my first book"}
)
5.3.5 findAndModify命令
findAndModify兼容了查询和修改指定文档的功能,findAndModify只能更新单个文档
//将某个book文档的收藏数(favCount)加1
db.books.findAndModify({
	query:{_id:ObjectId("61caa09ee0782536660494dd")},
	update:{$inc:{favCount:1}}
})
该操作会返回符合查询条件的文档数据,并完成对文档的修改。
默认情况下,findAndModify会返回修改前的“旧”数据。如果希望返回修改后的数据,则可以指定new选
项
db.books.findAndModify({
	query:{_id:ObjectId("61caa09ee0782536660494dd")},
	update:{$inc:{favCount:1}},
	new: true
})
与findAndModify语义相近的命令如下:
- findOneAndUpdate:更新单个文档并返回更新前(或更新后)的文档。
- findOneAndReplace:替换单个文档并返回替换前(或替换后)的文档。
5.4 删除文档
5.4.1 使用 remove 删除文档
- remove 命令需要配合查询条件使用;
- 匹配查询条件的文档会被删除;
- 指定一个空文档条件会删除所有文档;
db.user.remove({age:28})// 删除age 等于28的记录
db.user.remove({age:{$lt:25}}) // 删除age 小于25的记录
db.user.remove( { } ) // 删除所有记录
db.user.remove() //报错
remove命令会删除匹配条件的全部文档,如果希望明确限定只删除一个文档,则需要指定justOne参
数,命令格式如下:
db.collection.remove(query,justOne)
例如:删除满足type:novel条件的首条记录
db.books.remove({type:"novel"},true)
5.4.2 使用 delete 删除文档
官方推荐使用 deleteOne() 和 deleteMany() 方法删除文档,语法格式如下:
db.books.deleteMany ({}) //删除集合下全部文档
db.books.deleteMany ({ type:"novel" }) //删除 type等于 novel 的全部文档
db.books.deleteOne ({ type:"novel" }) //删除 type等于novel 的一个文档
注意: remove、deleteMany等命令需要对查询范围内的文档逐个删除,如果希望删除整个集合,则使
用drop命令会更加高效
5.4.3 返回被删除文档
remove、deleteOne等命令在删除文档后只会返回确认性的信息,如果希望获得被删除的文档,则可以
使用findOneAndDelete命令
b.books.findOneAndDelete({type:"novel"})
除了在结果中返回删除文档,findOneAndDelete命令还允许定义“删除的顺序”,即按照指定顺序删除找
到的第一个文档
db.books.findOneAndDelete({type:"novel"},{sort:{favCount:1}})
remove、deleteOne等命令只能按默认顺序删除,利用这个特性,findOneAndDelete可以实现队列的
先进先出。
5.5 聚合操作
聚合操作处理数据记录并返回计算结果(诸如统计平均值,求和等)。聚合操作组值来自多个文档,可以对分组数据执行各种操作以返回单个结果。聚合操作包含三类:单一作用聚合、聚合管道、MapReduce。
- 单一作用聚合:提供了对常见聚合过程的简单访问,操作都从单个集合聚合文档。
- 聚合管道:是一个数据聚合的框架,模型基于数据处理流水线的概念。文档进入多级管道,将文档转换为聚合结果。
- MapReduce操作具有两个阶段:处理每个文档并向每个输入文档发射一个或多个对象的map阶
段,以及reduce组合map操作的输出阶段。
5.5.1 单一作用聚合
MongoDB提供 db.collection.estimatedDocumentCount(), db.collection.count(),
db.collection.distinct() 这类单一作用的聚合函数。 所有这些操作都聚合来自单个集合的文档。虽然这
些操作提供了对公共聚合过程的简单访问,但它们缺乏聚合管道和map-Reduce的灵活性和功能。
#检索books集合中所有文档的计数
db.books.estimatedDocumentCount()
#计算与查询匹配的所有文档
db.books.count({favCount:{$gt:50}})
#返回不同type的数组
db.books.distinct("type")
#返回收藏数大于90的文档不同type的数组
db.books.distinct("type",{favCount:{$gt:90}})
注意:在分片群集上,如果存在孤立文档或正在进行块迁移,则db.collection.count()没有查询谓词可能导致计数不准确。要避免这些情况,请在分片群集上使用 db.collection.aggregate()方法。
5.5.2 聚合管道
5.5.2.1 什么是 MongoDB 聚合框架
MongoDB 聚合框架(Aggregation Framework)是一个计算框架,它可以:
- 作用在一个或几个集合上;
- 对集合中的数据进行的一系列运算;
- 将这些数据转化为期望的形式;
从效果而言,聚合框架相当于 SQL 查询中的GROUP BY、 LEFT OUTER JOIN 、 AS等。
5.5.2.2 管道(Pipeline)和阶段(Stage)
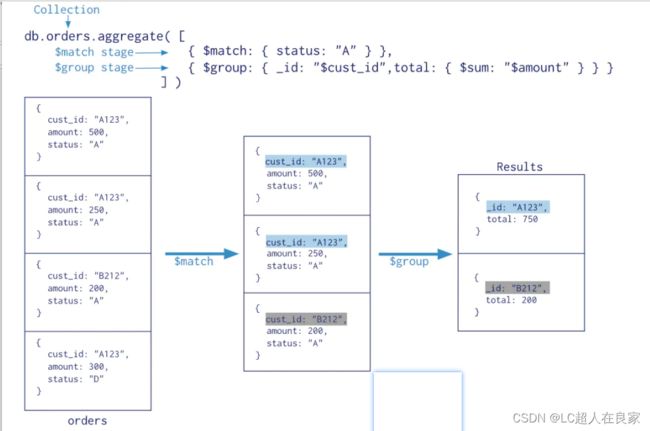
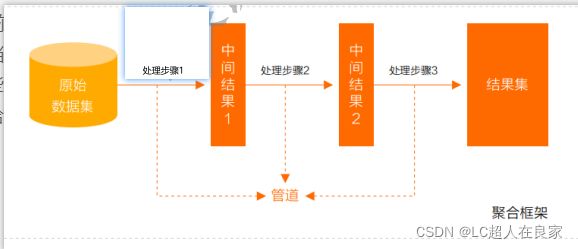
整个聚合运算过程称为管道(Pipeline),它是由多个阶段(Stage)组成的, 每个管道:
- 接受一系列文档(原始数据);
- 每个阶段对这些文档进行一系列运算;
- 结果文档输出给下一个阶段;
聚合管道操作语法
pipeline = [$stage1, $stage2, ...$stageN];
db.collection.aggregate(pipeline, {options})
- pipelines 一组数据聚合阶段。除 o u t 、 out、 out、Merge和$geonear阶段之外,每个阶段都可以在管道中
出现多次。 - options 可选,聚合操作的其他参数。包含:查询计划、是否使用临时文件、 游标、最大操作时
间、读写策略、强制索引等等
5.5.2.3 常用的管道聚合阶段
聚合管道包含非常丰富的聚合阶段,下面是最常用的聚合阶段
| 阶段 | 描述 | SQL等价运算符 |
|---|---|---|
| $match | 筛选条件 | WHERE |
| $project | 投影 | AS |
| $lookup | 左外连接 | LEFT OUTER JOIN |
| $sort | 排序 | ORDER BY |
| $group | 分组 | GROUP BY |
| s k i p / skip/ skip/limit | 分页 | |
| $unwind | 展开数组 | |
| $graphLookup | 图搜索 | |
| f a c e t / facet/ facet/bucket | 分面搜索 |
文档:https://docs.mongodb.com/manual/reference/operator/aggregation-pipeline/
5.5.2.4 数据准备
准备数据集,执行脚本
var tags = ["nosql","mongodb","document","developer","popular"];
var types = ["technology","sociality","travel","novel","literature"];
var books=[];

for(var i=0;i<50;i++){
	var typeIdx = Math.floor(Math.random()*types.length);
	var tagIdx = Math.floor(Math.random()*tags.length);
	var tagIdx2 = Math.floor(Math.random()*tags.length);
	var favCount = Math.floor(Math.random()*100);
	var username = "xx00"+Math.floor(Math.random()*10);
	var age = 20 + Math.floor(Math.random()*15);
	var book = {
		title: "book-"+i,
		type: types[typeIdx],
		tag: [tags[tagIdx],tags[tagIdx2]],
		favCount: favCount,
		author: {name:username,age:age}
	};
	books.push(book)
}


db.books.insertMany(books);
- $project
投影操作, 将原始字段投影成指定名称, 如将集合中的 title 投影成 name
db.books.aggregate([{$project:{name:"$title"}}])
$project 可以灵活控制输出文档的格式,也可以剔除不需要的字段
db.books.aggregate([{$project:{name:"$title",_id:0,type:1,author:1}}])
从嵌套文档中排除字段
db.books.aggregate([
{$project:{name:"$title",_id:0,type:1,"author.name":1}}
])
或者
db.books.aggregate([
{$project:{name:"$title",_id:0,type:1,author:{name:1}}}
])
- $match
m a t c h 用 于 对 文 档 进 行 筛 选 , 之 后 可 以 在 得 到 的 文 档 子 集 上 做 聚 合 , match用于对文档进行筛选,之后可以在得到的文档子集上做聚合, match用于对文档进行筛选,之后可以在得到的文档子集上做聚合,match可以使用除了地理空间之外的所有常规查询操作符,在实际应用中尽可能将 m a t c h 放 在 管 道 的 前 面 位 置 。 这 样 有 两 个 好 处 : 一 是 可 以 快 速 将 不 需 要 的 文 档 过 滤 掉 , 以 减 少 管 道 的 工 作 量 ; 二 是 如 果 再 投 射 和 分 组 之 前 执 行 match放在管道的前面位置。这样有两个好处:一是可以快速将不需要的文档过滤掉,以减少管道的工作量;二是如果再投射和分组之前执行 match放在管道的前面位置。这样有两个好处:一是可以快速将不需要的文档过滤掉,以减少管道的工作量;二是如果再投射和分组之前执行match,查询可以使用索引。
db.books.aggregate([{$match:{type:"technology"}}])
筛选管道操作和其他管道操作配合时候时,尽量放到开始阶段,这样可以减少后续管道操作符要操作的文档数,提升效率
- $count
计数并返回与查询匹配的结果数
db.books.aggregate([ {$match:{type:"technology"}}, {$count: "type_count"}
])
$match阶段筛选出type匹配technology的文档,并传到下一阶段;
$count阶段返回聚合管道中剩余文档的计数,并将该值分配给type_count
- g r o u p 按 指 定 的 表 达 式 对 文 档 进 行 分 组 , 并 将 每 个 不 同 分 组 的 文 档 输 出 到 下 一 个 阶 段 。 输 出 文 档 包 含 一 个 i d 字 段 , 该 字 段 按 键 包 含 不 同 的 组 。 输 出 文 档 还 可 以 包 含 计 算 字 段 , 该 字 段 保 存 由 group 按指定的表达式对文档进行分组,并将每个不同分组的文档输出到下一个阶段。输出文档包含一个_id字段,该字段按键包含不同的组。输出文档还可以包含计算字段,该字段保存由 group按指定的表达式对文档进行分组,并将每个不同分组的文档输出到下一个阶段。输出文档包含一个id字段,该字段按键包含不同的组。输出文档还可以包含计算字段,该字段保存由group的_id字段分组的一些accumulator表达式的值。$group不会输出具体的文档而只是统计信息。
{ $group: { _id: , : {  :  }, ...
} }
-
id字段是必填的;但是,可以指定id值为null来为整个输入文档计算累计值。
-
剩余的计算字段是可选的,并使用运算符进行计算。
-
_id和表达式可以接受任何有效的表达式。
-
accumulator操作符

g r o u p 阶 段 的 内 存 限 制 为 100 M 。 默 认 情 况 下 , 如 果 s t a g e 超 过 此 限 制 , group阶段的内存限制为100M。默认情况下,如果stage超过此限制, group阶段的内存限制为100M。默认情况下,如果stage超过此限制,group将产生错误。但是,要
允许处理大型数据集,请将allowDiskUse选项设置为true以启用$group操作以写入临时文件。
举例
- book的数量,收藏总数和平均值
db.books.aggregate([
{$group:{_id:null,count:{$sum:1},pop:{$sum:"$favCount"},avg:
{$avg:"$favCount"}}}
]
- 统计每个作者的book收藏总数
db.books.aggregate([
{$group:{_id:"$author.name",pop:{$sum:"$favCount"}}}
])
- 统计每个作者的每本book的收藏数
db.books.aggregate([
{$group:{_id:{name:"$author.name",title:"$title"},pop:{$sum:"$favCount"}}}
])
- 每个作者的book的type合集
db.books.aggregate([
{$group:{_id:"$author.name",types:{$addToSet:"$type"}}}
])
- $unwind
可以将数组拆分为单独的文档
v3.2+支持如下语法:
{
	$unwind:
		{
			#要指定字段路径,在字段名称前加上$符并用引号括起来。
			path: ,
			#可选,一个新字段的名称用于存放元素的数组索引。该名称不能以$开头。
			includeArrayIndex: ,
			#可选,default :false,若为true,如果路径为空,缺少或为空数组,则$unwind输出文档
			preserveNullAndEmptyArrays:
} }
姓名为xx006的作者的book的tag数组拆分为多个文档
db.books.aggregate([
	{$match:{"author.name":"xx006"}},
	{$unwind:"$tag"}
])
每个作者的book的tag合集
db.books.aggregate([
	{$unwind:"$tag"},
	{$group:{_id:"$author.name",types:{$addToSet:"$tag"}}}
])
案例
示例数据
db.books.insert([
{
	"title" : "book-51",
	"type" : "technology",
	"favCount" : 11,
	"tag":[],
	"author" : {
	"name" : "fox",
	"age" : 28
}
},{
	"title" : "book-52",
	"type" : "technology",
	"favCount" : 15,
	"author" : {
	"name" : "fox",
	"age" : 28
}
},{
	"title" : "book-53",
	"type" : "technology",
	"tag" : [
	"nosql",
	"document"
],
	"favCount" : 20,
	"author" : {
	"name" : "fox",
	"age" : 28
}
}])
测试
# 使用includeArrayIndex选项来输出数组元素的数组索引
db.books.aggregate([
		{$match:{"author.name":"fox"}},
		{$unwind:{path:"$tag", includeArrayIndex: "arrayIndex"}}
	])
# 使用preserveNullAndEmptyArrays选项在输出中包含缺少size字段,null或空数组的文档
db.books.aggregate([
	{$match:{"author.name":"fox"}},
	{$unwind:{path:"$tag", preserveNullAndEmptyArrays: true}}
])
- $limit
限制传递到管道中下一阶段的文档数
db.books.aggregate([
	{$limit : 5 }
])
此操作仅返回管道传递给它的前5个文档。 l i m i t 对 其 传 递 的 文 档 内 容 没 有 影 响 。 注 意 : 当 limit对其传递的文档内容没有影响。 注意:当 limit对其传递的文档内容没有影响。注意:当sort在管道中的 l i m i t 之 前 立 即 出 现 时 , limit之前立即出现时, limit之前立即出现时,sort操作只会在过程中维持前n个结果,其中n是指
定的限制,而MongoDB只需要将n个项存储在内存中。
- $skip
跳过进入stage的指定数量的文档,并将其余文档传递到管道中的下一个阶段
db.books.aggregate([
   {$skip : 5 }
])
此操作将跳过管道传递给它的前5个文档。 $skip对沿着管道传递的文档的内容没有影响。
- $sort
对所有输入文档进行排序,并按排序顺序将它们返回到管道。
语法:{ $sort: { : , : … } }
要对字段进行排序,请将排序顺序设置为1或-1,以分别指定升序或降序排序,如下例所示:
db.books.aggregate([
	{$sort : {favCount:-1,title:1}}
])
- l o o k u p M o n g o d b 3.2 版 本 新 增 , 主 要 用 来 实 现 多 表 关 联 查 询 , 相 当 关 系 型 数 据 库 中 多 表 关 联 查 询 。 每 个 输 入 待 处 理 的 文 档 , 经 过 lookup Mongodb 3.2版本新增,主要用来实现多表关联查询, 相当关系型数据库中多表关联查询。每个输入 待处理的文档,经过 lookupMongodb3.2版本新增,主要用来实现多表关联查询,相当关系型数据库中多表关联查询。每个输入待处理的文档,经过lookup 阶段的处理,输出的新文档中会包含一个新生成的数组(可根据需要命名
新key )。数组列存放的数据是来自被Join集合的适配文档,如果没有,集合为空(即 为[ ])
语法:
db.collection.aggregate([{
$lookup: {
from: "",
localField: "",
foreignField: "",
as: " 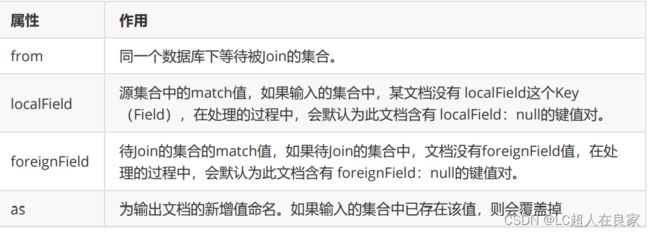
注意:null = null 此为真
其语法功能类似于下面的伪SQL语句:
SELECT *, 5.5.2.1 案例
聚合操作示例1:
- 统计每个分类的book文档数量
db.books.aggregate([
	{$group:{_id:"$type",total:{$sum:1}}},
	{$sort:{total:-1}}
])
标签的热度排行,标签的热度则按其关联book文档的收藏数(favCount)来计算
db.books.aggregate([
	{$match:{favCount:{$gt:0}}},
	{$unwind:"$tag"},
	{$group:{_id:"$tag",total:{$sum:"$favCount"}}},
	{$sort:{total:-1}}
])
- $match阶段:用于过滤favCount=0的文档。
- $unwind阶段:用于将标签数组进行展开,这样一个包含3个标签的文档会被拆解为3个条目。
- g r o u p 阶 段 : 对 拆 解 后 的 文 档 进 行 分 组 计 算 , group阶段:对拆解后的文档进行分组计算, group阶段:对拆解后的文档进行分组计算,sum:"$favCount"表示按favCount字段进行累
加。 - $sort阶段:接收分组计算的输出,按total得分进行排序。
- 统计book文档收藏数[0,10),[10,60),[60,80),[80,100),[100,+∞)
https://docs.mongodb.com/manual/reference/operator/aggregation/bucket/
db.books.aggregate([{
	$bucket:{
		groupBy:"$favCount",
		boundaries:[0,10,60,80,100],
		default:"other",
		output:{"count":{$sum:1}}
	}
}])
聚合操作示例2
导入邮政编码数据集 :https://media.mongodb.org/zips.json
使用mongoimport工具导入数据(https://www.mongodb.com/try/download/database-tools)
mongoimport -h 192.168.65.204 -d aggdemo -u fox -p fox --
authenticationDatabase=admin -c zips --file
D:\ProgramData\mongodb\import\zips.json
h,–host :代表远程连接的数据库地址,默认连接本地Mongo数据库;
–port:代表远程连接的数据库的端口,默认连接的远程端口27017;
-u,–username:代表连接远程数据库的账号,如果设置数据库的认证,需要指定用户账号;
-p,–password:代表连接数据库的账号对应的密码;
-d,–db:代表连接的数据库;
-c,–collection:代表连接数据库中的集合;
-f, --fields:代表导入集合中的字段;
–type:代表导入的文件类型,包括csv和json,tsv文件,默认json格式;
–file:导入的文件名称
–headerline:导入csv文件时,指明第一行是列名,不需要导入;
- 返回人口超过1000万的州
db.zips.aggregate( [
{ $group: { _id: "$state", totalPop: { $sum: "$pop" } } },
{ $match: { totalPop: { $gt: 10*1000*1000 } } }
] )
- 这个聚合操作的等价SQL是:
db.zips.aggregate( [
{ $group: { _id: "$state", totalPop: { $sum: "$pop" } } },
{ $match: { totalPop: { $gt: 10*1000*1000 } } }
] )
- 返回各州平均城市人口
db.zips.aggregate( [
	{ $group: { _id: { state: "$state", city: "$city" }, cityPop: { $sum: "$pop" }
} },
	{ $group: { _id: "$_id.state", avgCityPop: { $avg: "$cityPop" } } },
	{ $sort:{avgCityPop:-1}}
] )
- 按州返回最大和最小的城市
db.zips.aggregate( [
	{ $group:
		{
			_id: { state: "$state", city: "$city" },
			pop: { $sum: "$pop" }
		}
	},
	{ $sort: { pop: 1 } },
	{ $group:
		{
			_id : "$_id.state",
			biggestCity: { $last: "$_id.city" },
			biggestPop: { $last: "$pop" },
			smallestCity: { $first: "$_id.city" },
			smallestPop: { $first: "$pop" }
		}
	},
{ $project:
	{ _id: 0,
			state: "$_id",
			biggestCity: { name: "$biggestCity", pop: "$biggestPop" },
			smallestCity: { name: "$smallestCity", pop: "$smallestPop" }
	}
},
	{ $sort: { state: 1 } }
] )
5.5.3 MapReduce
MapReduce操作将大量的数据处理工作拆分成多个线程并行处理,然后将结果合并在一起。MongoDB
提供的Map-Reduce非常灵活,对于大规模数据分析也相当实用。
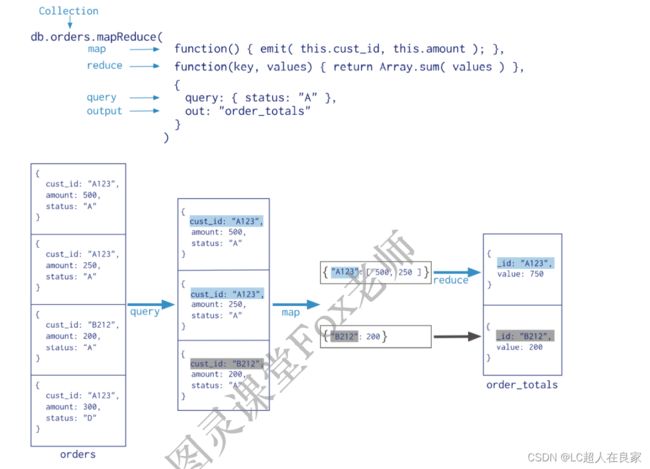
MapReduce具有两个阶段:
- 将具有相同Key的文档数据整合在一起的map阶段
- 组合map操作的结果进行统计输出的reduce阶段
MapReduce的基本语法
db.collection.mapReduce(
   function() {emit(key,value);}, //map 函数
   function(key,values) {return reduceFunction}, //reduce 函数
   {
   	out: ,
   	query: ,
   	sort: ,
   	limit: ,
   	finalize: ,
   	scope: ,
   	jsMode: ,
   	verbose: ,
   	bypassDocumentValidation:
   }
)
- map,将数据拆分成键值对,交给reduce函数
- reduce,根据键将值做统计运算
- out,可选,将结果汇入指定表
- quey,可选筛选数据的条件,筛选的数据送入map
- sort,排序完后,送入map
- limit,限制送入map的文档数
- finalize,可选,修改reduce的结果后进行输出
- scope,可选,指定map、reduce、finalize的全局变量
- jsMode,可选,默认false。在mapreduce过程中是否将数 据转换成bson格式。
- verbose,可选,是否在结果中显示时间,默认false
- bypassDocmentValidation,可选,是否略过数据校验
统计type为travel的不同作者的book文档收藏数
db.books.mapReduce(
		function(){emit(this.author.name,this.favCount)},
		function(key,values){return Array.sum(values)},
		{
			query:{type:"travel"},
			out: "books_favCount"
		}
)
5.6视图
MongoDB视图是一个可查询的对象,它的内容由其他集合或视图上的聚合管道定义。 MongoDB不会将视图内容持久化到磁盘。 当客户端查询视图时,视图的内容按需计算。 MongoDB可以要求客户端具有查询视图的权限。 MongoDB不支持对视图进行写操作。
作用:
- 数据抽象
- 保护敏感数据的一种方法
- 将敏感数据投影到视图之外
- 只读
- 结合基于角色的授权,可按角色访问信息
数据准备
var orders = new Array();
var shipping = new Array();
var addresses = ["广西省玉林市", "湖南省岳阳市", "湖北省荆州市", "甘肃省兰州市", "吉林省松
原市", "江西省景德镇", "辽宁省沈阳市", "福建省厦门市", "广东省广州市", "北京市朝阳区"];

for (var i = 10000; i < 20000; i++) {
	var orderNo = i + Math.random().toString().substr(2, 5);
	orders[i] = { orderNo: orderNo, userId: i, price: Math.round(Math.random() *
10000) / 100, qty: Math.floor(Math.random() * 10) + 1, orderTime: new Date(new Date().setSeconds(Math.floor(Math.random() * 10000)))
};

var address = addresses[Math.floor(Math.random() * 10)];

shipping[i] = { orderNo: orderNo, address: address, recipienter: "Wilson",
	province: address.substr(0, 3), city: address.substr(3, 3) }
}

db.order.insert(orders);
db.shipping.insert(shipping);
5.6.1创建视图
基本语法格式
db.createView(
"",
"",
[],
{
"collation" : {  }
}
)
- viewName : 必须,视图名称
- source : 必须,数据源,集合/视图
- [] : 可选,一组管道
- collation 可选,排序规则
5.6.1.1 单个集合创建视图
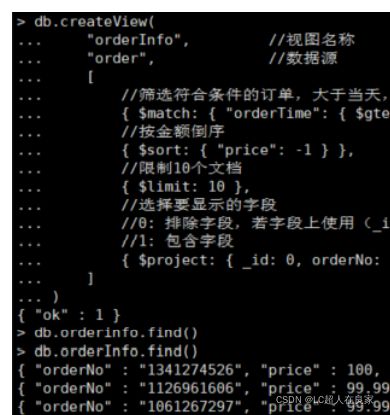
假设现在查看当天最高的10笔订单视图,例如需要实时显示金额最高的订单
db.createView(
	"orderInfo", //视图名称
	"order", //数据源
	[
		//筛选符合条件的订单,大于当天,这里要注意时区
		{ $match: { "orderTime": { $gte: ISODate("2022-01-26T00:00:00.000Z") } }},
		//按金额倒序
		{ $sort: { "price": -1 } },
		//限制10个文档
		{ $limit: 10 },
		//选择要显示的字段
		//0: 排除字段,若字段上使用(_id除外),就不能有其他包含字段
		//1: 包含字段
		{ $project: { _id: 0, orderNo: 1, price: 1, orderTime: 1 } }
	]
)
5.6.1.2 多个集合创建视图
跟单个是集合是一样,只是多了$lookup连接操作符,视图根据管道最终结果显示,所以可以关联多个集合
db.orderDetail.drop()
db.createView(
	"orderDetail",
	"order",
	[
		{ $lookup: { from: "shipping", localField: "orderNo", foreignField:
		"orderNo", as: "shipping" } },
		{ $project: { "orderNo": 1, "price": 1, "shipping.address": 1 } }
	]
)
5.6.2 修改视图
db.runCommand({
	collMod: "orderInfo",
	viewOn: "order",
	pipeline: [
		{ $match: { "orderTime": { $gte: ISODate("2020-04-13T16:00:00.000Z") } }},
		{ $sort: { "price": -1 } },
		{ $limit: 10 },
		//增加qty
		{ $project: { _id: 0, orderNo: 1, price: 1, qty: 1, orderTime: 1 } }
	]
})
![]()
5.6.3 删除视图
db.orderInfo.drop();
5.7 索引
5.7.1 索引介绍
索引是一种用来快速查询数据的数据结构。B+Tree就是一种常用的数据库索引数据结构,MongoDB采用B+Tree 做索引,索引创建在colletions上。MongoDB不使用索引的查询,先扫描所有的文档,再匹配符合条件的文档。 使用索引的查询,通过索引找到文档,使用索引能够极大的提升查询效率。
MongoDB索引数据结构
思考:MongoDB索引数据结构是B-Tree还是B+Tree?
B-Tree说法来源于官方文档,然后就导致了分歧:有人说MongoDB索引数据结构使用的是B-Tree,有的
人又说是B+Tree。
MongoDB官方文档:https://docs.mongodb.com/manual/indexes/
参考数据结构网站:https://www.cs.usfca.edu/~galles/visualization/Algorithms.html
索引的分类
- 按照索引包含的字段数量,可以分为单键索引和组合索引(或复合索引)。
- 按照索引字段的类型,可以分为主键索引和非主键索引。
- 按照索引节点与物理记录的对应方式来分,可以分为聚簇索引和非聚簇索引,其中聚簇索引是指索引节点上直接包含了数据记录,而后者则仅仅包含一个指向数据记录的指针。
- 按照索引的特性不同,又可以分为唯一索引、稀疏索引、文本索引、地理空间索引等
与大多数数据库一样,MongoDB支持各种丰富的索引类型,包括单键索引、复合索引,唯一索引等一
些常用的结构。由于采用了灵活可变的文档类型,因此它也同样支持对嵌套字段、数组进行索引。通过
建立合适的索引,我们可以极大地提升数据的检索速度。在一些特殊应用场景,MongoDB还支持地理
空间索引、文本检索索引、TTL索引等不同的特性。
5.7.2 索引操作
5.7.2.1 创建索引
db.collection.createIndex(keys, options)
- Key 值为你要创建的索引字段,1 按升序创建索引, -1 按降序创建索引
- 可选参数列表如下:
| Parameter | Type | Description |
|---|---|---|
| background | Boolean | 建索引过程会阻塞其它数据库操作,background可指定以后台方式创建索引,即增加 “background” 可选参数。 “background” 默认值为false。 |
| unique | Boolean | 建立的索引是否唯一。指定为true创建唯一索引。默认值为false |
| name | string | 索引的名称。如果未指定,MongoDB的通过连接索引的字段名和排序顺序生成一个索引名称 |
| dropDups | Boolean | 引的名称。如果未指定,MongoDB的通过连接索引的字段名和排序顺序生成一个索引名称 |
| sparse | Boolean | 对文档中不存在的字段数据不启用索引;这个参数需要特别注意,如果设置为true的话,在索引字段中不会查询出不包含对应字段的文档.。默认值为 false |
| expireAfterSeconds | integer | 指定一个以秒为单位的数值,完成 TTL设定,设定集合的生存时间 |
| v | index version | 索引的版本号。默认的索引版本取决于mongod创建索引时运行的版本 |
| weights | document | 索引权重值,数值在 1 到 99,999 之间,表示该索引相对于其他索引字段的得分权重 |
| default_language | Strng | 对于文本索引,该参数决定了停用词及词干和词器的规则的列表。 默认为英语 |
| language_override | string | 对于文本索引,该参数指定了包含在文档中的字段名,语言覆盖默认的language,默认值为 language. |
注意:3.0.0 版本前创建索引方法为 db.collection.ensureIndex()
# 创建索引后台执行
db.values.createIndex({open: 1, close: 1}, {background: true})
# 创建唯一索引
db.values.createIndex({title:1},{unique:true})
5.7.2.2 查看索引
#查看索引信息
db.books.getIndexes()
#查看索引键
db.books.getIndexKeys()
查看索引占用空间
db.collection.totalIndexSize([is_detail])
is_detail:可选参数,传入除0或false外的任意数据,都会显示该集合中每个索引的大小及总大
小。如果传入0或false则只显示该集合中所有索引的总大小。默认值为false。

5.7.2.3 删除索引
#删除集合指定索引
db.col.dropIndex("索引名称")
#删除集合所有索引
db.col.dropIndexes()
5.7.3 索引类型
5.7.3.1 单键索引(Single Field Indexes)
在某一个特定的字段上建立索引 mongoDB在ID上建立了唯一的单键索引,所以经常会使用id来进行查询; 在索引字段上进行精确匹配、排序以及范围查找都会使用此索引
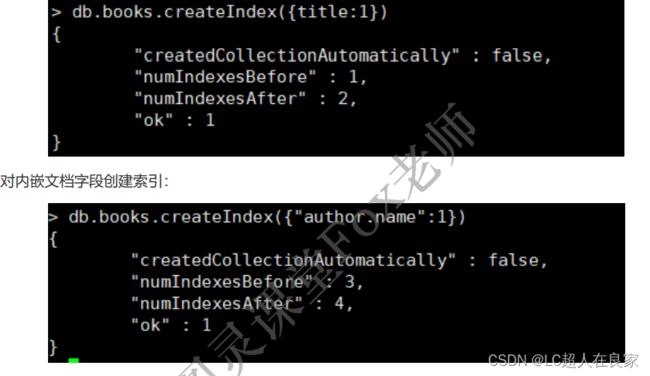
db.books.createIndex({title:1})
5.7.3.2 复合索引(Compound Index)
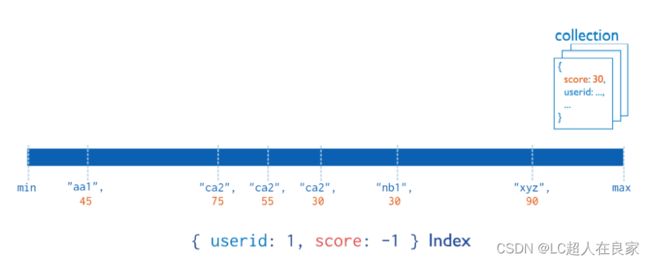
复合索引是多个字段组合而成的索引,其性质和单字段索引类似。但不同的是,复合索引中字段的顺序、字段的升降序对查询性能有直接的影响,因此在设计复合索引时则需要考虑不同的查询场景。
db.books.createIndex({type:1,favCount:1})
5.7.3.3 多键索引(Multikey Index)
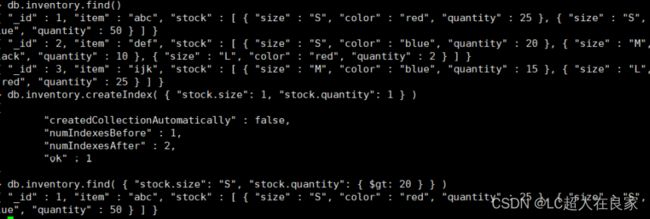
在数组的属性上建立索引。针对这个数组的任意值的查询都会定位到这个文档,既多个索引入口或者键值引用同一个文档
准备inventory集合:
db.inventory.insertMany([
	{ _id: 5, type: "food", item: "aaa", ratings: [ 5, 8, 9 ] },
	{ _id: 6, type: "food", item: "bbb", ratings: [ 5, 9 ] },
	{ _id: 7, type: "food", item: "ccc", ratings: [ 9, 5, 8 ] },
	{ _id: 8, type: "food", item: "ddd", ratings: [ 9, 5 ] },
	{ _id: 9, type: "food", item: "eee", ratings: [ 5, 9, 5 ] }
])
创建多键索引
db.inventory.createIndex( { ratings: 1 } )
多键索引很容易与复合索引产生混淆,复合索引是多个字段的组合,而多键索引则仅仅是在一个字段上出现了多键(multi key)。而实质上,多键索引也可以出现在复合字段上
# 创建复合多键索引
db.inventory.createIndex( { item:1,ratings: 1} )
注意: MongoDB并不支持一个复合索引中同时出现多个数组字段
嵌入文档的索引数组
db.inventory.insertMany([
{
	_id: 1,
	item: "abc",
	stock: [
			{ size: "S", color: "red", quantity: 25 },
			{ size: "S", color: "blue", quantity: 10 },
			{ size: "M", color: "blue", quantity: 50 }
	]
},
{
	_id: 2,
	item: "def",
	stock: [
			{ size: "S", color: "blue", quantity: 20 },
			{ size: "M", color: "blue", quantity: 5 },
			{ size: "M", color: "black", quantity: 10 },
			{ size: "L", color: "red", quantity: 2 }
	]
},
{
	_id: 3,
	item: "ijk",
	stock: [
			{ size: "M", color: "blue", quantity: 15 },
			{ size: "L", color: "blue", quantity: 100 },
			{ size: "L", color: "red", quantity: 25 }
	]
}
])
在包含嵌套对象的数组字段上创建多键索引
db.inventory.createIndex( { "stock.size": 1, "stock.quantity": 1 } )
5.7.3.4 地理空间索引(Geospatial Index)
在移动互联网时代,基于地理位置的检索(LBS)功能几乎是所有应用系统的标配。MongoDB为地理空
间检索提供了非常方便的功能。地理空间索引(2dsphereindex)就是专门用于实现位置检索的一种特
殊索引。
案例:MongoDB如何实现“查询附近商家"?
假设商家的数据模型如下:
db.restaurant.insert({
	restaurantId: 0,
	restaurantName:"兰州牛肉面",
	location : {
		type: "Point",
		coordinates: [ -73.97, 40.77 ]
	}
})
创建一个2dsphere索引
db.restaurant.createIndex({location : "2dsphere"})
查询附近10000米商家信息
db.restaurant.find( {
	location:{
		$near :{
			$geometry :{
				type : "Point" ,
				coordinates : [ -73.88, 40.78 ]
			} ,
			$maxDistance:10000
		}
	}
} )
- $near查询操作符,用于实现附近商家的检索,返回数据结果会按距离排序。
- g e o m e t r y 操 作 符 用 于 指 定 一 个 G e o J S O N 格 式 的 地 理 空 间 对 象 , t y p e = P o i n t 表 示 地 理 坐 标 点 , c o o r d i n a t e s 则 是 用 户 当 前 所 在 的 经 纬 度 位 置 ; geometry操作符用于指定一个GeoJSON格式的地理空间对象,type=Point表示地理坐标点, coordinates则是用户当前所在的经纬度位置; geometry操作符用于指定一个GeoJSON格式的地理空间对象,type=Point表示地理坐标点,coordinates则是用户当前所在的经纬度位置;maxDistance限定了最大距离,单位是米。
5.7.3.5 全文索引(Text Indexes)
MongoDB支持全文检索功能,可通过建立文本索引来实现简易的分词检索。
db.reviews.createIndex( { comments: "text" } )
t e x t 操 作 符 可 以 在 有 t e x t i n d e x 的 集 合 上 执 行 文 本 检 索 。 text操作符可以在有text index的集合上执行文本检索。 text操作符可以在有textindex的集合上执行文本检索。text将会使用空格和标点符号作为分隔符对检索字符串进行分词, 并且对检索字符串中所有的分词结果进行一个逻辑上的 OR 操作。
全文索引能解决快速文本查找的需求,比如有一个博客文章集合,需要根据博客的内容来快速查找,则可以针对博客内容建立文本索引。
案例
数据准备
db.stores.insert(
[
	{ _id: 1, name: "Java Hut", description: "Coffee and cakes" },
	{ _id: 2, name: "Burger Buns", description: "Gourmet hamburgers" },
	{ _id: 3, name: "Coffee Shop", description: "Just coffee" },
	{ _id: 4, name: "Clothes Clothes Clothes", description: "Discount clothing"
},
	{ _id: 5, name: "Java Shopping", description: "Indonesian goods" }
]
)
创建name和description的全文索引
db.stores.createIndex({name: "text", description: "text"})
测试:通过$text操作符来查寻数据中所有包含“coffee”,”shop”,“java”列表中任何词语的商店
db.stores.find({$text: {$search: "java coffee shop"}})
MongoDB的文本索引功能存在诸多限制,而官方并未提供中文分词的功能,这使得该功能的应用场景
十分受限。
5.7.3.6 Hash索引(Hashed Indexes)
不同于传统的B-Tree索引,哈希索引使用hash函数来创建索引。在索引字段上进行精确匹配,但不支持范围查询,不支持多键hash; Hash索引上的入口是均匀分布的,在分片集合中非常有用;
db.users. createIndex({username : 'hashed'})
5.7.3.7 通配符索引(Wildcard Indexes)
MongoDB的文档模式是动态变化的,而通配符索引可以建立在一些不可预知的字段上,以此实现查询
的加速。MongoDB 4.2 引入了通配符索引来支持对未知或任意字段的查询。
案例
准备商品数据,不同商品属性不一样
db.products.insert([
	{
			"product_name" : "Spy Coat",
			"product_attributes" : {
				"material" : [ "Tweed", "Wool", "Leather" ],
				"size" : {
					"length" : 72,
					"units" : "inches"
				}
			}
	},
	{
		"product_name" : "Spy Pen",
		"product_attributes" : {
			"colors" : [ "Blue", "Black" ],
			"secret_feature" : {
				"name" : "laser",
				"power" : "1000",
				"units" : "watts",
			}
		}
	},
	{
		"product_name" : "Spy Book"
	}
])
创建通配符索引
db.products.createIndex( { "product_attributes.$**" : 1 } )
测试
通配符索引可以支持任意单字段查询 product_attributes或其嵌入字段:
db.products.find( { "product_attributes.size.length" : { $gt : 60 } } )
db.products.find( { "product_attributes.material" : "Leather" } )
db.products.find( { "product_attributes.secret_feature.name" : "laser" } )
- 注意事项
通配符索引不兼容的索引类型或属性
通配符索引是稀疏的,不索引空字段。因此,通配符索引不能支持查询字段不存在的文档。
# 通配符索引不能支持以下查询
db.products.find( {"product_attributes" : { $exists : false } } )
db.products.aggregate([
	{ $match : { "product_attributes" : { $exists : false } } }
])
通配符索引为文档或数组的内容生成条目,而不是文档/数组本身。因此通配符索引不能支持精确的文档/数组相等匹配。通配符索引可以支持查询字段等于空文档{}的情况。
#通配符索引不能支持以下查询:
db.products.find({ "product_attributes.colors" : [ "Blue", "Black" ] } )
db.products.aggregate([{
	$match : { "product_attributes.colors" : [ "Blue", "Black" ] }
}])
5.7.4 索引属性
5.7.4.1 唯一索引(Unique Indexes)
在现实场景中,唯一性是很常见的一种索引约束需求,重复的数据记录会带来许多处理上的麻烦,比如订单的编号、用户的登录名等。通过建立唯一性索引,可以保证集合中文档的指定字段拥有唯一值
# 创建唯一索引
db.values.createIndex({title:1},{unique:true})
# 复合索引支持唯一性约束
db.values.createIndex({title:1,type:1},{unique:true})
#多键索引支持唯一性约束
db.inventory.createIndex( { ratings: 1 },{unique:true} )
- 唯一性索引对于文档中缺失的字段,会使用null值代替,因此不允许存在多个文档缺失索引字段的情况。
- 对于分片的集合,唯一性约束必须匹配分片规则。换句话说,为了保证全局的唯一性,分片键必须作为唯一性索引的前缀字段。
5.7.4.2 部分索引(Partial Indexes)
部分索引仅对满足指定过滤器表达式的文档进行索引。通过在一个集合中为文档的一个子集建立索引,部分索引具有更低的存储需求和更低的索引创建和维护的性能成本。3.2新版功能。
部分索引提供了稀疏索引功能的超集,应该优先于稀疏索引。
db.restaurants.createIndex(
{ cuisine: 1, name: 1 },
{ partialFilterExpression: { rating: { $gt: 5 } } }
)
partialFilterExpression选项接受指定过滤条件的文档:
等式表达式(例如:field: value或使用$eq操作符)
- $exists: true
- $gt, $gte, $lt, $lte
- $type
- 顶层的$and
# 符合条件,使用索引
db.restaurants.find( { cuisine: "Italian", rating: { $gte: 8 } } )
# 不符合条件,不能使用索引
db.restaurants.find( { cuisine: "Italian" } )
案例1
restaurants集合数据
db.restaurants.insert({
	"_id" : ObjectId("5641f6a7522545bc535b5dc9"),
	"address" : {
		"building" : "1007",
		"coord" : [
				-73.856077,
				40.848447
		],
	"street" : "Morris Park Ave",
	"zipcode" : "10462"
},
	"borough" : "Bronx",
	"cuisine" : "Bakery",
	"rating" : { "date" : ISODate("2014-03-03T00:00:00Z"),
		"grade" : "A",
		"score" : 2
	},
	"name" : "Morris Park Bake Shop",
	"restaurant_id" : "30075445"
})
创建索引
db.restaurants.createIndex(
	{ borough: 1, cuisine: 1 },
	{ partialFilterExpression: { 'rating.grade': { $eq: "A" } } }
)
测试
db.restaurants.find( { borough: "Bronx", 'rating.grade': "A" } )
db.restaurants.find( { borough: "Bronx", cuisine: "Bakery" } )
唯一约束结合部分索引使用导致唯一约束失效的问题
注意:如果同时指定了partialFilterExpression和唯一约束,那么唯一约束只适用于满足筛选器表达式的
文档。如果文档不满足筛选条件,那么带有惟一约束的部分索引不会阻止插入不满足惟一约束的文档。
案例2
users集合数据准备
db.users.insertMany( [
{ username: "david", age: 29 },
{ username: "amanda", age: 35 },
{ username: "rajiv", age: 57 }
] )
创建索引,指定username字段和部分过滤器表达式age: {$gte: 21}的唯一约束。
db.users.createIndex(
	{ username: 1 },
	{ unique: true, partialFilterExpression: { age: { $gte: 21 } } }
)
测试
索引防止了以下文档的插入,因为文档已经存在,且指定的用户名和年龄字段大于21
db.users.insertMany( [
	{ username: "david", age: 27 },
	{ username: "amanda", age: 25 },
	{ username: "rajiv", age: 32 }
] )
但是,以下具有重复用户名的文档是允许的,因为唯一约束只适用于年龄大于或等于21岁的文档。
db.users.insertMany( [
{ username: "david", age: 20 },
{ username: "amanda" },
{ username: "rajiv", age: null }
] )
5.7.4.3 稀疏索引(Sparse Indexes)
索引的稀疏属性确保索引只包含具有索引字段的文档的条目,索引将跳过没有索引字段的文档。
特性: 只对存在字段的文档进行索引(包括字段值为null的文档)
#不索引不包含xmpp_id字段的文档
db.addresses.createIndex( { "xmpp_id": 1 }, { sparse: true } )
如果稀疏索引会导致查询和排序操作的结果集不完整,MongoDB将不会使用该索引,除非hint()明确指
定索引。
5.7.4.4 TTL索引(TTL Indexes)
在一般的应用系统中,并非所有的数据都需要永久存储。例如一些系统事件、用户消息等,这些数据随着时间的推移,其重要程度逐渐降低。更重要的是,存储这些大量的历史数据需要花费较高的成本,因此项目中通常会对过期且不再使用的数据进行老化处理。通常的做法如下:
方案一:为每个数据记录一个时间戳,应用侧开启一个定时器,按时间戳定期删除过期的数据。
方案二:数据按日期进行分表,同一天的数据归档到同一张表,同样使用定时器删除过期的表。
对于数据老化,MongoDB提供了一种更加便捷的做法:TTL(Time To Live)索引。TTL索引需要声明在一个日期类型的字段中,TTL 索引是特殊的单字段索引,MongoDB 可以使用它在一定时间或特定时钟时间后自动从集合中删除文档。
# 创建 TTL 索引,TTL 值为3600秒
db.eventlog.createIndex( { "lastModifiedDate": 1 }, { expireAfterSeconds: 3600 }
)
对集合创建TTL索引之后,MongoDB会在周期性运行的后台线程中对该集合进行检查及数据清理工作。除了数据老化功能,TTL索引具有普通索引的功能,同样可以用于加速数据的查询。
TTL 索引不保证过期数据会在过期后立即被删除。文档过期和 MongoDB 从数据库中删除文档的时间之间可能存在延迟。删除过期文档的后台任务每 60 秒运行一次。因此,在文档到期和后台任务运行之间的时间段内,文档可能会保留在集合中。
案例
数据准备
db.log_events.insertOne( {
"createdAt": new Date(),
"logEvent": 2,
"logMessage": "Success!"
} )
创建TTL索引
db.log_events.createIndex( { "createdAt": 1 }, { expireAfterSeconds: 20 } )
可变的过期时间
TTL索引在创建之后,仍然可以对过期时间进行修改。这需要使用collMod命令对索引的定义进行变更
db.runCommand({collMod:"log_events",index:{keyPattern:
{createdAt:1},expireAfterSeconds:600}})
使用约束
TTL索引的确可以减少开发的工作量,而且通过数据库自动清理的方式会更加高效、可靠,但是在使用
TTL索引时需要注意以下的限制:
- TTL索引只能支持单个字段,并且必须是非_id字段。
- TTL索引不能用于固定集合。
- TTL索引无法保证及时的数据老化,MongoDB会通过后台的TTLMonitor定时器来清理老化数据,默认的间隔时间是1分钟。当然如果在数据库负载过高的情况下,TTL的行为则会进一步受到影响。
-TTL索引对于数据的清理仅仅使用了remove命令,这种方式并不是很高效。因此TTL Monitor在运行期间对系统CPU、磁盘都会造成一定的压力。相比之下,按日期分表的方式操作会更加高效。
5.7.4.5 隐藏索引(Hidden Indexes)
隐藏索引对查询规划器不可见,不能用于支持查询。通过对规划器隐藏索引,用户可以在不实际删除索引的情况下评估删除索引的潜在影响。如果影响是负面的,用户可以取消隐藏索引,而不必重新创建已删除的索引。4.4新版功能。
创建隐藏索引
db.restaurants.createIndex({ borough: 1 },{ hidden: true });
# 隐藏现有索引
db.restaurants.hideIndex( { borough: 1} );
db.restaurants.hideIndex( "索引名称" )
# 取消隐藏索引
db.restaurants.unhideIndex( { borough: 1} );
db.restaurants.unhideIndex( "索引名称" );
5.7.5 索引使用建议
-
为每一个查询建立合适的索引
这个是针对于数据量较大比如说超过几十上百万(文档数目)数量级的集合。如果没有索引MongoDB需要把所有的Document从盘上读到内存,这会对MongoDB服务器造成较大的压力并影响到其他请求的执行。 -
创建合适的复合索引,不要依赖于交叉索引
如果你的查询会使用到多个字段,MongoDB有两个索引技术可以使用:交叉索引和复合索引。交叉索引就是针对每个字段单独建立一个单字段索引,然后在查询执行时候使用相应的单字段索引进行索引交叉而得到查询结果。交叉索引目前触发率较低,所以如果你有一个多字段查询的时候,建议使用复合索引能够保证索引正常的使用。 -
复合索引字段顺序:匹配条件在前,范围条件在后(Equality First, Range After)
前面的例子,在创建复合索引时如果条件有匹配和范围之分,那么匹配条件(sport: “marathon”) 应该在复合索引的前面。范围条件(age: <30)字段应该放在复合索引的后面。 -
尽可能使用覆盖索引(Covered Index)
-
建索引要在后台运行
在对一个集合创建索引时,该集合所在的数据库将不接受其他读写操作。对大数据量的集合建索引,建议使用后台运行选项 {background: true}
六、springboot整合MongoDB
第一步:引入依赖
	org.springframework.boot
	spring-boot-starter-data-mongodb
第二步:配置yml
spring:
	data:
		mongodb:
			uri: mongodb://fox:[email protected]:27017/test?authSource=admin
			#uri等同于下面的配置
			#database: test
			#host: 192.168.65.174
			#port: 27017
			#username: fox
			#password: fox
			#authentication-database: admin
连接配置参考文档:https://docs.mongodb.com/manual/reference/connection-string/
启动类启动,会发现
第三步:使用时注入mongoTemplate
@Autowired
MongoTemplate mongoTemplate;
第四步:操作
6.1 集合操作
@Autowired
MongoTemplate mongoTemplate;

@Test
public void testCollection(){
	boolean exists = mongoTemplate.collectionExists("emp");
	if (exists) {
		//删除集合
		mongoTemplate.dropCollection("emp");
	}
	//创建集合
	mongoTemplate.createCollection("emp");
}
6.2文档操作
相关注解
-
@Document
修饰范围: 用在类上
作用: 用来映射这个类的一个对象为mongo中一条文档数据。
属性:( value 、collection )用来指定操作的集合名称 -
@Id
修饰范围: 用在成员变量、方法上
作用: 用来将成员变量的值映射为文档的_id的值 -
@Field
修饰范围: 用在成员变量、方法上
作用: 用来将成员变量及其值映射为文档中一个key:value对。
属性:( name , value )用来指定在文档中 key的名称,默认为成员变量名 -
@Transient
修饰范围:用在成员变量、方法上
作用:用来指定此成员变量不参与文档的序列化
先创建一个实体类
@Document("emp") //对应emp集合中的一个文档
@Data
@AllArgsConstructor
@NoArgsConstructor
public class Employee {
@Id //映射文档中的_id
private Integer id;
@Field("username")
private String name;
@Field
private int age;
@Field
private Double salary;
@Field
private Date birthday;
}
6.2.1 添加文档
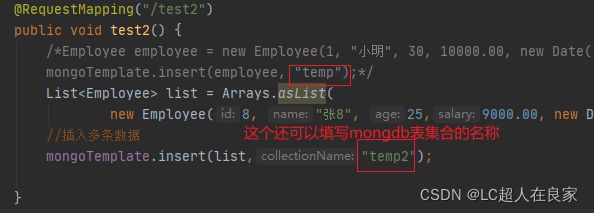
insert方法返回值是新增的Document对象,里面包含了新增后id的值。如果集合不存在会自动创建集合。通过Spring Data MongoDB还会给集合中多加一个class的属性,存储新增时Document对应Java中类的全限定路径。这么做为了查询时能把Document转换为Java类型。
@Test
public void testInsert(){
	Employee employee = new Employee(1, "小明", 30,10000.00, new Date());
	//添加文档
	// sava: _id存在时更新数据
	//mongoTemplate.save(employee);
	// insert: _id存在抛出异常 支持批量操作
	mongoTemplate.insert(employee);
	List<Employee> list = Arrays.asList(
		new Employee(2, "张三", 21,5000.00, new Date()),
		new Employee(3, "李四", 26,8000.00, new Date()),
		new Employee(4, "王五",22, 8000.00, new Date()),
		new Employee(5, "张龙",28, 6000.00, new Date()),
		new Employee(6, "赵虎",24, 7000.00, new Date()),
		new Employee(7, "赵六",28, 12000.00, new Date()));
		//插入多条数据
		mongoTemplate.insert(list,Employee.class);
}
6.2.2 查询文档
Criteria是标准查询的接口,可以引用静态的Criteria.where的把多个条件组合在一起,就可以轻松地将多个方法标准和查询连接起来,方便我们操作查询语句。

@Test
public void testFind(){
	System.out.println("==========查询所有文档===========");
	//查询所有文档
	List<Employee> list = mongoTemplate.findAll(Employee.class);
	list.forEach(System.out::println);
	System.out.println("==========根据_id查询===========");
	//根据_id查询
	Employee e = mongoTemplate.findById(1, Employee.class);
	System.out.println(e);
	System.out.println("==========findOne返回第一个文档===========");
	//如果查询结果是多个,返回其中第一个文档对象
	Employee one = mongoTemplate.findOne(new Query(), Employee.class);
	System.out.println(one);
	System.out.println("==========条件查询===========");
	//new Query() 表示没有条件
	//查询薪资大于等于8000的员工
	//Query query = new Query(Criteria.where("salary").gte(8000));
	//查询薪资大于4000小于10000的员工
	//Query query = new Query(Criteria.where("salary").gt(4000).lt(10000));
	//正则查询(模糊查询) java中正则不需要有//
	//Query query = new Query(Criteria.where("name").regex("张"));
	//and or 多条件查询
	Criteria criteria = new Criteria();
	//and 查询年龄大于25&薪资大于8000的员工
	//criteria.andOperator(Criteria.where("age").gt(25),Criteria.where("salary").gt(8000));
	//or 查询姓名是张三或者薪资大于8000的员工
	criteria.orOperator(Criteria.where("name")
		.is("张三"),Criteria.where("salary").gt(5000));
	Query query = new Query(criteria);
	//sort排序
	//query.with(Sort.by(Sort.Order.desc("salary")));
	//skip limit 分页 skip用于指定跳过记录数,limit则用于限定返回结果数量。
	query.with(Sort.by(Sort.Order.desc("salary")))
		.skip(0) //指定跳过记录数
		.limit(4); //每页显示记录数
	//查询结果
	List<Employee> employees = mongoTemplate.find(
	query, Employee.class);
	employees.forEach(System.out::println);
}
@Test
public void testFindByJson() {
	//使用json字符串方式查询
	//等值查询
	//String json = "{name:'张三'}";
	//多条件查询
	String json = "{$or:[{age:{$gt:25}},{salary:{$gte:8000}}]}";
	Query query = new BasicQuery(json);
	//查询结果
	List<Employee> employees = mongoTemplate.find(
	query, Employee.class);
	employees.forEach(System.out::println);
}
6.2.3 更新文档
在Mongodb中无论是使用客户端API还是使用Spring Data,更新返回结果一定是受行数影响。如果更新
后的结果和更新前的结果是相同,返回0。
- updateFirst() 只更新满足条件的第一条记录
- updateMulti() 更新所有满足条件的记录
- upsert() 没有符合条件的记录则插入数据(一定要设置id的值,要不然查询的时候会报错)
@Test
public void testUpdate(){
	//query设置查询条件
	Query query = new Query(Criteria.where("salary").gte(15000));
	System.out.println("==========更新前===========");
	List<Employee> employees = mongoTemplate.find(query, Employee.class);
	employees.forEach(System.out::println);
	Update update = new Update();
	//设置更新属性
	update.set("salary",13000);
	//updateFirst() 只更新满足条件的第一条记录
	//UpdateResult updateResult = mongoTemplate.updateFirst(query, update,Employee.class);
	//updateMulti() 更新所有满足条件的记录
	//UpdateResult updateResult = mongoTemplate.updateMulti(query, update,Employee.class);
	//upsert() 没有符合条件的记录则插入数据
	update.setOnInsert("id",11); //指定_id
	UpdateResult updateResult = mongoTemplate.upsert(query, update,Employee.class);
	//返回修改的记录数
	System.out.println(updateResult.getModifiedCount());
	System.out.println("==========更新后===========");
	employees = mongoTemplate.find(query, Employee.class);
	employees.forEach(System.out::println);
}
6.2.4 删除文档
@Test
public void testDelete(){
	//删除所有文档
	//mongoTemplate.remove(new Query(),Employee.class);
	//条件删除
	Query query = new Query(Criteria.where("salary").gte(10000));
	mongoTemplate.remove(query,Employee.class);
}
6.3 聚合操作
MongoTemplate提供了aggregate方法来实现对数据的聚合操作。

基于聚合管道mongodb提供的可操作的内容:
| 支持的操作 | java接口 | 说明 |
|---|---|---|
| $project | Aggregation.project | 修改输入文档的结构 |
| $match | Aggregation.match | 用于过滤数据 |
| $limit | Aggregation.limit | 用来限制MongoDB聚合管道返回的文档数 |
| $skip | Aggregation.skip | 在聚合滚到中跳过指定数量的文档 |
| $unwind | Aggregation.unwind | 将文档中的某一个数组类型字段拆分成多条 |
| $group | Aggregation.group | 将集合中的文档分组,可用于统计结果 |
| $sort | Aggregation.sort | 将输入文档排序后输出 |
| $geoNear | Aggregation.geoNear | 输出接近某一地理位置的有序文档 |
基于聚合操作Aggregation.group,mongodb提供可选的表达式:
| 聚合表达式 | java接口 | 说明 |
|---|---|---|
| $sum | Aggregation.group().sum(“field”).as(“sum”) | 求和 |
| $avg | Aggregation.group().avg(“field”).as(“avg”) | 求平均 |
| $min | Aggregation.group().min(“field”).as(“min”) | 获取集合中所有文档对应值的最小值 |
| $max | Aggregation.group().max(“field”).as(“max”) | 获取集合中所有文档对应值的最大值 |
| $push | Aggregation.group().push(“field”).as(“push”) | 在结果文档中插入值到一个数组中 |
| $addToSet | Aggregation.group().addToSet(“field”).as(“addToSet”) | 在结果文档中插入值到一个数组中吗,但是创建副本 |
| $first | Aggregation.group().first(“field”).as(“first”) | 根据资源你文档的排序获取第一个文档数据 |
| $last | Aggregation.group().last(“field”).as(“last”) | 根据资源你文档的排序获取最后一个文档数据 |
6.3.1示例:以聚合管道示例2为例
导入邮政编码数据集 :https://media.mongodb.org/zips.json
使用mongoimport工具导入数据(https://www.mongodb.com/try/download/database-tools)
创建一个txt文件夹,复制一部分邮政编码数据集中的数据进去,然后修改文件名以json结尾。
然后安装下面方式导入进mongodb的集合中
实体结构
@Document("zips")
@Data
@AllArgsConstructor
@NoArgsConstructor
public class Zips {
	@Id //映射文档中的_id
	private String id;
	@Field
	private String city;
	@Field
	private Double[] loc;
	@Field
	private Integer pop;
	@Field
	private String state;
}
- 返回人口超过1000万的州
db.zips.aggregate( [
{ $group: { _id: "$state", totalPop: { $sum: "$pop" } } },
{ $match: { totalPop: { $gt: 10*1000*1000 } } }
] )
java实现
@Test
public void test(){
//$group
GroupOperation groupOperation = Aggregation.group("state").sum("pop").as("totalPop");
//$match
MatchOperation matchOperation = Aggregation.match(Criteria.where("totalPop").gte(10*1000*1000));
// 按顺序组合每一个聚合步骤
TypedAggregation typedAggregation =Aggregation.newAggregation(Zips.class,groupOperation, matchOperation);
//执行聚合操作,如果不使用 Map,也可以使用自定义的实体类来接收数据
AggregationResults 注意:只能返回一部分数据(state-因为是按照这个分组的;以及totalPop 这两个字段)
![]()
- 返回各州平均城市人口
db.zips.aggregate( [
{ $group: { _id: { state: "$state", city: "$city" }, cityPop: { $sum: "$pop" }
} },
{ $group: { _id: "$_id.state", avgCityPop: { $avg: "$cityPop" } } },
{ $sort:{avgCityPop:-1}}
] )
java实现
@Test
public void test2(){
	//$group
	GroupOperation groupOperation = Aggregation.group("state","city").sum("pop").as("cityPop");
	//$group
	GroupOperation groupOperation2 = Aggregation.group("_id.state").avg("cityPop").as("avgCityPop");
	//$sort
	SortOperation sortOperation = Aggregation.sort(Sort.Direction.DESC,"avgCityPop");

	// 按顺序组合每一个聚合步骤
	TypedAggregation typedAggregation = Aggregation.newAggregation(Zips.class,  groupOperation, groupOperation2,sortOperation);
	//执行聚合操作,如果不使用 Map,也可以使用自定义的实体类来接收数据
	AggregationResults aggregationResults = mongoTemplate.aggregate(typedAggregation, Map.class);

	// 取出最终结果
	List mappedResults = aggregationResults.getMappedResults();
	for(Map map:mappedResults){
		System.out.println(map);
	}
}
- 按州返回最大和最小的城市
db.zips.aggregate( [
	{ $group:
		{
			_id: { state: "$state", city: "$city" },
			pop: { $sum: "$pop" }
		}
	},
	{ $sort: { pop: 1 } },
	{ $group:
		{
			_id : "$_id.state",
			biggestCity: { $last: "$_id.city" },
			biggestPop: { $last: "$pop" },
			smallestCity: { $first: "$_id.city" },
			smallestPop: { $first: "$pop" }
		}
	},
	{ $project:
		{ _id: 0,
			state: "$_id",
			biggestCity: { name: "$biggestCity", pop: "$biggestPop" },
			smallestCity: { name: "$smallestCity", pop: "$smallestPop" }
		}
	},
	{ $sort: { state: 1 } }
] )
java
@Test
public void test3(){
	//$group
	GroupOperation groupOperation = Aggregation.group("state","city").sum("pop").as("pop");
	//$sort
	SortOperation sortOperation = Aggregation.sort(Sort.Direction.ASC,"pop");
	//$group
	GroupOperation groupOperation2 = Aggregation.group("_id.state")
		.last("_id.city").as("biggestCity")
		.last("pop").as("biggestPop")
		.first("_id.city").as("smallestCity")
		.first("pop").as("smallestPop");
	//$project
	ProjectionOperation projectionOperation = Aggregation
		.project("state","biggestCity","smallestCity")
		.and("_id").as("state")
		.andExpression(
			"{ name: \"$biggestCity\", pop: \"$biggestPop\" }")
		.as("biggestCity")
		.andExpression(
			"{ name: \"$smallestCity\", pop: \"$smallestPop\" }")
		.as("smallestCity")
		.andExclude("_id");
	//$sort
	SortOperation sortOperation2 = Aggregation.sort(Sort.Direction.ASC,"state");


	// 按顺序组合每一个聚合步骤
	TypedAggregation typedAggregation = Aggregation.newAggregation(Zips.class, groupOperation, sortOperation, groupOperation2,
			projectionOperation,sortOperation2);

	//执行聚合操作,如果不使用 Map,也可以使用自定义的实体类来接收数据
	AggregationResults aggregationResults = mongoTemplate.aggregate(typedAggregation, Map.class);
	// 取出最终结果
	List mappedResults = aggregationResults.getMappedResults();
	for(Map map:mappedResults){
		System.out.println(map);
	}
}
七、 explain执行计划详解
通常我们需要关心的问题:
- 查询是否使用了索引
- 索引是否减少了扫描的记录数量
- 是否存在低效的内存排序
MongoDB提供了explain命令,它可以帮助我们评估指定查询模型(querymodel)的执行计划,根据实际情况进行调整,然后提高查询效率。
explain()方法的形式如下:
db.collection.find().explain()
# 未创建title的索引
db.books.find({title:"book-1"}).explain("queryPlanner")
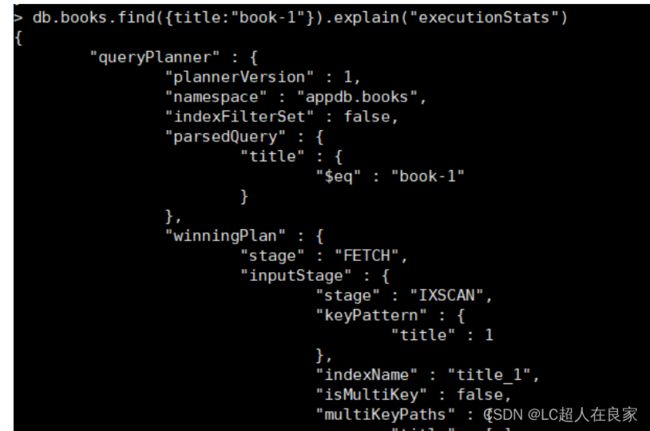
- executionStats
executionStats 模式的返回信息中包含了 queryPlanner 模式的所有字段,并且还包含了最佳执行计划的执行情况
#创建索引
db.books.createIndex({title:1})
db.books.find({title:"book-1"}).explain("executionStats")
- allPlansExecution
allPlansExecution返回的信息包含 executionStats 模式的内容,且包含allPlansExecution:[]块
"allPlansExecution" : [
	{
		"nReturned" : ,
		"executionTimeMillisEstimate" : ,
		"totalKeysExamined" : ,
		"totalDocsExamined" :,
		"executionStages" : {
			"stage" : ,
			"nReturned" : ,
			"executionTimeMillisEstimate" : ,
			...
		}
	}
},
...
]
执行计划的返回结果中尽量不要出现以下stage:
COLLSCAN(全表扫描)
SORT(使用sort但是无index)
不合理的SKIP
SUBPLA(未用到index的$or)
COUNTSCAN(不使用index进行count)
请不要吝啬你发财的小手,点赞收藏评论,谢谢!
请不要吝啬你发财的小手,点赞收藏评论,谢谢!
请不要吝啬你发财的小手,点赞收藏评论,谢谢!


